Optima Training Webbased Case Management software system used

Optima Training

• Web-based Case Management software system used by CASA programs across the country. • Designed to help CASA volunteers and advocate supervisors share case-related information in a secure, organized, easy-to-use fashion.

Why is Optima Important • Contact logs - volunteer keeps advocate supervisor informed of developments in the case. • Forms a record of the case the volunteer and staff can both readily access. • Optima helps the advocate supervisor fill in if the volunteer is not available. • Recording your time spent on both case-related and noncase related activities helps CASA track and document volunteer time for reporting purposes.

Case Data in Optima • Optima contains a variety of helpful case-related information: – Names and key information about the children in the case – Contact information for related parties (resource parents, biological parents, attorneys, etc. ) – Dates and times of upcoming hearings – A log of notes on each case-related contact – Case related documents – – – Court reports Court Orders DCP&P court reports Educational records Medical records

Tracking Contacts in Optima • Use Optima to document interactions with any of the parties in a case. • This keeps the advocate supervisor informed of caserelated activities. • These notes can be used as a basis for the court report.

Non-case related information in Optima • Optima contains Volunteer information • • • Address Phone number Emergency Contacts Training activities Documents Demographics

How to Access Optima • To access Optima go to • nj-mercer. evintosolutions. com • Do NOT put WWW in front of this…

Logging In • Your log in is your first name. last name • Ex. John. smith • Your temporary password is: • 123456 • You will be prompted to change this

Changing Password • When you log into Optima for the first time, please be sure to change your password to something more secure than the temporary password. • In the upper right corner of the home screen, you will see a link to “Change Password” • Remember that Optima contains sensitive, confidential information about the children in your case, so please choose a strong password and keep it secured.

Your Personal information in Optima • Your personal information section in Optima contains information about you that CASA uses, such as: – Contact Information – Emergency Contacts • Step 1: Click on the Volunteer’s Dashboard Button at the top of the screen to make sure you are on the Optima home page – Step 2: Click the button labeled “Personal Information”

Personal Information, cont. • Ensure your personal information is correct • Click the edit button to make changes • Add an emergency contact • Click the Add button


• To return to the home screen, click the Volunteer Dashboard Button

Accessing your case • Step 1: Click the Volunteers Dashboard button to return home • Step 2: Click on the BLUE case number • This takes you directly into your case

Parts of a Case file • You will see as you scroll through the file the following sections: • • • Case information Case assignments Children in Case Current Placements Family Members

Parts of a case file, cont. • And then tabs along the bottom: • • • Contact logs To Do Associated Parties Wellbeing Documents Petitions and Allegations Hearings Services Placement History
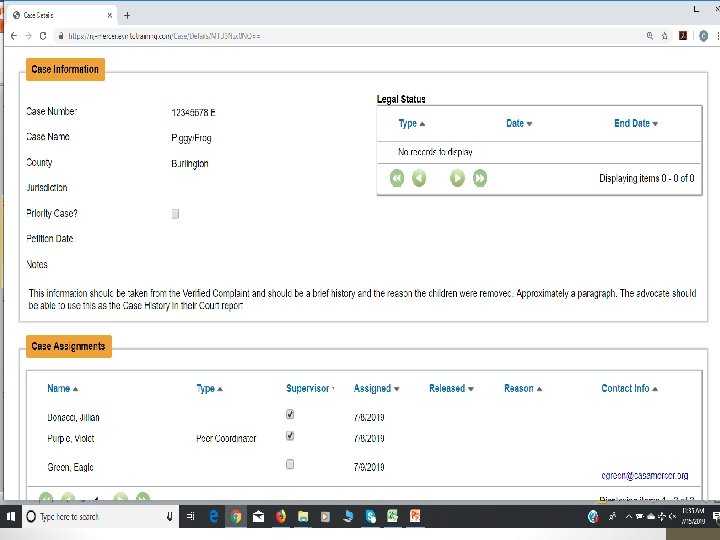


Details of the Case File • Case Information • • Case Number Case Name Petition Date Notes • This should be approximately a paragraph • Basic history of case • Should be used as the History in court report • Case assignments – shows who is attached to the case • Supervisor • Peer Coach (if applicable) • Volunteer

Details of the Case File, cont. • Children in the Case • This will list each child involved in the litigation • To get more information on each child, click the magnifying glass on the right hand side • The first box will give you basic information • • • Birthdate ID number – the child’s DCP&P Spirit number Gender Race Removal Date


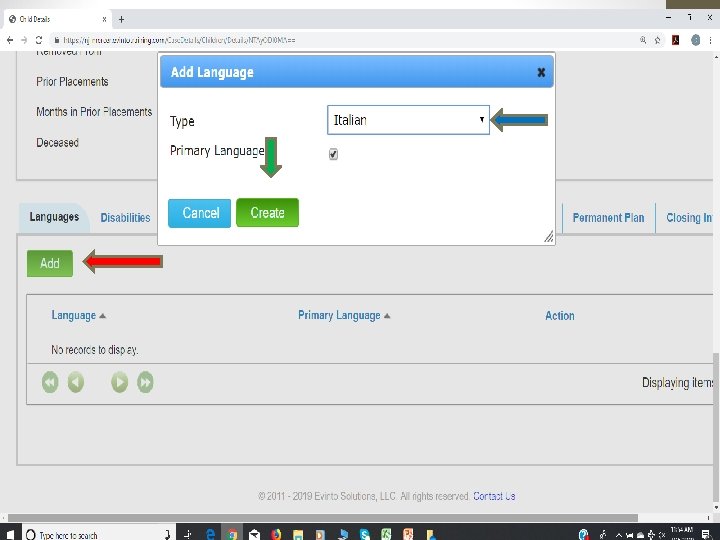
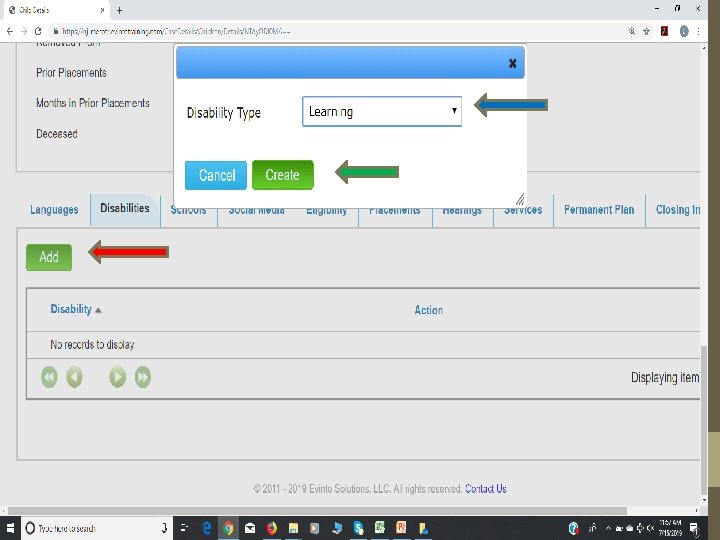
Child information, cont. • The tabs along the bottom will need to be filled in • Languages – to add a Language • • Step 1: Click Add Step 2: Use the Drop down menu to choose the language Step 3: Click create You can put in multiple languages • Disabilities – to add a Disability • • Step 1: Click Add Step 2: Use the Drop down menu to choose Step 3: Click Create You can put in multiple disabilities

Child Information, cont. • Schools • Step 1: Click on the Schools tab • Step 1 a: If your youth has an IEP • Click the Edit button and change to Yes (No is the default) • Step 2: Click on the Add button under School History • Step A: Look in the drop down menu for the school • If it is not there – notify your supervisor • Step B: Add their grade • Step C: Add the start date (update the end date at the end of the year) • Step C 1: If they transferred here – put that in • Step D: Add a contact name • Try to use a guidance counselor – they are easier to reach than teachers • Step 3: Click Create


Child information, cont. • Social media • Step 1: Click Add • Step 2: Add the type and User name • Step 3: Click Create

Current Placements • Placements – to see more information, click on the magnifying glass

Note – the address is in this area, but the phone number is on the previous page. This also tells you the placement type and placement dates and MOST important…if they are with their Siblings

Family Members • This area lists the family members known to the Division • Click on the magnifying glass to see more information

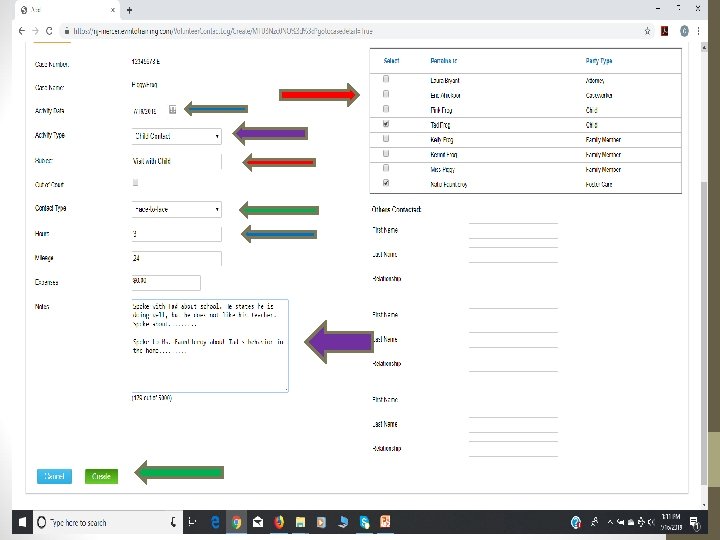
Contact Logs • Except for visiting youth, Contact logs are the MOST important part of being a CASA • Step 1: Click on the Contact Logs Tab • Step 2: Click Add • Step 3: Put in the Date of the Activity • Step 4: Use the drop down menu for the Activity Type • If the child is seen during the activity, then the Activity Type will Always be Child Contact • For example – if you attend an IEP meeting and the Child is there, this is still considered Child Contact • Step 5: Type the Subject in

Contact Logs, cont. • Step 6: Use the drop down menu for the Contact Type • Step 7: Put in the Hours • Hours are done in quarter hour increments -. 25 = 15 min; . 50 = 30 min; . 75 = 45 min; 1 = 1 hour • Notes are a minimum of. 25 • Hours include travel time • Step 8: Mileage • Add if you want to use for tax purposes

Contact Logs, cont. • Step 9: Notes • • • This section should include what was discussed It does NOT have to be the conversation verbatim It should be enough that anyone can know what happened Please do not just write – Visited with child You should be able to review your notes to use for your report • Step 10: Contact box on the right • Check off any individuals you spoke with during the encounter • The Child should be checked off on EVERY contact log • Step 11: Click Create

Contact Logs, cont.

Associated Parties • This is where non-family members are listed • If a caseworker, attorney, therapist changes, you can add a new one • Step 1: Click ADD

Associated Parties, cont. • • Step 2: Select the Associated Party you want to add Step 3: Use the Drop down list to select the name Step 4: Click Save IF the person is not there, contact your supervisor, they will create the contact

Documents • Any and all documents associated with the case should go here • Step 1: Click Add

Documents, cont. • Step 2: Choose File – this is like attaching a document to an email

Documents, cont. • Step 3: Choose Document Type

Documents, cont. • Step 4: Add the Date and Save

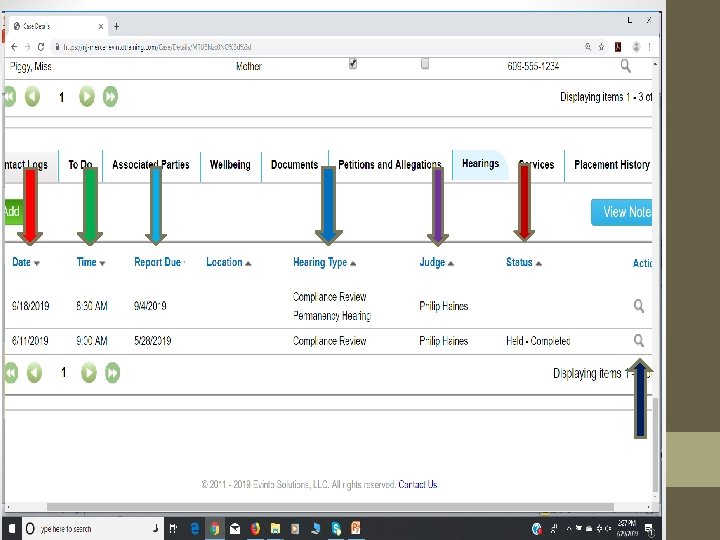
Hearings • This is where all hearing information can be found • This will provide: • • • Hearing Date Hearing Time Report Due Date Hearing Type Judge Hearing Status

Hearings, cont. • Most of this information is provided by the Supervisor • HOWEVER – it is your responsibility to check it often to: • Ensure when your report is due • When you are to be in court • After the court date, the notes from the hearing • To see anything from the court hearing, Click on the Magnifying glass -


Hearings, cont. • Hearing Outcomes shows what happened at the hearing • Hearing Participants shows who attended

Hearings, cont. • Volunteer Input – shows how many recommendations were accepted • Court Ordered Services – what was ordered by the court

Hearings, cont. • Visitation – What is the visitation plan? • Permanency – What is the permanency plan?

Training log • To check or add to your training log • Click on the Training Log tab • This will show your training and whether it has been approved or not • This is also where you can enter your own training

To add training • Step 1: Click the Add button • Step 2: Enter the dates of training • Step 3: Enter the Training Topic/Training Format/Trainer • Step 4: Hours (of training only – no travel time) • Step 5: Mileage (if you are tracking for tax purposes) • Step 6: Notes – brief note about what the training was about • Step 7: Click Create

- Slides: 52