Optical Flow Open CV Implementation Contents 1 Introduction


 from the")


 is an open")


 or any other website")


 From: Optical. Flow_vs directory")


 and cpp files. • Numbers with arrows")


.")


- Slides: 51
Optical Flow Open. CV Implementation
Contents 1. Introduction. 2. Open. CV. 3. Downloading the Required Software. 4. Installing Open. CV. 5. Start a new Visual C++ Project for Optical Flow.
Contents Cont. 6. Editing the Project Properties. 6. 1 Adding the Open. CV Include Directories. 6. 2 Adding the Open. CV Library Directories. 6. 3 Referencing Required Open. CV Libraries. 6. 4 The Preprocessor Definitions. 6. 5 Command Arguments. 6. 6 Run The Project/Solution.
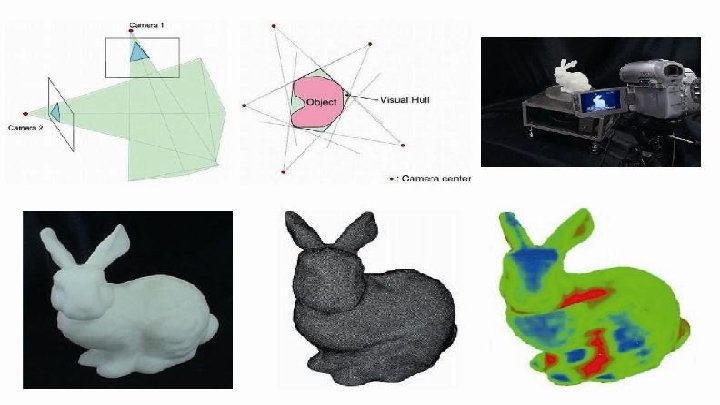
1. Introduction • It is an implementation of optical flow algorithm with Open. CV and Visual Studio 2017 (any Visual Studio version can be used, but better to get VS 2017) using VC++. • This guide shows steps for VS 2017 with Open. CV 2. 4. 9 on Windows 10. (We recommend you to do this assignment with the same versions to avoid any unexpected errors/issues) • Implementation can run either real time to track moving objects (using webcam) or between two frames.
Visual Studio 2017 - Installation Download the Visual Studio 2017 (Community version) from the following link: https: //visualstudio. microsoft. com/downloads/ (For Mac OS, select Mac. OS from the top right of this webpage (see purple arrow))
Visual Studio 2017 - Installation Open the installer once it has been downloaded. Follow through the instructions till you reach to this window:
Visual Studio 2017 - Installation • Select the following Workloads: –. NET desktop development – Desktop development with C++ – Universal Windows Platform development – Visual Studio Extension development • Then select “Install while downloading” option from dropdown button at the bottom right of the opened window. • Click the install button. • It might take longer depending on the computer (for a 64 -bit CORE i 3 machine with 4 GB RAM, it took couple of hours at least). You will need to reboot your machine once everything is installed. •
2. Open. CV • Open. CV (Open Source Computer Vision Library) is an open source computer vision and machine learning software library. • Open. CV was built to provide a common infrastructure for computer vision applications and to accelerate the use of machine perception in the commercial products.
• The library has more than 2500 optimized algorithms, which includes a comprehensive set of both classic and state-of-the-art computer vision and machine learning algorithms.
● These algorithms can be used to: ○ detect and recognize faces, ○ identify objects, ○ classify human actions in videos, ○ track camera movements, ○ track moving objects, ○ extract 3 D models of objects, ○ produce 3 D point clouds from stereo cameras, ○ etc.
• It has C++, C, Python, Java and MATLAB interfaces and supports Windows, Linux, Android and Mac OS.
3. Downloading the Required Software • Download from (opencv. org) or any other website that offers the download. You can download from the given link below: http: //sourceforge. net/projects/opencvlibrary/files/ • For this tutorial, version 2. 4. 9 will be used.
4. Installing Open. CV • Installation requires about 4 GB of free disk space. • Run the downloaded executable file (Note that the Open. CV installer simply creates a folder named “opencv” in the chosen “Extract to: ”directory).
• You should choose an extraction directory that is safe, accessible, and unlikely to change. This guide uses an “Extract to: ” directory of “C: ”.
• When it closes, confirm that the opencv directory was created in your Extract to: directory of choice:
• Then, go to https: //www. dropbox. com/login and then sign in using the following information: Email: robot. vision. files@gmail. com , and Password: robotvision • Download the Optical. Flow_vs. zip file on your computer. Note: This folder contains the implementation for Optical Flow assignment.
5. Start a new Visual C++ Project for Optical Flow File -> New -> Project
• Visual C++ -> Windows Console Application • Write the name you choose for the project. For example, Optical_Flow • Then, Press OK. Numbers with arrows in the figure shows steps.
You will see the following window, when the project has been successfully created.
• Then, close the project. • File -> Close Solution
• Copy the following files (listed on next slide) From: Optical. Flow_vs directory (the extracted zip file you have already downloaded from the Dropbox). <the directory that contains the extracted zip file> Optical. Flow_vsOptical. Flow_vsOpti. Flow For example, C: Optical. Flow_vsOptical. Flow_vsOpti. Flow To: the project folder <the new project directory>Optical_Flow For example, C: UsersVisionsourcereposOptical_Flow
between. h between. cpp image 0. jpg common. h cv_pyrlk. cpp image 1. jpg resource. h main. cpp stdafx. h Tracker. cpp targetver. h stdafx. cpp
• In the new project directory, perform the following steps: 1. Delete the cpp file that contains the main function (its name is the same as the project name). For example, delete C: UsersVisionsourcereposOptical_FlowOptical_Flow. cpp 2. Rename main. cpp to be the same name as the deleted file.
• Copy all dll files From the following directory: <Open. CV install directory>build\x 86vc 11bin For example, C: opencvbuildx 86vc 11bin To <the new project directory>Optical_Flow For example, C: UsersVisionsourcereposOptical_Flow
• Then, open the project again. • File -> Open -> Project/Solution
Select the Optical_Flow. sln file from the newly created Optical_Flow project directory. Click Open.
• Now, we need to add the source files (copied from Dropbox project to our project directory in previous step) to our solution. • Right click on “Source Files” -> Add -> Existing Item
• Then, choose all h (header) and cpp files. • Numbers with arrows shows steps.
VS 2017 creates pch. h and pch. cpp files for precompiled headers. Since we copied stdafx. h and stdafx. cpp, we need to remove pch. * files to avoid errors for the sake of this project. • NOTE: Read more about when they are useful in this link If you are interested. Do the following: • Remove pch. h and pch. cpp from the “Source Files” i. e. • Right click on “pch. cpp” -> Remove -> Delete -> Ok • Repeat for “pch. h” Note: You may not see the pch. h file under the “Source Files”. In that case, just delete pch. cpp •
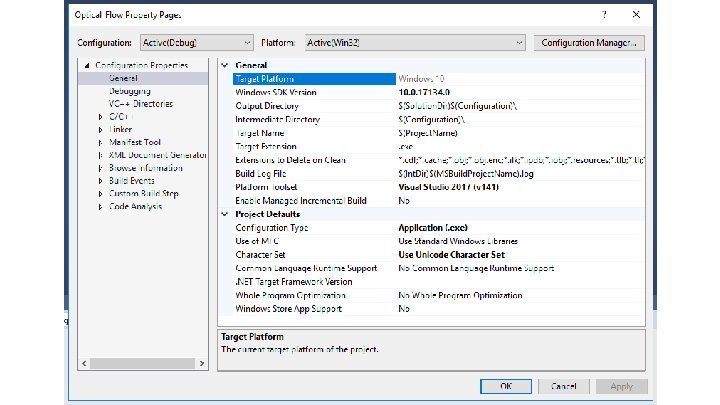
6. Editing the Project Properties • Open the Project Properties window via the Solution Explorer view. • Right click Project>Properties
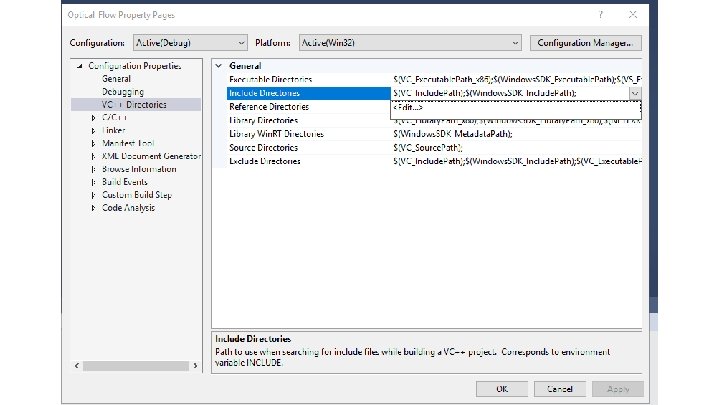
• Select VC++ Directories on the left pane of the Project Properties window.
6. 1 Adding the Open. CV Include Directories • Edit the Include Directories to point to include three following directories: <Open. CV install directory>buildincludeopencv 2
• For example, if your install directory was C: opencv, include three following directories: C: opencvbuildinclude Numbers in the left figure shows the steps. 1. Adds new line 2. Browse to the directories you wish to add. C: opencvbuildincludeopencv 2 2 NOTE: You can either copy these three lines directly or browse to them to select the directories.
6. 2 Adding the Open. CV Library Directories • Edit the Library Directories to include the following directory: <Open. CV install directory>buildx 86vc 11lib
• For example, if your install directory was C: opencv, add the following library directory: C: opencvbuildx 86vc 11lib
6. 3 Referencing Required Open. CV Libraries • To add Open. CV libraries, you must add the. lib files to Linker>Input>Additional. Dependencies.
opencv_calib 3 d 249. lib opencv_calib 3 d 249 d. lib opencv_contrib 249 d. lib opencv_core 249 d. lib opencv_features 2 d 249 d. lib opencv_flann 249 d. lib opencv_gpu 249 d. lib opencv_highgui 249 d. lib opencv_imgproc 249 d. lib opencv_legacy 249 d. lib opencv_ml 249 d. lib opencv_nonfree 249 d. lib opencv_objdetect 249 d. lib opencv_ocl 249 d. lib opencv_photo 249 d. lib opencv_stitching 249 d. lib opencv_superres 249 d. lib opencv_ts 249 d. lib opencv_videostab 249 d. lib Copy and paste the. lib files listed here into Additional Dependencies (left figure).
6. 4 The Preprocessor Definitions • C/C++ -> Preprocessor ->Preprocessor Definitions
• Then, add the following: _CRT_SECURE_NO_WARNINGS Purpose: Adding _CRT_SECURE_NO_WARNINGS to Preprocessor Definitions removes/supresses the precompiler secure warnings that come up when you build the project.
6. 5 Command Arguments • • Project Properties > Configuration Properties > Debugging >Command Arguments Add one of the following argument to your project: i) camera: is for real-time tracking using the webcam. ii) frames: apply Optical flow between two frames.
Do the following for each. cpp file: Select the file in the solution explorer. Click on properties. Select the C++ options. Choose precompiled Headers. Select none. NOTE: For VS 2015 and older, you don’t need to do this step. Repeat the above step for all. cpp files.
6. 6 Run The Project/Solution • Save the project. • Start debugging (F 5).
7. Code Analysis Load Image 1 Interest Points KLT Tracker using 2 images
7. 1 KLT Tracker • Detect Harris corners in the first frame
7. 1 KLT Tracker • Build the Optical Flow Pyramid
• For each Harris corner compute motion between consecutive frames • Link motion vectors in successive frames to get a track for each Harris point
Thank You