Open Source Operating System Lecture 4 Dr Samah
 Dr. Samah Mohammed")


 number of the group. • Users")


 The first 10 characters of")


- Slides: 53
Open Source Operating System ﻧﻈﻢ ﺗﺸﻐﻴﻞ ﻣﻔﺘﻮﺣﺔ ﺍﻟﻤﺼﺪﺭ Lecture (4) Dr. Samah Mohammed
Objectives Working with users and Groups Creating and Managing User Accounts from the Command Line Linux Groups Managing groups from the command line What Are Permissions Typical file permissions
Manage users and group • Linux user accounts is the mechanism by which the Linux operating system is able to handle the task of protection. • In Linux, there are three forms of user accounts: 1 - root 2 -user (human) accounts 3 -software accounts
How Linux User Accounts Work • Username • Password By default, all user home directories are created and maintained in the /home directory. However, the root user’s home directory is /root
• To view information about the user_name account on my Linux system, you would enter finger user_name • The following information about the user account: Login This is the username that is used to authenticate to the system. Name This is the user’s full name. Directory This is the user’s home directory. Shell This is the default shell that will be provided to the user. Last Login This displays the last time the user logged in and where from.
• In addition to having a home directory and default shell assigned, each user account is also assigned a unique user ID (UID) number when they are created. • No two user accounts on the system will have the same UID. • To view the UID for a given user account: id username Example: to view information about our khalid user account, we can enter id khalid
• The root user account is always assigned a UID of 0 on most Linux distributions. • Other distributions may use a different numbering scheme for the UID, however. For example, UIDs on a Red Hat system start at 500 instead of 1000. • It’s this UID that the operating system actually uses to control access to files and directories in the file system.
Where Linux User Accounts Are Stored Linux is a very flexible operating system. One of its flexible features is the location of user accounts on the system. When you originally installed the system, your distribution may have given you several options for where you wanted to store your user accounts. This screen allows you to choose from the following authentication methods:
1 - Local This option stores user accounts in the /etc/passwd file. This has been the default configuration used by Linux systems for many years. 2 - LDAP This is a newer option that many Linux administrators are starting to adopt. Instead of storing user accounts in a file in the file system, user accounts are stored in a directory service provided by Open. LDAP. Unlike local authentication, which is a flat file, the directory service is hierarchical in nature, allowing you to sort and organize your user accounts by location, function, or department.
Local option • /etc/passwd This file contains the user account information for your system. • /etc/shadow This file contains passwords for your user accounts. • /etc/group This file contains your system’s groups.
- The /etc/passwd File Username: Password: UID: GID: Full_Name: Hom e_Directory: Default_Shell • Username: The Username field simply identifies the username the user will supply when logging in to the system • Password: This is a legacy field. At one time, the user’s password was stored in encrypted form in this field in the passwd file. However, for security reasons, the password has been moved from /etc/passwd to /etc/shadow.
• UID This is the user ID for the user account • GID This field references the group ID number of the user’s default group • Full_Name This field contains the user’s full name • Home_Directory This field contains the path to the user’s home directory. • Default_Shell This field specifies the shell that will be used by default
The /etc/shadow File • • Username: Password: Last_Modified: Min_Days: Max _Days: Days_Warn: Disabled_Days: Expire Username This is the user’s login name from /etc/passwd. • Password This is the user’s password in encrypted format • Last_Modified This field displays the number of days since the password was last changed
• Min_Days This field displays the minimum number of days required before a password can be changed. • Max_Days This field displays the maximum number of days before a password must be changed. • Days_Warn This field displays the number of days prior to password expiration that the user will be warned of the pending expiration.
• Disabled_Days This field displays the number of days to wait after a password has expired to disable the account. • Expire This field displays the number of days since after which the account will be disabled.
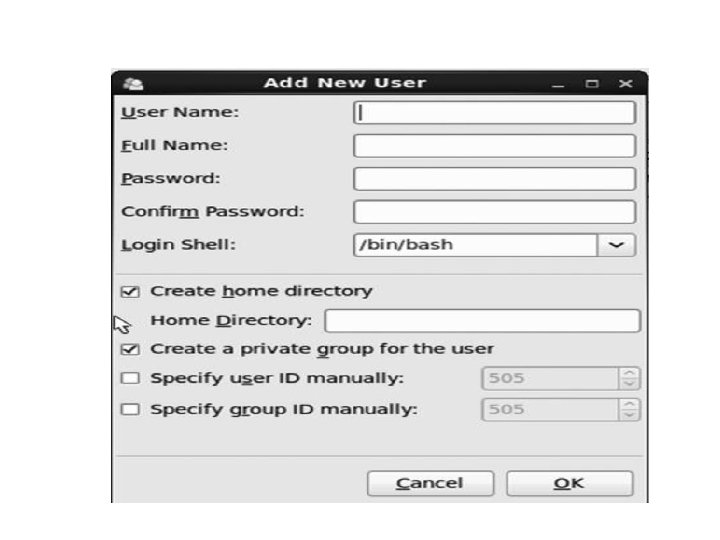
creating user accounts There are two approaches to creating user accounts and groups. 1 - There is a GUI tool, the User Manager, and 2 - There are command line programs.
Create user from GUI The GUI User Manager program is launched either from the menu selecting System> Administration > Users and Groups
Create group from GUI
Creating and Managing User Accounts from the Command Line • • Using useradd Using passwd Using usermod Using userdel
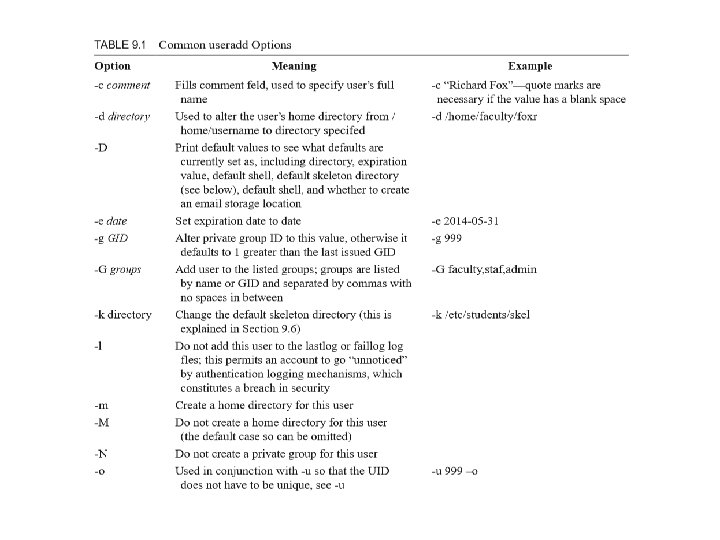
Using useradd userdd is the command used to create a new user for the Linux system. Syntax: useradd options username Example (1): useradd Eman account is created using the default parameters contained in the following configuration files: /etc/default/useradd Example (2): useradd -e 2018 -05 -28 khalid
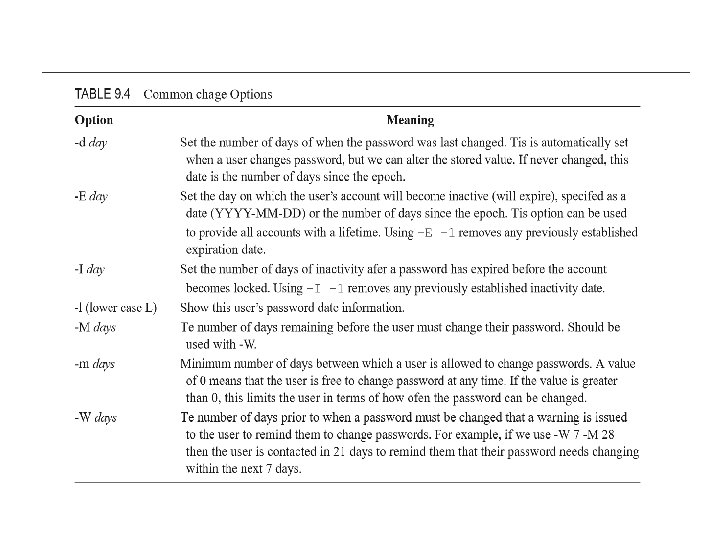
Managing Passwords Password management requires that passwords are modified in a timely fashion. For this duty, we turn to two standard Linux programs: chage and passwd The chage program allows the system administrator to change user password expiration dates of a user. The syntax: chage [options] username
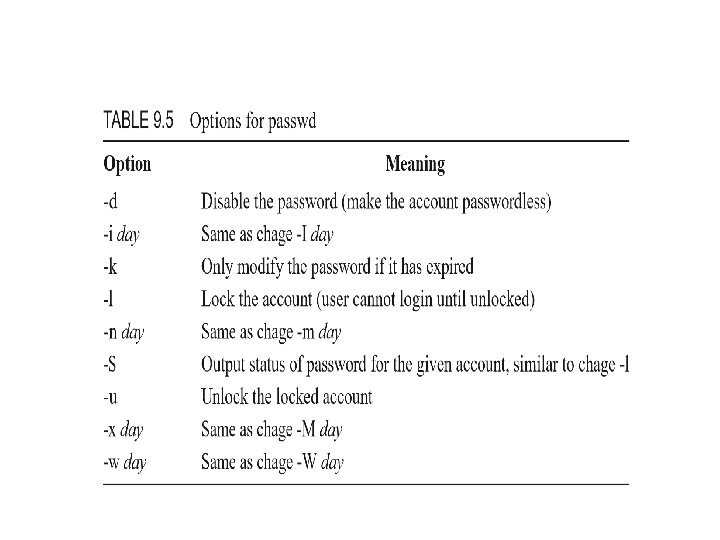
Managing Passwords Cont. . The passwd utility is used to change an existing user’s password You can find out this information using the –S option with passwd. Syntax: passwd username Example: passwd –S khalid
- Using usermod • From time to time, you will need to modify an existing user account. The syntax for usermod is very similar to that used by useradd. Syntax: usermod options username
options –c Edits the user’s full name. –e Sets the date when the user account will be disabled. Format the date as yyyy-mm-dd. –f Sets the number of days after password expiration before the account is disabled. Use a value of – 1 to disable this functionality. –g Sets the user’s default group. –G Specifies additional groups that the user is to be made a member of.
options –l Changes the username. –L Locks the user’s account. This option invalidates the user’s password. –m Sets the user’s home directory. –p Sets the user’s password. –s Specifies the default shell for the user. –u Sets the UID for the user. –U Unlocks a user’s account that has been locked.
Using userdel The userdel command is used to delete user accounts. This can but does not have to delete the associated files (the user’s home directory, temporary files, and mail file). Syntax: userdel username Example: userdel khalid
Using userdel Cont. . If you do want to remove the home directory when you delete the user, you need to use the –r option in the command line. Example: userdel –r khalid will remove the account and delete his home directory.
Linux Groups • How Linux groups work • Managing groups from the command line
How Linux Groups Work • If your Linux system has been configured to use local authentication, your groups are defined in the /etc/group file. Each record is composed of the following four fields: Group: Password: GID: Users • Group Specifies the name of the group. • Password Specifies the group password.
• GID Specifies the group ID (GID) number of the group. • Users Lists the members of the group. • As with /etc/shadow, each line in /etc/gshadow represents a record for a single group. Each record is composed of the following fields: Group_Name: Password: Group_Admins: Grou p_Members
Managing groups from the command line • Using groupadd • Using groupmod • Using groupdel
- Using groupadd • Syntax: groupadd options groupname groupadd –r workstudent
- Using groupmod • To modify a group, including adding users to the group membership, you use the groupmod utility. • Syntax: groupmod options group • Options: –g Changes the group’s GID number. –p Changes the group’s password. –A Adds a user account to the group. –R Removes a user account from the group.
• If we wanted to add “Ali” to the group, we would enter groupmod –A “Ali” student at the shell prompt.
Using groupdel There are no options; instead it is simply groupdel groupname The group is deleted from the /etc/group and /etc/gshadow files, and the group is removed from any user’s list of groups as stored in /etc/passwd. Example: groupdel student
Manage ownership and permissions • Managing ownership • Managing permissions
What Are Permissions are a mechanism to support operating system protection. Protection ensures that users do not misuse system resources (CPU, memory, network, partitions, directories and files). Permissions specify who can access a file or directory and the types of access. In Linux, permissions are controlled at three levels: 1 - Owner (called user, or ‘u’ for short) 2 - Group (‘g’ for short) 3 - The rest of the world (called other, or ‘o’ for short)
Each level of access provides: • Read: for a file, it can be viewed or copied. For a directory, the directory’s contents can be viewed by ls. • Write: for a file, it can be overwritten (e. g. , using save as). for a directory, files can be written there. • Execute: for a file, it can be executed (this is necessary for executable programs and shel l scripts). for a directory, a user can cd into it Note: to delete a file, you must have write access to the directory that contains it.
Typical file permissions In the long listing (ls -l) The first 10 characters of a line are a combination of letters and hyphens.
File Permissions On a Linux system, each file and directory is assigned access rights for the owner of the file, the members of a group of related users, and everybody else. Rights can be assigned to read a file, to write a file, and to execute a file. To see the permission settings for a file, we can use the ls -l command. Example, we will look at the file 1. txt permissions: $ ls –l file 2. txt $ -rwxr-xr-x 1 root 316848 Feb 27 2017 Here we can see: The file “file 1. txt" is owned by user "root" The super user has the right to read, write, and execute this file The file is owned by the group "root" Members of the group "root" can also read and execute this file Everybody else can read and execute this file
Altering Permissions To change a file’s permission, the command is chmod. The command’s syntax is chmod permissions file(s) where permissions can be specified using one of three different approaches: 1 -Describe the changes to be applied as a combination of u, g, o along with r, w, x. To add a permission, use + and to remove a permission, use –. Example: file 1. txt currently readable and writable by u and g and readable by o. To remove writable by group and remove readable by other. The command would be: chmod g–w, o–r file 1. txt
Altering Permissions Cont. . 2 -Altering permissions uses an = to assign new permissions rather than a change to the permissions. Example: To make file 1. txt readable, writable, and executable to the user, readable to the group, and nothing to the world, this could be done with: chmod u=rwx, g=r, o= file 1. txt Can combine =, +, and - as in: chmod u=rwx, g–w+x, o–r file 1. txt
Altering Permissions Cont. . 3 -Using a 3 -digit number. Each digit is the summation of the access rights granted to that party (user, group, other) where readable is a 4, writable is a 2, and executable is a 1. Readability, write ability, and execute ability would be 4 + 2 + 1 = 7. Readability and execute ability would be 4+1=5. No access at all would be 0. Example: we want file 1. txt to have readable, writable, and executable access for the owner, readable, and executable access for the group and no access for the world. The command would be: chmod 750 file 1. txt
Example 3 -Digit Permissions:
How ownership works Anytime a user creates a new file or directory, his or her user account is assigned as that file or directory’s “owner. ” Example, suppose khalid is a user logs in to his Linux system and creates a file named file 1. txt in home directory. Because he created this file, automatically assigned ownership of file 1. txt to “khalid”. You can also view file ownership from the command line using the : ls –l
Managing ownership from the command line • You can specify a different user and/or group as the owner of a given file or directory. To change the user who owns a file, you must be logged in as root. To change the group that owns a file, you must be logged in as root or as the user who currently owns the file. Using chown Using chgrp
Using chown – The chown utility can be used to change the user or group that owns a file or directory. Syntax chown user. group file or directory. Ex: If I wanted to change the file’s owner to the ncth 1 user, I would enter chown ncth 1 /tmp/myfile. txt
chown – If I wanted to change this to the users group, of which users is a member, I would enter chown. users /tmp/myfile. txt Notice that I used a period (. ) before the group name to tell chown that the entity specified is a group, not a user account. Ex: chown student. users /tmp/myfile. txt Note: You can use the –R option with chown to change ownership on many files at once recursively.
- Using chgrp • In addition to chown, you can also use chgrp to change the group that owns a file or directory. • Syntax: chgrp group file (or directory) • For example: chgrp student /tmp/newfile. txt.