Open Journal Systems Asst Prof Dr Ahmed Hashim

 open source software and conducting")

 is a free Web publishing tool")


 • Open Journal Systems (OJS) is an open source solution")


 at a")


 is an eight-digit number which identifies journals.")


- Slides: 107
Open Journal Systems Asst. Prof. Dr. Ahmed Hashim Mohammed 22/02/2018
• PKP is a multi-university initiative developing (free) open source software and conducting research to improve the quality and reach of scholarly publishing •
Open Harvester Systems • The Open Harvester Systems is a free metadata indexing system developed by the Public Knowledge Project through its federally funded efforts to expand improve access to research.
Open Conference Systems • Open Conference Systems (OCS) is a free Web publishing tool that will create a complete Web presence for your scholarly conference. OCS will allow you to:
Open Monograph Press • Open Monograph Press is an open source software platform for managing the editorial workflow required to see monographs, edited volumes and, scholarly editions through internal and external review, editing, cataloguing, production, and publication. • OMP can operate, as well, as a press website with catalog, distribution, and sales capacities. •
Open Journal Systems • “Scholars need the means to launch a new generation of journals committed to open access, and to help existing journals that elect to make the transition to open access…” Budapest Open Access Initiative, 2002
Open Journal Systems (OJS) • Open Journal Systems (OJS) is an open source solution to managing and publishing scholarly journals online. • OJS is a highly flexible editor-operated journal management and publishing system that can be downloaded for free and installed on a local Web server.
• It has been designed to reduce the time and energy devoted to the clerical and managerial tasks associated with editing a journal, while improving the record-keeping and efficiency of editorial processes. • It seeks to improve the scholarly and public quality of journal publishing through a number of innovations, including enhancing the reader experience, making journal policies more transparent, and improving indexing.
• OJS is a journal/web site management/publishing system. • OJS covers all aspects of online journal publishing, from establishing a journal website to operational tasks such as the author's submission process, peer review, editing, publication, archiving, and indexing of the journal. • OJS also helps to manage the people aspects of organizing a journal, including keeping track of the work of editors, reviewers, and authors, notifying readers, and assisting with the correspondence.
• The origins of OJS. The system was first released in 2001 as a research and development initiative at the University of British Columbia, with the support of the Social Sciences and Humanities Research Council of Canada, the Max Bell Foundation, the Pacific Press Endowment, and the Mac. Arthur Foundation. Its continuing development is currently overseen by the Simon Fraser University Library.
OJS Features 1. OJS is installed locally and controlled locally 2. Editors configure requirements, sections, review process, etc. 3. Online submission, double-blind review, and management of all content 4. Comprehensive indexing of content 5. Responsive, themable reader interface 6. Email notification for readers 7. Support for online payments 8. Complete context-sensitive online Help support 9. Multilingual support
Roles in OJS • The OJS workflow revolves around different roles for different users, allowing them access to different parts of the workflow, and different permissions and responsibilities. • Major roles include Site Administrator, Journal Manager, Editor, Section Editor, Author, Reviewer, Copyeditor, Layout Editor, Proofreader, and Reader.
Site Administrator • The Site Administrator is responsible for the overall OJS installation, ensuring the server settings are accurate, adding language files, and creating any new journals on the installation. • The Site Administrator account is created as part of the installation process. Unlike all other OJS roles, there can only be one Site Administrator.
Journal Manager • The Journal Manager is responsible for setting up the journal web site, configuring the system options, and managing the user accounts. This does not involve any advanced technical skills, but entails filling out webbased forms and uploading files. • The Journal Manager also enrolls the Editors, Section Editors, Copyeditors, Layout Editors, Proofreaders, Authors, and Reviewers.
• The Journal Manager also has access to the journal's other management features, and can create new Sections for the journal, set up Review Forms, edit the default Emails, manage the Reading Tools, view Statistics and Reports, and more. • Many Journal Managers also enroll as Editors, allowing them to easily manage both the journal settings as well as submissions in the editorial workflow.
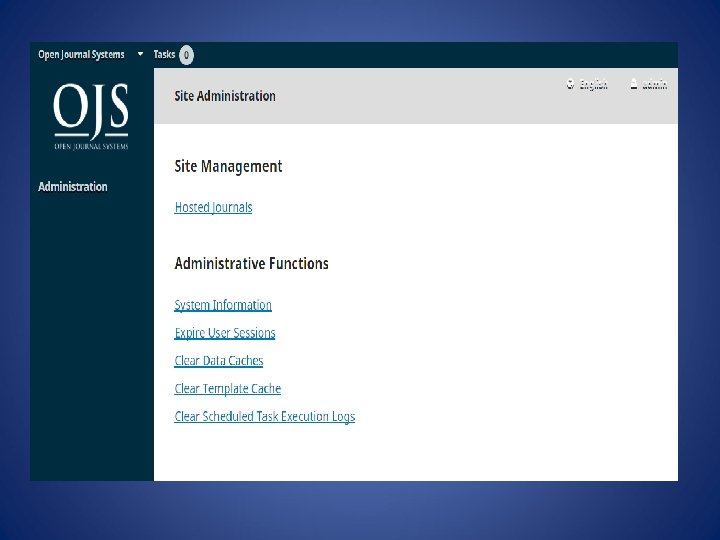
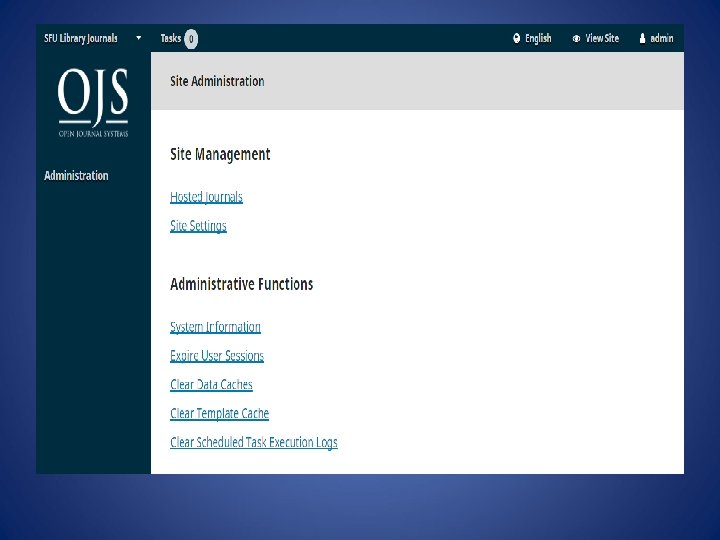
Site Administration • As part of installing OJS, you will have created a Site Administrator user account. When you log into OJS with that account you will have access to Site Administrator settings from the Dashboard. • You will be able to create new hosted journal instances, manage language support across your system, and perform other administrative functions.
Site Management • To get to Site Management, login as the Site Administrator, and choose Administration from the left menu.
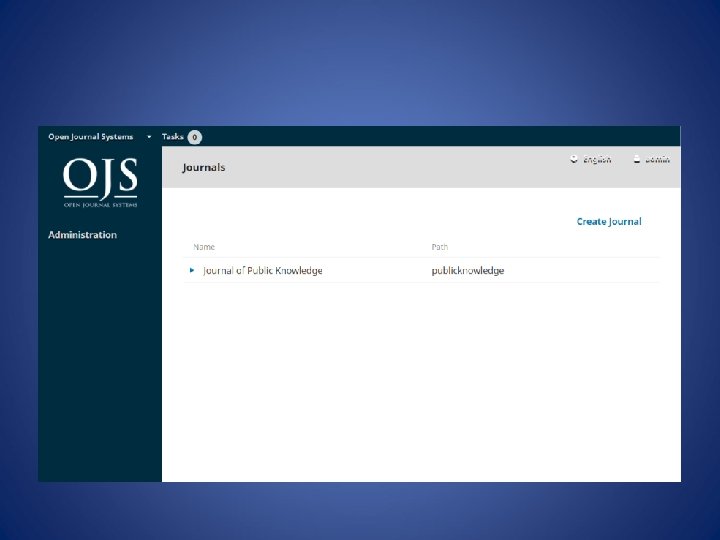
Hosted Journals • From here, choose Hosted Journals. One the resulting page, you will see all of the journals in this OJS installation. In the example, below, there is only one.
• To edit the existing journal, click on the blue arrow to the left of the journal name. You will see options to edit, remove, or update the settings.
Edit will let you change the title, description, or path • .
• Remove will let you delete the journal from the installation. You will be asked to confirm that you really do want to do this, as it is irreverisible.
• Settings Wizard will take you to the various settings options for that journal.
Users will allow you to add and manage users associated with this journal.
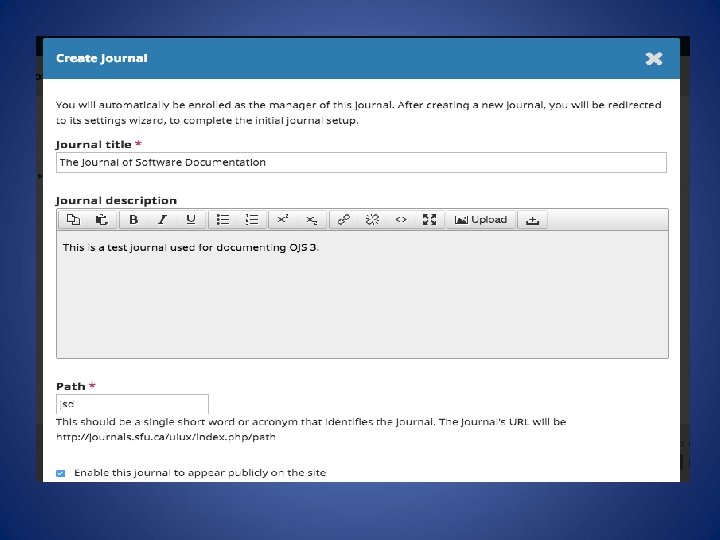
Back on the Hosted Journals page, you can use the Create Journal link to add a new journal to this OJS installation. From the resulting form, fill in the fields with the new information.
Site Settings • This section will appear if you have two or more journals, and allow you to add information regarding your overall OJS installation, not individual journals.
Site Setup • This includes the name of your site, a site logo, an introductory statement about your site, a site footer, a redirect option (if you only plan to have one journal on this installation), contact information, a minimum password length for registered users, style sheet and theme options, and sidebar management.
You will have the opportunity to provide details about your individual journal(s) at a later stage.
Languages OJS is a multilingual system and you can additional languages to your site here, making them available to all of the journals on your installation.
Plugins From here, you can choose to enable or disable various plugins, making them available (or not) to all of the journals on this OJS installation.
Navigation Menus Use this section to modify your site-wide menus.
Administrative Functions • This section provides detailed information about the server on which your OJS installation is running.
System Information Use this section to find out details about the server running your installation.
Expire User Sessions • Clicking Expire User Sessions immediately clears all active user sessions in the system, requiring any user that is currently logged in to sign in to the system again. This can be useful before an upgrade, to ensure all users are logged out.
Clear Data Caches • Clicking Clear Data Caches clears all cached data, including locale information, help cache, and search cache. This function may be useful to force data to be reloaded after customizations have been made.
Clear Template Cache • Clicking Clear Template Cache clears all cached versions of HTML templates. This function may be useful to force templates to be reloaded after customizations have been made.
Clear Scheduled Task Execution Logs • If scheduled tasks have been enabled for your journal, clicking Clear Scheduled Task Execution Logs will delete the task execution log files from your server. The execution log files include dates that correspond to previously completed scheduled tasks (e. g. sending automatic email review reminders).
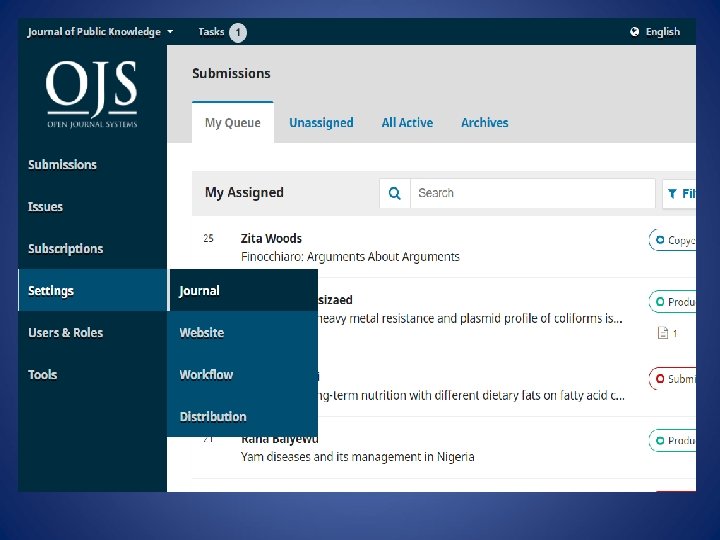
Settings • The Settings section allows you to configure your OJS installation to best meet your publishing needs. • You can find the Settings in the left menu panel when you are logged in as a user with Journal Manager permissions.
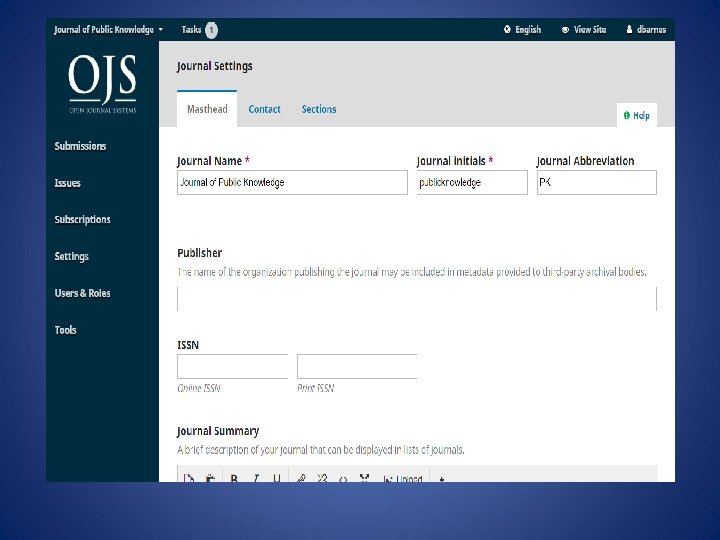
Journal Settings • The Journal Settings page includes details about the journal. • Use the tabs to navigate to the different sections of Journal Settings: Masthead, Contact, Sections.
Masthead • Journal Name is the name of your journal. E. g. , Journal of Software Documentation • Journal Initials are the initials of the journal. E. g. , JSD. • Journal Abbreviation is the abbreviation of your journal name. E. g. , JSoft. Doc. • Publisher is the name of the organization publishing the journal.
• ISSN (International Standard Serial Number) is an eight-digit number which identifies journals. It is managed by a world wide network of National Centres coordinated by an International Centre based in Paris, backed by Unesco and the French Government. A number can be obtained from the ISSN web site. This can be done at any point in operating the journal. • OJS journals will typically have an online ISSN, but some may also publish a print version, which requires a different print ISSN.
• Journal Summary is a brief description of your journal. If you are on an OJS installation with multiple journals, this text will appear with your journal listing. • Masthead allows you to add the names of your editorial team or anyone else you wish to mention. This will appear on the public website under About > Editorial Team. • About the Journal is a space to add any information about your journal which may be of interest to readers, authors, or reviewers. • This could include your open access policy, the focus and scope of the journal, copyright notice, sponsorship disclosure, history of the journal, a privacy statement, and inclusion in any LOCKSS or CLOCKSS archival system. • Hit the Save button to save your changes.
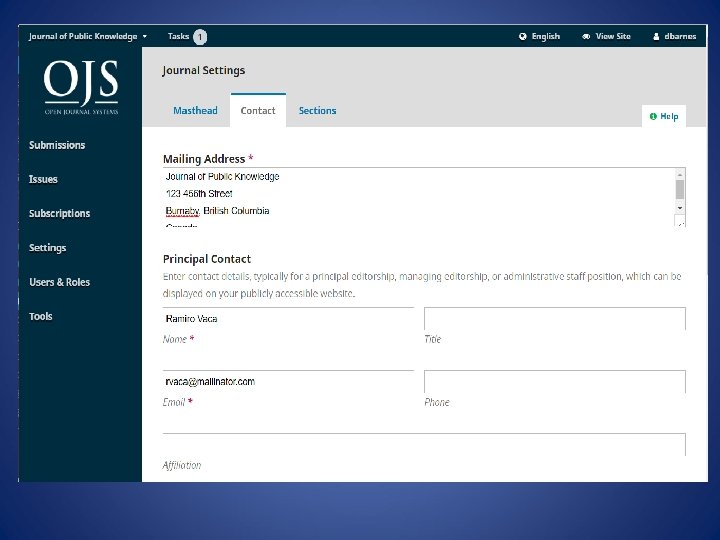
Contact • Use this section to add journal contacts. • Mailing Address: Add your journal's official mailing address here. This will appear on the journal's Contact page. • Principal Contact: Add contact information for the journal's main contact person. • Technical Support Contact: Add contact information for the journal's technical support person. This information will appear on the journal's Contact page and also in different points in the workflow to offer assistance to users. • Hit the Save button to save your changes.
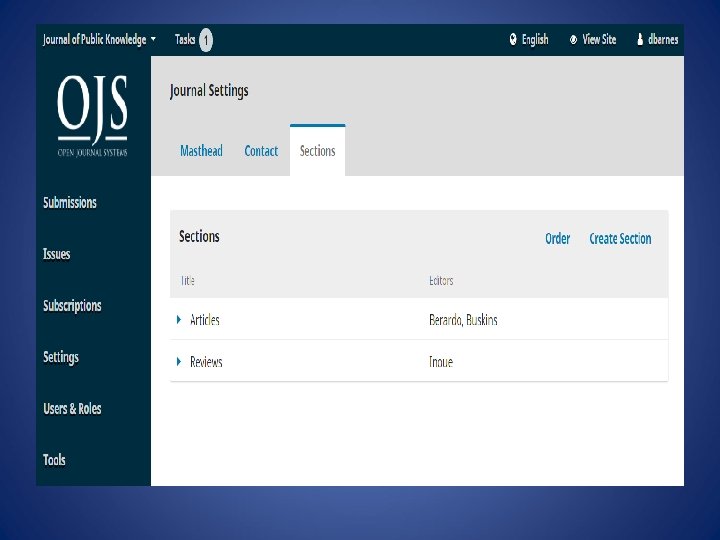
Sections • Use this page to configure the different sections of your journal. E. g. , Articles, Editorials, Reviews, Commentary, etc. • All of your existing sections will appear here. OJS requires at least one section, and creates an "Articles" section by default.
• You can modify sections by clicking on the blue arrow to the left of the section name. This will reveal options to edit or delete the section.
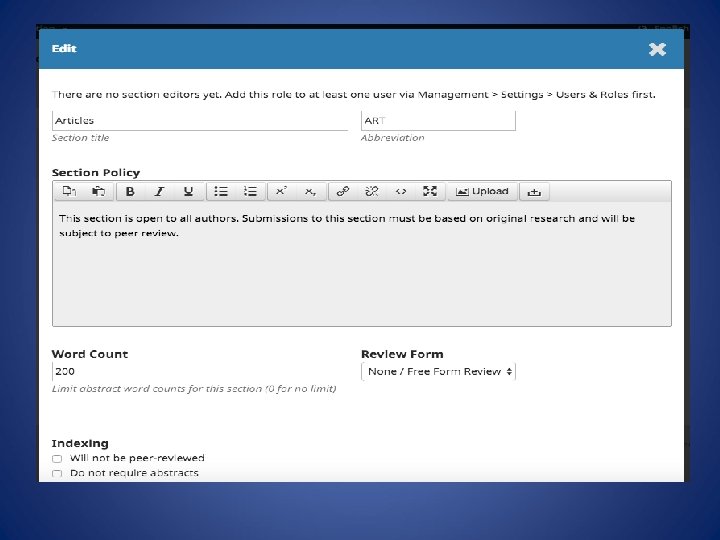
Editing a Section • Selecting the edit link will open a new window with different configuration options.
• From here, you can change the name or abbreviation of the section. • Section Policy: Use this field to add important details such as submission requirements, peer review, etc. • Word Count: Use this to limit the number of words for abstracts in this section. • Review Form: You can select specific review forms for each section. Learn more about Review Forms here. • Indexing: Each section can have different indexing settings. For example, an Editorial section will not typically be peerreviewed. • Identify items published in this section as a(n): This used by some indexing systems. Note that it is not a required field. • Hit the Save button to save your changes and return to the Sections page.
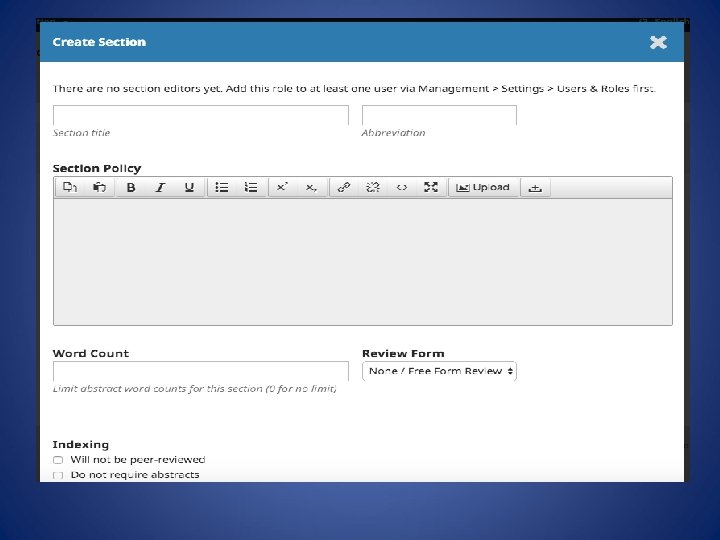
Create Section • From the sections page, select the Create Section link to open a blank window, exactly the same as the window used for editing a section described above.
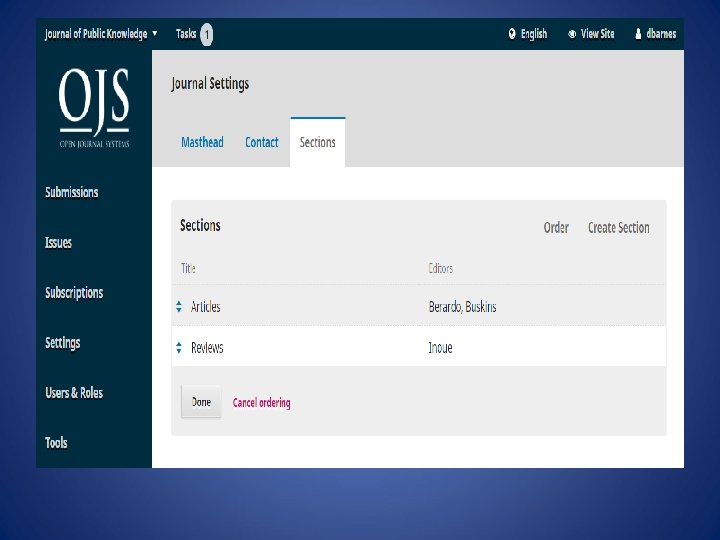
Ordering Sections • When you have more than one section created, you will see an Order link. Use that to reorder how those sections display on your journal website.
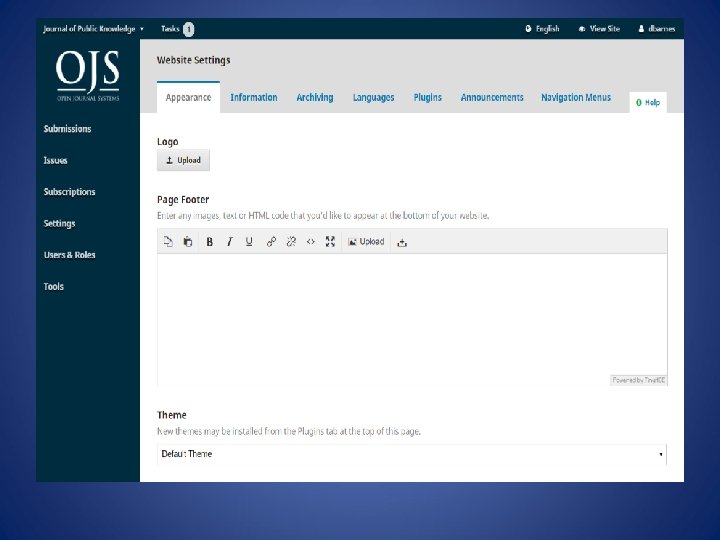
Website Settings • The Website Settings allow you to configure how your journal's website looks and operates. It consists of tabs for Appearance, Information, Archiving, Languages, Plugins, Announcements, and Navigation Menus.
Appearance • Logo: Use this space to upload a journal logo to the upper left corner of your reader interface. • Page Footer: This allows you to display text at the bottom of each page of your website. • Theme: As new themes become available, you can enable them here. • Typography: Quickly choose the fonts for your journal. • Colour: Quickly change the colour of your journal's header.
• Journal Style Sheet: Use this to upload a unique style sheet for your journal. • Sidebar Management: This allows you to move different blocks in or out of the sidebar in the reader interface. • Homepage Image: Uploading an image here will place it on your journal's home page. • Journal Favicon: Add a favicon to display in the reader's browser address bar. • Additional Content: Any text entered here will appear on your homepage.
• Lists: Limit the number of items (for example, submissions, users, or editing assignments) to show in a list before showing subsequent items in another page. Also, limit the number of links to display to subsequent pages of the list. • Journal thumbnail: Upload a small logo or image representative of the journal that will be used in lists of journals on this OJS installation. This will only be used on OJS installations with multiple journals. • Hit Save to record your changes.
Information Use these fields to modify the text in the For Readers, For Authors, For Librarians pages on the journal website.
Archiving If you are a member of a LOCKSS or CLOCKSS network, use this page to activate your journal.
Languages Use this page to configure the languages used by your journal.
• Primary Locale: One language must be set as primary. • UI: This will enable all selected languages to appear on the reader interface. • Submission: This will enable all selected languages to be available to submitting authors. • Forms: This will enable all selected languages to be available when filling in online forms.
Plugins • Use this page to see all of the installed plugins and find new plugins. • Installed Plugins • All of the plugins listed here available in your OJS installation. Use the Enable link to use them. • You will notice that some plugins are required for the system and cannot be disabled.
Plugin Gallery The Plugin Gallery provides access to externally-created plugins, that may not be included in your OJS installation, but are available for download and activation. Selecting the plugin title will provide additional details, including the author, status, description, and compatibility.
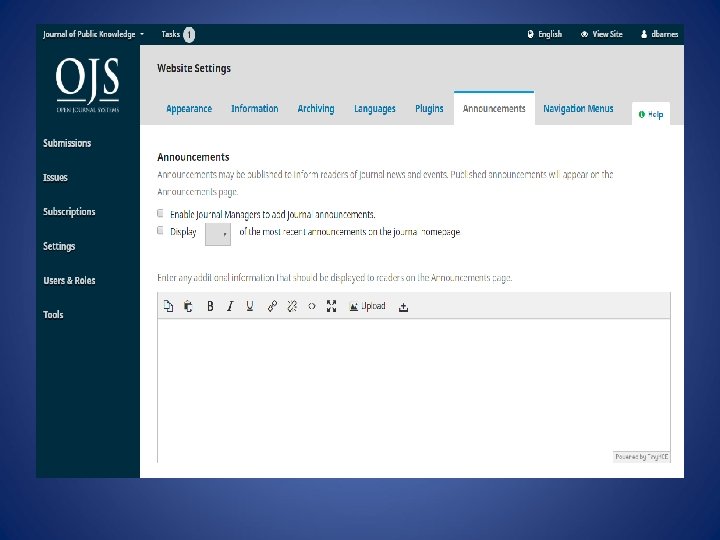
Announcements • This section allows you to create and display news announcements on the journal's website. • Announcements: Configure how announcements will appear on your journal website. • Announcement Types: You can create different types of announcements (e. g. , News, New Issue Alert, etc. ). Use the Add Announcement Type link to create them. • Announcements: Use the Add Announcement link to create a new announcement for your Announcements page.
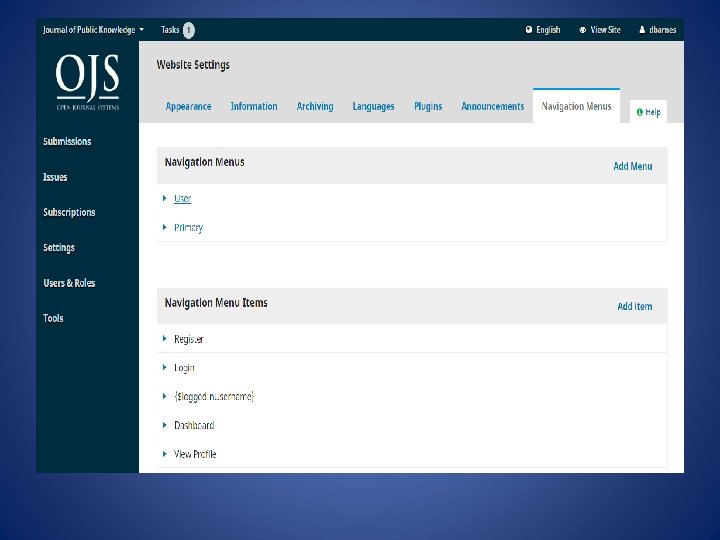
Navigation Menus • This section allows you to configure your navigation menus, such as including new links.
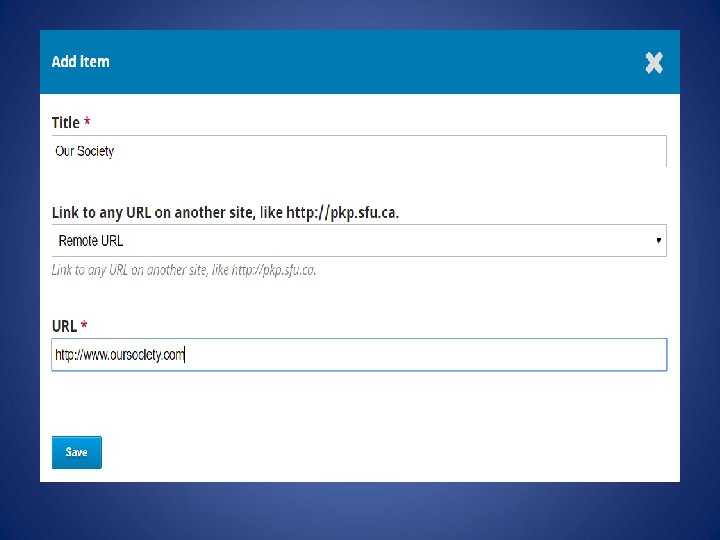
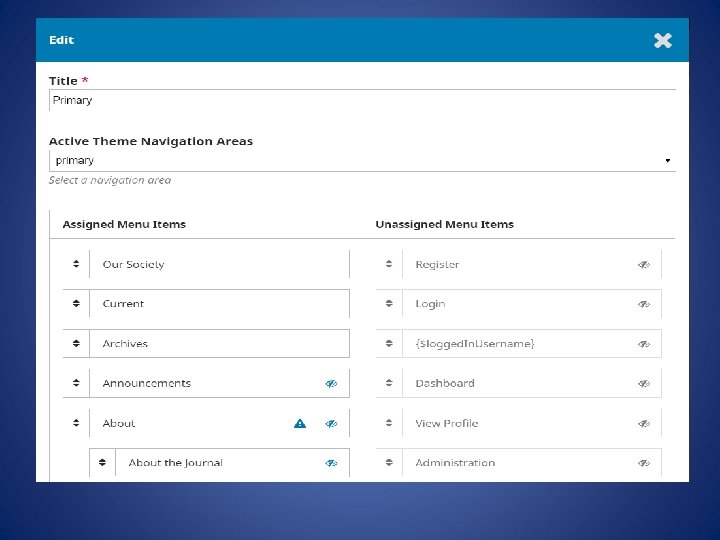
• Navigation Menus: Configure the User Menu (which includes Language, View Site, and Username) or the Primary Menu (on the journal home page, including Current, Archive, About, etc. ). • Navigation Menu Items: These are programmed links you can add to either menu above. If you wish to add a link to the Primary Menu (e. g. , "Our Society"), add it here using the Add Item link.
• It will now appear in the list of Navigation Menu Items. Next, go to the desired Navigation Menu (e. g. , Primary), use the blue arrow to reveal the options, and choose Edit. You can now drag and drop it from Unassigned Menu Items to Assigned Menu Items and into the appropriate location on the menu
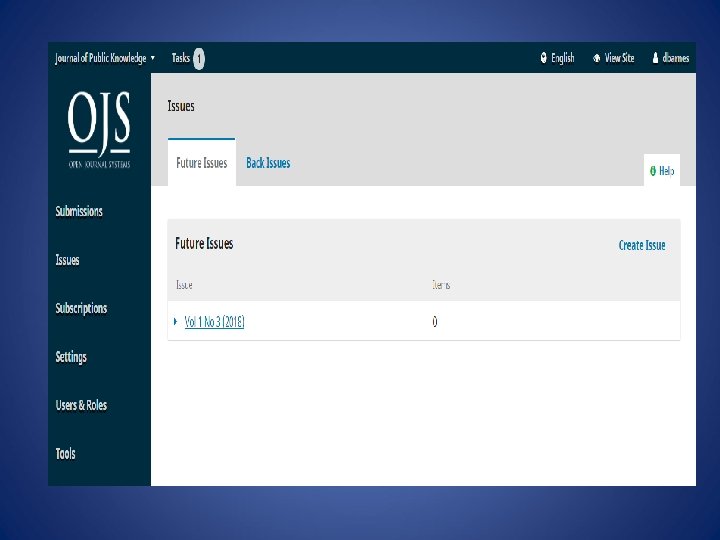
Issues • From the left menu, select Issues to manage all of the issues for your journal.
1. Future Issues • Future Issues are all of your unpublished issues. You can create as many of these as you wish, and schedule submissions to any of them.
Create Issue To create a new issue, use the Create Issue link and fill in the form. There are spaces to add volume, number, year, and title information (e. g. , Special Issue #1), as well as a description and a cover image (if needed).
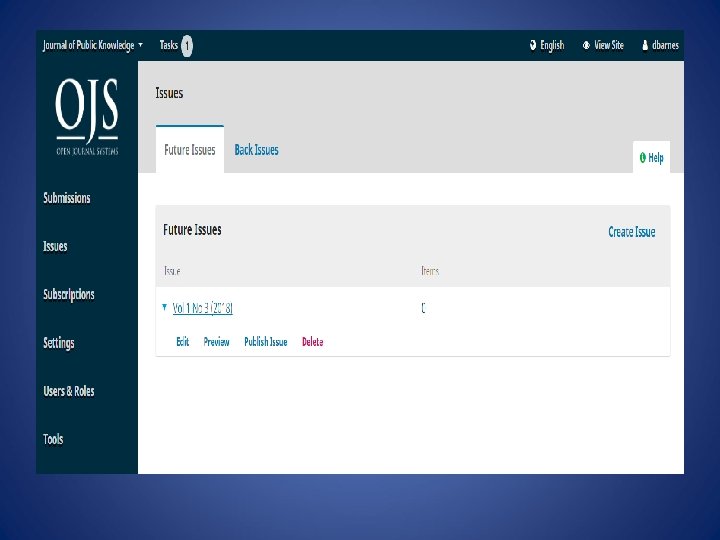
Edit Issue You can also edit an existing future issue by selecting the blue arrow to the left of the issue entry on the Future Issues page
This will reveal an Edit link, which will open a new window of information
• Table of Contents: For a new issue, this will be empty, but for issues that have had submissions scheduled, they will be listed here. • Use the blue arrow next to each submission to reveal links to go directly to the submission record or remove it. • You can also use the Order link to reorder the entries. • Issue Data: This provides access to the volume, issue, number data you entered when first creating the issue. • Issue Galleys: This allows you to upload galley of the complete issue -- e. g. , one PDF containing all articles. This will be linked from the issue web page. • Identifiers: Use this space to add a DOI for the issue, if your journal supports issue-level identifiers.
• Preview Issue • Using that same blue arrow will also reveal a Preview link, letting you get a look at the issue before publishing it. • Publish Issue • Once you are happy with the issue hit the Publish Issue link to publish it on your journal website. • Delete Issue • You can use the Delete link to remove the issue. Any assigned articles will revert to their unpublished status.
2. Back Issues This tab lists all of your published issues. As with Future Issues, using the blue arrow will reveal similar options as described above (Edit, Preview, etc. ).
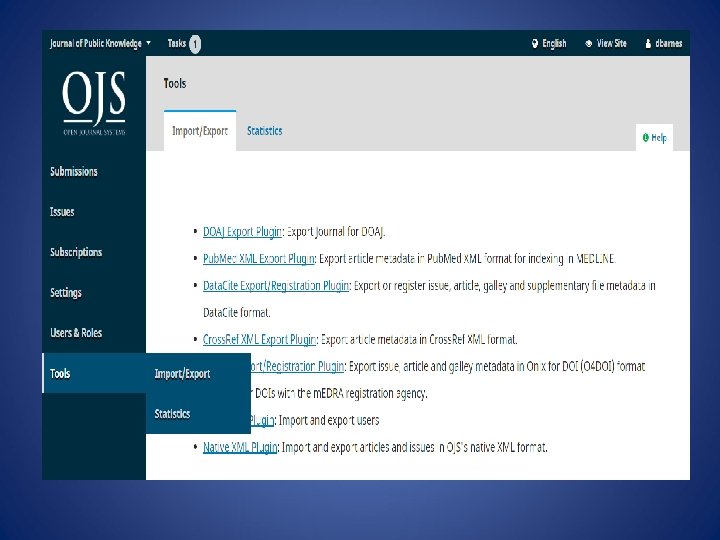
Tools The Tools section can be accessed from the left sidebar menu. Tools consist of an Import/Export tab and a Statistics tab.
1. Import/Export allows you to easily get data out of your OJS journal and get data into it. Some of the tools allow you to export to third-party systems, such as Pub. Med or the DOAJ. Others allow you to import or export user or article data. For more information on the Crossref XML Export Plugin, see the PKP Crossref Guide.
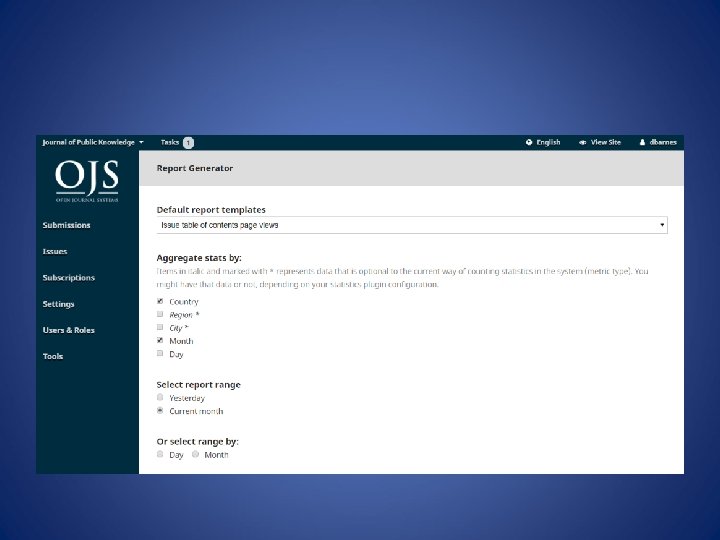
2. Statistics The Statistics page provides access to a variety of reports from your journal.
• The system generates reports that track the details associated with site usage and submissions over a given period of time. Reports are generated in CSV format which requires a spreadsheet application to view. • View Report: Provides a report on galley and abstract views by readers (i. e. , how many times a PDF for an article has been viewed). • Review Report: Provides a spreadsheet of all review activity. • Subscriptions Report: Provides a spreadsheet of subscription activity. • COUNTER Reports: Provides COUNTER data. • Articles Report: Provides a spreadsheet of all published articles. • PKP Usage Statistics Report: Provides basic usage statistics for your journal.
Generate Custom Report Use this feature to build your own reports •