ONEPOINT PERSPECTIVE Raphael School of Athens Onepoint linear


")


- Slides: 17
ONE-POINT PERSPECTIVE Raphael, School of Athens, One-point linear perspective
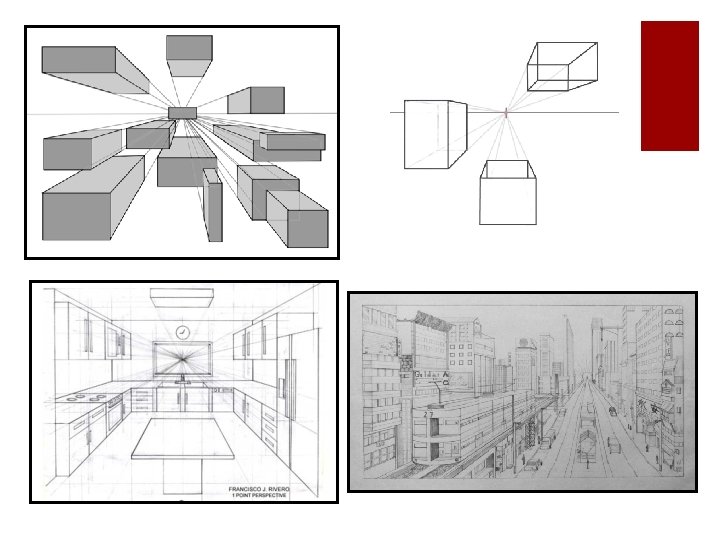
ONE-POINT PERSPECTIVE Perspective- portraying a three-dimensional object /space on a 2 -dimensional surface Vanishing point (VP)- Using one perspective, parallel lines converge to one point somewhere in the distance. This point is called the vanishing point (VP). This gives objects an impression of depth. When drawing using one point perspective all objects vanish to one common point somewhere on the horizon.
ONE-POINT PERSPECTIVE The sides of an object diminish towards the vanishing point. All vertical and horizontal lines are drawn with no perspective. i. e. face on. One point perspective is of limited use, the main problem being that the perspective is too pronounced for small products making them appear bigger than they actually are. ¡ All perspective drawings start with the basic geometric shapes. ¡ Then the combination of multiple shapes creates a form.
Main components of perspective Vanishing Point: The single point on the horizon where all the lines on the ground level seem to come together. Horizon Line: The place where the land the sky meet. THIS IS EQUAL TO YOUR EYE LEVEL. Orthogonal Line: The imaginary lines that go back to the horizon line.
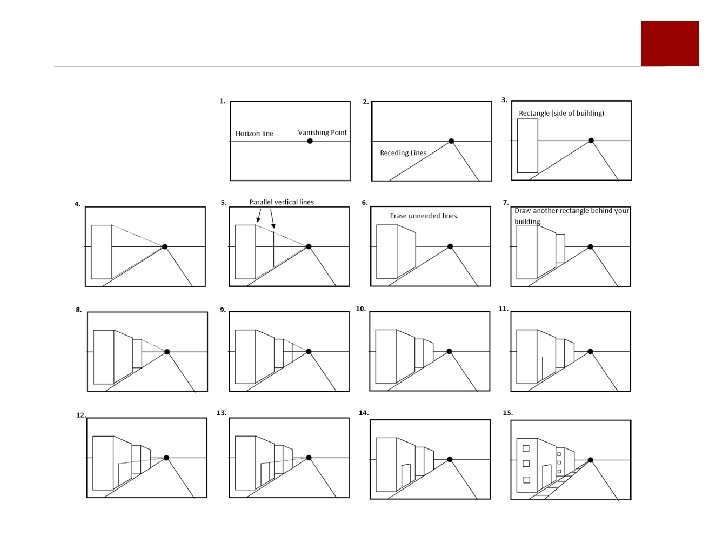
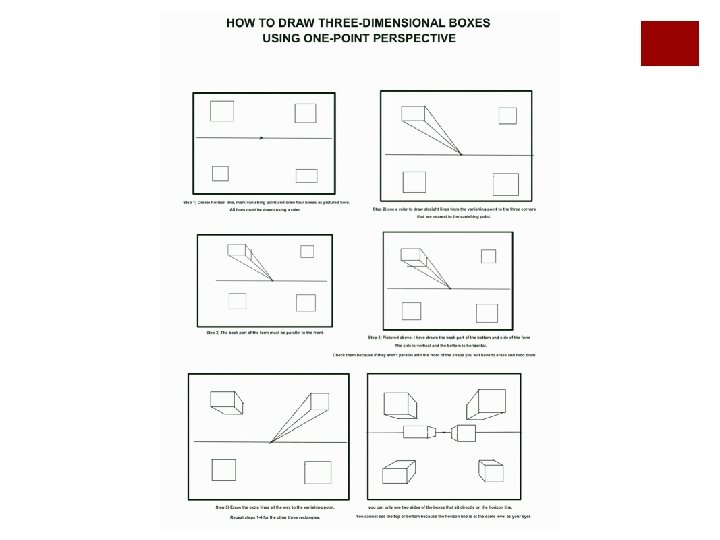
STEP 1 Draw the vanishing point in the center of the horizon line and label it. Make sure your line is perfectly parallel to the edge of the paper. • Remember you can only have one horizon line as you can only have one eye level at a time.
STEP 2 Now draw a square or rectangle and label it "front face". Draw it in one of the lower corners so you have plenty of room to add more forms. You can continue to relate the drawing to the physical box model as you work.
STEP 3 Now connect three corners of your rectangle or square to the vanishing point. These are the orthogonals. Draw lightly so you can erase!
STEP 4 Draw a horizontal line to end your form. Make sure that line is parallel to the horizon line.
STEP 5 Draw a vertical line down from the horizontal line to complete the side of the form. Make sure the vertical lines are parallel to the edge of the paper.
STEP 6 Erase the remaining orthogonals. (construction lines)
Horizon Line Orthogonal lines
Various Perspectives Great examples of assignment
Online sources http: //www. youtube. com/watch? v=7 ZYBWA-if. Es http: //www. olejarz. com/arted/perspective/intro 3. html http: //floresvma. weebly. com/drawing-1. html
Homework One point perspective drawing Depending on your skill level Beginner Draw 15 boxes in one point – perspective Advanced Draw an exterior space like a city scape or landscape multiple buildings or multiple structures in one point- perspective