October 2019 Ver 1 0 8 STEP PRACTICAL

October 2019 Ver 1. 0 8 STEP PRACTICAL PROBLEM SOLVING SUMMARY TEACH POSTER OVERVIEW
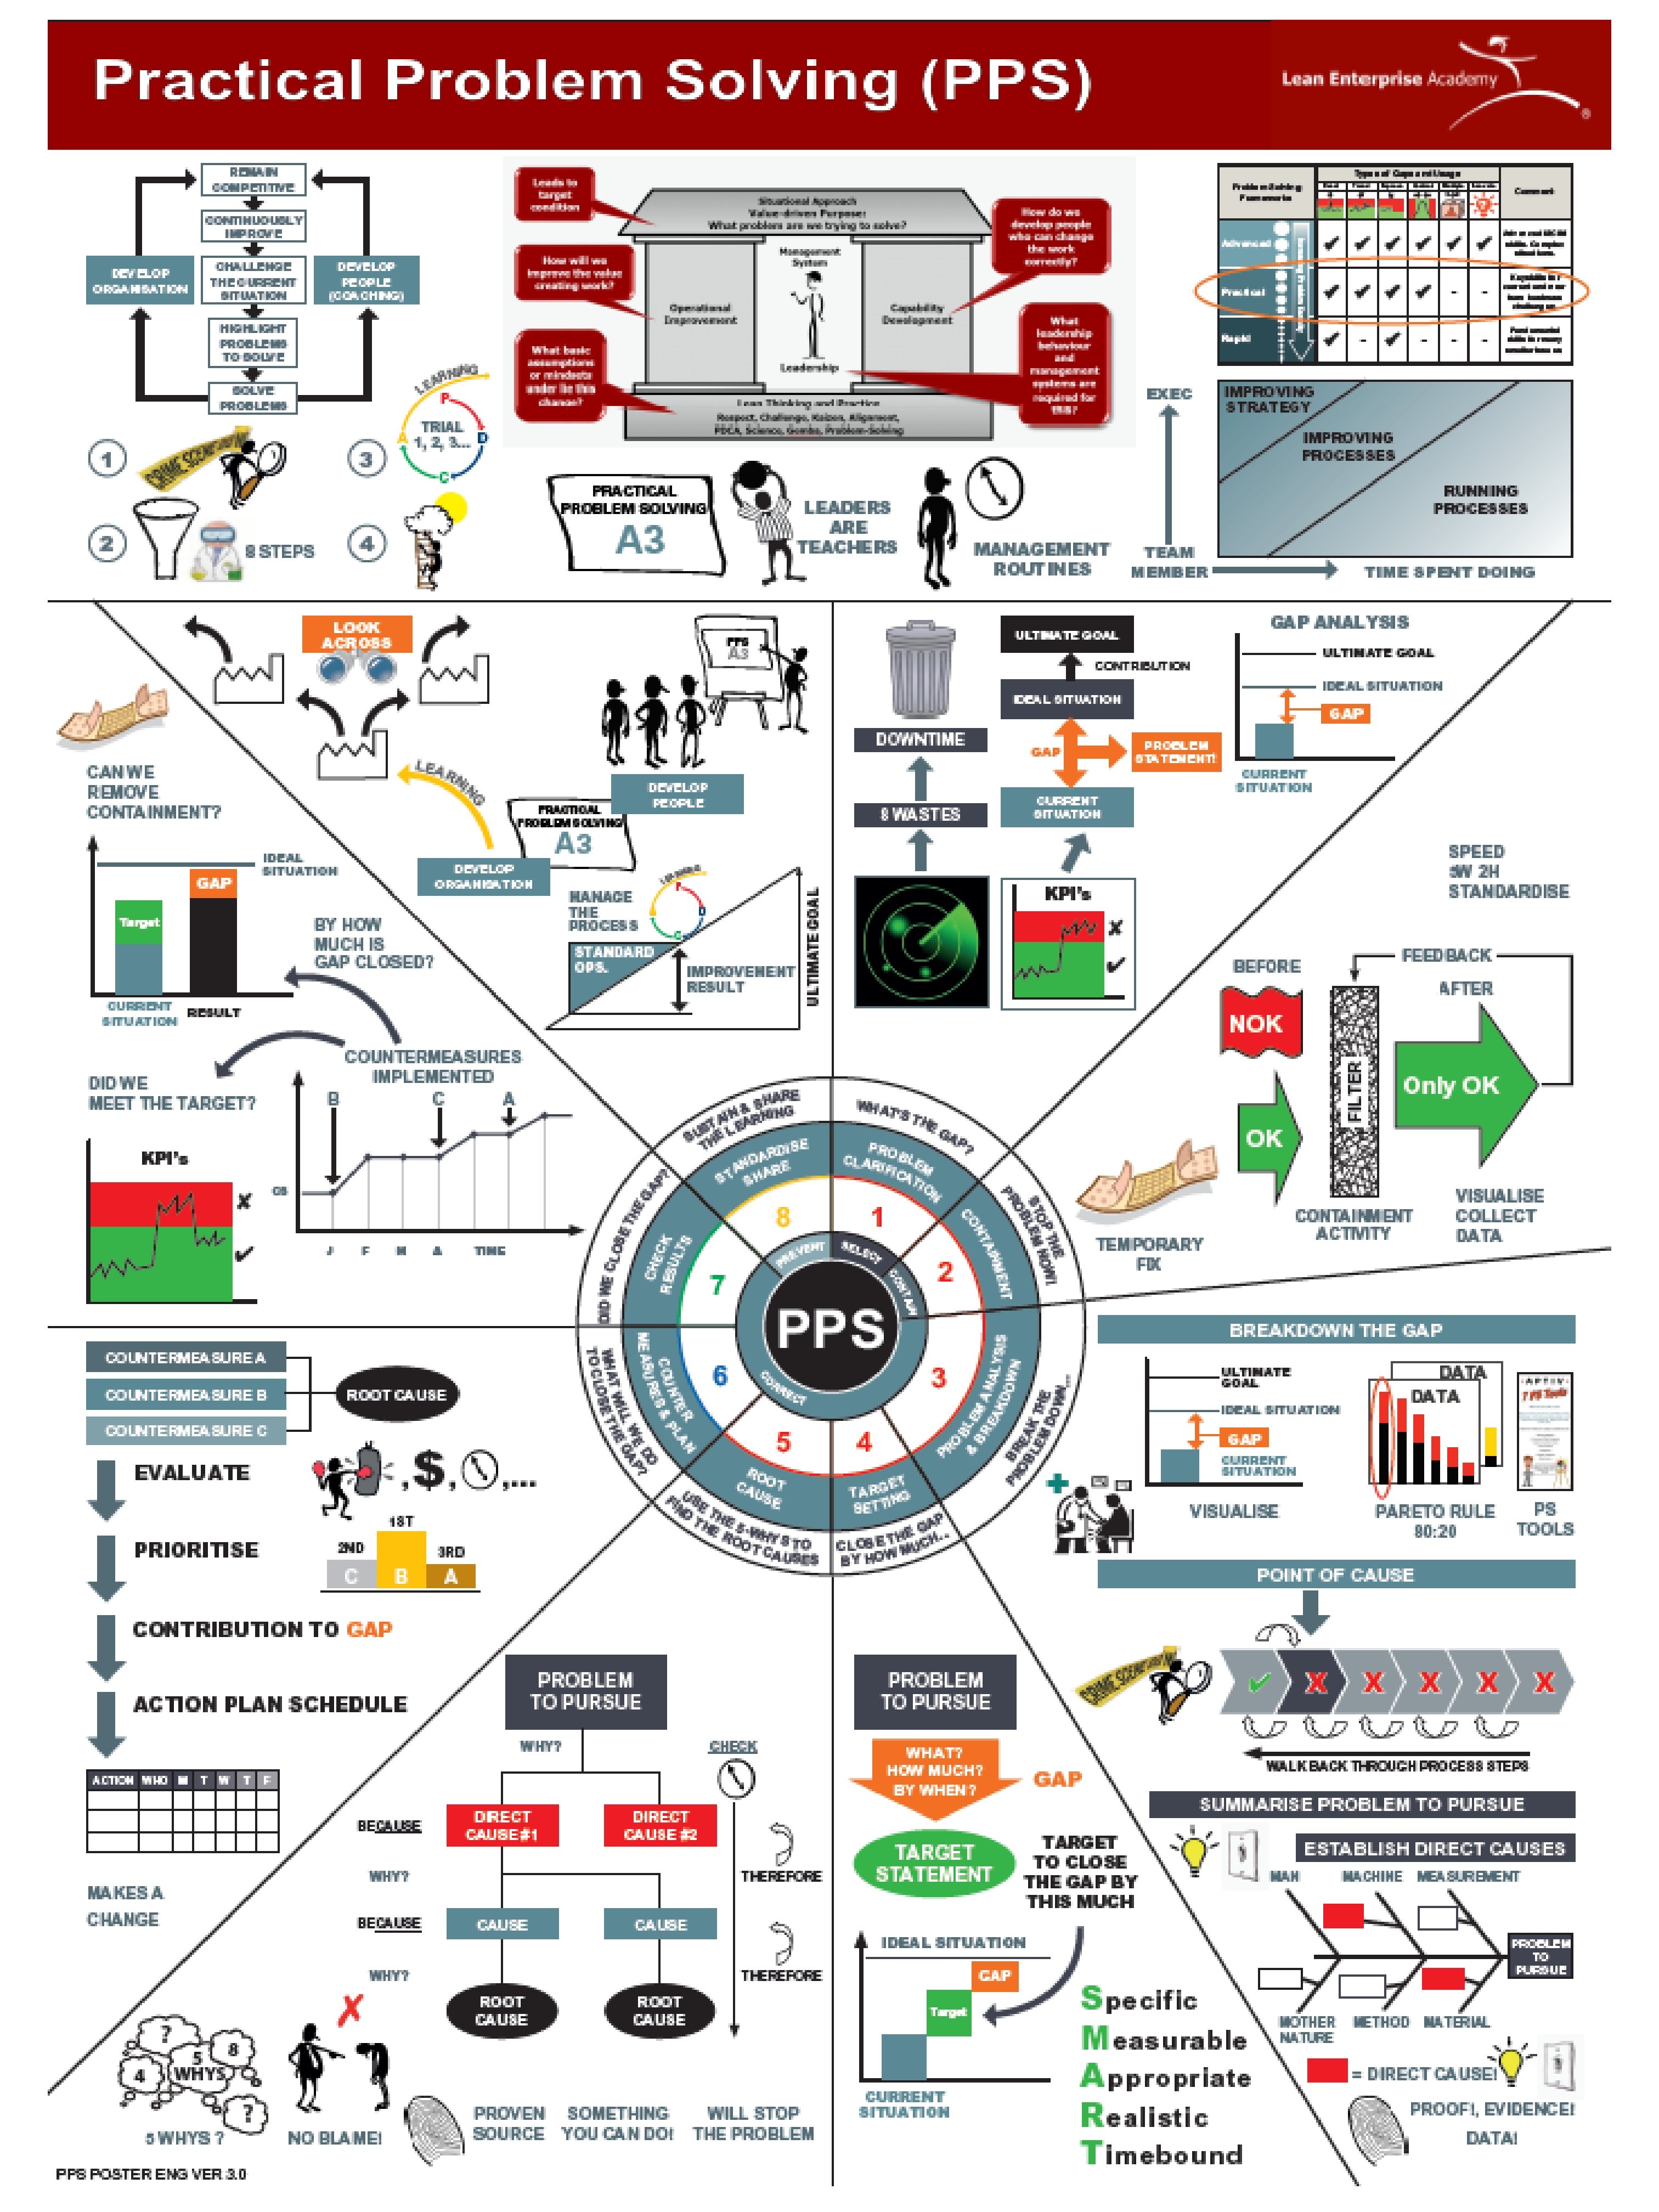

Lean Transformation Framework explains “How we need to know “how to do the work” and continually improve the work considering 5 dimensions : Value Driven Purpose Process Improvement People Capability Management System Lean Thinking & Practice PPS PURPOSE: - In Order to Survive, we must: Remain Competitive (Better than competitors) - By Continuously Improving & Challenging the way we do things today - This highlights problems that need to be solved, if we solve those problems we can…. . 1. Develop the organisation (better results, stay ahead of competition) 2. Develop our peoples skills to solve more problems (Critical) LEAN THINKING AND PRACTICE: 1. Go, See like CSI!. Speed 2. Use a scientific method 8 Step Approach (Structured) 3. PDCA learning cycles. Confirm, speed, learning 4. Never give up – Work towards Ultimate Goal – 1 step further - A 3 - to report / share learning STEP 8: STANDRARDISE & SHARE -Create the new Std / process ESTABLISH THE BASELINE -Consider Compliance review -We move 1 step closer to the Ultimate goal and solve 1 more problem -What problems should we tackle next? Sharing: -Where else could benefit from this? (Site/Division) -What learning can be shared to others? Via Paper or Sharepoint/DU Development: -How can we share the learning to develop others -Can one of the team coach other teams in PPS? -Can we print and show this A 3 by the Teams workplace? KEY POINT: -Supports People & Organisational development for Short, Medium & Long Term STEP 7: CHECK RESULTS -Show on graph timeline the impact of C/measure (Clearly Visualise) -When each C/measure implemented -What was the effect or contribution -Proof by DATA of C/measure effectiveness -Implement ongoing measurement to capture results and montior -The measure should be linked / contribute to the measure in Step 1 -Clarify impact on the overall problem (Visualisation important) -Confirm how much the GAP closed & “Did we meet the target? ” -Can we now remove containment MUST be asked. KEY POINTS: -Proof of Success - Helps to show benefit when sharing -Can recognise TEAM efforts – The reward for Problem Solving! STEP 6: COUNTERMEASURE & PLAN Define Countermeasures -The root causes should be shown (Links to analysis and 1 st 5 Steps) -What – the potential actions(C/M’s) we could use to address these should be evaluated in terms of…. -Priority – The best option when analysed vs agreed headings (eg; Q, C) -How much – Contribution to the overall GAP – (What is the impact) -Who/When – The action plan -Use matrix to gain consensus for action planning -These countermeasures are the agreed and aligned Plan -Important to Visualise the evaluation – Clarity and alignment KEY POINT: This is where we define actions to therefore see Results MAKES A CHANGE STEP 5: ROOT CAUSE Very Important Step - Start with Problem to Pursue -Then all direct causes found - Gives Structure and Framework to RCA. Link back to Nodal points -Ask Why to drill down to the root cause (not easy skill) -Multiple “legs” may be found – give example -3 -Legged 5 -why can be used – but not valid for all problems (non Quality) To Check 5 Whys are Correct: -Ask “Therefore” or “Because” on the way up to check the logic. If it doesn’t work, then your 5 Whys is wrong… -Pathway to Root Cause should be in “Time order or sequence” as you progress down to the root cause -No Blame – It’s NOT an employee’s fault. -It should never be – Re-train Operator…. Ask the group why? A: It is usually a standard/process that didn’t exist, or failed…. -Ask why is it 5? (A: experience shows it’s the average, can be more or less) -The Root Cause should be something you can influence or change -Fixing the Root Cause – It will Change how we do it– not just re-implement the same thing -RC Can be an event, condition, organisation factor or process (or a combination of the two) -Can be a lack of Standard (or clarity), or lack of a process -ASK YOURSELF– If you had a clear standard, would the problem happen KEY POINTS: 1. Can be more or less than 5 and multiple legs 2. Check the logic through the Therefore and Time tests 3. RC = Something you can change/influence 4. No Blame! PROCESS IMPROVEMENT: -3 Frameworks -Few large problems -Hundreds medium problems -Thousands of small problems MGT ROUTINES: -Structure. -Do it every day – Make Time -Opportunity to coach -Follow up and Support -3 categories of what we do: By teaching/coaching others we can spend more time on Strategy / Process Improvement Why Leaders as Teachers is KEY – Develop Capability in others STEP 1: PROBLEM CLARIFICATION -Goal is to Clarify the problem you are trying to solve in simple, numeric terms -First step – Identify the problem. How? We could find by: 8 Wastes – DOWNTIME (Explain 8 wastes on Flipchart) KPI’s – Where are we missing targets -Next step – does it fit with Business goals & priorities? -Ultimate goal = Where do we want to be in 5 -10 years. Eg for Q, it may be Zero defects or perfect Customer Quality -Ideal situation – Annual target / budget, immediate goal, eg: 10 ppm -Then confirm the current situation (today result); eg: 30 ppm -Only then we clarify the “gap” or problem we are trying to solve. -2 GAPS Exist: 1. Return to Standard; 2. Created GAP by increased target or business goal -The GAP is then defined as the PROBLEM STATEMENT -GAP needs to be clear / concise. Only state the problem itself WHY? Without a clear GAP a problem might just be perception or opinion. Create Alignment, common direction. Clarity stops us going the wrong way STEP 2: CONTAINMENT -Like a Band aid / Plaster – Stop the bleeding -Protect customer & Buy time for solving problem -Temporary fix -it can cost $ (& ultimately waste) -Do it fast and now, and standardise the process -Use the opportunity to capture data re: problem -Check and confirm that the containment is working -Ensure 5 W, 2 H -Later, can use to check if the countermeasure was effective (Proof of Solving) - Remove Containment once effective countermeasures in place WHY? Stop the problem “flowing out” immediately. Cost pressure on Mgt to solve STEP 3: PROBLEM ANALYSIS & BREAKDOWN Breakdown the GAP Very Important Step by Breaking Down the problem or the GAP from Step 1 to something you can tackle – it takes time to do. -Use Doctor Example of breaking a problem down: -Facilitate discussion - Data, Data – In order to break down the GAP. Explain Pareto -Understand what is happening (Inch wide – mile deep approach) -Ensure we have facts & don’t jump to solutions – “I think that…. ” -PPS Tools to aid analysis (hand Out). Explain 7 PPS tools briefly -Visualisation is KEY – Creates Alignment around the problem -Focus on BIGGEST Impact / Contribution WHY? Focus efforts on right issues Point Of Cause -Understand where and when it happens. -Work back through the process steps (GO, SEE – CSI) -Try to Focus the activity on a specific point Problem to Pursue (WHAT, WHERE, WHEN) -Using Data & Point of Cause, you can define the Problem to Pursue -Important as this is the problem you will try to solve, NOT the large vague problem in step 1. This is the Contribution to closing the GAP! Direct Cause (s) -Establish Direct Causes – Proven by data or experiment -Like a light switch – Turn the cause off, the Effect stops… - Every effect has a cause – this is what you see (fuse blown) -Use data to establish direct cause –Refer to PPS Tools…. . or -Use Ishikawa (Fishbone) diagram to structure ideas (Structured Brainstorming). Prove which ones are Causes, and which aren’t -Direct Causes should be clearly summarised and proven This is what you want to prevent from recurring KEY POINTS: Data Proves Thinking. Visualisation of data drives alignment Avoid Guessing / I think and GO, SEE and Understand STEP 4: TARGET SETTING -Target Statement must be Clear and not open to interpretation -By how much/when will you close the GAP -Target and measure is set against the “problem to pursue” -Consider impact on GAP that removing direct causes will have -To close GAP in Step 1, may need to repeat process many times. -SMART Target is important -Needs to motivate the team to achieve, not be out of reach RECOGNISE – That it may not be possible to solve the overall problem in Step 1 -The target should be clearly visualised -Must have a clear understanding of the contribution to the “Ultimate Goal”

A 3 - What the Story Should Look Like

Facilitation - General Points • To gain involvement, at each important step ask “What are the important points ? • For each key point ask why is it important? • The reasons provide the cognitive influence to help people follow the method described • After each Teach potion of the Poster explain What the Story Should Look Like (WSSLL) • Make a plan using the agenda ! – who will Teach who will Support and explain WSSLL • If people are struggling or have missed a key point the Support person should step in to help • The Delegates must have time to learn by doing the Case Study – that is the point of the day ! • Steps 3 and 4 are difficult to do in the Case Study so look at the Facilitation Guide notes carefully • Have a contingency plan for the timing if you are over running…Steps 7 and 8 can be a “Tell” when sharing the answer if required • Practice what you are going to say…. • Use your own experiences - you know what they will be going through! • Ensure each Group is helped whilst doing the Case Study

Facilitation Tools • • Use OPEN questions, one at a time • Waiting 10 SECONDS for questions to be answered • REINFORCING contributions – verbally and non-verbally • DEFERRING to the group • MAINTAINING and ENHANCING self-esteem; ‘you’re OK’ • POLLING or voting • BACKING OFF: sitting, getting the group to discuss without using the facilitator • ASKING the group to SUMMARISE • RECALL individual’s points and REFER back to them • LINK workshop/material to business, departmental or individual topics • Use IMPACTORS: vivid language, link to topical/current issues etc. • Use VARIETY of pace, tone, position, activity etc • Use HUMOUR and HUMILITY, your own experiences/learning
- Slides: 6