Objectives To discuss tools used for basic surgical


Objectives • To discuss tools used for basic surgical procedures in livestock. • To understand the importance of each procedure. • To examine the techniques used in each basic surgical procedure. 2

Main Menu • Dehorning • Castration • Tail Docking, Teeth Clipping & Lancing 3


Dehorning • Is the surgical removal of horns and hornproducing tissues • Should be performed as early in the animal’s life as possible – reduces the risk of complications – younger animals heal faster and experience less stress Surgical Scoop: All surgical procedures discussed should be performed on healthy animals. Performing procedures on ill animals can increase the risks associated with the procedure. 5

Dehorning • Increases the safety of individuals and other animals • Increases profits at market • Decreases the chance of bruised carcasses – bruising reduces meat value • Allows for more room at the feed trough • Makes animals easier to handle Surgical Scoop: Animals are provided with a sedative to induce analgesia. Analgesia is defined as the inability to experience pain during a procedure. 6

Dehorning Tools • For nursing animals include: – chemical pastes or sticks – hot iron – spoon or tube dehorners • For weaned animals include: – cup dehorners – scoop dehorners Surgical Scoop: Some animals are born without horn-producing tissue. These animals are referred to as “polled”. 7

Chemical Dehorning • Is the application of caustic paste/sticks to the horn buds – completed between one to three weeks of age • Destroys horn-producing cells surrounding the horn buds Surgical Scoop: “Caustic” by definition is a substance which is able to burn or corrode organic tissue by chemical action. 8

Chemical Dehorning • Includes the following types: – caustic chemical paste – causticks • Safety precautions to follow are: – always wear gloves – do not preform in rainy weather 9

Chemical Dehorning Equipment 10

Chemical Dehorning • Advantages include: – less stressful compared to other procedures – bloodless – can be performed year-round • Disadvantages include: – painful without anesthesia – scurs could grow following improper techniques – not permitted in some countries Surgical Scoop: Loose horns which are attached by skin rather than bone are known as scurs. 11

Chemical Dehorning • Steps include: 1. administering anesthetic 2. uncovering horn bud • push back hair surrounding the horn bud 3. applying a thin layer of caustic chemical paste to horn bud • use a wooden applicator 4. repositioning hair over applied paste 5. placing an adhesive patch over each horn bud • protects other animals from accidental burns 12

Hot Iron Dehorning • Uses the hollow circle of a heated iron to destroy the horn-producing skin – should fit around the horn bud • Is the preferred method to use on animals 12 weeks or older Surgical Scoop: When dehorning using a hot iron, it is extremely important to have skills and knowledge of the procedure and to always wear gloves. 13

Hot Iron Dehorning Equipment • Can include the following types: – furnace heated – 12 -volt battery operated – 120 -volt electric 14

Hot Iron Dehorning Equipment 15

Hot Iron Dehorning • Advantages include: – bloodless – can be performed year-round • Disadvantages include: – animals need to be 12 weeks or older – scurs could grow following improper techniques – could cause brain damage if held in place too long 16

Hot Iron Dehorning • Steps include: 1. 2. 3. 4. administering anesthetic firmly restraining animal heating iron until it is bright red moving ears out of the way so they are not burned 5. pressing the tip of the iron over the horn bud 6. rotating iron around the base of the horn bud • ensures the horn-producing cells are destroyed 17

Hot Iron Dehorning • Steps include: 7. continuing application for 10 to 15 seconds • any longer could damage skull or brain • copper color will appear when dehorning is complete • Will cause horn buds to fall off within four to six weeks 18

Spoon or Tube Dehorning • Uses a sharp, metal tube-shaped device – consists of a blade in the form of a circle used to cut through the horn buds • Is used on animals younger than eight weeks of age 19

Spoon or Tube Dehorning Tools 20

Spoon or Tube Dehorning • Safety procedures include: – refraining from using during fly season • increased risk for infection • slows healing process – properly cleaning and disinfecting tools between animals 21

Spoon or Tube Dehorning • Advantages include: – useful in younger animals – quick procedure • Disadvantages include: – not bloodless – open wounds • increased risk of infection – scurs could grow following improper techniques 22

Spoon or Tube Dehorning • Steps are as follows: 1. administering anesthetic 2. covering the skin surrounding the base of the horn with the dehorning tool • size is based on the size of the horn 3. placing the edge directly over the horn bud 4. applying pressure to the tube 5. alternating between a push and twist motion until skin has been cut through 23

Spoon or Tube Dehorning • Steps are as follows: 6. cutting under the horn bud for removal • if the horn bud is not completely removed, make a small incision to remove the bud and skin 7. applying disinfectant to the wound • light bleeding will occur 8. disinfecting the cutting edge of the tube between animals 24

Cup or Scoop Dehorning • Uses scissor-like devices to remove horns • Is used on animals ranging from two to four months of age • Are available in many sizes – depends on horn size 25

Cup or Scoop Dehorning Tools • Safety precautions include: – knowing the correct placement to remove the horn • cutting too deep could open the frontal sinus • opening the frontal sinus will expose the brain cavity – refrain from using during fly season • increased risk of infection Surgical Scoop: The frontal sinus is a cavity above the eye which helps with mucus drainage. 26

Cup or Scoop Dehorning Equipment 27

Cup or Scoop Dehorning • Advantages include: – quick – useful once the horn has attached to the skull • Disadvantages include: – requires control of bleeding • could bleed a large amount – open wounds • increases the risk of infection – could open frontal sinus • exposes brain 28

Cup or Scoop Dehorning • Steps include: 1. administering anesthetic or sedation 2. closing the handles of the dehorners together • opens blades to place the horn between them 3. positioning the jaws over the horn bud 4. pressing the blades against the head • maintain pressure 5. spreading handles apart to bring the blades together • this is when the removal of the horn takes place 29

Cup or Scoop Dehorning • Steps include: 6. controlling bleeding • clotting blood with dressing powder • pulling the artery with forceps – should only be performed by a veterinarian • cauterizing the artery with heat Surgical Scoop: When an individual cauterizes an artery, they are burning skin to stop the bleeding. 30

Castrating • Is the process of removing testicles • Should be performed as early in the animal’s life as possible – varies from species to species • boars are castrated between four and 14 days of age • bulls are castrated before three months of age • rams and bucks are castrated between two and 21 days of age Surgical Scoop: In the United States, 100 percent of male pigs used for meat production are castrated. 32

Castrating • • • Eliminates unwanted breeding Decreases aggressiveness Increases feed efficiency Increases profit at market Increases meat quality and tenderness – intact males have less fat, making meat tougher – meat from intact males can have an offensive odor and taste 33

Castration • Should be performed by a veterinarian if the following complications occur: – unilateral cryptorchidism • one testicle fails to drop into the scrotum – bilateral cryptorchidism • both testicles fail to drop into the scrotum – inguinal or scrotal hernia • part of the abdominal cavity or intestine protrudes into the scrotum 34

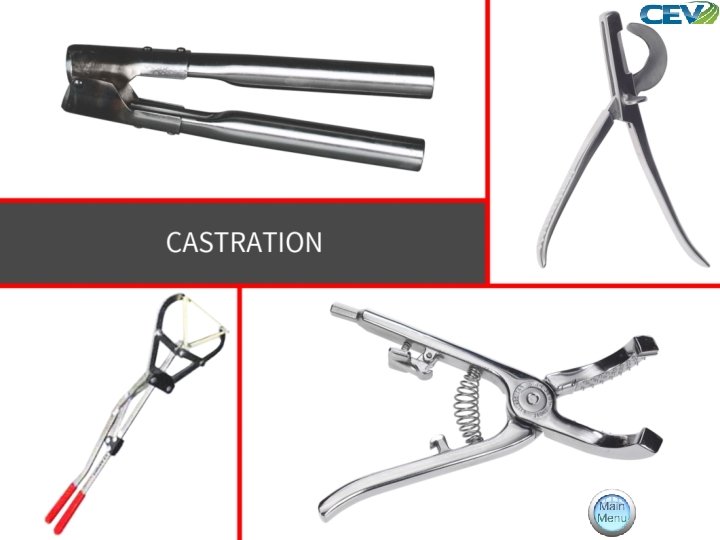
Castration Tools • For bulls, bucks or rams include: – elastrator • elastic rings – burdizzo • crushes the spermatic cord over the skin without surgically revealing it 35

Surgical Castration Tools • For bulls, bucks, rams or boars include: – emasculator • crushes the spermatic cord after it is revealed surgically by cutting into the scrotum 36

Elastic Bands • Use an elastrator tool to stretch rubber rings – needs to stretch far enough to slip over the scrotum and testicles • Obstruct blood flow to testicles and scrotum – within six weeks the testicles and scrotum should fall off • Are most commonly used on bulls, bucks and rams 37

Elastic Band Castration • Uses a universal tool to stretch the rubber rings – rings come in many different sizes • depends on the size of the animal and testicles – rings should be used within a year of purchase • decreases the chance of rings breaking 38

Elastrator & Elastic Bands 39

Elastic Band Castration • Safety precautions include: – restrain animals legs – ensure band is above both testicles – after procedure, conduct checkups daily to ensure procedure was completed correctly 40

Elastic Band Castration • Advantages include: – bloodless – easily performed • Disadvantages include: – wounds heal slowly – rings could break – painful – flies are attracted to the rotting skin • could lead to infection or maggot infestation 41

Elastic Band Castration • Steps are as follows: 1. 2. 3. 4. keeping animal in a standing position placing the band onto the elastrator tool pulling both testicles into the scrotum using the elastrator tool to stretch the elastic ring open and align under the scrotum • prongs should be facing up • squeeze the handles together to stretch the ring 42

Elastic Band Castration • Steps are as follows: 5. slipping the open ring over the scrotum and testicles 6. releasing the ring slightly above both testicles 7. ensuring both testicles are below the ring • if the ring is not properly placed, cut the ring and redo the procedure • if the ring is incorrectly placed, the scrotum and testicles will swell 43

Burdizzos • Crush blood vessels, restricting blood flow to the testicles – the scrotum will stay attached to the body, but the animal will be sterile • Are used on bulls, bucks and rams 44

Burdizzo 45

Burdizzo Castration • Safety precautions include: – restraining animal’s legs – ensuring clamp is correctly placed on each side – holding for 10 to 45 seconds to ensure spermatic cord is severed 46

Burdizzo Castration • Advantages include: – bloodless – decreased risk of weight loss after castration • compared to surgical castrations • Disadvantages include: – slow to perform • must be held in place for 10 to 45 seconds to be effective – could result in an ineffective castration 47

Burdizzo Castration • Steps include: 1. selecting the correctly sized clamp • based on the size of the animal’s testicles 2. locating the spermatic cord • between the animal’s hind legs 3. moving spermatic cord to the outside of the scrotum 4. aligning the burdizzo or emasculator on one side of the scrotum • center it over the spermatic cord 48

Burdizzo Castration • Steps are as follows: 5. placing the spermatic cord between clamps 6. closing the clamps • hold for about 10 to 45 seconds 7. releasing the clamps 49

Burdizzo Castration • Steps are as follows: 8. repeating steps three through five on the other testicle • should be one centimeter above or below the previous clamp site • Should cause testicles to shrivel within four to six weeks Crush Site Spermatic cord carries blood to testicle Testicle 50

Surgical Castration • Completely removes testicles from body • Is the most reliable form of castration • Has the best outcome when performed in dry weather – allows animals to have an easier recovery • Is used on bulls, bucks, rams and boars of all ages Surgical Scoop: Swine can only be castrated surgically. 51

Surgical Castration • Incisions best for bulls, bucks and rams include: – either side of the scrotum – under the testicle • Incisions best for boars include: – behind and under each testicle • also referred to as the dorsal side 52

Surgical Castration • Safety precautions to follow are: – sterilizing all equipment – restraining the animal • completely anesthetized • local sedation and hands-on restraint – separating from other animals until the wound is completely healed • prevents infection and injuries 53

Surgical Castration • Disinfecting procedures are completed before and after castration is performed • Disinfecting procedures are as follows: 1. Disinfect all equipment and tools with an antiseptic solution such as Chlorhexidine(R) solution 2. Wash hands with a surgical scrub such as Chlorhexidine(R) Scrub 3. Disinfect the incision site with a mild disinfectant such as Iodine 54

Surgical Castration • Advantages include: – completely removes testicles – wounds heal quicker • compared to banding • Disadvantages include: – not bloodless – more time consuming – increased weight loss after procedure 55

Emasculators • Crush blood vessels, restricting blood flow • Allow the spermatic cord to be cut from the body by restricting bleeding – the testicles and spermatic cord are revealed surgically – if the spermatic cord is cut without using an emasculator the animal could bleed to death 56

Emasculator 57

Emasculator Castration • Steps are as follows: 1. pushing testicles to the bottom of the scrotum 2. making an incision from the bottom of the scrotum upwards • about two centimeters 3. pushing a testicle and spermatic cord through the opening of the scrotum 58

Emasculator Castration • Steps are as follows: 4. using the emasculator to cut the spermatic cord high above the testicle • increases blood clotting 5. repeating steps one through four for the other testicle 59

Castration • After care tips include: – using a dressing powder to increase clotting and reduce bleeding – keeping animals in a dry area • maximizes healing and minimizes recovery time – contacting a veterinarian, if complications occur 60


Tail Docking • Is the removal of most of an animal’s tail • Is most commonly used on lambs and pigs • Should be performed on lambs and pigs before two weeks of age • Can cause health issues if performed incorrectly – if tails are docked too short, the animal could suffer from rectal prolapses • when the rectum protrudes out of the body 62

Tail Docking • Helps prevent accumulation of urine and feces in sheep’s wool – sheep with long tails and wool have more problems with contamination – long tails can cause bacterial infections, maggot infestations and fly strike • fly strike is the invasion of fly larvae which feeds on the skin – can cause toxemia or death • blood poisoning from toxins within the blood 63

Tail Docking • Helps prevent tail biting in swine – tail biting can cause the following: • • infection abscesses in the spine carcass damage profit loss when harvested 64

Tail Docking • Advantages include: – decreases risk of infection – decreases tail biting – cleaner wool • Disadvantages include: – can cause rectal prolapse if docked too short 65

Tail Docking Tools • For sheep include: – elastrator • For swine include: – teeth clippers – scissors – scalpel blade – burdizzo instrument Surgical Scoop: Some dairy farmers also dock tails to aid in the sanitation of the milking process. 66

Tail Docking Tools 67

Tail Docking • Steps for lambs include: 1. opening the elastrator and inserting the tail into the rubber ring 2. placing the ring beyond the caudal folds of the skin 3. releasing the ring onto the tail • after a few days, the tail should fall off • tail may need to be cut beneath the band if it does not fall off in a timely manner 4. applying disinfectant solution to the area 68

Tail Docking • Steps for pigs are as follows: 1. aligning the tail inside the tooth nippers at the desired location • should be anywhere from a 1/2 inch to one inch from the base of the tail 2. firmly pressing on the nippers to puncture through the skin and vertebrae 3. applying disinfectant solution to the area 69

Tail Docking • Should be performed within the animal’s first week of life • Safety precautions to follow include: – knowing proper placement to remove tail – using sterile tools 70

Teeth Clipping • Involves cutting piglets’ incisor teeth – sharp, narrow teeth located toward the front of the mouth • Helps reduce trauma to sows’ teats and other piglets – piglets will fight, using these teeth, to claim a teat for feeding purposes – fighting could cause bodily harm • increases the risk of infection in young piglets • Is only used in the swine industry 71

Teeth Clipping • Should be completed within 24 hours of the piglets’ birth • Removes the incisor teeth of piglets – piglets use incisor teeth to fight for the best teat during feeding – incisor teeth cause damage to the mother’s teats 72

Teeth Clipping Tools • For young swine include: – “teeth clippers”, which can be side cutters, wire cutters or large toenail clippers 73

Teeth Clipping Tools 74

Teeth Clipping • Safety precautions include: – knowing proper teeth to clip – using sterile tools – clipping teeth at the proper length • right below the gum line 75

Teeth Clipping • Advantages include: – reduce trauma to sow’s teats – reduce bodily harm to other piglets • Disadvantages include: – painful if clipped too far down – bleeding if the gum is clipped 76

Teeth Clipping • Steps are as follows: 1. restraining piglet by cradling between the body and forearm 2. opening the piglet’s mouth 3. restraining piglet’s tongue using a finger 4. clipping each incisor tooth right below the gum line • be careful to not clip the gum 5. rubbing finger over clipped teeth to ensure there are no sharp edges 77

Lancing • Is puncturing an abscess to release fluid • Is needed when a wound or infection has swelled and filled with fluid • Removes harmful bacteria which causes infection within the body 78

Lancing • Releases fluid under the skin of an animal • Is most commonly used to treat abscesses – develop from cuts or puncture wounds 79

Lancing Tools • For an abscess include: – razor blade – knife – scalpel 80

Lancing Tools 81

Lancing • Safety precautions include: – making an incision large enough to release fluid – using sterile tools – wearing gloves 82

Lancing • Advantages include: – releases fluid – decreases pain – cleans infections • Disadvantages include: – leaves an open wound – needs hydrotherapy to heal properly 83

Lancing • Steps are as follows: 1. cleaning equipment with a disinfectant 2. cleaning infected area with a disinfectant 3. holding one side of the abscessed area with one hand 4. cutting an incision through the center of the abscess with the other hand 5. applying pressure to the infected area to expel the majority of the fluid • fluid could be blood or pus 84

Lancing • Steps are as follows: 6. applying a disinfectant into the incision site, using a needleless syringe, to finish cleaning the wound 7. continuing cleaning wound via hydrotherapy until healed Surgical Scoop: To help the healing process after lancing an abscess, a constant stream of water is applied to the wound for a few minutes a day until the wound is healed. This healing process is known as hydrotherapy. 85

Resources • http: //www. omafra. gov. on. ca/english/livestock/dairy/facts/09003. htm#bud • https: //www. aphis. usda. gov/animal_health/nahms/beefcowcalf /downloads/beef 0708/Beef 0708_dr_Part. I_rev. pdf • http: //web. jhu. edu/animalcare/procedures/survival-large. html • http: //www. dpi. nsw. gov. au/agriculture/livestock/beef/husbandr y/general/dehorning-cattle • http: //www. thepigsite. com/pighealth/article/555/docking-tailclipping-piglets/ • https: //extension. tennessee. edu/publications/documents/pb 16 84. pdf • http: //beefmagazine. com/health/0401 -castrate-calves-timing • http: //animalsmart. org/species/pigs/swine-castration 86

Resources • http: //www. esgpip. org/pdf/Technical%20 bulletin%20 No. %201 8. pdf • https: //www. cals. ncsu. edu/an_sci/extension/animal/news/janfe b 96/jf 963 art. html • http: //www. sdstate. edu/vs/extension/beef-castration. cfm • http: //www. ciwf. com/farm-animals/pigs/welfare-issues/toothclipping/ • http: //www. motherearthnews. com/homesteading-andlivestock/wound-management-for-farm-animalszmaz 00 djzgoe. aspx • http: //www. leawhitefarms. com/castration. htm • http: //kinne. net/latehrn 1. htm • http: //www. mayoclinic. org/diseases-conditions/inguinalhernia/basics/causes/con-20021456 87

Acknowledgements Production Coordinator Ashley Pearson Assistant Brand Manager Amy Hogan Graphic Designer Melody Rowell V. P. of Brand Management Clayton Franklin CEV Multimedia, Ltd. ©MMXVI Executive Producer Gordon W. Davis, Ph. D. 88
- Slides: 88