Nursing and communication A Pokorn Department of Nursing

 Ø")


 intervenes, as guided by the action")


")


 lower limb upper limb")


- 12 to 20 breaths per minute Ø Children")


 Mouth")
 is a")


")


- Slides: 132
Nursing and communication A. Pokorná Department of Nursing
This subject has three main parts Ø Theoretical lessons – Nursing (3 hours) Ø Theoretical lessons – Communication (4 hours) Ø Practical lessons – Practice in the hospital (2 x 4 hours)
Definition of Nursing Ø Nursing is a system of typical nursing activities concerning the individual, families or groups which assists these people to be able to take of their health and well-being.
Definition of Nursing Ø Generally, nursing aims include the maintenance and support of health, restoration of health and progressive development of self-sufficiency, alleviation of the suffering of the dying and ensuring peaceful dying and death.
Definition of Nursing Ø Nursing significantly participates in the prevention, diagnostics, therapy and rehabilitation. Ø The nurse helps the individual and groups to be able to care of their own elementary physiological, psycho-social and spiritual needs.
Definition of Nursing Ø The nurse leads the patient towards self- care and educates the people close to the patient in rendering lay medical services. For the patients who can or will not take care of themselves and/or those who do not know how to do so, the nurse renders professional nursing care.
Objectives of nursing Ø In her efforts to accomplish these objectives, the nurse works closely with the physician and other medical and professionals such as physiotherapeutists and ergotherapeutists, social workers, dietary nurses and other professionals who have already their respective professional training concepts established.
The main responsibilities of the nurse include: Ø helping the individual, the family or group, to attain physical and mental health as well as social well/being in conformity with the individual`s surroundings, Ø supporting the self/sufficiency of the man in tending for him/herself
The main responsibilities of the nurse include: Ø accomplishing prevention to disease, Ø securing the consulting services of the physician, Ø alleviating the adverse effects of the disease and forestalling complication, Ø identifying and satisfying the needs of persons suffering from medical problems, medically handicapped people and people suffering from terminal diseases
Characteristic feature of nursing Ø the nurse renders active care Ø the nursing services are rendered in the individualised fashion Ø the nursing services are based upon scientific understanding
Characteristic feature of nursing Ø the nurse view the patient in the complex fashion, as a biological psycho-social and spiritual entity Ø the nursing services are rendered by the nursing team comprising several types of professionals with different training backgrounds Ø the nursing care is preventive in its nature
A Nurse Ø carries out a lot of procedures Ø assists the doctors and other profesionals Ø assists the patients with daily living activities (bath, dressing etc. ) Ø prepares and serves meals according to the instruction Ø turns and positions the patients in bed
A Nurse Ø gives bedpan and urinal or provides incontinent care Ø assists the patients in dressing Ø takes the patient`s temperature, pulse, respiration and blood pressure (BP) Ø take samples some other biological materials Ø gives injection and medicaments
A Nurse Ø takes the patients to the X-ray Department, the Therapy Unit, the Operating Room or to some other place in the hospital Ø should keep an eye on all patients under her care all the time and notice all changes in their condition [both in physical and mental state]
A Nurse Ø is supposed to do everything possible to relieve the patient`s pain and encourage his comfort Ø helps the patients in all possible ways Ø must find time to talk to patients and the significant ones Ø ensures an appropriate patient`s environment
Nurses and their training University Bachelor or Master study of Nursing Higher nursing schools Secondary nursing schools Various other types of secondary schools Primary schools
Education of nurses in Czech republic University Higher school Secondary school (since May 2004 only health care asistant) Primary school Ph. D. M. A. B. c. 3 5 2 3 3 4 4 9
Current situation Ø Since April 2004 it has been in operation a new law about education: Future nurses can only study at higher schools and universities Ø The secondary schools organize the study for health asistent
Specialised education of nurses Ø is focused on clinical specialisations various forms of field and hospital care, management and pedagogy Ø is realized by National Centre of Nursing and Other Health Professions in Brno
Department of Internal Medicine, Geriatrics, Nursing and General Medicine The Bachelor degree Nursing Education is a new speciality since 1997 at the Medical Faculty in Brno Ø There are two kind of study of Nursing Education: 3 year full-time and 4 year part-time Ø There about 300 students altogether Ø There are 10 nursing teachers Ø Since Mai 2005 was established Department of Nursing at our University Ø
The ward unit Ø Ø Ø Ø Ø Treatment room Nurse`s office Kitchen “Clean” and “Dirty” Annex Sluice room Dining-room Store Visiting room Lavatories and Bathrooms for patients Staff cloakroom with Washbasins and Lavatories
The room for the patients Ø Ø Ø Ø Ø Maxim. three beds Dining table Chairs Bedside lamps Bedside tables Built - in wardrobe Patient-to-nurse alarm system Lavatory Wastepaper basket
Nursing care models Ø Functional nursing Ø Comprehensive nursing Ø Team nursing Ø Primary nursing
Functional nursing Ø Basing staff assignments on specific duties Ø One nurse give medications, another performs all treatments, another assesses vital sign, and all other members of the staff assists patients with personal care
Comprehensive nursing Ø The group care system – total pacient care – each nurse is assigned to care for a group of patients and provides all care for each patient in the group Ø Nurse has an opportunity to build a therapeutic nurse-patient relationship, which includes identifying psychosocial needs of a patients and planning nursing interventions to meet those needs
Team nursing Ø The assigment of group of nurses to care for a number of patients Ø The team may be made up of two levels – RNs – LPNs – or three levels – RNs and LPNs and nursing assistants
Primary nursing Ø The primary nurse system - upon admission the patient is assigned his/her primary nurse who draws up the nursing care plan for the patient and is responsible for the implementation of the plan throughout the hospitalization of the patient. The nursing care plan is draw up with the assistance of other nursing worker. When off duty, the nurse passes on the patient to the nurses of the other shift to take her patients back when reporting on duty again. During the shift, the primary nurse participates in rendering medical care to patient for whom she is not the primary nurse
Nursing documentation Ø The nursing process is recorded for every patient/client in the independent nursing documentation which forms a part of the patient’s medical documentation Ø High-quality nursing care is the basic current requirement in the field. The definition of the standard of quality of the nursing care is set forth in the nursing standards whereby also the measurable criteria for the quality of the nursing services are established. The standards can be issued in the legislation (laws, directives or methodological instructions)
Nursing process is the essential methodological framework for the implementation of the objectives of nursing. Ø Is a implementation of the objectives nursing Ø Is a systematic and profession/specific method of individualised approach to the nursing for every patient/client the hospital or in the field services which is implemented in the following five integrate steps. Ø
Nursing process Assesment of the patient Evaluating the effect of the care provider Implementing the interventions Definition of the nursing diagnosis Planning the nursing care
A nursing assessment includes Ø A physical assessment Ø The deliberate and systematic collection of data Ø A determination of an individual's current health status Ø An evaluation of his/her present and past coping pattern Ø Data verification, data organization Ø Data analysis and problem identification
Definition of nursing diagnosis Nursing Diagnosis: a statement of a present or potential patient problem that requires nursing intervention in order to be resolved or lessened. Nursing Diagnosis = Patient problem + Cause if Known
Planning Ø Ø The RN shall develop the action plan (which is an organized way of recording an individual's health needs, the nursing care goals and intervention), based on the data obtained during the assessment. The action plan shall be developed within 30 days or as determined by the RN as part of the individual's overall plan of service or follow along plan. The RN will collaborate with other members of the IDT while developing the action plan. The LPN may assist in the delegation process under the direction of the RN.
Planning includes Ø setting priorities Ø writing goals short-term long-term goals Ø planning nursing actions
Implementation Ø Ø Ø The licensed nurse (RN/LPN) intervenes, as guided by the action plan, to implement nursing actions that promote, maintain or restore health, prevent illness and effect habilitation. Intervention shall be documented in accordance with Nursing Documentation Standard (96. 3). The licensed nurse (RN/LPN) may delegate specific interventions per the approved Nursing Delegation Standard. The LPN may assist in the delegation process under the direction of the RN. Includes validating care plan, documenting care plan, giving nursing care, continuing data collection
Evaluation Ø The purpose of evaluation is to decide if the goal in the care plan has been achieved Evaluative statement = Goal Met = Goal Partially Met = Goal Not Met
Evaluation The RN evaluates the individual's response to the action plan and interventions in order to revise the data base, nursing assessment, and action plan. This evaluation shall be shared with the person's IDT. The RN shall continually evaluate and document individual's responses to interventions to identify the degree to which the expected outcomes have been achieved. Based on the evaluation, the RN shall revise the action plan as appropriate. The LPN may assist in the delegation process under the direction of the RN. Evaluations shall be performed and documented in the person's FAP/OPS: Ø Ø Ø l Annually OR, as required by regulation, OR as determined by the RN, based on the individual's needs.
Relationship between nursing prescribed interventions and physician prescribed intervention Nursing diagnoses Reposition q 2 h Lightly massage vulnerable areas Teach how to reduce pressure when sitting High risk for impaired Skin Integrity related to immobility Secondary to fatigue Physician prescribed intervention Ussually not needed
Relationship between nursing prescribed interventions and physician prescribed intervention Nursing prescribed intervention Maintian NPO state Monitor: Hydration Vital sign Intake/output Specific gravity Monitor electrolytes Maintain IV at prescribed rate Provide encourage mouth care Collaborative problems Potential Complication: Fluid and electrolyte Imbalances Physician prescribed intervention IV (type, amount) Laboratory studies
Maslow´s hierarchy of needs Self actualisation Self-esteem needs Love and belonging needs Safety and security needs Physiological needs
Assessment according the Dr. Marjory Gordon Typology of the eleven functional health patterns: 1. Health perception - Health management pattern 2. Nutritional – Metabolic pattern 3. Elimination pattern 4. Activity – exercise pattern
Assessment according the Dr. Marjory Gordon 5. Cognitive – Perceptual pattern 6. Sleep – rest pattern 7. Self perception – Self concept pattern 8. Role – Relationship pattern 9. Sexuality – Reproductive pattern 10. Coping – Stress tolerance pattern 11. Value – Belief pattern
Basic nursing skills Basic nursing procedures (washing, positioning, help with eating, excreting, moving etc. ) Ø Pain management Ø Bedsores Ø Measurements : Blood pressure Pulse Temperature EKG Injections – i. m. , s. c. , i. v. Ø
Basic nursing equipment Bedpan wash basin with soap and towel urinal
Help patients with excreting How you can give the bedpan to the patiens when is lying or sitting How you can give the bedpan to the patients when he cannot lift hipp
How to help patient with moving Helping a patients to stand
Positions in the bed Supine – dorsal position Sim´s position also using for the rectal examination and rectal treatment
Positions in the bed
Positions in the bed Fowler´s position Trendelenburgh position
Examination position Knee-chest position – used for reptal or vaginal examination Lithotomy position – using for rectal, vaginal and bladder examination
Pain management Ø Pain is best defined as an uncomfortable or unpleasant feeling that tells you something may be wrong in your body. It's one way your body sends a warning to your brain. The spinal cord and nerves serve as passageways through which pain messages travel to and from your brain and the other parts of your body. acute pain Ø Pain that occurs immediately after illness or injury and resolves after healing. Ø chronic pain Ø Pain that persists beyond the time of normal healing and can last from a few months to many years. Can result from disease, such as arthritis, or from an injury or surgery. Also can occur without a known injury or disease. Ø
Pain measurements Ø Visual scales have pictures of human anatomy to help patients explain where your pain is located. A popular visual scale — the Wong-Baker Faces Pain Rating Scale — features facial expressions to help patients show the doctor how the pain makes his/her feel. This scale is particularly useful for children, who sometimes don't have the vocabulary to explain how they feel. Ø Verbal scales contain commonly used words such as "low, " "mild" or "excruciating" to help patients describe the intensity or severity of his/her discomfort. Verbal scales are useful because the terminology is relative, and you must focus on the most characteristic quality of your pain. Ø Numerical scales help patients to quantify his/her pain using numbers, sometimes in combination with words.
The Wong-Baker Faces Pain Rating Scale Ø Face 0 is very happy because he or she doesn't hurt at all. Ø Face 1 hurts just a little bit. Ø Face 2 hurts a little more. Ø Face 3 hurts even more. Ø Face 4 hurts a whole lot. Ø Face 5 hurts as much as you can imagine, although you don't have to be crying to feel this bad.
Faces scale from Kuttner and Le. Page (1989)
A Verbal Pain Scale With a verbal scale, you can describe the degree of patients discomfort by choosing one of the vertical lines that most corresponds to the intensity of pain you are feeling. This is a good way to explain early postoperative pain, which is expected to diminish over time. You can use this scale to determine if patient recovery is progressing in a positive direction.
A Numerical Pain Scale Ø A numerical pain scale allows you to describe the intensity of patients discomfort in numbers ranging from 0 to 10 (or greater, depending on the scale). Rating the intensity of sensation is one way of helping determine treatment.
Mc. Gill Pain Questionaire
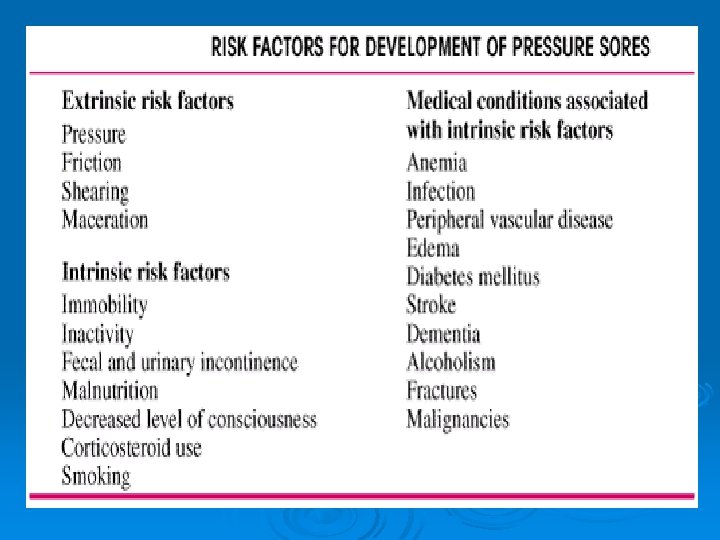
Bedsores Ø are also called decubitus ulcers, pressure ulcers, or pressure sores. These tender or inflamed patches develop when skin covering a weight-bearing part of the body is squeezed between bone and another body part, or a bed, chair, splint, or other hard object.
Bedsores Common sites in pressure ulcers
The Norton Scale Note: Scores of 14 or less rate the patient as “at risk” Name: Date: Physical Condition Mental Condition Activity Good 4 Alert 4 Ambulant 4 Full Fair 3 Apathetic 3 Walk/help 3 Poor 2 Confused 2 Bad 1 Stupor 1 Incontinence Mobility Not 4 Slightlz Limited 3 Occasional 3 Chairbound 2 Very Limited 2 Usually-urine 2 Bedridden Immobile 1 Doubly 1 1 4 Total Score
Modified Norton/Scale Risk for pressure ulcers acc. to modified Norton-Scale: low (25 - 24 points) high (18 - 14 points) medium (23 - 19 points)very high (13 - 9 points) Points 4 Points 3 Points 2 Points 1 Point Readiness for cooperatio n/ motivation full less partly none Age < 10 < 30 < 60 > 60 Condition of skin o. k. scaly, dry moist wounds, allergic laceratio ns Additional Diseases none undermine of resistance, fever, diabetes multiple scleroses, adiposis artery Physical Condition good fair poor very bad Mental Condition alert apathetic confused stupor Activity ambulant walk-help chair-bound stupor Mobility full slightly limited very limited immobile Incontinent not occasional usually urine doubly occlusio n
Stage 1 Ø The skin is intact but shows a persistent pink or red area that does not turn white when you press it with your finger. The wound may look like a mild sunburn. The affected skin may be tender, painful or itchy. It may feel warm, spongy or firm to the touch.
Stage 2 Ø The skin outer layer is broken, red and painful. Surrounding tissues may show areas of pale, red or purple discoloration. Some swelling and/or oozing may be present. The wound is no longer superficial and the ulcer is an open sore that does not extend through the full thickness of the skin.
Stage 3 Ø The skin has broken down and the wound now extends through all layers of the skin. The ulcer has become a crater involving damage or necrosis of subcutaneous tissues. The pressure ulcer has become deeper and very difficult to heal. At this stage, a large percentage of patients may require treatment of up to one year. The wound is now a primary site for a serious infection to occur.
Stage 4 Ø There is full-thickness skin loss with extension beyond the deep fascia and involvement of muscle, underlying organs, bone, and tendon or joint space. This deep open wound may show blackened tissue called eschar. The decubitus ulcer is now extremely deep, having gone through the muscle layers and now involving underlying organs and bone. Surgical removal of the necrotic or decayed tissue is often used on wounds of larger diameter. Surgery is the normal course of treatment. The wound is very serious and can produce a life threatening infection, especially if not treated aggressively.
THE PRIMARY GOAL OF DECUBITUS ULCER TREATMENT IS PREVENTION
Blood pressure What Is Blood Pressure? Blood pressure is the force of blood against the walls of arteries. Blood pressure is recorded as two numbers — the systolic pressure (as the heart beats) over the diastolic pressure (as the heart relaxes between beats). The measurement is written one above or before the other, with the systolic number on top and the diastolic number on the bottom. For example, a blood pressure measurement of 120/80 mm. Hg (millimeters of mercury) is expressed verbally as "120 over 80. „ Ø Normal blood pressure is less than 120 mm. Hg systolic and less than 80 mm. Hg diastolic. Ø Ø
Measuring blood pressure Systolic pressure: The pressure in the artery during the ventricular contraction phase of the heart cycle. The pressure in the vessel is highest at this time. Diastolic pressure: The pressure in the artery when the ventricles are relaxed. The pressure is at its lowest point, though it does not drop all the way to zero.
Measuring Blood Pressure Ø We find the blood pressure by using an instrument called a sphygmomanometer (pronounced sfig-mo-muh -NAM-eh-ter). This device consists of an inflatable cuff that is wrapped around the upper arm and a gauge that measures pressure. A stethoscope is used to listen to the different sounds that occur.
Procedure for Measuring Blood Pressure 1. You begin by inflating the cuff. Once the pressure in the cuff is above the subject's systolic pressure (140 in this example), blood cannot flow below the cuff. You will hear no sound in the brachial artery when you listen with the stethoscope. 2. As you release the pressure valve and slowly deflate the cuff, blood begins to flow through the artery. 3. When the pressure in the cuff is between the systolic and diastolic pressure, you can hear a tapping sound with each pulse. The first tapping sound you hear indicates that blood has entered the artery. Record this reading as the systolic pressure. You continue to deflate the cuff until the tapping sounds cease.
Measuring blood pressure 1. 2. 3. 4. 5. 6. 7. Wash hands and identify patient Explain procedure Position patient comfortably, either seated or lying. Position patient’s arm by supporting it on the bed or arm of chair with the palm turned upward; push sleeve up to shoulder Place cuff 2 to 3 centimetre above bend in elbow, wrap it around the arm smoothly, and secure it Clean earpiece of the stethoscope and put earpiece in your ears; place diaphragm of stethoscope over brachial artery; hold in place with one hand Close air valve and pump bulb to inflate the cuff; continue pumping until the gauge reads 180 or until you can no longer hear the pulse beat
Measuring blood pressure 8. 9. 10. 11. Ø Open air valve and allow the air to escape slowly Listen for first sound (systolic) and read the gauge as soon as the sound occurs Continue to release air; note muffled sound (or no sound, whichever comes firs) and take a second reading (diastolic) Deflate cuff completely. Repeat steps 6 to 9 if you need to recheck to obtain an accurate reading Record the blood pressure as a fraction: Systolic reading Diastolic reading Ø Ø The systolic pressure is the maximum pressure in an artery at the moment when the heart is beating and pumping blood through the body. The diastolic pressure is the lowest pressure in an artery in the moments between beats when the heart is resting.
Categories for Blood Pressure Levels in Adults legend: < means lesst han … > means greater than or equal to Blood pressure level In milimeter in mercury (mm. Hg) Category Systolic Diastolic Normal <120 and <80 Prehypertension 120 - 139 and 80 - 89 High blood pressure Stage 1 hypertension 140 - 159 or 90 - 99 Stage 2 > 160 or > 110
Blood pressure meassurements points (special) lower limb upper limb
Assesing the Pulse Equipment: Ø Watch with second hand Ø Pen and Pad Ø Stethoscope (for apical pulse only) PULSE Alternative names Heart rate; Heart beat
Assesing the Pulse 1. Place your index and middle fingers in the groove on the inside of the wrist. Just slide your fingers across the tendons until they slip into soft tissue. 2. Wait until you clearly feel beats coming with a regular rhythm. 3. Count the number of beats for 15 seconds and multiply by 4 (or for 30 seconds and multiply by 2) to get the number of beats per minute.
Assesing the Pulse Steps for radial pulse: Ø Assist patient to a seated or lying position to ensure relaxation and comfort; explain the procedure Ø Place patient’s forearm palm downward, across the chest; using the index and third fingers, locate the radial pulse Ø Exert firm but gentle pressure over the artery; pulsation will cease if pressure is the firm Ø Count pulse for 60 seconds, assess rhythm and quality Ø Record rate, rhythm and quality Ø Repeat observation if rate is under 60 or over 100, if rhythm is irregular, or if quality is abnormal
Assesing the Pulse Ø a. temporalis Ø a. radialis Ø a. carotis Ø a. poplitea Ø a. femoralis Ø a. dorsalis pedis Ø Apex cordis
a. carotis
a. carotis
a. radialis
a. radialis
a. poplitea
a. femoralis
a. dorsalis pedis
NORMAL PULSE RATE Average Beats per Minute Ø The Unborn Child 140 to 150 Ø Newborn Infants 130 to 140 Ø During first year 110 to 130 Ø During second year 96 to 115 Ø During third year 86 to 105 Ø 7 th to 14 year 76 to 90 Ø 14 th to 21 st year 76 to 85 Ø 21 st to 60 th year 70 to 75 Ø After 60 th year 67 to 80 Ø Ø Ø Notes: Pulse rates rise normally during excitement, following physical exertion and during digestion. The pulse rate is generally more rapid in females. The pulse rate is also influenced by the breathing rate. Variation of one degree of temperature above 98 F. is approximately equivalent to a rise of 10 beats in pulse
Assesing respirations Ø Equipment Watch with second hand - Pen and pad -
Assesing respirations 1. 2. 3. 4. 5. 6. 7. Wash your hands If patient is lying in bed, fold arm across the chest allow respirations to be felt as well as seen. If patient is in a chaire, observe respirations visually Keep fingers on patient´s wrist, as if counting pulse. Count respiratory rate for 30 second and multiply by 2, if respiration is irregular, count 60 seconds Observe character of respirations Record rate, record character is there any significant deviation from normal. Report adult rate under 8 or over 40 to the appropriate person
Normal respirations rate Ø Adult (normal)- 12 to 20 breaths per minute Ø Children - age 1 to 8 years 15 to 30 Ø Infants - age 1 to 12 months 25 to 50 Ø Neonates - age 1 to 28 days 40 to 60
Temperature You can measure the temperature on three body locations: Ø Mouth - This method is not recommended for children younger than 5 years old. Ø Rectum - by the rectum Ø Armpit - axillary method, under the armpit Ø Ear - tympanic method, in the ear
Mouth Temperature Ø place thermometer under the tongue and close the mouth using the lips to hold thermometer tightly. The patient must breathe through the nose. Leave thermometer in the mouth for 3 minutes. The oral temperature is usually about 1/2 to 1 degree higher axillary.
Rectal Temperature Ø for this method, use a rectal thermometer. This method is for infants and small children who are not able to hold a thermometer safely in their mouths. Lubricate the bulb of thermometer with petroleum jelly. Place the small child face down on a flat surface or lap. Spread the buttocks and insert the bulb end of thermometer about 1/2 to 1 inch into the anal canal. Remove thermometer after 3 minutes. The rectal temperature is usually about 1/2 to 1 degree higher than the oral
Armpitt – Axillary Temperature Ø place thermometer in the armpit, with the arm pressed against the body for 5 minutes before reading. This is the least accurate method for using a glass thermometer. The axillary temperature is usually about 1/2 to 1 degree below oral
Temperature measurement
Thermometers
Normal Values Ø The normal temperature varies by person, age, time of day, and where on the body the temperature was taken. The average normal body temperature is 98. 6°F (37°C). Ø Your body temperature is usually highest in the evening. It can be raised by physical activity, strong emotion, eating, heavy clothing, medications, high room temperature, and high humidity. Ø Daily variations change as children get older: In children younger than six months of age, the daily variation is small. Ø In children 6 months to 2 years old, the daily variation is about 1 degree. Ø By age six, daily variations gradually increase to 2 degrees per day. Ø Body temperature varies less in adults. However, a woman's menstrual cycle can elevate temperature by one degree or more. Ø
Normal temperature range Rectum 36. 6°C to 38°C (97. 9°F to 100. 4°F) Mouth 35. 5°C to 37. 5°C (95. 9°F to 99. 5°F) Armpit 34. 7°C to 37. 3°C (94. 5°F to 99. 1°F) Ear 35. 8°C to 38°C (96. 4°F to 100. 4°F)
ECG Ø An electrocardiogram (ECG or EKG, abbreviated from the German Elektrokardiogramm) is a graphic produced by an electrocardiograph, which records the electrical voltage in the heart in the form of a continuous strip graph. It is the prime tool in cardiac electrophysiology, and has a prime function in screening and diagnosis of cardiovascular diseases.
ECG Ø The flow of positive electrical charges can be measured and tracked with strategically placed electrodes attached to the surface of the skin. There at least 12 different lead pairs or positions for measurement on the body's surface: six limb leads; I, III, a. VR, a. VF and a. VL, and six chest leads; V 1 - V 6.
Six limb leads
Six limb leads Ø Lead I consists of a positive electrode attached to the left arm or shoulder and a negative on the right arm or shoulder. A wave of depolarization on the heart that advances toward the positive lead causes a positive deflection on the ECG strip.
Six limb leads Ø Lead II has its positive electrode at the left leg or lower left chest and its negative electrode at the right arm or shoulder. This pair is more in line with the long axis of the heart, thus the upward deflections are greater than in Lead I.
Six limb leads Ø Lead III has its positive electrode at the lower left leg or lower left chest and the negative electrode at the upper left arm or shoulder.
Six chest leads Ø Ø Ø LOCATION OF CHEST ELECTRODES IN 4 TH AND 5 TH INTERCOSTAL SPACES: V 1: right 4 th intercostal space V 2: left 4 th intercostal space V 3: halfway between V 2 and V 4: left 5 th intercostal space, mid-clavicular line V 5: horizontal to V 4, anterior axillary line V 6: horizontal to V 5, midaxillary line
Six chest leads
The normal ECG Ø A typical ECG tracing of a normal heartbeat consists of a P wave, a QRS complex and a T wave. A small U wave is not normally visible.
Electrocardiogram
Injections – general rules Ø Ø Ø Expiry dates l Check the expiry dates of each item including the drug. Drug l Make sure that the vial or ampoule contains the right drug in the right strength. Sterility l During the whole preparation procedure, material should be kept sterile. l Wash your hands before starting to prepare the injection. l Disinfect the skin over the injection site. No bubbles l Make sure that there are no air bubbles left in the syringe. l This is more important in intravenous injections. Prudence l Once the protective cover of the needle is removed extra care is needed. l Do not touch anything with the unprotected needle. l Once the injection has been given take care not to prick yourself or somebody else. Waste l Make sure that contaminated waste is disposed of safely.
Intramuscular injections Ø Intramuscular means within the muscle tissue Ø Most solutions to be administered by injection are introduced into the muscle to allow for better absorption
Intramuscular injections Ø Ø Ø Deltoid site Locate the lower edge of the acromial process. Insert the needle 1" to 2" below the acromial process at a 90 -degree angle. Only 1 ml or less should be injected into the deltoid This side may be more painful to the patient
Intramuscular injections Dorsogluteal site Ø Draw an imaginary line from the posterior superior iliac spine to the greater trochanter. Ø Insert the needle at a 90 degree angle above and outside the drawn line. Ø You can administer a Z-track injection through this site. After drawing up the drug, change the needle, displace the skin lateral to the injection site, withdraw the needle, and then release the skin. Ø
Intramuscular injections Ø Ø Ventrogluteal site With the palm of your hand, locate the greater trochanter of the femur. Spread your index and middle fingers posteriorly from the anterior superior iliac spine to the furthest area possible. This is the correct injection site. Remove your fingers and insert the needle at a 90 degree angle
Intramuscular injections Vastus lateralis and rectus femoris sites Ø Find the lateral quadriceps muscle for the vastus lateralis, or the anterior thigh for the rectus femoris. Ø Insert the needle at a 90 degree angle into the middle third of the muscle, parallel to the skin surface Ø
i. m. injections technique Ø Ø Ø Ø Technique Wash your hands. Reassure yourself / patient's for procedure. Uncover the area to be injected (lateral upper quadrant major gluteal muscle, lateral side of upper leg, deltoid muscle). Disinfect the skin. Relax the muscle. Insert the needle swiftly at an angle of 90 degrees (watch depth!). Aspirate briefly; if blood appears, withdraw needle. Replace it with a new one, if possible, and start again from point 4. Inject slowly (less painful). Withdraw needle swiftly. Press sterile cotton wool onto the opening. Fix with adhesive tape. Check yourself / patient's reaction and give additional reassurance, if necessary. Clean up; dispose of waste safely; wash your hands.
Z – track technique A Zig – zag method of injecting a medication is used if the medication is irritating to tissues or capable of staining tissue if a drop leaks as the needle is withdrawn Ø Skin at the injection site is pulled laterally before the needle is inserted Ø After the needle is withdrawn the skin returns to its normal position, thereby sealing the path of the needle Ø The gluteus maximus is the site of choice for Z-track, because this large muscle can absorb an irritating solution more easily than a smaller can Ø
Z track technique
Z – track technique Ø Prevents leakage of drug to surface skin (Campbell 1995) Ø Drag skin to one side with finger as shown Ø Inject as normal deep IM Ø Remove needle Ø Allow skin to return to normal state Ø Leaves an indirect line, prevents leak Ø Reduces pain of IM inj
Subcutaneous injections S. C. drugs can be injected into the fat pads on the abdomen, buttocks, upper back, and lateral upper arms and thighs (shaded in the illustrations below). If your patient requires frequent S. C. injections, make sure to rotate injection sites. Ø Gently gather and elevate or spread S. C. tissue. Ø Insert the needle at a 45 - or 90 -degree angle, depending on the drug or the amount of S. C. tissue at the site. Ø
Subcutaneous injections
i. v. injections Ø I. V. drugs can be injected into the veins of the arms and hands. The illustration at below shows commonly used sites. Ø Locate the vein using a tourniquet. Ø Insert the catheter at a slight angle (about 10 degrees). Ø Release the tourniquet when blood appears in the syringe or tubing. Ø Slowly inject the drug into the vein
i. v. injections
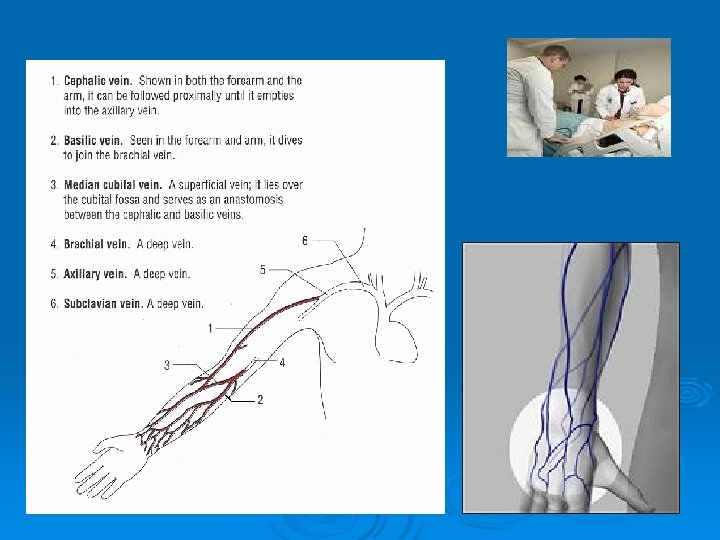
Blood collection Ø Venipuncture is the collection of blood from a vein. As a general rule, arm veins are the best source from which to obtain blood. It may become necessary to use hand or foot veins when the arms are bandaged or have been punctured repeatedly and are sore.
Venipuncture Site Selection Ø Choosing an appropriate site for venipuncture is crucial to the success of the procedure. Veins most often considered for use during venipuncture include the medial cubital vein, cephalic vein, and basilic vein.
Phlebotomy 1 Venipuncture 1 Selecting/organizing the needed supplies/equipment Needle and needle holder Vacutainer® tubes--The tests needed will determine what tubes will need to be selected Ø Tourniquet Ø Gloves Ø Alcohol prep pad, gauze and bandage Ø Ø
Phlebotomy 2 Venipuncture 2 Ø Tourniquet Application Apply the tourniquet about midway between the elbow and shoulder and have the patient make a fist Ø The tourniquet must be applied with enough tension to compress the vein Ø Tie the tourniquet so that one end is hanging, so that end may be pulled when it is time to release the tourniquet Ø
Phlebotomy 3 Venipuncture 3 Position the patients arm so that the phlebotomist may select a suitable vein. Once the vein has been selected, clean the area with an alcohol prep pad and allow the site to air dry. Note: The vein will feel like an elastic tube that "gives" under the pressure of your finger
Phlebotomy 4 Venipuncture 4 Ø Ø Ø Performing the venipuncture Attach sterile needle to needle holder and place the tube inside the holder With the other hand, fix the vein in place Introduce the needle into the vein with the bevel up and at about a 15 degree angle with the skin. Puncture the skin with a clean, smooth motion. When the needle is in the vein, push the Vacutainer® tube onto the retractable sheath. This will allow the blood to flow into the tube. After all tubes have been collected, release the tourniquet FIRST, then withdraw the needle from the vein. Using gauze, apply pressure to the site to stop the bleeding. Cover site with a bandage.
Blood collection We can use: Ø not only venous blood, but capillary blood also Ø standard syringe and needle, or special test tubes – SARSTEDT, VACUTAINER Ø
SARSTEDT test tubes
Thank you for your attention