NEW SMALL WHEEL DESIGN DESCRIPTION OF THE DESIGN


![WEIGHTS TABLE Current Small Wheel + Current JD [kg] New Small Wheel + New WEIGHTS TABLE Current Small Wheel + Current JD [kg] New Small Wheel + New](https://slidetodoc.com/presentation_image_h2/a0e7ed0df06c33c7bdfa408eb84b33c0/image-31.jpg)

- Slides: 36

NEW SMALL WHEEL DESIGN DESCRIPTION OF THE DESIGN AND REASONS BEHIND THE CHOICES Pictures and sketches: Courtesy of Tatiana Klioutchnikova and Giancarlo Spigo 02 -Dec-2014 M. Ciapetti – G. Spigo

New Small Wheel The increased energy foreseen for Run 2, and the increased luminosity foreseen for Run 3 (well above the project luminosity) are not compatible with the actual Small Wheel muon detectors. For this reason a New Small Wheel (NSW) detector will replace the current Small Wheel starting from Run 3. This means the installation on both sides must be completed during LS 2 (2018 -2019). The NSW will have a similar shape and approximately the same location (between the ECT and the ECC) compare to the actual one, but it will be very different in the conceptual design due to different constraints. The major constraints are the following: 02 -Dec-2014 NSW design 2

Constraints 02 -Dec-2014 a) The sectors (MM and s. TGC wedges) are thicker than the current EIL/EIS chambers and their overall load is more than threefold higher (around 160 k. N or more). b) Muon detector composed of full monolithic sectors (increased bending moment and, therefore, deformation due to the concentrated loads transmitted by the sector KM supports to the NSW mechanical structure) c) Two azimuthal sets of alignment bars (16 in total) d) The manipulation of the JD-NSW must be made with only a 140 -t crane e) No overlapping coverage degradation (very tight spaces for sector insertion) f) Reduced longitudinal envelope than today (55 mm space sold to LAr) f) The complete NSW (mechanical structure, alignment bars and Sectors) must be assembled and solidly linked to the JD shielding on surface (building 191) and the whole complete assembly lowered down in the cavern as today. NSW design 3

Why a New JD? In the last several months, it has been concluded that merging both JD and NSW structures could be the remedy for the majority of the conflicting issues: 1. The structure results more compact to fulfill envelope needs 2. It is lighter for a better manipulation 3. It is more rigid to limit the deformations due to the increase of sector weight and bending due to more concentrated sector loads During last design review (05/09/2014) it has been presented the New JD which has been conceived in such a way that it becomes part of the structure. The NSW is permanently attached to the New JD surface and the feet (sustaining the whole assembly) are integrated in the NSW mechanical structure, so that the stress is shared between the two objects. 02 -Dec-2014 NSW design 4

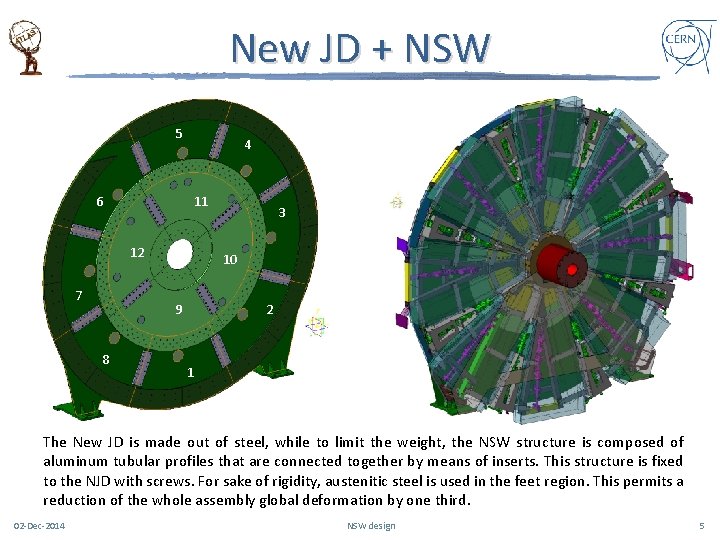
New JD + NSW 5 4 11 6 12 7 10 2 9 8 3 1 The New JD is made out of steel, while to limit the weight, the NSW structure is composed of aluminum tubular profiles that are connected together by means of inserts. This structure is fixed to the NJD with screws. For sake of rigidity, austenitic steel is used in the feet region. This permits a reduction of the whole assembly global deformation by one third. 02 -Dec-2014 NSW design 5

What else need to be done? The NSW project started several years ago. Lots of things have been done so far, but many others need to be studied and designed. For the moment the people involved have been: Giancarlo, Marco, Julien, Tatiana and Jamie In the near future, most of the ATLAS Project Office will be involved into this project: Raphael, Michel, Aimilianos, Alexandre, Vit, Augusto, Fred, Cedric, Gevorg, Tomasz A reductive and not exhaustive list of the things that still have to be done is the following 02 -Dec-2014 NSW design 6

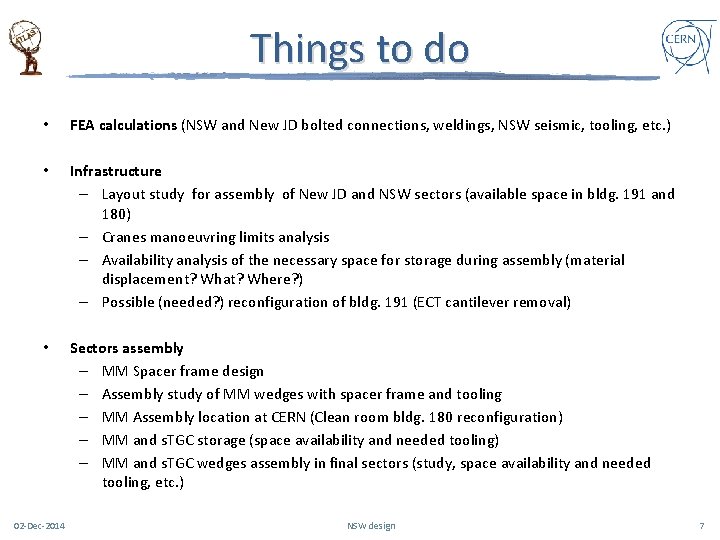
Things to do • FEA calculations (NSW and New JD bolted connections, weldings, NSW seismic, tooling, etc. ) • Infrastructure – Layout study for assembly of New JD and NSW sectors (available space in bldg. 191 and 180) – Cranes manoeuvring limits analysis – Availability analysis of the necessary space for storage during assembly (material displacement? What? Where? ) – Possible (needed? ) reconfiguration of bldg. 191 (ECT cantilever removal) • Sectors assembly – MM Spacer frame design – Assembly study of MM wedges with spacer frame and tooling – MM Assembly location at CERN (Clean room bldg. 180 reconfiguration) – MM and s. TGC storage (space availability and needed tooling) – MM and s. TGC wedges assembly in final sectors (study, space availability and needed tooling, etc. ) 02 -Dec-2014 NSW design 7

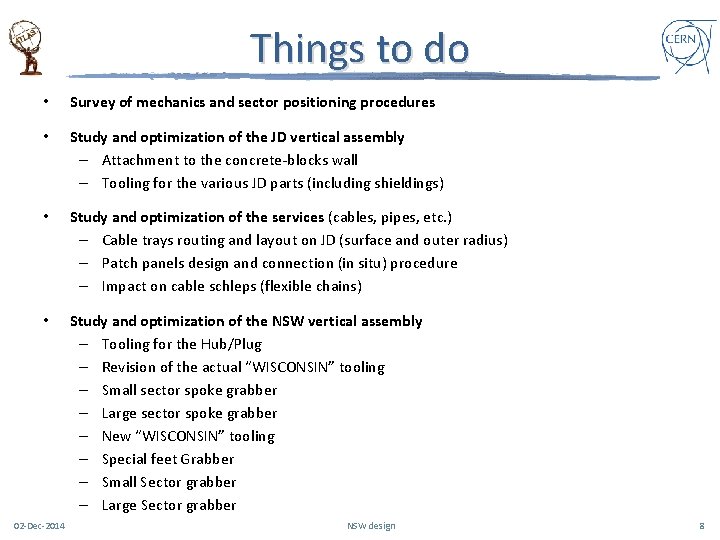
Things to do • Survey of mechanics and sector positioning procedures • Study and optimization of the JD vertical assembly – Attachment to the concrete-blocks wall – Tooling for the various JD parts (including shieldings) • Study and optimization of the services (cables, pipes, etc. ) – Cable trays routing and layout on JD (surface and outer radius) – Patch panels design and connection (in situ) procedure – Impact on cable schleps (flexible chains) • Study and optimization of the NSW vertical assembly – Tooling for the Hub/Plug – Revision of the actual “WISCONSIN” tooling – Small sector spoke grabber – Large sector spoke grabber – New “WISCONSIN” tooling – Special feet Grabber – Small Sector grabber – Large Sector grabber 02 -Dec-2014 NSW design 8

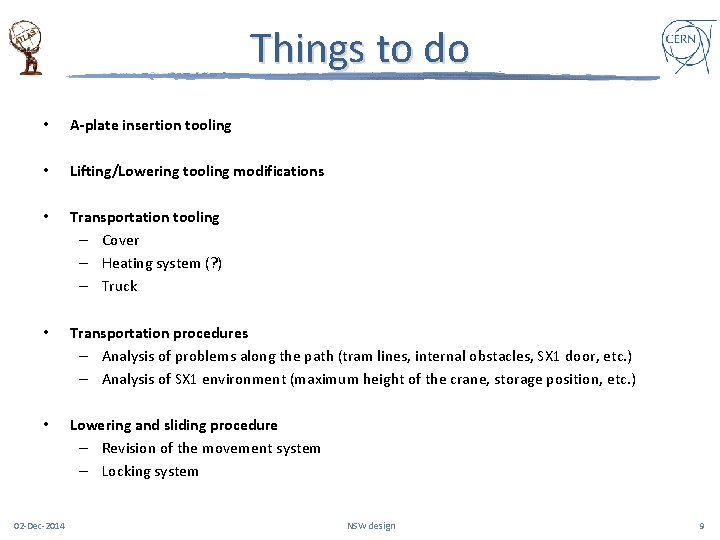
Things to do • A-plate insertion tooling • Lifting/Lowering tooling modifications • Transportation tooling – Cover – Heating system (? ) – Truck • Transportation procedures – Analysis of problems along the path (tram lines, internal obstacles, SX 1 door, etc. ) – Analysis of SX 1 environment (maximum height of the crane, storage position, etc. ) • Lowering and sliding procedure – Revision of the movement system – Locking system 02 -Dec-2014 NSW design 9

BACK-UP SLIDES 02 -Dec-2014 NSW design 10

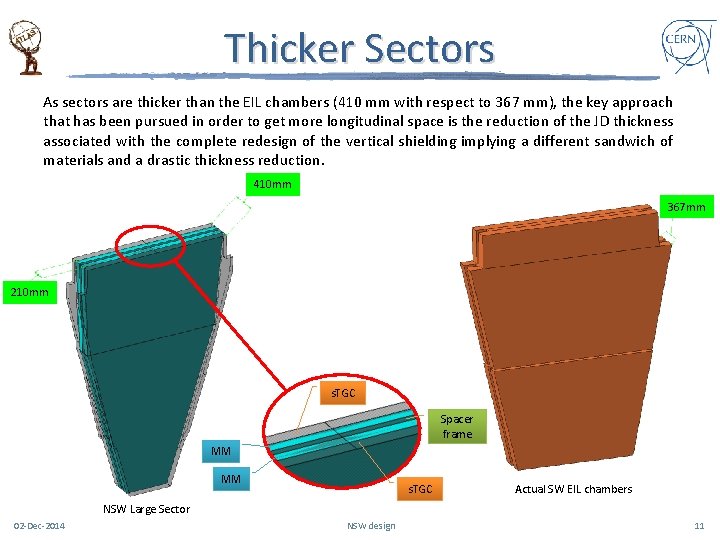
Thicker Sectors As sectors are thicker than the EIL chambers (410 mm with respect to 367 mm), the key approach that has been pursued in order to get more longitudinal space is the reduction of the JD thickness associated with the complete redesign of the vertical shielding implying a different sandwich of materials and a drastic thickness reduction. 410 mm 367 mm 210 mm s. TGC Spacer frame MM MM s. TGC Actual SW EIL chambers NSW Large Sector 02 -Dec-2014 NSW design 11

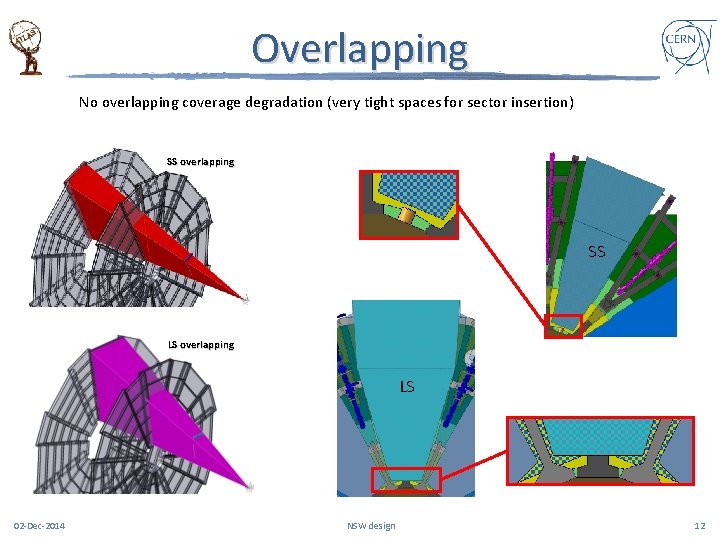
Overlapping No overlapping coverage degradation (very tight spaces for sector insertion) SS overlapping SS LS overlapping LS 02 -Dec-2014 NSW design 12

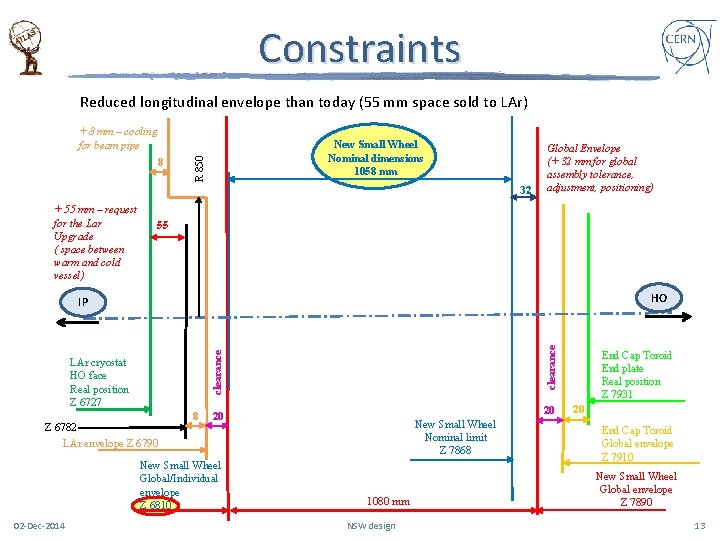
Constraints Reduced longitudinal envelope than today (55 mm space sold to LAr) + 8 mm – cooling for beam pipe R 850 8 New Small Wheel Nominal dimensions 1058 mm 32 + 55 mm – request for the Lar Upgrade ( space between warm and cold vessel) Global Envelope (+ 32 mm for global assembly tolerance, adjustment, positioning) 55 HO clearance LAr cryostat HO face Real position Z 6727 Z 6782 LAr envelope Z 6790 8 20 20 New Small Wheel Global/Individual envelope Z 6810 02 -Dec-2014 clearance IP New Small Wheel Nominal limit Z 7868 1080 mm NSW design End Cap Toroid End plate Real position Z 7931 20 End Cap Toroid Global envelope Z 7910 New Small Wheel Global envelope Z 7890 13

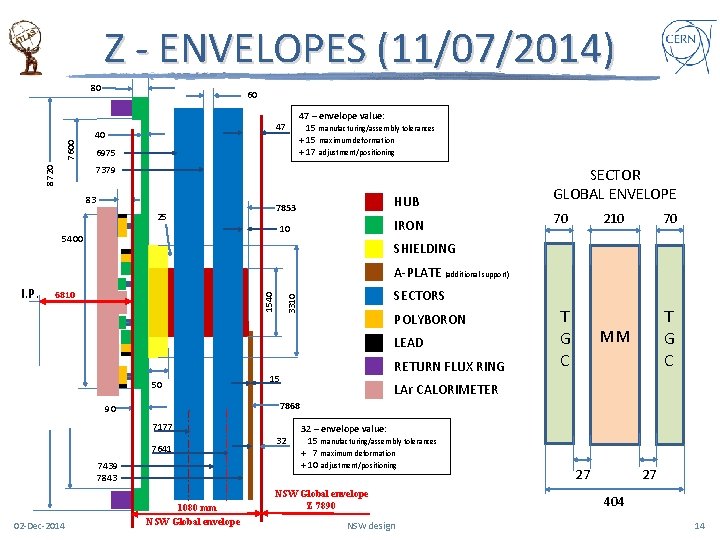
Z - ENVELOPES (11/07/2014) 7600 80 60 47 40 6975 47 – envelope value: 15 manufacturing/assembly tolerances + 15 maximum deformation + 17 adjustment/positioning 8720 7379 83 25 7853 HUB 10 IRON 5400 SECTOR GLOBAL ENVELOPE 70 210 70 MM T G C SHIELDING A-PLATE (additional support) 6810 SECTORS 3310 1540 I. P. POLYBORON LEAD 50 RETURN FLUX RING 15 LAr CALORIMETER 7868 90 7177 7641 7439 7843 02 -Dec-2014 T G C 1080 mm NSW Global envelope 32 32 – envelope value: 15 manufacturing/assembly tolerances + 7 maximum deformation + 10 adjustment/positioning NSW Global envelope Z 7890 NSW design 27 27 404 14

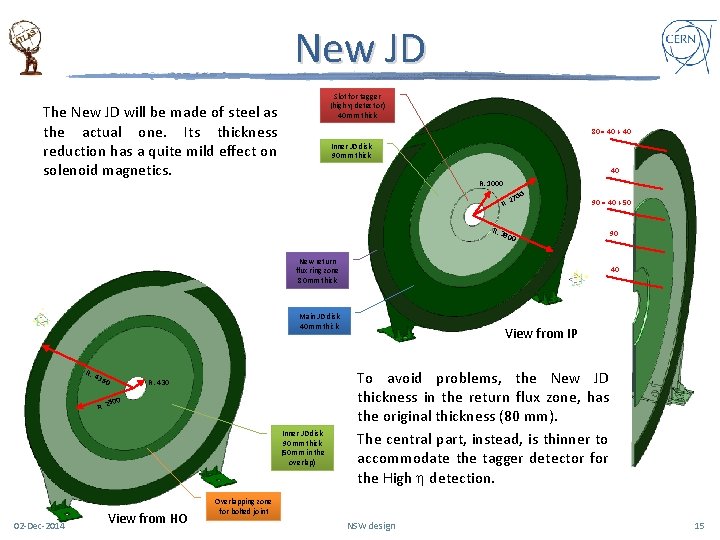
New JD Slot for tagger (high h detector) 40 mm thick The New JD will be made of steel as the actual one. Its thickness reduction has a quite mild effect on solenoid magnetics. 80 = 40 + 40 Inner JD disk 90 mm thick 40 R. 1000 R. 00 27 90 = 40 + 50 R. 3 800 New return flux ring zone 80 mm thick 40 Main JD disk 40 mm thick R. 436 0 R. 430 300 R. 2 Inner JD disk 90 mm thick (50 mm in the overlap) 02 -Dec-2014 View from HO 90 View from IP To avoid problems, the New JD thickness in the return flux zone, has the original thickness (80 mm). The central part, instead, is thinner to accommodate the tagger detector for the High h detection. Overlapping zone for bolted joint NSW design 15

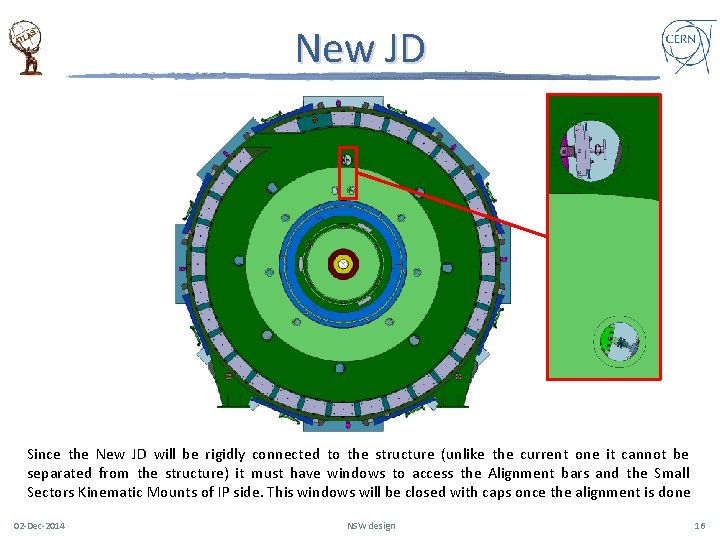
New JD Since the New JD will be rigidly connected to the structure (unlike the current one it cannot be separated from the structure) it must have windows to access the Alignment bars and the Small Sectors Kinematic Mounts of IP side. This windows will be closed with caps once the alignment is done 02 -Dec-2014 NSW design 16

New JD Vertical assembly 12 Parts design 02 -Dec-2014 NSW design 17

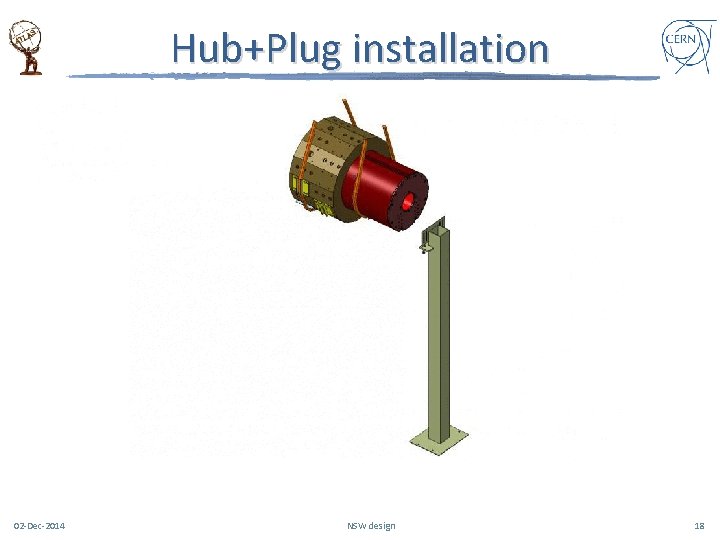
Hub+Plug installation 02 -Dec-2014 NSW design 18

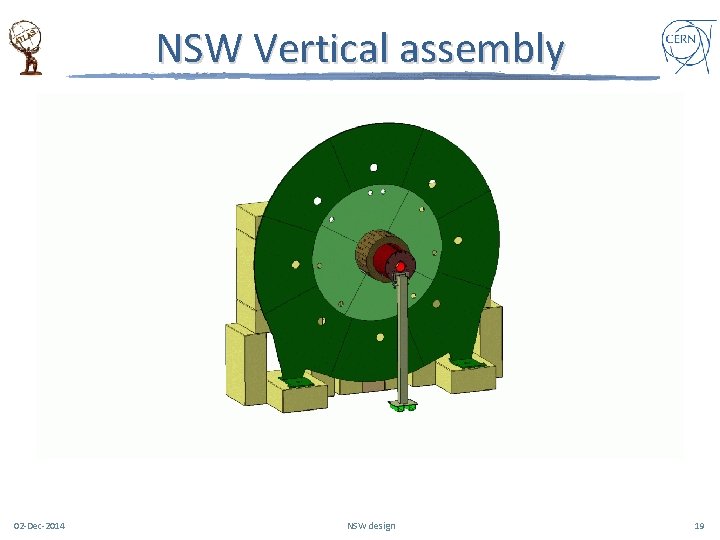
NSW Vertical assembly 02 -Dec-2014 NSW design 19

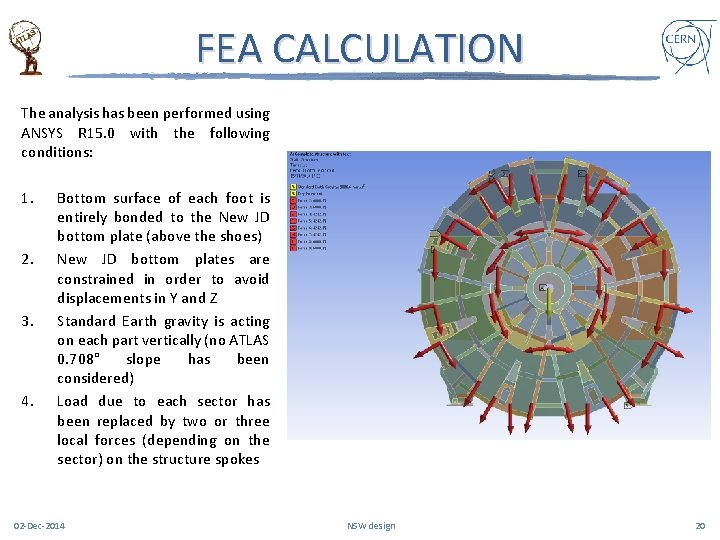
FEA CALCULATION The analysis has been performed using ANSYS R 15. 0 with the following conditions: 1. 2. 3. 4. Bottom surface of each foot is entirely bonded to the New JD bottom plate (above the shoes) New JD bottom plates are constrained in order to avoid displacements in Y and Z Standard Earth gravity is acting on each part vertically (no ATLAS 0. 708° slope has been considered) Load due to each sector has been replaced by two or three local forces (depending on the sector) on the structure spokes 02 -Dec-2014 NSW design 20

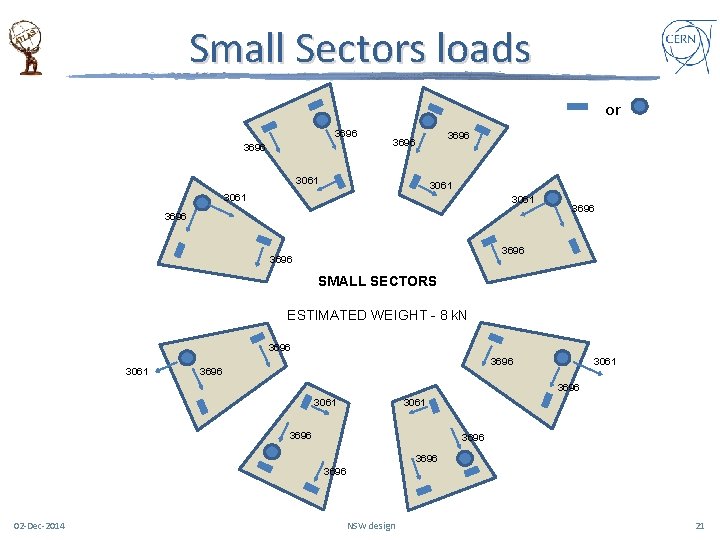
Small Sectors loads or 3696 3061 3696 SMALL SECTORS ESTIMATED WEIGHT - 8 k. N 3696 3061 3696 02 -Dec-2014 NSW design 21

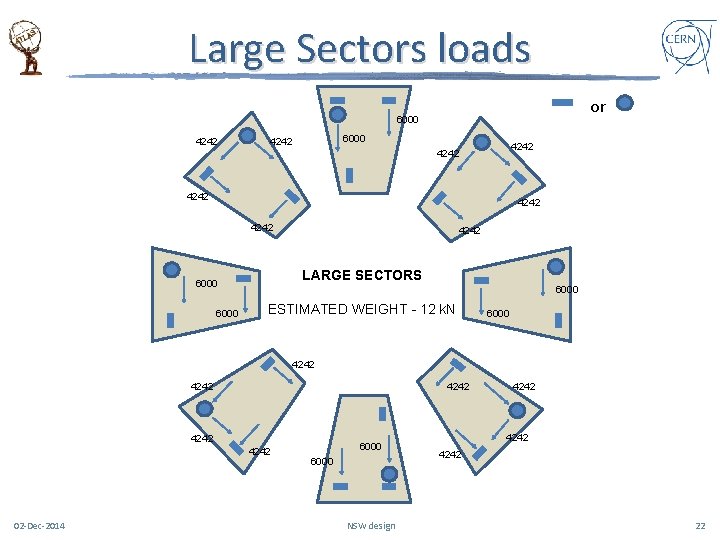
Large Sectors loads or 6000 4242 4242 LARGE SECTORS 6000 4242 6000 ESTIMATED WEIGHT - 12 k. N 6000 4242 4242 02 -Dec-2014 6000 NSW design 4242 22

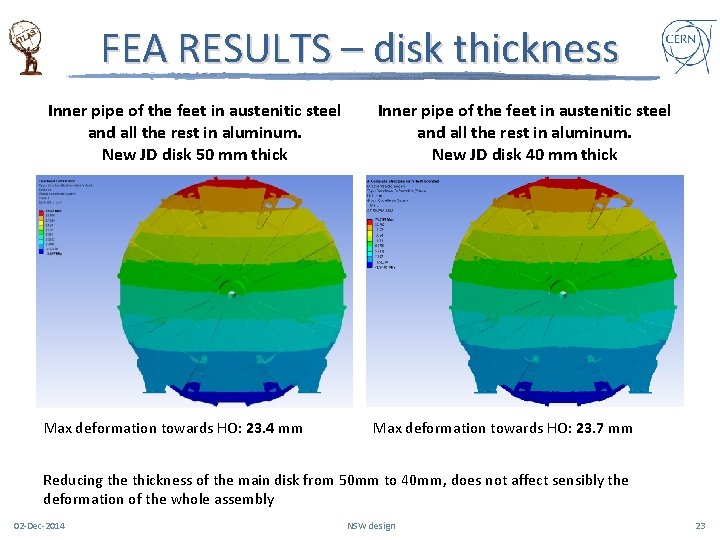
FEA RESULTS – disk thickness Inner pipe of the feet in austenitic steel and all the rest in aluminum. New JD disk 50 mm thick Inner pipe of the feet in austenitic steel and all the rest in aluminum. New JD disk 40 mm thick Max deformation towards HO: 23. 4 mm Max deformation towards HO: 23. 7 mm Reducing the thickness of the main disk from 50 mm to 40 mm, does not affect sensibly the deformation of the whole assembly 02 -Dec-2014 NSW design 23

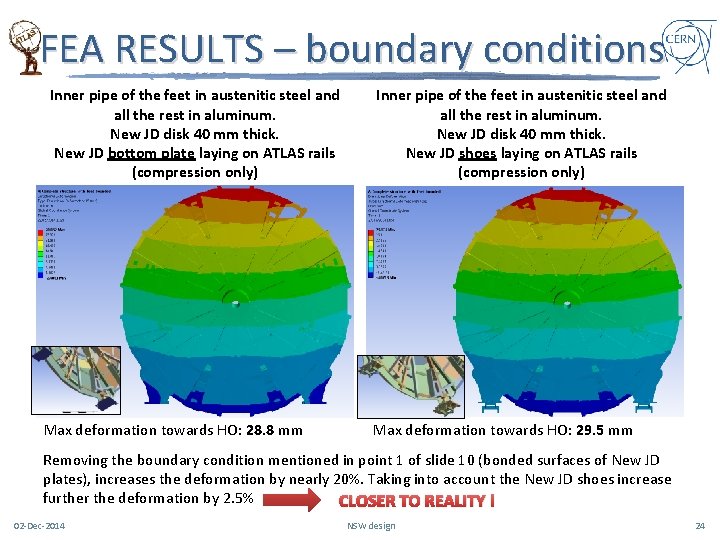
FEA RESULTS – boundary conditions Inner pipe of the feet in austenitic steel and all the rest in aluminum. New JD disk 40 mm thick. New JD bottom plate laying on ATLAS rails (compression only) Max deformation towards HO: 28. 8 mm Inner pipe of the feet in austenitic steel and all the rest in aluminum. New JD disk 40 mm thick. New JD shoes laying on ATLAS rails (compression only) Max deformation towards HO: 29. 5 mm Removing the boundary condition mentioned in point 1 of slide 10 (bonded surfaces of New JD plates), increases the deformation by nearly 20%. Taking into account the New JD shoes increase further the deformation by 2. 5% CLOSER TO REALITY ! 02 -Dec-2014 NSW design 24

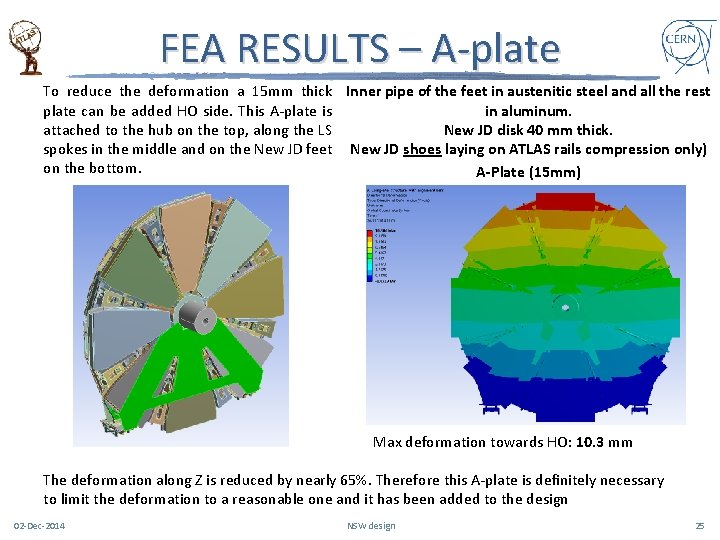
FEA RESULTS – A-plate To reduce the deformation a 15 mm thick Inner pipe of the feet in austenitic steel and all the rest plate can be added HO side. This A-plate is in aluminum. attached to the hub on the top, along the LS New JD disk 40 mm thick. spokes in the middle and on the New JD feet New JD shoes laying on ATLAS rails compression only) on the bottom. A-Plate (15 mm) Max deformation towards HO: 10. 3 mm The deformation along Z is reduced by nearly 65%. Therefore this A-plate is definitely necessary to limit the deformation to a reasonable one and it has been added to the design 02 -Dec-2014 NSW design 25

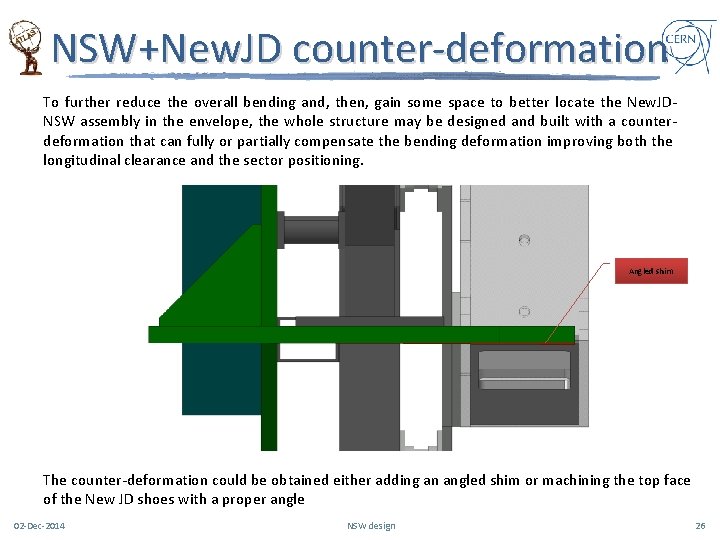
NSW+New. JD counter-deformation To further reduce the overall bending and, then, gain some space to better locate the New. JDNSW assembly in the envelope, the whole structure may be designed and built with a counterdeformation that can fully or partially compensate the bending deformation improving both the longitudinal clearance and the sector positioning. Angled shim The counter-deformation could be obtained either adding an angled shim or machining the top face of the New JD shoes with a proper angle 02 -Dec-2014 NSW design 26

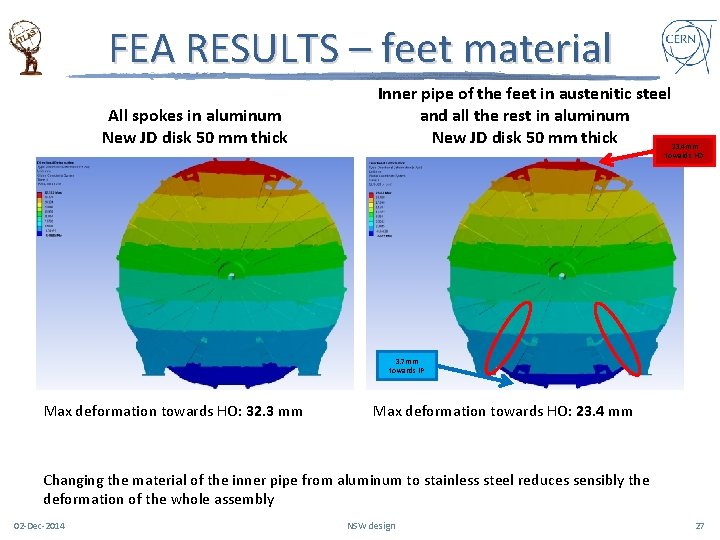
FEA RESULTS – feet material All spokes in aluminum New JD disk 50 mm thick Inner pipe of the feet in austenitic steel and all the rest in aluminum New JD disk 50 mm thick 23. 4 mm towards HO 3. 7 mm towards IP Max deformation towards HO: 32. 3 mm Max deformation towards HO: 23. 4 mm Changing the material of the inner pipe from aluminum to stainless steel reduces sensibly the deformation of the whole assembly 02 -Dec-2014 NSW design 27

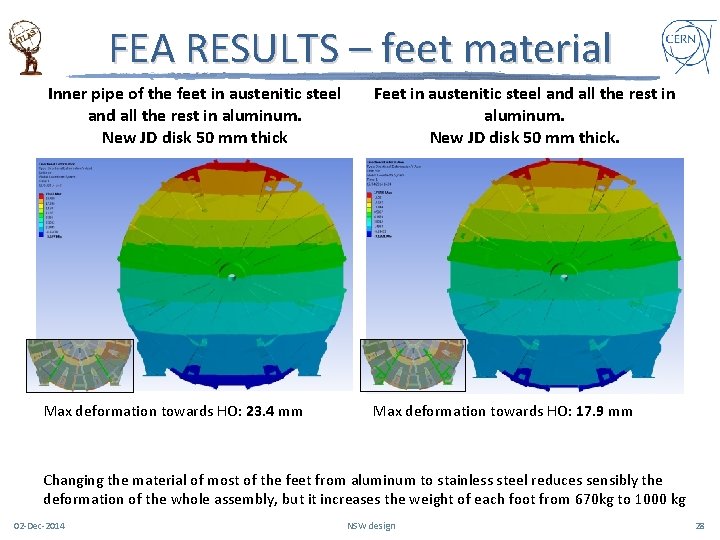
FEA RESULTS – feet material Inner pipe of the feet in austenitic steel and all the rest in aluminum. New JD disk 50 mm thick Feet in austenitic steel and all the rest in aluminum. New JD disk 50 mm thick. Max deformation towards HO: 23. 4 mm Max deformation towards HO: 17. 9 mm Changing the material of most of the feet from aluminum to stainless steel reduces sensibly the deformation of the whole assembly, but it increases the weight of each foot from 670 kg to 1000 kg 02 -Dec-2014 NSW design 28

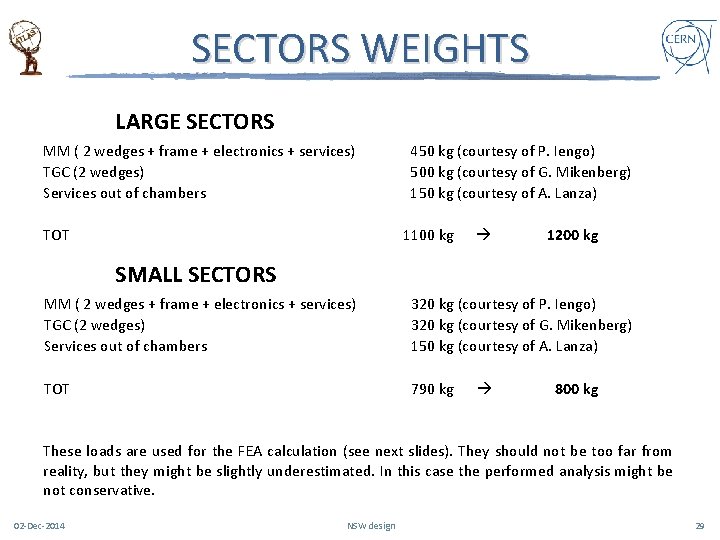
SECTORS WEIGHTS LARGE SECTORS MM ( 2 wedges + frame + electronics + services) TGC (2 wedges) Services out of chambers TOT 450 kg (courtesy of P. Iengo) 500 kg (courtesy of G. Mikenberg) 150 kg (courtesy of A. Lanza) 1100 kg 1200 kg SMALL SECTORS MM ( 2 wedges + frame + electronics + services) TGC (2 wedges) Services out of chambers 320 kg (courtesy of P. Iengo) 320 kg (courtesy of G. Mikenberg) 150 kg (courtesy of A. Lanza) TOT 790 kg 800 kg These loads are used for the FEA calculation (see next slides). They should not be too far from reality, but they might be slightly underestimated. In this case the performed analysis might be not conservative. 02 -Dec-2014 NSW design 29

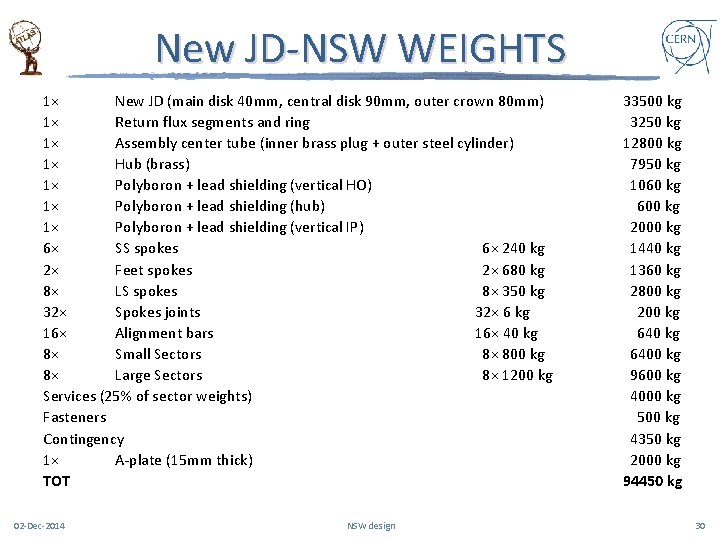
New JD-NSW WEIGHTS 1× New JD (main disk 40 mm, central disk 90 mm, outer crown 80 mm) 1× Return flux segments and ring 1× Assembly center tube (inner brass plug + outer steel cylinder) 1× Hub (brass) 1× Polyboron + lead shielding (vertical HO) 1× Polyboron + lead shielding (hub) 1× Polyboron + lead shielding (vertical IP) 6× SS spokes 6× 240 kg 2× Feet spokes 2× 680 kg 8× LS spokes 8× 350 kg 32× Spokes joints 32× 6 kg 16× Alignment bars 16× 40 kg 8× Small Sectors 8× 800 kg 8× Large Sectors 8× 1200 kg Services (25% of sector weights) Fasteners Contingency 1× A-plate (15 mm thick) TOT 02 -Dec-2014 NSW design 33500 kg 3250 kg 12800 kg 7950 kg 1060 kg 600 kg 2000 kg 1440 kg 1360 kg 2800 kg 200 kg 6400 kg 9600 kg 4000 kg 500 kg 4350 kg 2000 kg 94450 kg 30
![WEIGHTS TABLE Current Small Wheel Current JD kg New Small Wheel New WEIGHTS TABLE Current Small Wheel + Current JD [kg] New Small Wheel + New](https://slidetodoc.com/presentation_image_h2/a0e7ed0df06c33c7bdfa408eb84b33c0/image-31.jpg)
WEIGHTS TABLE Current Small Wheel + Current JD [kg] New Small Wheel + New JD [kg] Lifting beam (palonnier) (1) Lifting frame (2) Additional beams (3) Scaffolding Lifting cylinder (4) Airpads Assembly center tube (plug + nose) (5) 11200 19800 2150 900 2100 3200 14200 11200 19800 2150 900 2100 3200 12800 JD cone (6) TGCs JD disk (disk + feet + segments) (7) SW (Hub + structure + chambers) Everything else (fasteners + weldings + services + …) Crane hook and cables JD-SW (real weight measured during lifting operation) New JD (main disk 40 mm thick) Return flux segments and ring Polyboron + lead vertical shielding HO side Polyboron + lead hub shielding Polyboron + lead vertical shielding IP side (JD-Lar) Hub SS spokes Feet spokes (Inner pipe of the feet in st steel and all the rest in Al) LS spokes Spokes joints Alignment bars Small sectors Large sectors Services (25% of sector weights) Fasteners A-plate (15 mm thick) New JD-NSW estimated weight 7900 1700 56000 20000 4350 3500 Parts / Components 147000 33500 3250 1060 600 2000 7950 1440 1360 2800 200 6400 9600 4000 500 2000 Additional 1000 kg for the stiffer feet (see slide 15) 137300 As shown in the table, according to the loads estimation, the total weight of the New JD-NSW is lower than the actual JD-SW one. Furthermore a further reduction in weight is foreseen by revising the lifting tooling 02 -Dec-2014 NSW design 31

REFERENCES 1. 2. 3. 4. 5. 6. According to: ATLJD___0186 According to: ATLJD___0184 According to: ATLJD___0262 According to: ATLJD___0237 According to: ATLJD___0081 According to: ATLJD___0066, ATLJD___0067, ATLJD___0068, ATLJD___0069, ATLJD___0070, ATLJD___0071, ATLJD___0148, ATLJD___0149, ATLJD___0150 7. According to: ATLJD___0101, ATLJD___0146 02 -Dec-2014 NSW design 32

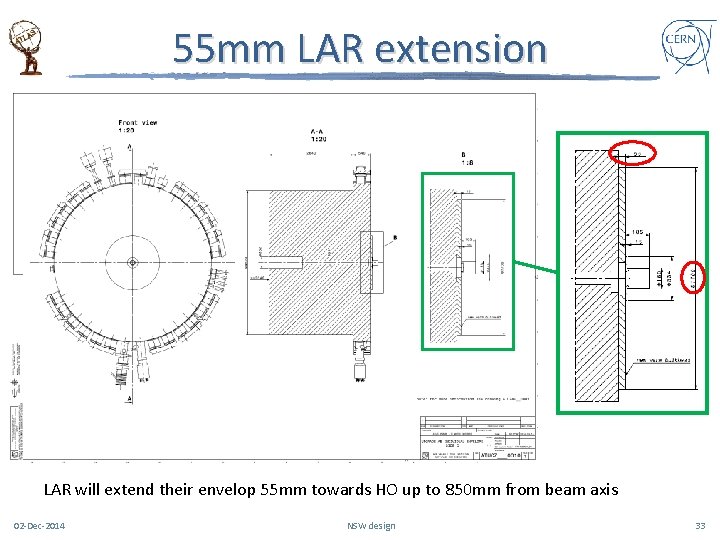
55 mm LAR extension LAR will extend their envelop 55 mm towards HO up to 850 mm from beam axis 02 -Dec-2014 NSW design 33

ENVELOPES Individual Envelope definition Nominal dimensions + manufacturing/assembly tolerances + maximum deformation Global Envelope definition Individual envelope + global assembly tolerance (when applicable**) + positioning and adjustment tolerances (to be worked out **If JD + sectors are considered as one assembly, the global assembly tolerance already taken into account in the individual envelope is not applicable. Therefore in this particular case is not applicable 02 -Dec-2014 NSW design 34

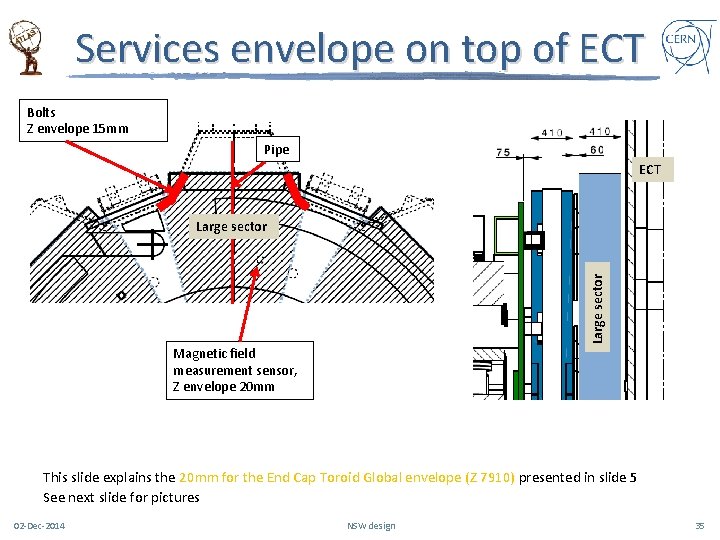
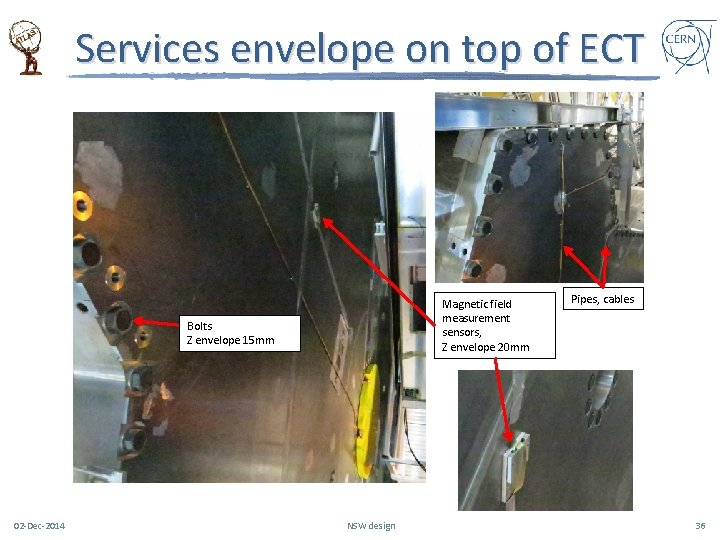
Services envelope on top of ECT Bolts Z envelope 15 mm Pipe ECT Large sector Magnetic field measurement sensor, Z envelope 20 mm This slide explains the 20 mm for the End Cap Toroid Global envelope (Z 7910) presented in slide 5 See next slide for pictures 02 -Dec-2014 NSW design 35

Services envelope on top of ECT Magnetic field measurement sensors, Z envelope 20 mm Bolts Z envelope 15 mm 02 -Dec-2014 NSW design Pipes, cables 36