Moodle 2 What is Moodle It is not


- Slides: 43
Moodle 2
What is Moodle? • It is not a Maltese Poodle Cross • Modular Object-Oriented Dynamic Learning Environment? ? • A tool to allow communication and collaboration with our classes, a Learning Management System LMS
The Pedagogy of Moodle? • How Moodle tries to support a Social Constructionist view 1. All of us are potential teachers as well as learners - in a true collaborative environment we are both 2. We learn particularly well from the act of creating or expressing something for others to see 3. We learn a lot by just observing the activity of our peers 4. By understanding the contexts of others, we can teach in a more transformational way (constructivism) 5. A learning environment needs to be flexible and adaptable, so that it can quickly respond to the needs of the participants within it source: http: //docs. moodle. org/en/Pedagogy
And now for some hands on
Open Your Own Moodle Course • Hopefully you took the time last week to login and ensure your current courses are available • Todays purpose is to have a hands on session working with one of your course – Navigation – Course Settings – Adding Resources
Navigating Moodle • The Navigation Blog allows you to move to the different sections of your moodle – My Home – My Profile – take a moment to edit your profile. – My Courses • Blocks – these display down the right. They can be minimized or docked
Course Settings • You may need to adjust the following basic settings for your course – A short course description for the student home page – Is it visible for students – Will you use a weekly layout or topic layout and how many will display • Note: the course name is created automatically from your timetable so best not to tamper
Course Settings • One the right hand side you will see the Settings Block. • Click on “Course Administration” And then “Edit Settings”
• In the Summary Box, you can write a very short course description. This will not show on the page itself, but on the home page when you or your students first login. Notice that you have full formatting options here, very similar to a word document. • The default setting is weekly. If you want to organise your course by topic, click the pull down menu and select Topics Format • Enter the number of Topics or Weeks you want displayed. You can always return later to add more topics/weeks.
• If you want to hide the course from students, select This Course is Not Available in the Availability Section. This will allow you to build the course without the students seeing your work in progress. You would also select this if you do not intend to use moodle for this course.
• Click the Save Changes Button at the bottom of the page
Topic Outline • At the Top of Your Course you can add an introduction for the students. • First step is to “Turn Editing On”
• Once you have turned editing on you will see a lot more icons on your page
• Click the edit Pen Icon
• Either leave the default section name, Outline, 1, 2, 3……… or uncheck default and name section • In the Word processing box, you can either type in a Title and an introduction • Use the formatting options as required. The Text styles pull down menu has set styles so you can get a consistent look to your course. All the normal layout options such as bullets and numbered lists are available for you.
• If you want to insert a link to another website simply type in the Name of your site, highlight it, click on the insert web link button (looks like a link in a chain), then type or paste in the full URL (website address). Also type a brief name for the link, and save details. The Text will now be blue underlined to show it is a link • Save changes by clicking the button at the bottom of the page. At any time you can edit this by clicking on the hand holding the pen immediately underneath the Topic summary.
• • • Insert images Click on the image Icon (looks like a tree) click on find or upload and image click on upload image browse to image Put name in save as box and up load file (note that you can copyright own images) • Click on appearance to set alignment, size etc
Setting up Topics • Each topic has the edit tool at the top, allowing you to give it a name, description, add images etc
Adding Resources for Students • Moodle is a convenient way for distributing documents for your course – Course outline – Course presentations – Permission slips – Etc • We will be uploading 1 at a time, and then more efficient methods to upload and display multiple resources
• Make sure you have Editing Tuned On. You should see the Add a Resource pull down menu Click on the menu and select “File” This will open the Add a new file page
• Enter a name for your resource, and a short description which will be displayed for the students when searching resources into the text editor.
• Click on the ADD button to get to file picker, then click the upload a file button • As per image, browse to select file, set copyright and upload, • Leave all the rest as is and click “save and return to course” button. • Click on your file to test it
Adding a Link to a Web Page • As well as adding links in the text boxes, links can added as a resource.
• Make sure you have Editing Tuned On. You should see the Add a Resource pull down menu Click on the menu and select URL. This will open the Add a URL page
• Enter a name for your resource, and a short description which will be displayed for the students when searching resources into the text editor. • Type or Paste the URL address • Leave all the rest as is and click “save and return to course” button. Click on your URL to test it
Linking to a Folder • This option allows the students to see all the contents of a folder as a series of links. – One link for multiple files – Additional files can be added to the folder as needed, without changing the link from the course – good for weekly homework etc
• Called Folder in the “Add a Resource” menu • Give the folder a name and description, then add files to the folder as required • Can also additional folders inside your folder • Save and check folder
Upload Multiple Files • Uploading one file at a time is time consuming. • Where you have several files you want to upload, zip them up.
• First, in a local folder on your , select the files you want to upload – Hold down Ctrl key and click files • Right click on one of the selected files , and then select “send to”, then select “compressed folder”
• Back in Moodle, either create a new folder or click on the edit tool (pen in hand) of an existing folder • Upload the compressed folder as you would a single file • Once uploaded, click the icon to the right of the file and you will see the option “unzip” • Now all the individual files are showing and available to in the folder
Intermediate Session • Adding Assignments for online submission and grading • Student Voice in Moodle – Forums – Blogging in Moodle – Comments Block – Wikis in Moodle • Collaborative Groups • Moodle Quiz feature
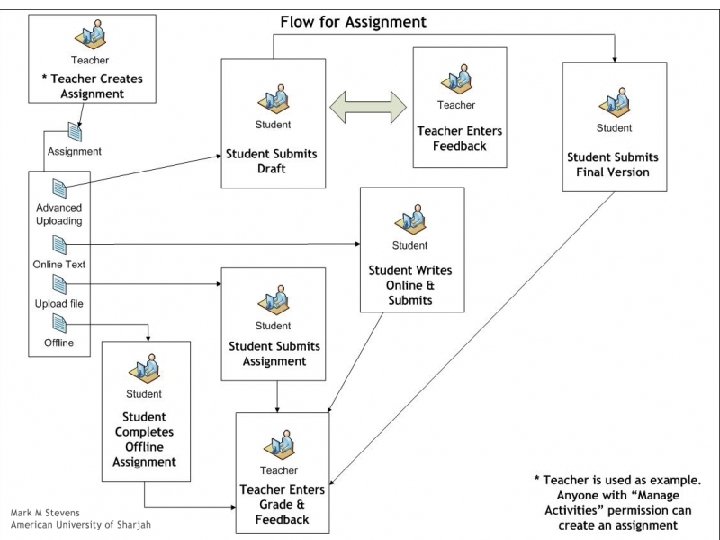
Adding Assignments • Assignments provide a way for students to upload digital versions of assignments for you to review, grade and give feedback/forward on • This can also be used as a type of eportfolio
• With Editing On, select Add an Activity, • select Upload a single file, advanced uploading of files, Online text, Offline activity • Give it a Name, and describe the task • There are options for deadlines, etc • You can select Grades as NCEA, or Max score. • Allow multiple submission if you want students to review feed-forward, and resubmit assignment
Try it out • Click on the assignment • Upload a file • Click on View upload files and grade your submission • Return to test page and you will see your grade and feed back
Student Voice - Forums • These are easy to add, and can be placed in the Topic Outline or in Topics. • Click Add and Activity, and Select Forum.
Student Voice-Blog • Bottom Right below all the blocks, Click on Add Block and select Blog Menu • The Blog Menu Block allows you and students to Add a Blog, View existing Blog by all, or just the student/teacher viewing. Can also view own blogs across all of moodle
Below each blog is a comments link to allow others to comment on your blog
Student Voice - Comments • These can be added to any course, or activity within a course i. e. assignment, folder • Right click to open to resource on a new page • Click on Add a Block, and select Comment
Student Voice - Wiki • Wiki’s allow students to help build pages of content. • To add the wiki, use the add activity menu. • On the first page create a contents list. • To hyperlink each page name, put it in double square brackets[[ ]]and when you save it moodle and then reopen, click on the link it will open the page. • Students can open the page to read, or edit them • Can be collaborative, groups or individual
Groups for Collaborative Work • In the Settings Block, select users/groups • Create Group Names by Adding Groups, then click on add/remove users and select names (students need to have logged in) • Groups can then be used for Wiki’s or assignments etc. • Forums with groups allow collaborative groups to share resources privately for projects
Quizzes • Add a Quiz using the Add Activity menu • Enter name for test and also any feedback for overall results, then save • Click on quiz and then start adding questions • When the students attempt the quiz, you will see the number of attempts. • Click on this to see the results