Modeling Part 3 Sahar Mosleh Ahmad R Hadaegh
- Slides: 40

Modeling Part 3 Sahar Mosleh & Ahmad R. Hadaegh California State University San Marcos Page 1

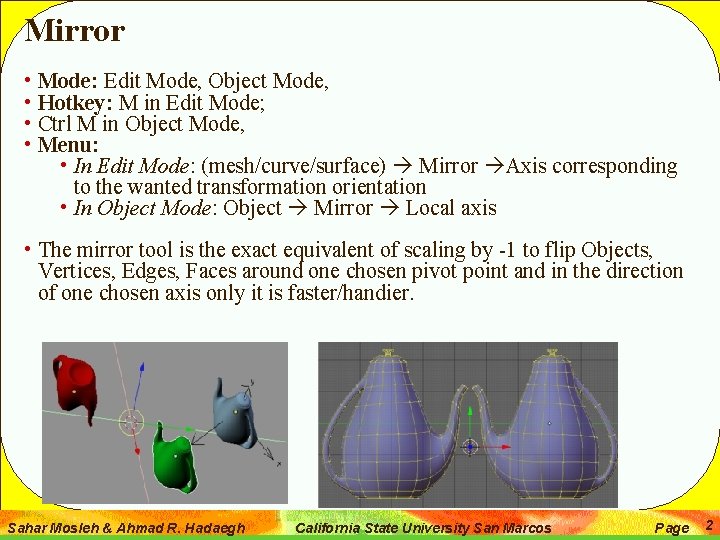
Mirror • Mode: Edit Mode, Object Mode, • Hotkey: M in Edit Mode; • Ctrl M in Object Mode, • Menu: • In Edit Mode: (mesh/curve/surface) Mirror Axis corresponding to the wanted transformation orientation • In Object Mode: Object Mirror Local axis • The mirror tool is the exact equivalent of scaling by -1 to flip Objects, Vertices, Edges, Faces around one chosen pivot point and in the direction of one chosen axis only it is faster/handier. Sahar Mosleh & Ahmad R. Hadaegh California State University San Marcos Page 2

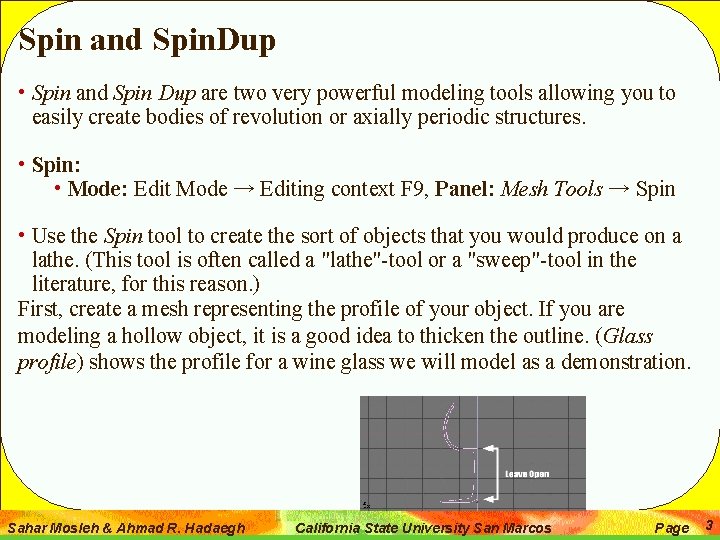
Spin and Spin. Dup • Spin and Spin Dup are two very powerful modeling tools allowing you to easily create bodies of revolution or axially periodic structures. • Spin: • Mode: Edit Mode → Editing context F 9, Panel: Mesh Tools → Spin • Use the Spin tool to create the sort of objects that you would produce on a lathe. (This tool is often called a "lathe"-tool or a "sweep"-tool in the literature, for this reason. ) First, create a mesh representing the profile of your object. If you are modeling a hollow object, it is a good idea to thicken the outline. (Glass profile) shows the profile for a wine glass we will model as a demonstration. Sahar Mosleh & Ahmad R. Hadaegh California State University San Marcos Page 3

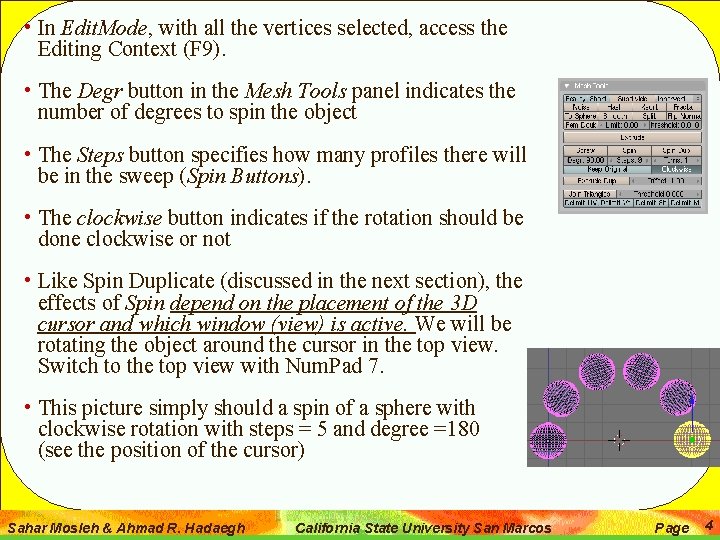
• In Edit. Mode, with all the vertices selected, access the Editing Context (F 9). • The Degr button in the Mesh Tools panel indicates the number of degrees to spin the object • The Steps button specifies how many profiles there will be in the sweep (Spin Buttons). • The clockwise button indicates if the rotation should be done clockwise or not • Like Spin Duplicate (discussed in the next section), the effects of Spin depend on the placement of the 3 D cursor and which window (view) is active. We will be rotating the object around the cursor in the top view. Switch to the top view with Num. Pad 7. • This picture simply should a spin of a sphere with clockwise rotation with steps = 5 and degree =180 (see the position of the cursor) Sahar Mosleh & Ahmad R. Hadaegh California State University San Marcos Page 4

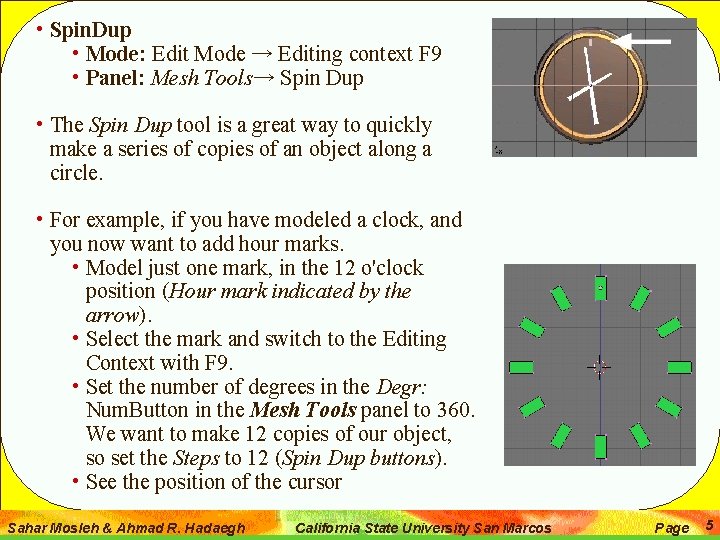
• Spin. Dup • Mode: Edit Mode → Editing context F 9 • Panel: Mesh Tools→ Spin Dup • The Spin Dup tool is a great way to quickly make a series of copies of an object along a circle. • For example, if you have modeled a clock, and you now want to add hour marks. • Model just one mark, in the 12 o'clock position (Hour mark indicated by the arrow). • Select the mark and switch to the Editing Context with F 9. • Set the number of degrees in the Degr: Num. Button in the Mesh Tools panel to 360. We want to make 12 copies of our object, so set the Steps to 12 (Spin Dup buttons). • See the position of the cursor Sahar Mosleh & Ahmad R. Hadaegh California State University San Marcos Page 5

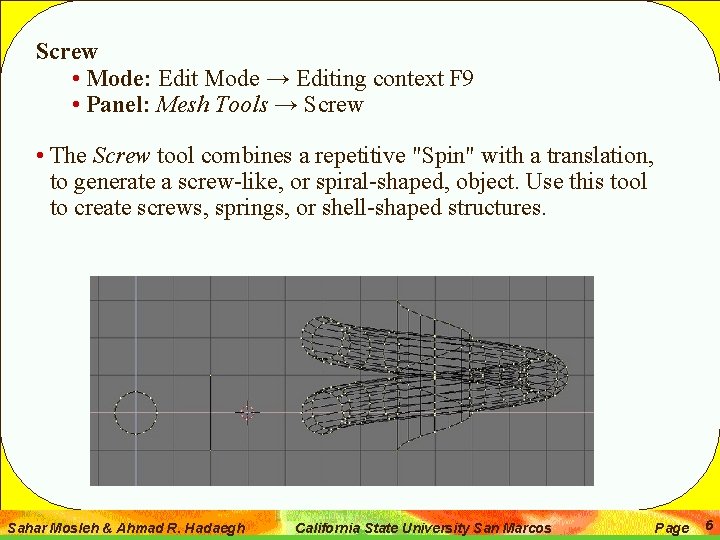
Screw • Mode: Edit Mode → Editing context F 9 • Panel: Mesh Tools → Screw • The Screw tool combines a repetitive "Spin" with a translation, to generate a screw-like, or spiral-shaped, object. Use this tool to create screws, springs, or shell-shaped structures. Sahar Mosleh & Ahmad R. Hadaegh California State University San Marcos Page 6

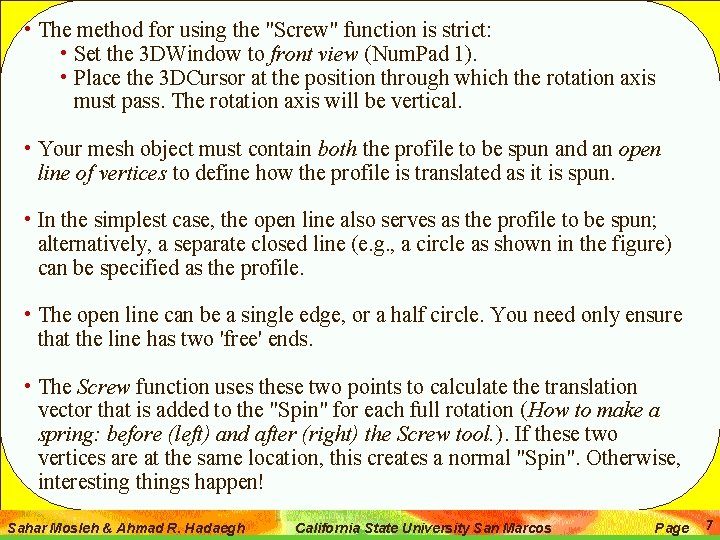
• The method for using the "Screw" function is strict: • Set the 3 DWindow to front view (Num. Pad 1). • Place the 3 DCursor at the position through which the rotation axis must pass. The rotation axis will be vertical. • Your mesh object must contain both the profile to be spun and an open line of vertices to define how the profile is translated as it is spun. • In the simplest case, the open line also serves as the profile to be spun; alternatively, a separate closed line (e. g. , a circle as shown in the figure) can be specified as the profile. • The open line can be a single edge, or a half circle. You need only ensure that the line has two 'free' ends. • The Screw function uses these two points to calculate the translation vector that is added to the "Spin" for each full rotation (How to make a spring: before (left) and after (right) the Screw tool. ). If these two vertices are at the same location, this creates a normal "Spin". Otherwise, interesting things happen! Sahar Mosleh & Ahmad R. Hadaegh California State University San Marcos Page 7

Warp Tool • Mode: Edit Mode → Editing context F 9 • Panel: Mesh Tools → Warp • The Warp tool is a little-known tool in Blender, partly because it is not found in the Edit Buttons window, and partly because it is only useful in very specific cases. At any rate, it is not something that the average Blender-user needs to use every day. • A piece of text wrapped into a ring shape is useful when creating flying logos, but it would be difficult to model without the use of the warp tool. • For our example, we'll warp the phrase "Amazingly Warped Text" around a sphere. Sahar Mosleh & Ahmad R. Hadaegh California State University San Marcos Page 8

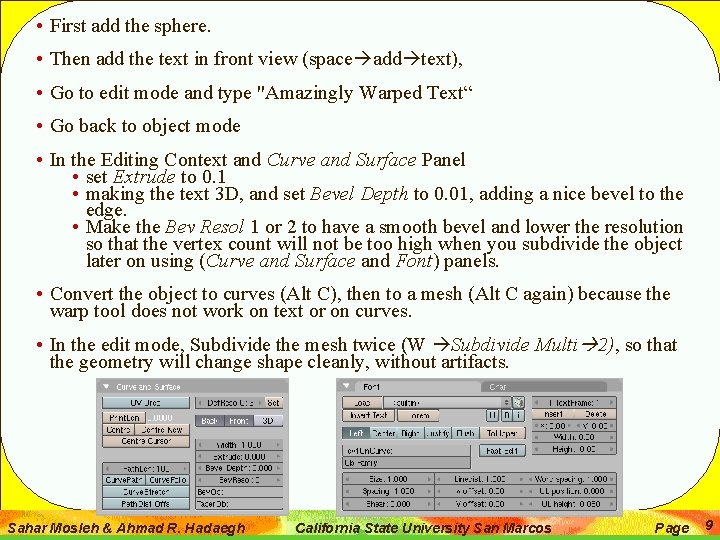
• First add the sphere. • Then add the text in front view (space add text), • Go to edit mode and type "Amazingly Warped Text“ • Go back to object mode • In the Editing Context and Curve and Surface Panel • set Extrude to 0. 1 • making the text 3 D, and set Bevel Depth to 0. 01, adding a nice bevel to the edge. • Make the Bev Resol 1 or 2 to have a smooth bevel and lower the resolution so that the vertex count will not be too high when you subdivide the object later on using (Curve and Surface and Font) panels. • Convert the object to curves (Alt C), then to a mesh (Alt C again) because the warp tool does not work on text or on curves. • In the edit mode, Subdivide the mesh twice (W Subdivide Multi 2), so that the geometry will change shape cleanly, without artifacts. Sahar Mosleh & Ahmad R. Hadaegh California State University San Marcos Page 9

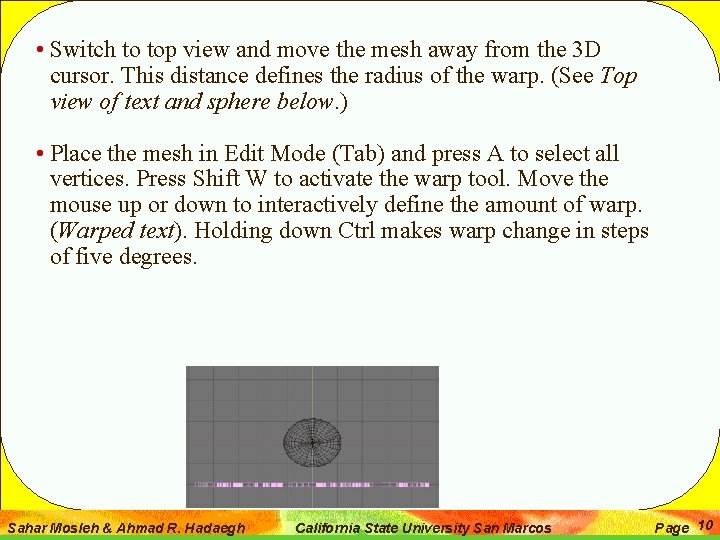
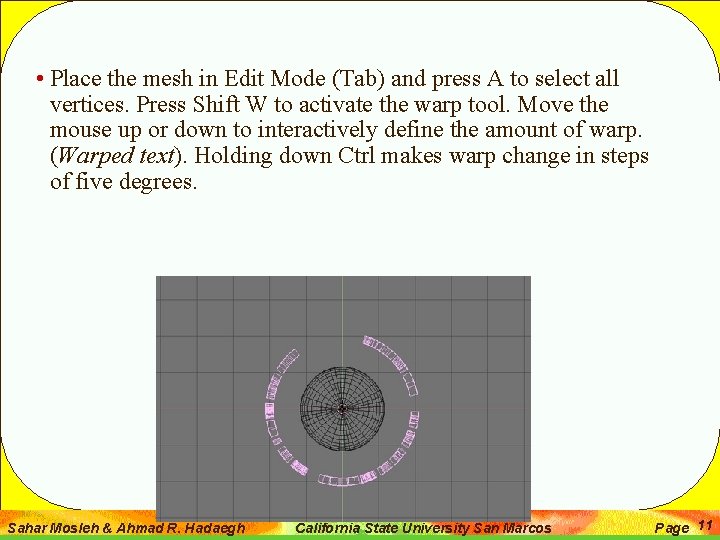
• Switch to top view and move the mesh away from the 3 D cursor. This distance defines the radius of the warp. (See Top view of text and sphere below. ) • Place the mesh in Edit Mode (Tab) and press A to select all vertices. Press Shift W to activate the warp tool. Move the mouse up or down to interactively define the amount of warp. (Warped text). Holding down Ctrl makes warp change in steps of five degrees. Sahar Mosleh & Ahmad R. Hadaegh California State University San Marcos Page 10

• Place the mesh in Edit Mode (Tab) and press A to select all vertices. Press Shift W to activate the warp tool. Move the mouse up or down to interactively define the amount of warp. (Warped text). Holding down Ctrl makes warp change in steps of five degrees. Sahar Mosleh & Ahmad R. Hadaegh California State University San Marcos Page 11

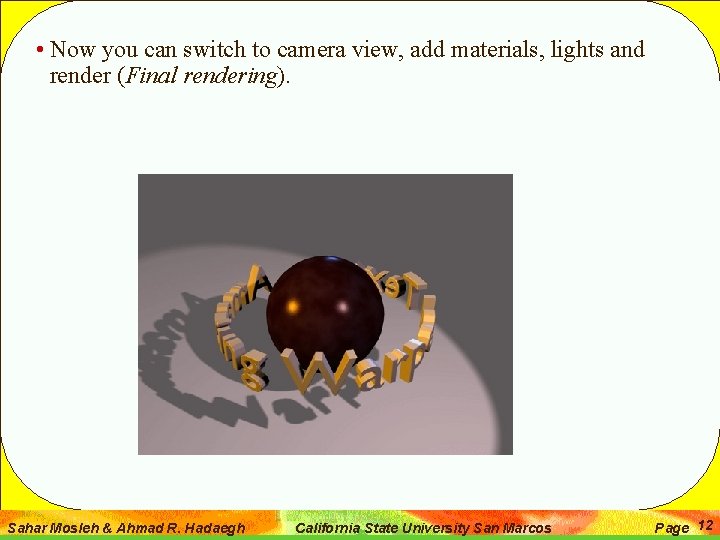
• Now you can switch to camera view, add materials, lights and render (Final rendering). Sahar Mosleh & Ahmad R. Hadaegh California State University San Marcos Page 12

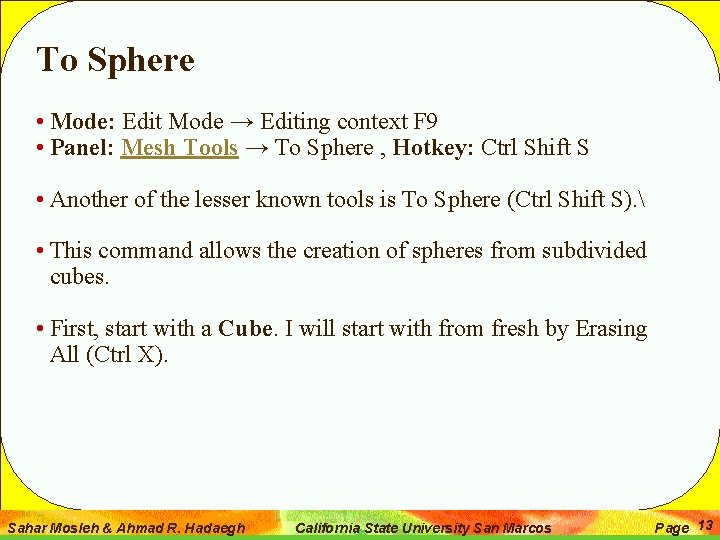
To Sphere • Mode: Edit Mode → Editing context F 9 • Panel: Mesh Tools → To Sphere , Hotkey: Ctrl Shift S • Another of the lesser known tools is To Sphere (Ctrl Shift S). • This command allows the creation of spheres from subdivided cubes. • First, start with a Cube. I will start with from fresh by Erasing All (Ctrl X). Sahar Mosleh & Ahmad R. Hadaegh California State University San Marcos Page 13

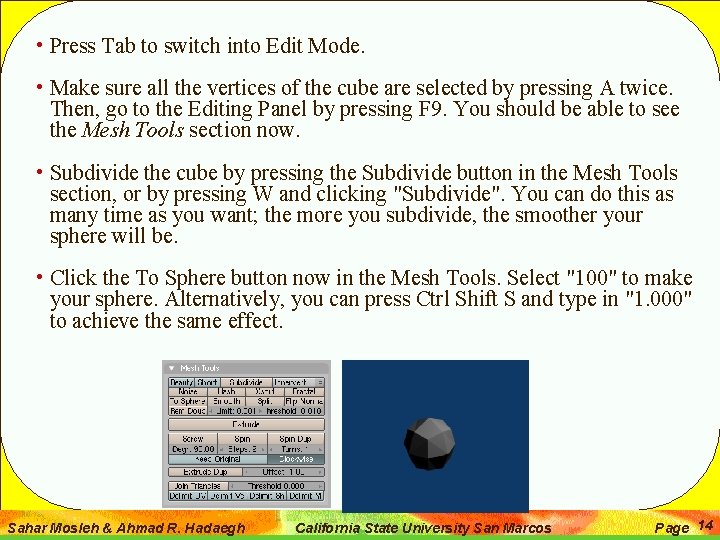
• Press Tab to switch into Edit Mode. • Make sure all the vertices of the cube are selected by pressing A twice. Then, go to the Editing Panel by pressing F 9. You should be able to see the Mesh Tools section now. • Subdivide the cube by pressing the Subdivide button in the Mesh Tools section, or by pressing W and clicking "Subdivide". You can do this as many time as you want; the more you subdivide, the smoother your sphere will be. • Click the To Sphere button now in the Mesh Tools. Select "100" to make your sphere. Alternatively, you can press Ctrl Shift S and type in "1. 000" to achieve the same effect. Sahar Mosleh & Ahmad R. Hadaegh California State University San Marcos Page 14

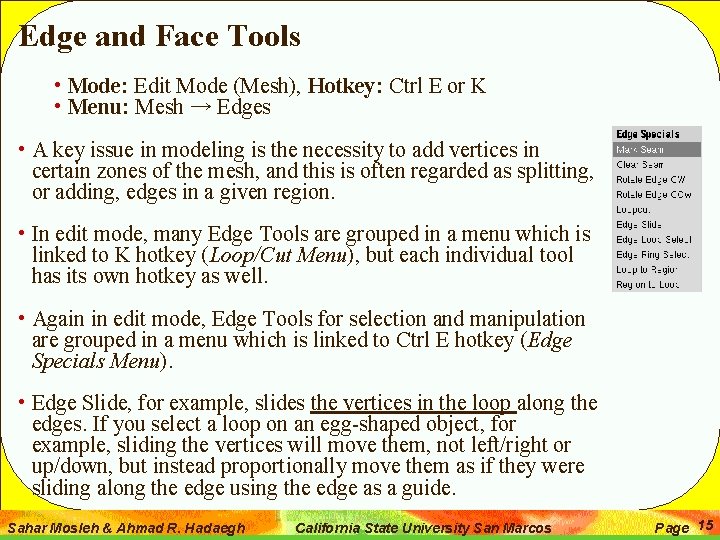
Edge and Face Tools • Mode: Edit Mode (Mesh), Hotkey: Ctrl E or K • Menu: Mesh → Edges • A key issue in modeling is the necessity to add vertices in certain zones of the mesh, and this is often regarded as splitting, or adding, edges in a given region. • In edit mode, many Edge Tools are grouped in a menu which is linked to K hotkey (Loop/Cut Menu), but each individual tool has its own hotkey as well. • Again in edit mode, Edge Tools for selection and manipulation are grouped in a menu which is linked to Ctrl E hotkey (Edge Specials Menu). • Edge Slide, for example, slides the vertices in the loop along the edges. If you select a loop on an egg-shaped object, for example, sliding the vertices will move them, not left/right or up/down, but instead proportionally move them as if they were sliding along the edge using the edge as a guide. Sahar Mosleh & Ahmad R. Hadaegh California State University San Marcos Page 15

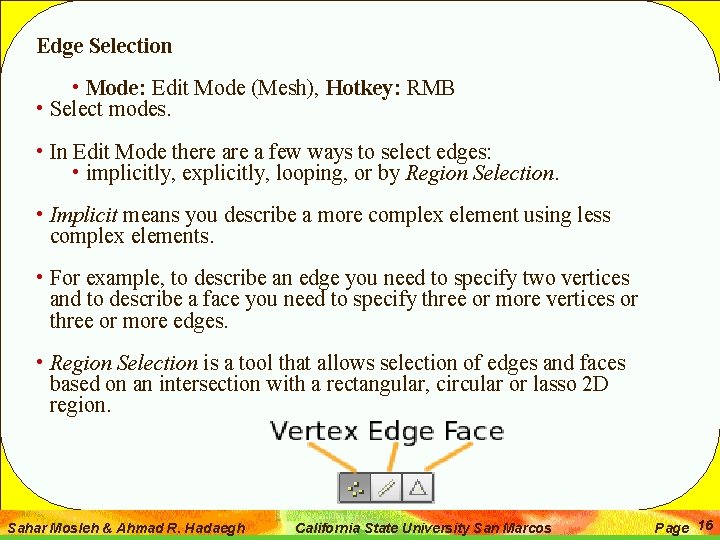
Edge Selection • Mode: Edit Mode (Mesh), Hotkey: RMB • Select modes. • In Edit Mode there a few ways to select edges: • implicitly, explicitly, looping, or by Region Selection. • Implicit means you describe a more complex element using less complex elements. • For example, to describe an edge you need to specify two vertices and to describe a face you need to specify three or more vertices or three or more edges. • Region Selection is a tool that allows selection of edges and faces based on an intersection with a rectangular, circular or lasso 2 D region. Sahar Mosleh & Ahmad R. Hadaegh California State University San Marcos Page 16

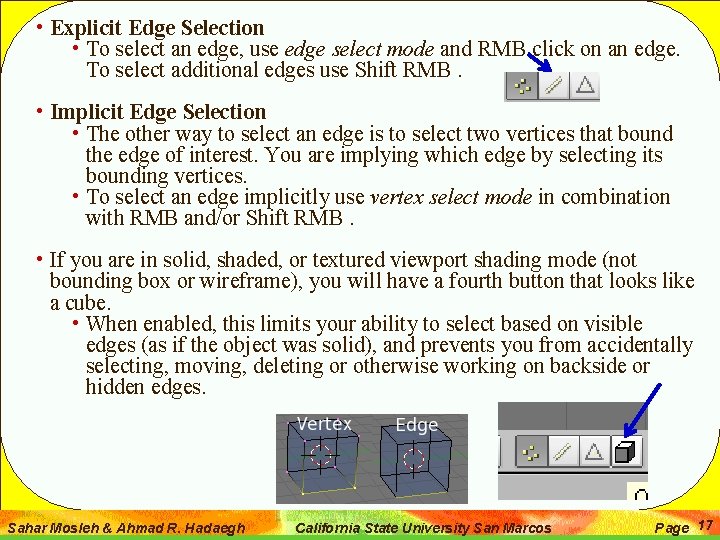
• Explicit Edge Selection • To select an edge, use edge select mode and RMB click on an edge. To select additional edges use Shift RMB. • Implicit Edge Selection • The other way to select an edge is to select two vertices that bound the edge of interest. You are implying which edge by selecting its bounding vertices. • To select an edge implicitly use vertex select mode in combination with RMB and/or Shift RMB. • If you are in solid, shaded, or textured viewport shading mode (not bounding box or wireframe), you will have a fourth button that looks like a cube. • When enabled, this limits your ability to select based on visible edges (as if the object was solid), and prevents you from accidentally selecting, moving, deleting or otherwise working on backside or hidden edges. Sahar Mosleh & Ahmad R. Hadaegh California State University San Marcos Page 17

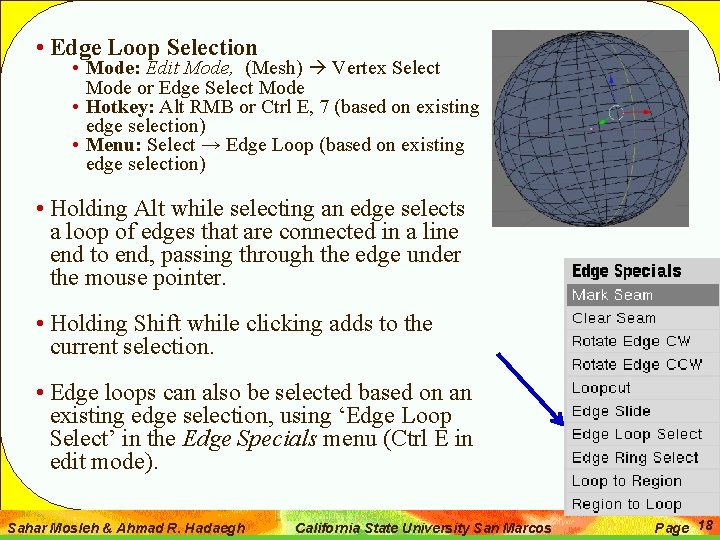
• Edge Loop Selection • Mode: Edit Mode, (Mesh) Vertex Select Mode or Edge Select Mode • Hotkey: Alt RMB or Ctrl E, 7 (based on existing edge selection) • Menu: Select → Edge Loop (based on existing edge selection) • Holding Alt while selecting an edge selects a loop of edges that are connected in a line end to end, passing through the edge under the mouse pointer. • Holding Shift while clicking adds to the current selection. • Edge loops can also be selected based on an existing edge selection, using ‘Edge Loop Select’ in the Edge Specials menu (Ctrl E in edit mode). Sahar Mosleh & Ahmad R. Hadaegh California State University San Marcos Page 18

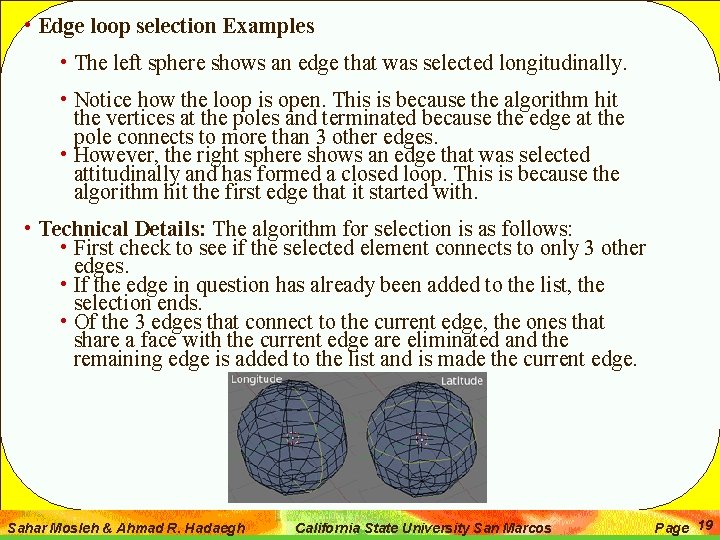
• Edge loop selection Examples • The left sphere shows an edge that was selected longitudinally. • Notice how the loop is open. This is because the algorithm hit the vertices at the poles and terminated because the edge at the pole connects to more than 3 other edges. • However, the right sphere shows an edge that was selected attitudinally and has formed a closed loop. This is because the algorithm hit the first edge that it started with. • Technical Details: The algorithm for selection is as follows: • First check to see if the selected element connects to only 3 other edges. • If the edge in question has already been added to the list, the selection ends. • Of the 3 edges that connect to the current edge, the ones that share a face with the current edge are eliminated and the remaining edge is added to the list and is made the current edge. Sahar Mosleh & Ahmad R. Hadaegh California State University San Marcos Page 19

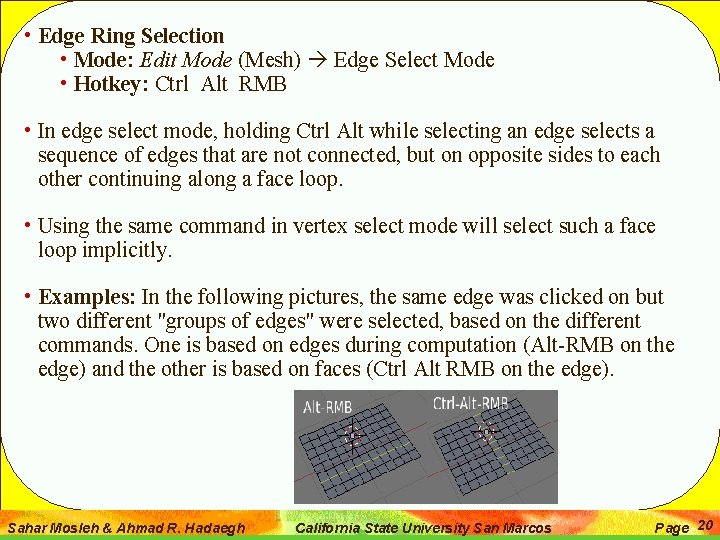
• Edge Ring Selection • Mode: Edit Mode (Mesh) Edge Select Mode • Hotkey: Ctrl Alt RMB • In edge select mode, holding Ctrl Alt while selecting an edge selects a sequence of edges that are not connected, but on opposite sides to each other continuing along a face loop. • Using the same command in vertex select mode will select such a face loop implicitly. • Examples: In the following pictures, the same edge was clicked on but two different "groups of edges" were selected, based on the different commands. One is based on edges during computation (Alt-RMB on the edge) and the other is based on faces (Ctrl Alt RMB on the edge). Sahar Mosleh & Ahmad R. Hadaegh California State University San Marcos Page 20

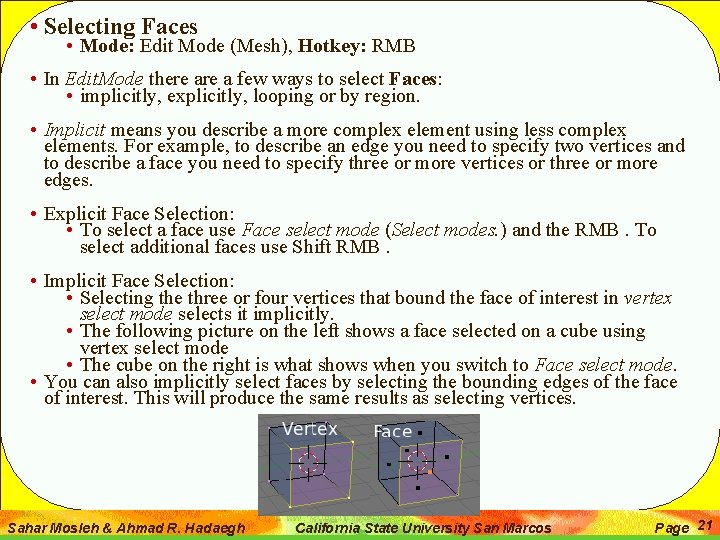
• Selecting Faces • Mode: Edit Mode (Mesh), Hotkey: RMB • In Edit. Mode there a few ways to select Faces: • implicitly, explicitly, looping or by region. • Implicit means you describe a more complex element using less complex elements. For example, to describe an edge you need to specify two vertices and to describe a face you need to specify three or more vertices or three or more edges. • Explicit Face Selection: • To select a face use Face select mode (Select modes. ) and the RMB. To select additional faces use Shift RMB. • Implicit Face Selection: • Selecting the three or four vertices that bound the face of interest in vertex select mode selects it implicitly. • The following picture on the left shows a face selected on a cube using vertex select mode • The cube on the right is what shows when you switch to Face select mode. • You can also implicitly select faces by selecting the bounding edges of the face of interest. This will produce the same results as selecting vertices. Sahar Mosleh & Ahmad R. Hadaegh California State University San Marcos Page 21

• Deleting Faces may delete edges and vertices: • If a vertex that defines a selected face is not connected to anything else, and you delete the face, Blender deletes the vertex as well as its connecting edges. • This is so you don't end up with a bunch of stray vertices running around unconnected in 3 D space. • If you want a vertex and/or an edge to stay, you need to make sure that you are in proper select mode to see it first. Note that • Vertices + edges are both visible in vertex select mode; • only the edges are visible in edge select mode; and • neither the vertices nor the edges are visible in face select mode) • Then you must use X Faces Only or X Edges and Faces, accordingly to what you want to keep of what you see. • If you are in solid, shaded, or textured viewport shading mode (not bounding box or wireframe), you will have a fourth button that looks like a cube. • When enabled, this limits your ability to select from visible faces (as if the object was solid), and prevents you from accidentally selecting, moving, deleting or otherwise working on backside or hidden faces. Sahar Mosleh & Ahmad R. Hadaegh California State University San Marcos Page 22

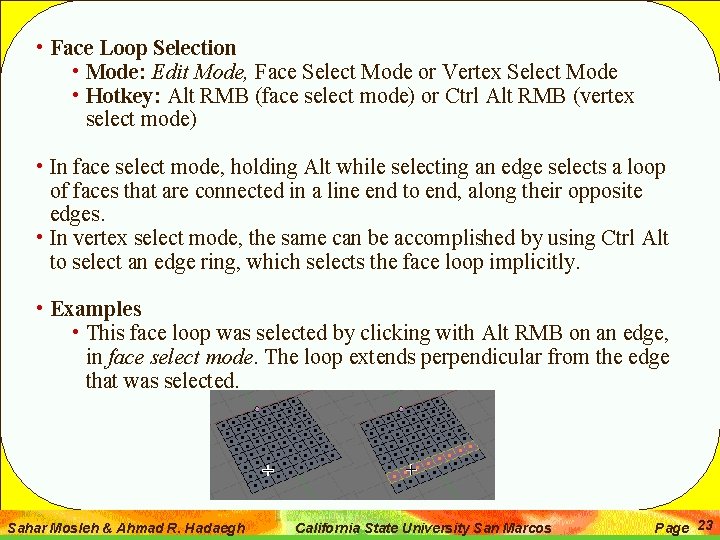
• Face Loop Selection • Mode: Edit Mode, Face Select Mode or Vertex Select Mode • Hotkey: Alt RMB (face select mode) or Ctrl Alt RMB (vertex select mode) • In face select mode, holding Alt while selecting an edge selects a loop of faces that are connected in a line end to end, along their opposite edges. • In vertex select mode, the same can be accomplished by using Ctrl Alt to select an edge ring, which selects the face loop implicitly. • Examples • This face loop was selected by clicking with Alt RMB on an edge, in face select mode. The loop extends perpendicular from the edge that was selected. Sahar Mosleh & Ahmad R. Hadaegh California State University San Marcos Page 23

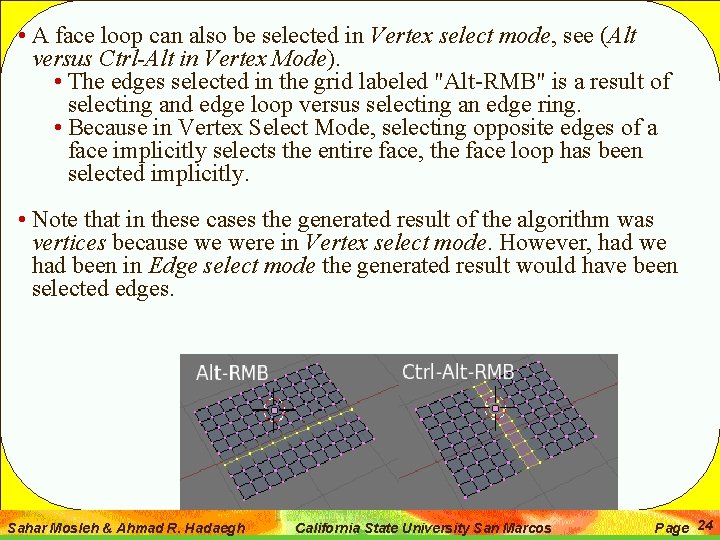
• A face loop can also be selected in Vertex select mode, see (Alt versus Ctrl-Alt in Vertex Mode). • The edges selected in the grid labeled "Alt-RMB" is a result of selecting and edge loop versus selecting an edge ring. • Because in Vertex Select Mode, selecting opposite edges of a face implicitly selects the entire face, the face loop has been selected implicitly. • Note that in these cases the generated result of the algorithm was vertices because we were in Vertex select mode. However, had we had been in Edge select mode the generated result would have been selected edges. Sahar Mosleh & Ahmad R. Hadaegh California State University San Marcos Page 24

Loop Subdivide • Mode: Edit Mode (Mesh), Hotkey: Ctrl R • Menu: Mesh → Edges → Loop Subdivide • Loop Subdivide splits a loop of faces by inserting a new edge loop intersecting the chosen edge. The tool is interactive and has two steps: Sahar Mosleh & Ahmad R. Hadaegh California State University San Marcos Page 25

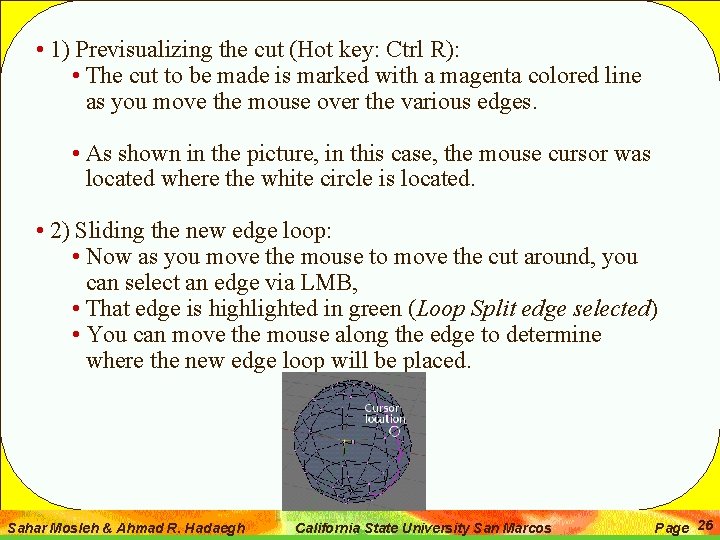
• 1) Previsualizing the cut (Hot key: Ctrl R): • The cut to be made is marked with a magenta colored line as you move the mouse over the various edges. • As shown in the picture, in this case, the mouse cursor was located where the white circle is located. • 2) Sliding the new edge loop: • Now as you move the mouse to move the cut around, you can select an edge via LMB, • That edge is highlighted in green (Loop Split edge selected) • You can move the mouse along the edge to determine where the new edge loop will be placed. Sahar Mosleh & Ahmad R. Hadaegh California State University San Marcos Page 26

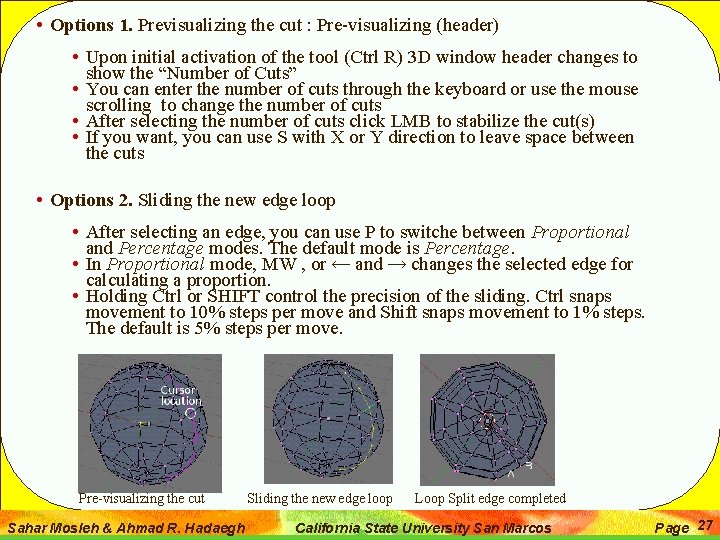
• Options 1. Previsualizing the cut : Pre-visualizing (header) • Upon initial activation of the tool (Ctrl R) 3 D window header changes to show the “Number of Cuts” • You can enter the number of cuts through the keyboard or use the mouse scrolling to change the number of cuts • After selecting the number of cuts click LMB to stabilize the cut(s) • If you want, you can use S with X or Y direction to leave space between the cuts • Options 2. Sliding the new edge loop • After selecting an edge, you can use P to switche between Proportional and Percentage modes. The default mode is Percentage. • In Proportional mode, MW , or ← and → changes the selected edge for calculating a proportion. • Holding Ctrl or SHIFT control the precision of the sliding. Ctrl snaps movement to 10% steps per move and Shift snaps movement to 1% steps. The default is 5% steps per move. Pre-visualizing the cut Sahar Mosleh & Ahmad R. Hadaegh Sliding the new edge loop Loop Split edge completed California State University San Marcos Page 27

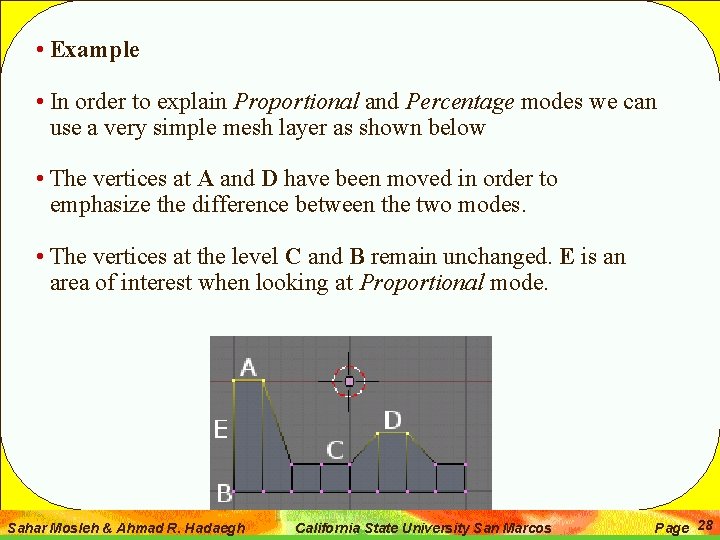
• Example • In order to explain Proportional and Percentage modes we can use a very simple mesh layer as shown below • The vertices at A and D have been moved in order to emphasize the difference between the two modes. • The vertices at the level C and B remain unchanged. E is an area of interest when looking at Proportional mode. Sahar Mosleh & Ahmad R. Hadaegh California State University San Marcos Page 28

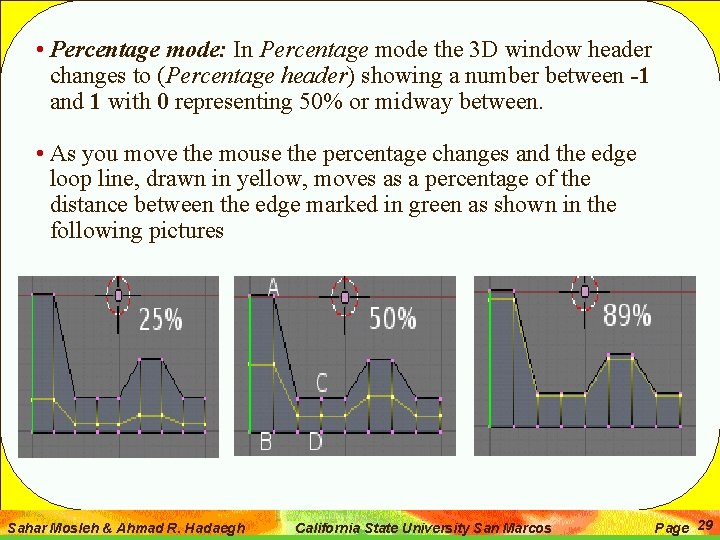
• Percentage mode: In Percentage mode the 3 D window header changes to (Percentage header) showing a number between -1 and 1 with 0 representing 50% or midway between. • As you move the mouse the percentage changes and the edge loop line, drawn in yellow, moves as a percentage of the distance between the edge marked in green as shown in the following pictures Sahar Mosleh & Ahmad R. Hadaegh California State University San Marcos Page 29

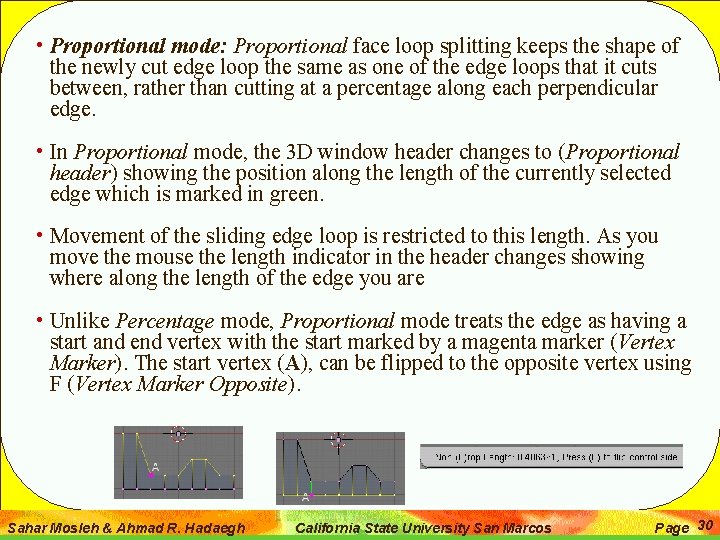
• Proportional mode: Proportional face loop splitting keeps the shape of the newly cut edge loop the same as one of the edge loops that it cuts between, rather than cutting at a percentage along each perpendicular edge. • In Proportional mode, the 3 D window header changes to (Proportional header) showing the position along the length of the currently selected edge which is marked in green. • Movement of the sliding edge loop is restricted to this length. As you move the mouse the length indicator in the header changes showing where along the length of the edge you are • Unlike Percentage mode, Proportional mode treats the edge as having a start and end vertex with the start marked by a magenta marker (Vertex Marker). The start vertex (A), can be flipped to the opposite vertex using F (Vertex Marker Opposite). Sahar Mosleh & Ahmad R. Hadaegh California State University San Marcos Page 30

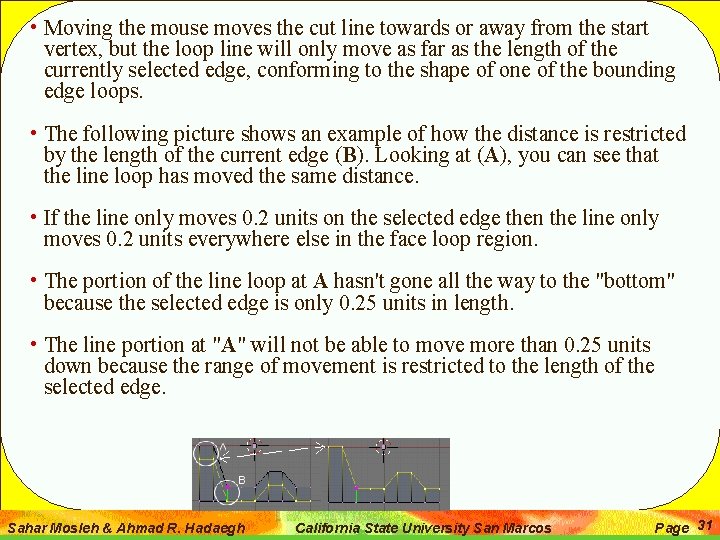
• Moving the mouse moves the cut line towards or away from the start vertex, but the loop line will only move as far as the length of the currently selected edge, conforming to the shape of one of the bounding edge loops. • The following picture shows an example of how the distance is restricted by the length of the current edge (B). Looking at (A), you can see that the line loop has moved the same distance. • If the line only moves 0. 2 units on the selected edge then the line only moves 0. 2 units everywhere else in the face loop region. • The portion of the line loop at A hasn't gone all the way to the "bottom" because the selected edge is only 0. 25 units in length. • The line portion at "A" will not be able to move more than 0. 25 units down because the range of movement is restricted to the length of the selected edge. Sahar Mosleh & Ahmad R. Hadaegh California State University San Marcos Page 31

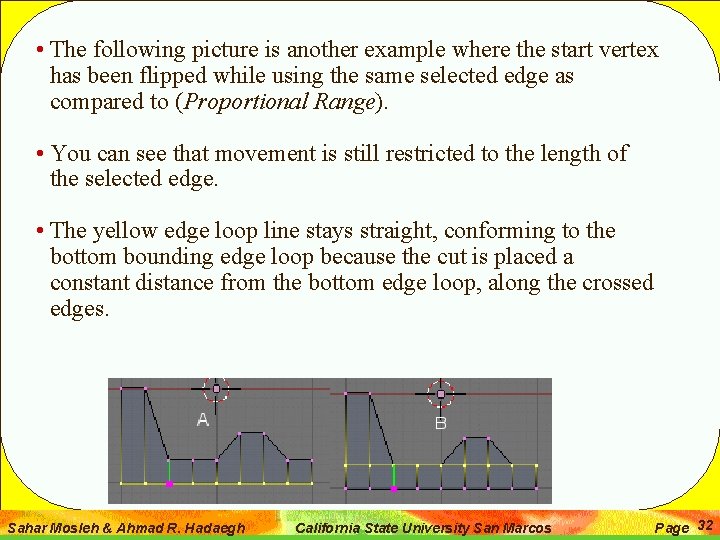
• The following picture is another example where the start vertex has been flipped while using the same selected edge as compared to (Proportional Range). • You can see that movement is still restricted to the length of the selected edge. • The yellow edge loop line stays straight, conforming to the bottom bounding edge loop because the cut is placed a constant distance from the bottom edge loop, along the crossed edges. Sahar Mosleh & Ahmad R. Hadaegh California State University San Marcos Page 32

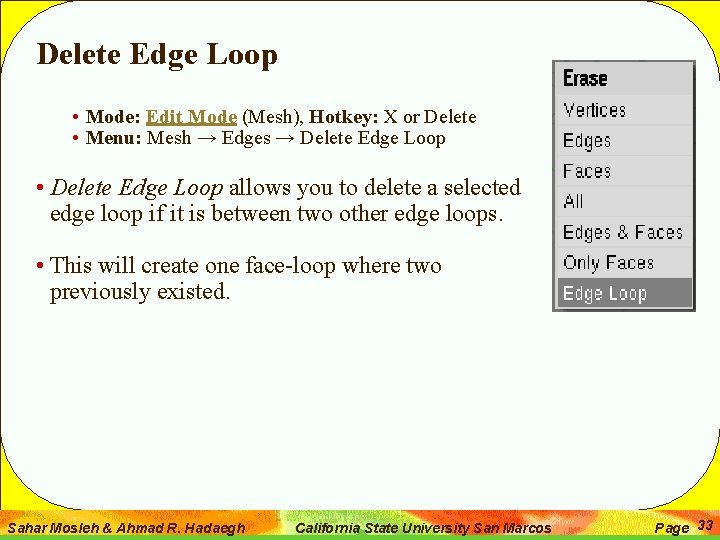
Delete Edge Loop • Mode: Edit Mode (Mesh), Hotkey: X or Delete • Menu: Mesh → Edges → Delete Edge Loop • Delete Edge Loop allows you to delete a selected edge loop if it is between two other edge loops. • This will create one face-loop where two previously existed. Sahar Mosleh & Ahmad R. Hadaegh California State University San Marcos Page 33

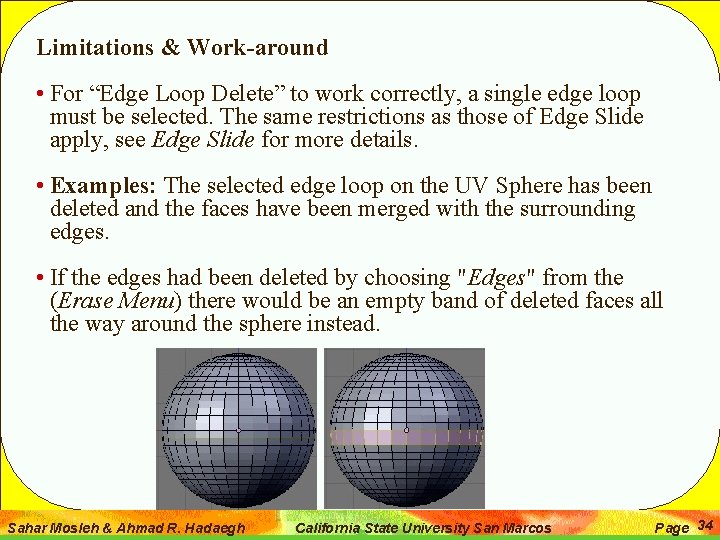
Limitations & Work-around • For “Edge Loop Delete” to work correctly, a single edge loop must be selected. The same restrictions as those of Edge Slide apply, see Edge Slide for more details. • Examples: The selected edge loop on the UV Sphere has been deleted and the faces have been merged with the surrounding edges. • If the edges had been deleted by choosing "Edges" from the (Erase Menu) there would be an empty band of deleted faces all the way around the sphere instead. Sahar Mosleh & Ahmad R. Hadaegh California State University San Marcos Page 34

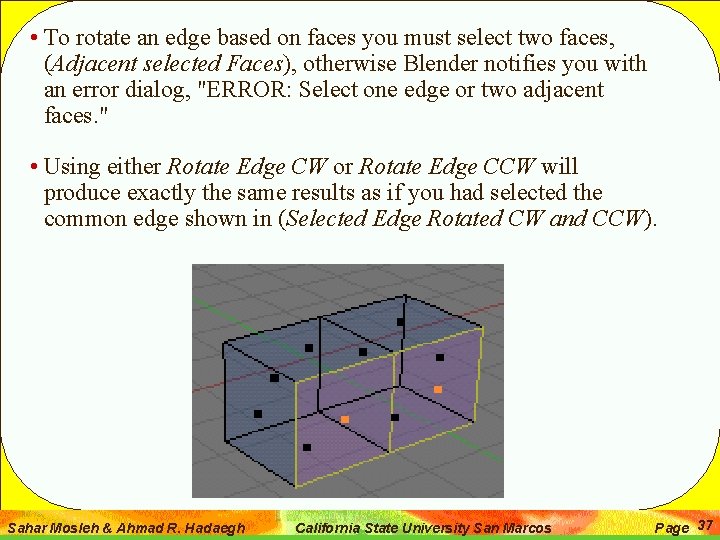
• Rotate Edge CW / Rotate Edge CCW • Mode: Edit Mode (Mesh) • Hotkey: Ctrl E, 3 and Ctrl E, 4 • Menu: Mesh → Edges → Rotate Edge CW / Rotate Edge CCW • Rotating an edge clockwise or counter-clockwise spins an edge between two faces around their vertices. • This is very useful for restructuring a mesh's topology. • The tool can operate on one explicitly selected edge, or on two selected vertices or two selected faces that implicitly select an edge between them. Sahar Mosleh & Ahmad R. Hadaegh California State University San Marcos Page 35

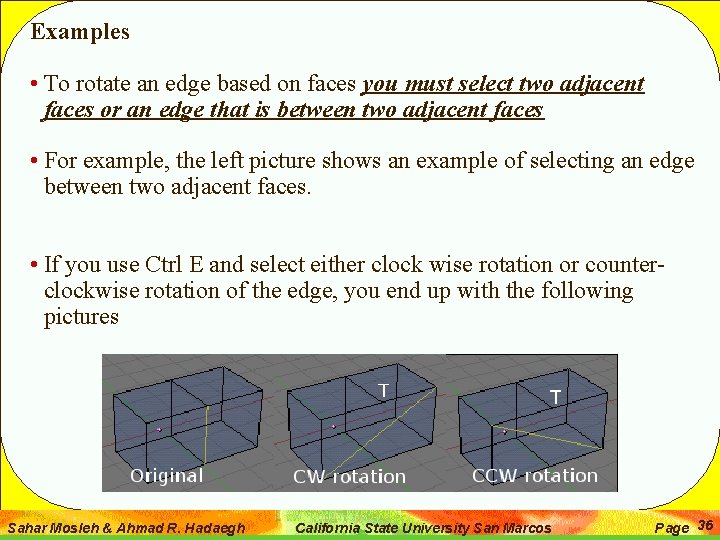
Examples • To rotate an edge based on faces you must select two adjacent faces or an edge that is between two adjacent faces • For example, the left picture shows an example of selecting an edge between two adjacent faces. • If you use Ctrl E and select either clock wise rotation or counterclockwise rotation of the edge, you end up with the following pictures Sahar Mosleh & Ahmad R. Hadaegh California State University San Marcos Page 36

• To rotate an edge based on faces you must select two faces, (Adjacent selected Faces), otherwise Blender notifies you with an error dialog, "ERROR: Select one edge or two adjacent faces. " • Using either Rotate Edge CW or Rotate Edge CCW will produce exactly the same results as if you had selected the common edge shown in (Selected Edge Rotated CW and CCW). Sahar Mosleh & Ahmad R. Hadaegh California State University San Marcos Page 37

• Edge Slide • Mode: Edit Mode (Mesh) > Vertex Select Mode or Edge Select Mode, Hotkey: Ctrl E, 6 • Menu: Mesh → Edges → Slide Edge • Edge Slide slides one or more edges along faces adjacent to the selected edge(s) with a few restrictions involving the selection of edges. • LMB confirms the tool, and RMB or Esc cancels • As with Loop Subdivide, this tool has both a Percentage and Proportional mode, which is displayed in the 3 D View header. These modes behave the same as in Loop Subdivide including all keys for controlling precision edge movement. Sahar Mosleh & Ahmad R. Hadaegh California State University San Marcos Page 38

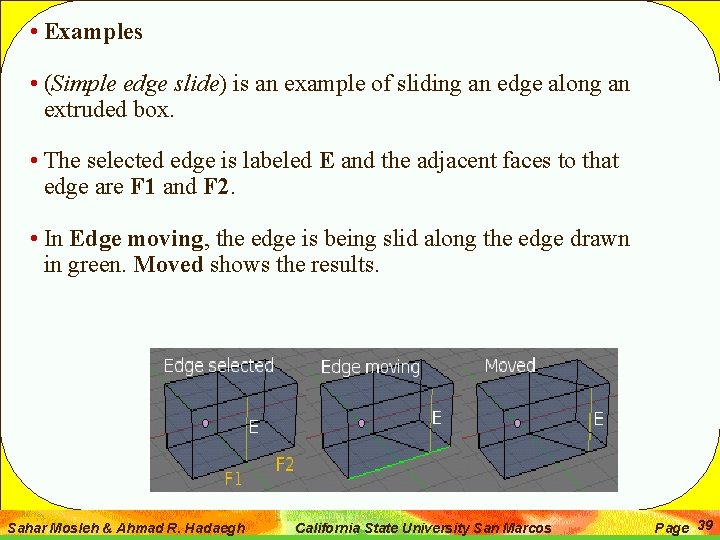
• Examples • (Simple edge slide) is an example of sliding an edge along an extruded box. • The selected edge is labeled E and the adjacent faces to that edge are F 1 and F 2. • In Edge moving, the edge is being slid along the edge drawn in green. Moved shows the results. Sahar Mosleh & Ahmad R. Hadaegh California State University San Marcos Page 39

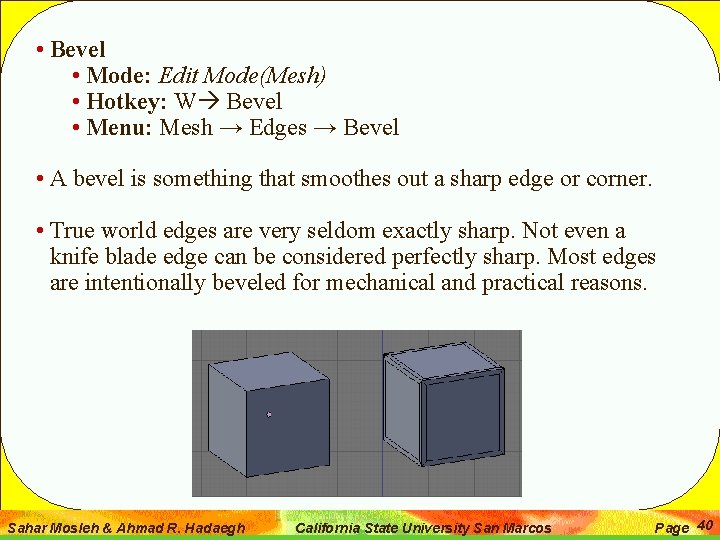
• Bevel • Mode: Edit Mode(Mesh) • Hotkey: W Bevel • Menu: Mesh → Edges → Bevel • A bevel is something that smoothes out a sharp edge or corner. • True world edges are very seldom exactly sharp. Not even a knife blade edge can be considered perfectly sharp. Most edges are intentionally beveled for mechanical and practical reasons. Sahar Mosleh & Ahmad R. Hadaegh California State University San Marcos Page 40