Mobile Programming Activities and Intents Activities Activity An

Mobile Programming Activities and Intents

Activities

Activity An Activity represents a single screen in your app with which your user can perform a single, focused task. Example: taking a photo, sending an email, or viewing a map. An activity is usually presented to the user as a full-screen window. Your app is a collection of activities that you either create yourself, or that you reuse from other apps. For example, a messaging app you write could start an activity in a camera app to take a picture, and then start the activity in an email app to let the user share that picture in email.

Creating Activities To implement an activity in your app, do the following: Create an activity Java class. Implement a user interface for that activity. Declare that new activity in the app manifest. When you create a new project for your app, or add a new activity to your app, in Android Studio (with File > New > Activity), template code for each of these tasks is provided for you.

Create an Activity Java Class

Two things you need to do: Create an Activity Class that extends Activity class or any of its subclass. Override the standard Activity Lifecycle Callback on. Create() must be implemented. The App. Compat. Activity class is a subclass of Activity that lets you to use up-to -date Android app features such as the action bar and material design, while still enabling your app to be compatible with devices running older versions of Android. Here is a skeleton subclass of App. Compat. Activity:

Activity Life Cycle The activity lifecycle is the set of states an activity can be in during its entire lifetime, from the time it is initially created to when it is destroyed and the system reclaims that activity's resources. As the user interacts with your app and other apps on the device, the different activities move into different states.

Contd. When an activity transitions into and out of the different lifecycle states as it runs, the Android system calls several lifecycle callback methods at each stage. All of the callback methods are hooks that you can override in each of your Activity classes to define how that activity behaves when the user leaves and re-enters the activity.
 Method) Your activity enters into the created state when it")
Activity Created (on. Create() Method) Your activity enters into the created state when it is started for the first time. When an activity is first created the system calls the on. Create() method to initialize that activity. The on. Create() method is the only required callback you must implement in your activity class. In your on. Create() method you perform basic application startup logic that should happen only once, such as setting up the user interface, assigning class -scope variables, or setting up background tasks. Created is a transient state; the activity remains in the created state only as long as it takes to run on. Create(), and then the activity moves to the started state.
 method) After your activity is initialized with on. Create(), the")
Activity started (on. Start() method) After your activity is initialized with on. Create(), the system calls the on. Start() method, and the activity is in the started state. The on. Start() method is also called if a stopped activity returns to the foreground, such as when the user clicks the back or up buttons to navigate to the previous screen. While on. Create() is called only once when the activity is created, the on. Start() method may be called many times during the lifecycle of the activity as the user navigates around your app. Typically you implement on. Start() in your activity as a counterpart to the on. Stop() method. For example, if you release hardware resources (such as GPS or sensors) when the activity is stopped, you can re-register those resources in the on. Start() method. Started, like created, is a transient state. After starting the activity moves into the resumed (running) state.
 method) Your activity is in the resumed state when it")
Activity resumed/running (on. Resume() method) Your activity is in the resumed state when it is initialized, visible on screen, and ready to use. The resumed state is often called the running state, because it is in this state that the user is actually interacting with your app. As with the on. Start() and on. Stop() methods, which are implemented in pairs, you typically only implement on. Resume() as a counterpart to on. Pause(). For example, if in the on. Pause() method you halt any onscreen animations, you would start those animations again in on. Resume(). The activity remains in the resumed state as long as the activity is in the foreground and the user is interacting with it. From the resumed state the activity can move into the paused state.
 method) The paused state can occur in several situations: The")
Activity paused (on. Pause() method) The paused state can occur in several situations: The activity is going into the background, but has not yet been fully stopped. This is the first indication that the user is leaving your activity. The activity is only partially visible on the screen, because a dialog or other transparent activity is overlaid on top of it. In multi-window or split screen mode (API 24), the activity is displayed on the screen, but some other activity has the user focus. The system calls the on. Pause() method when the activity moves into the paused state. Because the on. Pause() method is the first indication you get that the user may be leaving the activity, you can use on. Pause() to stop animation or video playback, release any hardware-intensive resources, or commit unsaved activity changes (such as a draft email). Your activity can move from the paused state into the resumed state (if the user returns to the activity) or to the stopped state (if the user leaves the activity altogether).
 method) An activity is in the stopped state when it")
Activity stopped (on. Stop() method) An activity is in the stopped state when it is no longer visible on the screen at all. This is usually because the user has started another activity, or returned to the home screen. The system retains the activity instance in the back stack, and if the user returns to that activity it is restarted again. Stopped activities may be killed altogether by the Android system if resources are low. The system calls the on. Stop() method when the activity stops. Implement the on. Stop() method to save any persistent data and release any remaining resources.
 method) When your activity is destroyed it is shut down")
Activity destroyed (on. Destroy() method) When your activity is destroyed it is shut down completely, and the Activity instance is reclaimed by the system. This can happen in several cases: You call finish() in your activity to manually shut it down. The user navigates back to the previous activity. The device is in a low memory situation where the system reclaims stopped activities to free more resources. A device configuration change occurs. Use on. Destroy() to fully clean up after your activity so that no component (such as a thread) is running after the activity is destroyed.

Implement a user interface for that activity.

The user interface for an activity is provided by a hierarchy of views, which controls a particular space within the activity's window and can respond to user interaction. User Interfaces using Views can be defined by XML layout file stored as part of your app's resources. Defining your layout in XML enables you to maintain the design of your user interface separately from the source code that defines the activity's behavior. You can also create new views directly in your activity code.

Views Every element of the screen is a view The View class represents the basic building block for all UI components, and the base class for classes that provide interactive UI components such as buttons, checkboxes, and text entry fields. Some commonly used views are Text (Text. View) Fields for entering and editing text (Edit. Text) Buttons users can tap (Button) and other interactive components Scrollable text (Scroll. View) and scrollable items (Recycler. View) Images (Image. View)

View. Groups A View. Group is a special view that can contain other views (called children. ) The view group is the base class for layouts and views containers.

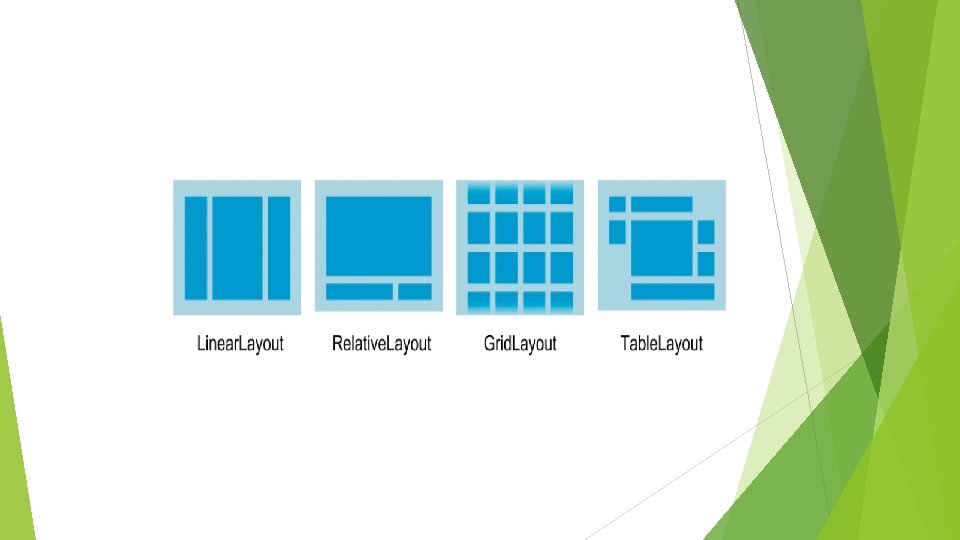
View Groups - Layouts Some view groups are designated as layouts because they organize child views in a specific way and are typically used as the root view group. Linear. Layout: A group of child views positioned and aligned horizontally or vertically. Relative. Layout: A group of child views in which each view is positioned and aligned relative to other views within the view group. In other words, the positions of the child views can be described in relation to each other or to the parent view group. Constraint. Layout: A group of child views using anchor points, edges, and guidelines to control how views are positioned relative to other elements in the layout. Constraint. Layout was designed to make it easy to drag and drop views in the layout editor. Table. Layout: A group of child views arranged into rows and columns. Absolute. Layout: A group that lets you specify exact locations (x/y coordinates) of its child views. Absolute layouts are less flexible and harder to maintain than other types of layouts without absolute positioning. Frame. Layout: A group of child views in a stack. Frame. Layout is designed to block out an area on the screen to display one view. Child views are drawn in a stack, with the most recently added child on top. The size of the Frame. Layout is the size of its largest child view. Grid. Layout: A group that places its child screens in a rectangular grid that can be scrolled.

Declare the Activity in Manifest file

Each activity in your app must be declared in the Android app manifest with the <activity> element, inside <application>. When you create a new project or add a new activity to your project in Android Studio, your manifest is created or updated to include skeleton activity declarations for each activity. The <activity> element includes a number of attributes to define properties of the activity such as its label, icon, or theme. The only required attribute is android: name, which specifies the class name for the activity (such as "Main. Activity"). The <activity> element can also include declarations for intent filters. The intent filters specify the kind of intents your activity will accept. Intent filters must include at least one <action> element, and can also include a <category> and optional <data>. The main activity for your app needs an intent filter that defines the "main" action and the "launcher" category so that the system can launch your app.

Intents

Intents All Android activities are started or activated with an intent. In android, Intent is a messaging object which is used to request an action from another app component such as activities, services, broadcast receivers and content providers. Generally in android, Intents will help us to maintain the communication between app components from the same application as well as with the components of other applications. Intents are mainly used to perform following things. Starting an Activity Starting a Service Delivering a Broadcast In addition to starting activities, intents are also used to pass data between activities. For example, an email activity that displays a list of messages can send an intent to the activity that displays that message. The display activity needs data about the message to display, and you can include that data in the intent.

Types of Intents There are two types of intents in Android: Implicit Intent doesn't specify the component. In such case, intent provides information of available components provided by the system that is to be invoked. Intent intent=new Intent(Intent. ACTION_VIEW); intent. set. Data(Uri. parse("http: //www. javatpoint. com")); start. Activity(intent); Explicit Intent specifies the component. In such case, intent provides the external class to be invoked. Intent i = new Intent(get. Application. Context(), Activity. Two. class); start. Activity(i);

Implicit Intents Phone Call Launch Website Send Email Open Maps

Contd.

Explicit Intents Starting an Activity with an Explicit Intent Create new Intent Call Start. Activity method passing the intent as argument The started activity remains on the screen until the user taps the back button on the device. You can also manually close the started activity in response to a user action (such as a button click) with the finish() method:

Passing data between Activities Two Ways Intent Data Intent Extras Intent Data The intent data can hold only one piece of information. Example: A URI representing the location of the data you want to operate on. That URI could be a web page URL (http: //), a telephone number (tel: //), a geographic location (geo: //) or any other custom URI you define. Use the intent data field: When you only have one piece of information you need to send to the started activity. When that information is a data location that can be represented by a URI.

Contd. Intent Extras Intent extras are for any other arbitrary data you want to pass to the started activity. Intent extras are stored in a Bundle object as key and value pairs, where the keys are strings, and the values can be any primitive or object type Use the intent extras: If you want to pass more than one piece of information to the started activity. If any of the information you want to pass is not expressible by a URI. To put data into the intent extras you can use any of the Intent class's put. Extra() methods, or create your own bundle and put it into the intent with put. Extras().
 method with a Uri object to add that")
Put Data Use the set. Data() method with a Uri object to add that URI to the intent. After you've added the data, you can start the activity with the intent as usual.
; message. Intent. put.")
Put Extras Intent message. Intent=new Intent(First. Activity. this, Second. Activity. class); message. Intent. put. Extra(“EXTRA_MESSAGE”, "this is my message"); message. Intent. put. Extra(“EXTRA_POSITION_X”, 100); message. Intent. put. Extra(“EXTRA_POSITION_Y”, 500); start. Activity(message. Intent);
; Get Data")
Get Data and Extras in Second Activity Intent intent = get. Intent(); Get Data Uri location. Uri = get. Data(); Get Extras String message = intent. get. String. Extra(“EXTRA_MESSAGE”); int position. X = intent. get. Int. Extra(“EXTRA_POSITION_X”); int position. Y = intent. get. Int. Extra(“EXTRA_POSITION_Y”);

Start Activity for Result Sometimes when you send data to an activity with an intent, you would like to also get data back from that intent. For example, you might start a photo gallery activity that lets the user pick a photo. In this case your original activity needs to receive information about the photo the user chose back from the launched activity. To launch a new activity and get a result back, do the following steps in your originating activity: Instead of launching the activity with start. Activity(), call start. Activity. For. Result() with the intent and a request code. Create a new intent in the launched activity and add the return data to that intent. Implement on. Activity. Result() in the originating activity to process the returned data.
 to launch the activity The start. Activity. For. Result()")
Use start. Activity. For. Result() to launch the activity The start. Activity. For. Result() method takes two arguments: Intent Object Request Code start. Activity. For. Result(message. Intent, REQUEST_Code); The request code is an integer that identifies the request and can be used to differentiate between results when you process the return data. For example, if you launch one activity to take a photo and another to pick a photo from a gallery, you'll need different request codes to identify which request the returned data belongs to. Conventionally you define request codes as static integer variables with names that include REQUEST. Use a different integer for each code. For example:
 The response data from the")
Return a Response from the launched activity (Second Activity) The response data from the launched activity back to the originating activity is sent in an intent. In the launched activity Create an Intent Add Data or Extras to that Intent Use set. Result(response_code, intent) method to set the result to be sent to the first activity Call finish() method to end the launched activity Intent return. Intent = new Intent(); return. Intent. put. Extra(“Message”, “Checking Return Intent”) set. Result(RESULT_OK, return. Intent) Response Codes: RESULT_OK. the request was successful. RESULT_CANCELED: the user cancelled the operation.
 In the originating activity, implement the on.")
Read response data in on. Activity. Result() In the originating activity, implement the on. Activity. Result() callback method public void on. Activity. Result(int request. Code, int result. Code, Intent data) { super. on. Activity. Result(request. Code, result. Code, data); if (request. Code == TEXT_REQUEST) { if (result. Code == RESULT_OK) { String reply = data. get. String. Extra(“Message”); // process data } } }

Thank You!
- Slides: 38