Mobile Application Development Unit 4 Designing User interface

Mobile Application Development Unit- 4 Designing User interface with View Miss. P. S. Dungarwal Computer Department S. H. H. J. B. Polytechnic, Chandwad

ANDROID UI CONTROLS There are number of UI controls provided by Android that allow you to build the graphical user interface for your app. Following are the commonly used UI or input controls in android applications. Text. View Radio. Group Edit. Text Progress. Bar Auto. Complete. Text. View Time. Picker Button Date. Picker Image. Button Seek. Bar Toggle. Button Alert. Dialog Check. Box Switch Radio. Button Rating. Bar

ANDROID UI CONTROLS The “views” are the building blocks of a U. I design and composes of almost every basic U. I element like Text. Views, Edit. Texts, Image. Views etc. This ‘view’ however comes along with a few properties bundled to them. Some of the important and are often used to build up a complete meaningful screen design. “id” This is basically the name of the particular view and will be used to refer that particular view through out the project. It has to be unique(multiple views referencing to same id will confuse the compiler). “width” and “height” As the name of these properties suggest, these are the dimensions of that particular view. Now these dimensions can be set using hard-coded values and it will adopt to them in most layouts, but its not a very good design as the content inside them might get cropped or will have unwanted spaces. Android provides two pre-defined options to set these dimensions — “match_parent” and “wrap_content”.

ANDROID UI CONTROLS Setting the dimensions to “match_parent” will make them equal to those of its parent’s dimensions. If there is no parent to that particular view, it merely sets to the screen’s dimensions (parent of a view is the U. I element in which it is housed in). And setting it to “wrap_content” will force the view to adopt its dimensions according to its content.

ANDROID UI CONTROLS “margin” This is the minimum distance that a view has to maintain from its neighbouring views. Since there are four sides to any view, the four margins corresponding to them are “margin_left”, “margin_right”, “margin_top” and “margin_bottom”. If the same margin is needed to be set on all sides, it can be set directly through “margin” property.

ANDROID UI CONTROLS “padding” The distance between the view’s outline and its content. Again similar to the “margin” property, “padding” too has “padding_left”, “padding_right”, “padding_top”, “padding_bottom” and the common padding to all sides can be set through “padding” property.

ANDROID UI CONTROLS 1. Text. View: A Text. View displays text to the user and optionally allows them to edit it. A Text. View is a complete text editor, however the basic class is configured to not allow editing. <? xml version="1. 0" encoding="utf-8"? > <Linear. Layout xmlns: android="http: //schemas. android. com/apk/res/android" android: layout_width="match_parent" android: layout_height="match_parent" android: orientation="vertical"> <Text. View android: id="@+id/text. View 1" android: layout_width="match_parent" android: layout_height="wrap_content" android: layout_margin. Bottom="10 dp" android: text="Welcome to Mobile App Development" android: text. Color="#86 AD 33" android: text. Size="20 dp" android: text. Style="bold" /> </Linear. Layout>

activity_main. xml <? xml version="1. 0" encoding="utf-8"? > <Linear. Layout xmlns: android="http: //schemas. andr oid. com/apk/res/android" android: layout_width="match_parent" android: layout_height="match_parent" android: layout_margin. Top="10 dp" android: orientation="vertical" <Text. View android: padding="10 dp"> android: id="@+id/text. View 3" <Text. View android: layout_width="wrap_content" android: id="@+id/text. View 1" android: layout_height="wrap_content" android: layout_width="match_parent" android: text=" Mobile App Development" android: layout_height="wrap_content" android: text. Style="bold" android: layout_margin. Bottom="10 dp" android: text. Color="#fff" android: text="Mobile App Development" android: background="#7 F 3 AB 5" android: text. Color="#86 AD 33" android: layout_margin. Bottom="15 dp"/> android: text. Size="20 dp" <Text. View android: text. Style="bold" /> android: id="@+id/text. View 4" <Text. View android: layout_width="wrap_content" android: id="@+id/text. View 2" android: layout_height="wrap_content" android: layout_width="wrap_content" android: auto. Link="email|web" android: layout_height="wrap_content" android: text=“Contact Admin" /> android: layout_margin. Bottom="15 dp" </Linear. Layout> android: text. All. Caps="true" />

Main. Activity. java package com. mmp. textviewexample; import android. support. v 7. app. App. Compat. Activity; import android. os. Bundle; import android. widget. Text. View; public class Main. Activity extends App. Compat. Activity { @Override protected void on. Create(Bundle saved. Instance. State) { super. on. Create(saved. Instance. State); set. Content. View(R. layout. activity_main); Text. View tv =find. View. By. Id(R. id. text. View 2); tv. set. Text("Welcome to MMP"); } }

ANDROID UI CONTROLS 2. Edit. Text: Edit. Text is a predefined subclass of Text. View that includes rich editing capabilities. It is used to allow the user to enter or modify the text. While using Edit. Text control in our android applications, we need to specify the type of data the text field can accept using input. Type attribute. <? xml version="1. 0" encoding="utf-8"? > <Linear. Layout xmlns: android="http: //schemas. android. com/apk/res/android" android: layout_width="match_parent" android: layout_height="match_parent" android: orientation="vertical" > <Edit. Text android: id="@+id/txt. Sub" android: layout_width="match_parent" android: layout_height="wrap_content" android: hint="Subject" android: input. Type="text"/> </Linear. Layout>

activity_main. xml <? xml version="1. 0" encoding="utf-8"? > <Linear. Layout xmlns: android="http: //sche mas. android. com/apk/res/android" android: layout_width="match_parent" android: layout_height="match_parent" android: padding. Left="40 dp" android: orientation="vertical" android: id= "@+id/linearlayout" > <Edit. Text android: id="@+id/txt. Name" android: layout_width="wrap_content" android: layout_height="wrap_content" android: layout_margin. Top="25 dp" android: ems="10" android: hint="Name" android: input. Type="text" android: select. All. On. Focus="true" /> <Edit. Text android: id="@+id/txt. Pwd" android: layout_width="wrap_content" android: layout_height="wrap_content" android: ems="10" android: hint="Password 0 to 9" android: input. Type="number. Password" /> <Edit. Text android: id="@+id/txt. Emai" android: layout_width="wrap_content" android: layout_height="wrap_content" android: ems="10" android: hint="Email" android: input. Type="text. Email. Address " /> <Edit. Text android: id="@+id/txt. Date" android: layout_width="wrap_content" android: layout_height="wrap_content" android: layout_below="@+id/edit. Text 3" android: ems="10" android: hint="Date" android: input. Type="date" /> <Edit. Text android: id="@+id/txt. Phone" android: layout_width="wrap_content" android: layout_height="wrap_content" android: ems="10" android: hint="Phone Number" android: input. Type="phone" android: text. Color. Hint="#FE 8 DAB"/> <Button android: id="@+id/btn. Send" android: layout_width="wrap_content" android: layout_height="wrap_content" android: text="submit" android: text. Size="16 sp" android: text. Style="normal|bold" /> <Text. View android: layout_width="wrap_content" android: layout_height="wrap_content" android: id="@+id/result. View" android: layout_margin. Top="25 dp" android: text. Size="15 dp"/> </Linear. Layout>

Main. Activity. java package com. mmp. edittextexample; import android. support. v 7. app. App. Compat. Activity; import android. os. Bundle; import android. view. View; import android. widget. Button; import android. widget. Edit. Text; import android. widget. Text. View; import org. w 3 c. dom. Text; public class Main. Activity extends App. Compat. Activity { Button btn. Submit; Edit. Text name, password, email, dob, phoneno; Text. View result; @Override protected void on. Create(Bundle saved. Instance. State) { super. on. Create(saved. Instance. State); set. Content. View(R. layout. activity_main); name=find. View. By. Id(R. id. txt. Name); password =find. View. By. Id(R. id. txt. Pwd); email = find. View. By. Id(R. id. txt. Emai); dob = find. View. By. Id(R. id. txt. Date); phoneno=find. View. By. Id(R. id. txt. Phone); btn. Submit = find. View. By. Id(R. id. btn. Send); result = find. View. By. Id(R. id. result. View); btn. Submit. set. On. Click. Listener(new View. On. Click. Listener() {
 { if (name. get. Text(). to. String(). is.")
@Override public void on. Click(View v) { if (name. get. Text(). to. String(). is. Empty() || password. get. Text(). to. String(). is. Empty() || email. get. Text(). to. String(). is. Empty() || dob. get. Text(). to. String(). is. Empty() || phoneno. get. Text(). to. String(). is. Empty()) { result. set. Text("Please Fill All the Details"); } else { result. set. Text("Name - " + name. get. Text(). to. String() + " n" + "Password " + password. get. Text(). to. String() + " n" + "E-Mail - " + email. get. Text(). to. String() + " n" + "DOB " + dob. get. Text(). to. String() + " n" + "Contact - " + phoneno. get. Text(). to. String()); } } }); } }

ANDROID UI CONTROLS 3. Button: Button is a user interface control which is used to perform an action when the user click or tap on it. Create Button in XML Layout File <Linear. Layout xmlns: android="http: //schemas. android. com/apk/res/android" android: orientation="vertical" android: layout_width="match_parent" android: layout_height="match_parent"> <Button android: id="@+id/add. Btn" android: layout_width="wrap_content" android: layout_height="wrap_content" android: text="Add" /> </Linear. Layout>

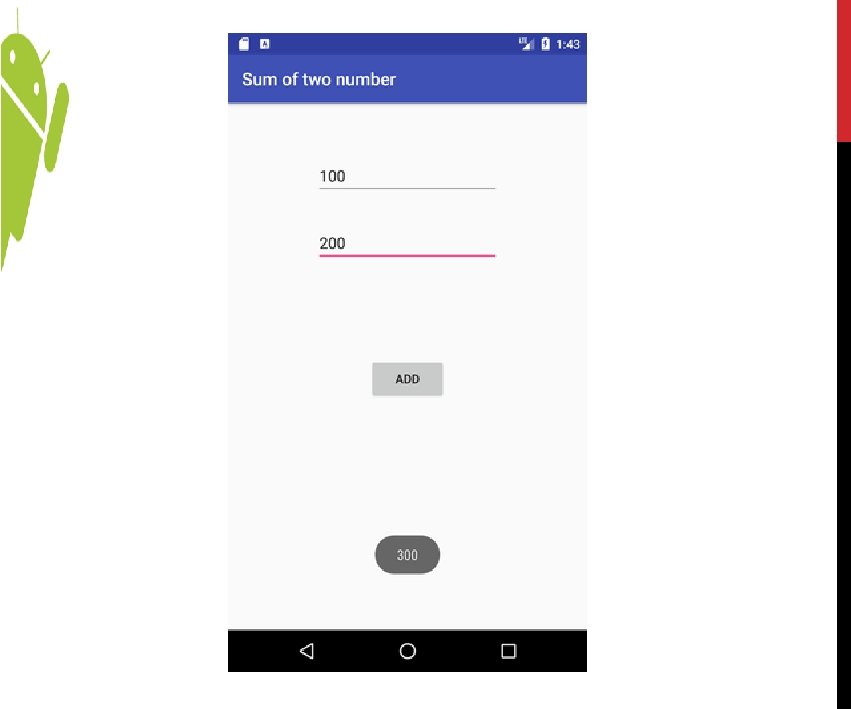
activity_main. xml <? xml version="1. 0" encoding="utf-8"? > <Relative. Layout xmlns: android="http: //schemas. android. com/apk/res/android" xmlns: app="http: //schemas. android. com/apk/res-auto" xmlns: tools="http: //schemas. android. com/tools" android: layout_width="match_parent" android: layout_height="match_parent" tools: context="example. javatpoint. com. sumoftwonumber. Main. Activity"> <Edit. Text android: id="@+id/edit. Text 1" android: layout_width="wrap_content" android: layout_height="wrap_content" android: layout_align. Parent. Top="true" android: layout_center. Horizontal="true" android: layout_margin. Top="61 dp" android: ems="10" android: input. Type="number" tools: layout_editor_absolute. X="84 dp" tools: layout_editor_absolute. Y="53 dp" />

<Edit. Text android: id="@+id/edit. Text 2" android: layout_width="wrap_content" android: layout_height="wrap_content" android: layout_below="@+id/edit. Text 1" android: layout_center. Horizontal="true" android: layout_margin. Top="32 dp" android: ems="10" android: input. Type="number" tools: layout_editor_absolute. X="84 dp" tools: layout_editor_absolute. Y="127 dp" /> <Button android: id="@+id/button" android: layout_width="wrap_content" android: layout_height="wrap_content" android: layout_below="@+id/edit. Text 2" android: layout_center. Horizontal="true" android: layout_margin. Top="109 dp" android: text="ADD" tools: layout_editor_absolute. X="148 dp" tools: layout_editor_absolute. Y="266 dp" /> </Relative. Layout>

Main. Activity. java package example. javatpoint. com. sumoftwonumber; import android. support. v 7. app. App. Compat. Activity; import android. os. Bundle; import android. view. View; import android. widget. Button; import android. widget. Edit. Text; import android. widget. Toast; public class Main. Activity extends App. Compat. Activity { private Edit. Text edittext 1, edittext 2; private Button button. Sum; @Override protected void on. Create(Bundle saved. Instance. State) { super. on. Create(saved. Instance. State); set. Content. View(R. layout. activity_main); add. Listener. On. Button(); }
 { edittext 1 = (Edit. Text) find. View.")
public void add. Listener. On. Button() { edittext 1 = (Edit. Text) find. View. By. Id(R. id. edit. Text 1); edittext 2 = (Edit. Text) find. View. By. Id(R. id. edit. Text 2); button. Sum = (Button) find. View. By. Id(R. id. button); button. Sum. set. On. Click. Listener(new View. On. Click. Listener() { @Override public void on. Click(View view) { String value 1=edittext 1. get. Text(). to. String(); String value 2=edittext 2. get. Text(). to. String(); int a=Integer. parse. Int(value 1); int b=Integer. parse. Int(value 2); int sum=a+b; Toast. make. Text(get. Application. Context(), String. value. Of(sum), Toast. LENGTH_LONG). show( ); } }

ANDROID UI CONTROLS 3. Image Button is a user interface control which is used to display a button with image to perform an action when user click or tap on it. Generally, the Image button in android looks similar as regular Button and perform the actions same as regular button but only difference is for image button we will add an image instead of text. Create Image. Button in XML Layout File <? xml version="1. 0" encoding="utf-8"? > <Linear. Layout xmlns: android="http: //schemas. android. com/apk/res/a ndroid" android: orientation="vertical" android: layout_width="match_parent " android: layout_height="match_parent"> <Image. Button android: id="@+id/add. Btn" android: layout_width="wrap_content" android: layout_height="wrap_content" android: src="@drawable/add_icon" /> </Linear. Layout>

activity_main. xml <? xml version="1. 0" encoding="utf-8"? > <Linear. Layout xmlns: android="http: //schemas. android. com/apk/res/android" android: layout_width="fill_parent" android: layout_height="fill_parent" android: orientation="vertical" > <Image. Button android: id="@+id/image. Button 1" android: layout_width="wrap_content" android: layout_height="wrap_content" android: src="@drawable/android_button" /> </Linear. Layout>

Main. Activity. java package com. mkyong. android; import android. app. Activity; import android. os. Bundle; import android. widget. Image. Button; import android. widget. Toast; import android. view. View. On. Click. Listener; public class My. Android. App. Activity extends Activity { Image. Button image. Button; @Override public void on. Create(Bundle saved. Instance. State) { super. on. Create(saved. Instance. State); set. Content. View(R. layout. main); add. Listener. On. Button(); }
 { image. Button = find. View. By. Id(R.")
public void add. Listener. On. Button() { image. Button = find. View. By. Id(R. id. image. Button 1); image. Button. set. On. Click. Listener(new On. Click. Listener() { @Override public void on. Click(View arg) { Toast. make. Text(get. Application. Context(), "Image. Button is clicked!", Toast. LENGTH_SHORT). show(); } }


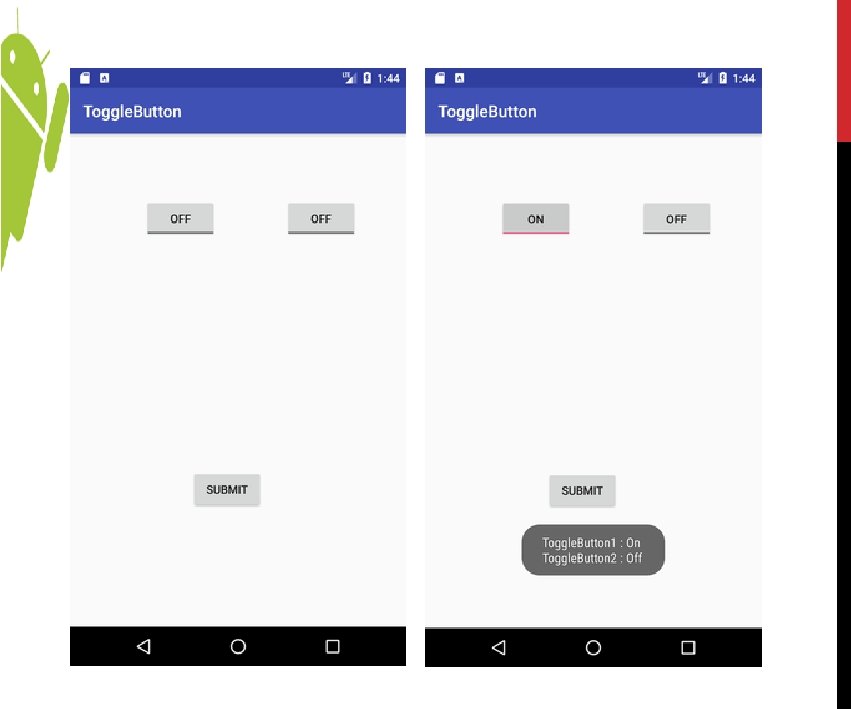
ANDROID UI CONTROLS 4. Toggle Button In android, Toggle Button is a user interface control which is used to display ON (Checked) or OFF (Unchecked) states as a button with a light indicator. Create Toggle. Button in XML Layout File <? xml version="1. 0" encoding="utf-8"? > <Relative. Layout xmlns: android="http: //schemas. android. com/apk/res /android" android: layout_width="match_parent" android: layout_height="mat ch_parent"> <Toggle. Button android: id="@+id/toggle 1" android: layout_width="wrap_content" android: layout_height="wrap_content" android: layout_margin. Left="100 dp" android: layout_margin. Top="120 dp" android: checked="true" android: text. Off="OFF" android: text. On="ON"/> </Relative. Layout>

activity_main. xml <? xml version="1. 0" encoding="utf-8"? > <android. support. constraint. Constraint. Layout xmlns: android="http: //schemas. android. com/apk/r es/android" xmlns: app="http: //schemas. android. com/apk/res-auto" xmlns: tools="http: //schemas. android. com/tools" android: layout_width="match_parent" android: layout_height="match_parent" tools: context="example. javatpoint. com. togglebutton. Main. Activity"> <Toggle. Button android: id="@+id/toggle. Button" android: layout_width="wrap_content" android: layout_height="wrap_content" android: layout_margin. Left="8 dp" android: layout_margin. Top="80 dp" android: text="Toggle. Button" android: text. Off="Off" android: text. On="On" app: layout_constraint. End_to. Start. Of="@+id/toggle. Button 2" app: layout_constraint. Start_to. Start. Of="parent" app: layout_constraint. Top_to. Top. Of="parent" />

<Toggle. Button android: id="@+id/toggle. Button 2" android: layout_width="wrap_content" android: layout_height="wrap_content" android: layout_margin. Right="60 dp" android: layout_margin. Top="80 dp" android: text="Toggle. Button" android: text. Off="Off" android: text. On="On" app: layout_constraint. End_to. End. Of="parent" app: layout_constraint. Top_to. Top. Of="parent" /> <Button android: id="@+id/button" android: layout_width="wrap_content" android: layout_height="wrap_content" android: layout_margin. Bottom="144 dp" android: layout_margin. Left="148 dp" android: text="Submit" app: layout_constraint. Bottom_to. Bottom. Of="parent" app: layout_constraint. Start_to. Start. Of="parent" /> </android. support. constraint. Constraint. Layout>

Main. Activity. java package example. javatpoint. com. togglebutton; import android. support. v 7. app. App. Compat. Activity; import android. os. Bundle; import android. view. View; import android. widget. Button; import android. widget. Toast; import android. widget. Toggle. Button; public class Main. Activity extends App. Compat. Activity { private Toggle. Button toggle. Button 1, toggle. Button 2; private Button button. Submit; @Override protected void on. Create(Bundle saved. Instance. State) { super. on. Create(saved. Instance. State); set. Content. View(R. layout. activity_main); add. Listener. On. Button. Click(); }
{ //Getting the Toggle. Button and Button instance")
public void add. Listener. On. Button. Click(){ //Getting the Toggle. Button and Button instance from the layout xml file toggle. Button 1=(Toggle. Button)find. View. By. Id(R. id. toggle. Button); toggle. Button 2=(Toggle. Button)find. View. By. Id(R. id. toggle. Button 2); button. Submit=(Button)find. View. By. Id(R. id. button); //Performing action on button click button. Submit. set. On. Click. Listener(new View. On. Click. Listener(){ @Override public void on. Click(View view) { String. Builder result = new String. Builder(); result. append("Toggle. Button 1 : "). append(toggle. Button 1. get. Text()); result. append("n. Toggle. Button 2 : "). append(toggle. Button 2. get. Text()); //Displaying the message in toast Toast. make. Text(get. Application. Context(), result. to. String(), Toast. LENGTH_LONG). sh ow(); } }

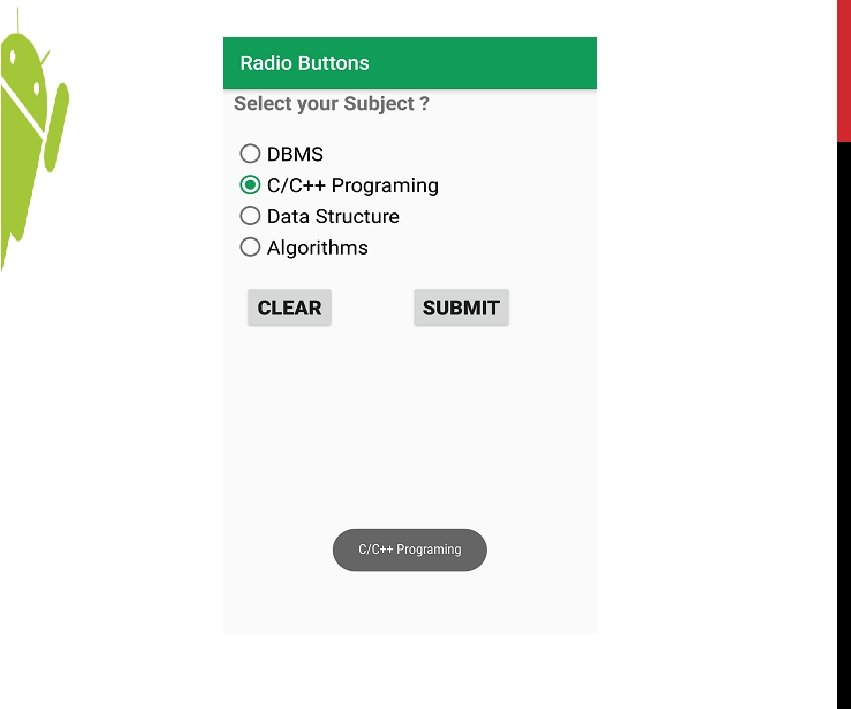
ANDROID UI CONTROLS 5. Radio Button & Radio Button Group In android, Radio Button is a two states button that can be either checked or unchecked and it cannot be unchecked once it is checked. Create Radio. Button in XML Layout File <? xml version="1. 0" encoding="utf-8"? > <Relative. Layout xmlns: android="http: //schemas. android. com/apk/res /android" android: layout_width="match_parent" android: layout_height="mat ch_parent"> <Radio. Group android: layout_width="match_parent" android: layout_height="wrap_content" android: orientation="vertical"> <Radio. Button android: layout_width="wrap_content" android: layout_height="wrap_content" android: text="Java" android: checked="true"/> </Relative. Layout>

Activity_main. xml <? xml version="1. 0" encoding="utf-8"? > <Relative. Layout xmlns: android="http: //schemas. android. com/apk/res/android" xmlns: app="http: //schemas. android. com/apk/res-auto" xmlns: tools="http: //schemas. android. com/tools" android: layout_width="match_parent" android: layout_height="match_parent" tools: context=". Main. Activity"> <Text. View android: layout_width="wrap_content" android: layout_height="wrap_content" android: text="Select your Subject ? " android: text. Style="bold" android: layout_margin. Left="10 dp" android: text. Size="20 dp"/> <!-- add Radio. Group which contain the many Radio. Button-->

<Radio. Group android: layout_margin. Top="50 dp" android: id="@+id/groupradio" android: layout_margin. Left="10 dp" android: layout_width="fill_parent" android: layout_height="wrap_content"> <!-- In Radio. Group create the 1 Radio Button--> <!-- like this we will add some more Radio Button--> <Radio. Button android: layout_width="fill_parent" android: layout_height="wrap_content" android: id="@+id/radia_id 1" android: text="DBMS" android: text. Size="20 dp"/> <Radio. Button android: layout_width="fill_parent" android: layout_height="wrap_content" android: id="@+id/radia_id 2" android: text="C/C++ Programing" android: text. Size="20 dp"/>

<Radio. Button android: layout_width="fill_parent" android: layout_height="wrap_content" android: id="@+id/radia_id 3" android: text="Data Structure" android: text. Size="20 dp"/> <Radio. Button android: layout_width="fill_parent" android: layout_height="wrap_content" android: id="@+id/radia_id 4" android: text="Algorithms" android: text. Size="20 dp"/> </Radio. Group> <!-- add button For Submit the Selected item-->

<Button android: layout_width="wrap_content" android: layout_height="wrap_content" android: text="Submit" android: id="@+id/submit" android: text. Style="bold" android: text. Size="20 dp" android: layout_margin. Top="200 dp" android: layout_margin. Left="180 dp" /> <!-- add clear button for clear the selected item--> <Button android: layout_width="wrap_content" android: layout_height="wrap_content" android: text="Clear" android: id="@+id/clear" android: text. Size="20 dp" android: text. Style="bold" android: layout_margin. Top="200 dp" android: layout_margin. Left="20 dp" /> </Relative. Layout>

Activity. java package org. geeksforgeeks. navedmalik. radiobuttons; import android. support. v 7. app. App. Compat. Activity; import android. os. Bundle; import android. view. View; import android. widget. Button; import android. widget. Radio. Group; import android. widget. Toast; public class Main. Activity extends App. Compat. Activity { private Radio. Group radio. Group; Button submit, clear; @Override protected void on. Create(Bundle saved. Instance. State) { super. on. Create(saved. Instance. State); set. Content. View(R. layout. activity_main); submit = find. View. By. Id(R. id. submit); clear = find. View. By. Id(R. id. clear); radio. Group = find. View. By. Id(R. id. groupradio); radio. Group. clear. Check();
")
radio. Group. set. On. Checked. Change. Listener( new Radio. Group. On. Checked. Change. Listener() { @Override public void on. Checked. Changed(Radio. Group group, int checked. Id) { Radio. Button radio. Button = group. find. View. By. Id(checked. Id); } }); submit. set. On. Click. Listener(new View. On. Click. Listener() { @Override
 { int selected. Id = radio. Group. get. Checked.")
public void on. Click(View v) { int selected. Id = radio. Group. get. Checked. Radio. Button. Id(); if (selected. Id == -1) { Toast. make. Text(Main. Activity. this, "No answer has been selected", Toast. LENGTH_SHORT). show(); } else { Radio. Button radio. Button = radio. Group. find. View. By. Id(selected. Id); Toast. make. Text(Main. Activity. this, radio. Button. get. Text(), Toast. LENGTH_SHORT). show( ); } } }); clear. set. On. Click. Listener(new View. On. Click. Listener() { @Override public void on. Click(View v) { radio. Group. clear. Check(); } }); }

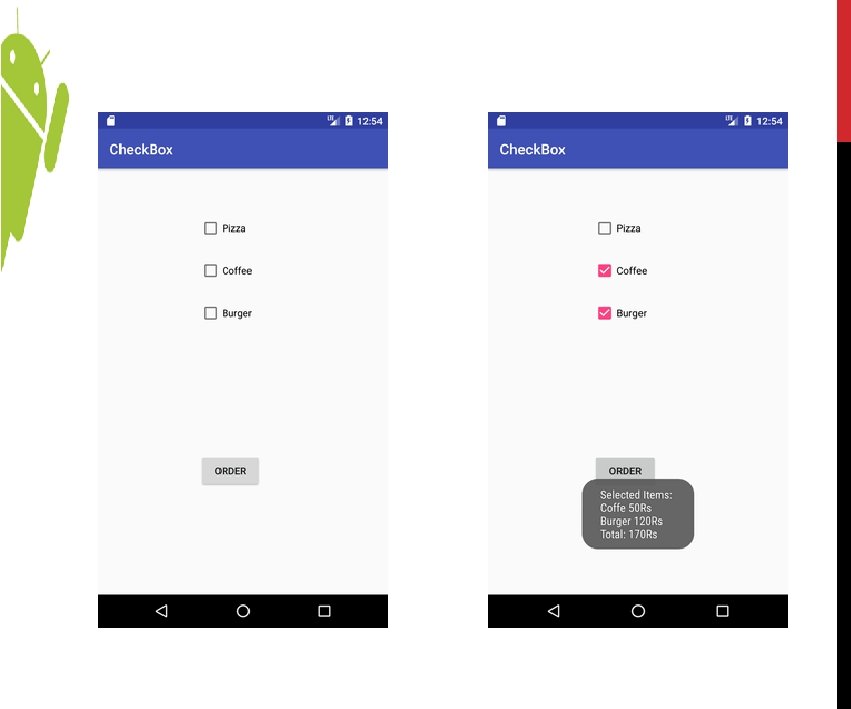
ANDROID UI CONTROLS 6. Check. Box Checkbox is a two states button that can be either checked or unchecked. Create Check. Box in XML Layout File <? xml version="1. 0" encoding="utf-8"? > <Relative. Layout xmlns: android="http: //schemas. android. com/apk/res/androi d" android: layout_width="match_parent" android: layout_height="match_par ent"> <Check. Box android: id="@+id/chk 1" android: layout_width="wrap_content" android: layout_height="wrap_content" android: checked="true" android: text="Java" /> </Relative. Layout>

activity_main. xml <? xml version="1. 0" encoding="utf-8"? > <android. support. constraint. Constraint. Layout xmlns: android="http: //schemas. android. c om/apk/res/android" xmlns: app="http: //schemas. android. com/apk/res-auto" xmlns: tools="http: //schemas. android. com/tools" android: layout_width="match_parent" android: layout_height="match_parent" tools: context="example. javatpoint. com. checkbox. Main. Activity"> <Check. Box android: id="@+id/check. Box" android: layout_width="wrap_content" android: layout_height="wrap_content" android: layout_margin. Left="144 dp" android: layout_margin. Top="68 dp" android: text="Pizza" app: layout_constraint. Start_to. Start. Of="parent" app: layout_constraint. Top_to. Top. Of="parent" />

<Check. Box android: id="@+id/check. Box 2" android: layout_width="wrap_content" android: layout_height="wrap_content" android: layout_margin. Left="144 dp" android: layout_margin. Top="28 dp" android: text="Coffee" app: layout_constraint. Start_to. Start. Of="parent" app: layout_constraint. Top_to. Bottom. Of="@+id/check. Box" /> <Check. Box android: id="@+id/check. Box 3" android: layout_width="wrap_content" android: layout_height="wrap_content" android: layout_margin. Left="144 dp" android: layout_margin. Top="28 dp" android: text="Burger" app: layout_constraint. Start_to. Start. Of="parent" app: layout_constraint. Top_to. Bottom. Of="@+id/check. Box 2" />

<Button android: id="@+id/button" android: layout_width="wrap_content" android: layout_height="wrap_content" android: layout_margin. Left="144 dp" android: layout_margin. Top="184 dp" android: text="Order" app: layout_constraint. Start_to. Start. Of="parent" app: layout_constraint. Top_to. Bottom. Of="@+id/check. Box 3" / > </android. support. constraint. Constraint. Layout>

Main. Activity. java package example. javatpoint. com. checkbox; import android. support. v 7. app. App. Compat. Activity; import android. os. Bundle; import android. view. View; import android. widget. Button; import android. widget. Check. Box; import android. widget. Toast; public class Main. Activity extends App. Compat. Activity { Check. Box pizza, coffe, burger; Button button. Order; @Override protected void on. Create(Bundle saved. Instance. State) { super. on. Create(saved. Instance. State); set. Content. View(R. layout. activity_main); add. Listener. On. Button. Click(); }
{ //Getting instance of Check. Boxes and Button")
public void add. Listener. On. Button. Click(){ //Getting instance of Check. Boxes and Button from the activty_m ain. xml file pizza=find. View. By. Id(R. id. check. Box); coffe=find. View. By. Id(R. id. check. Box 2); burger=find. View. By. Id(R. id. check. Box 3); button. Order=find. View. By. Id(R. id. button); //Applying the Listener on the Button click button. Order. set. On. Click. Listener(new View. On. Click. Listener(){ @Override public void on. Click(View view) { int totalamount=0; String. Builder result=new String. Builder(); result. append("Selected Items: ");
){ result. append(\"n. Pizza 100 Rs\"); totalamount+=100; } if(coffe. is. Checked()){ result.")
if(pizza. is. Checked()){ result. append("n. Pizza 100 Rs"); totalamount+=100; } if(coffe. is. Checked()){ result. append("n. Coffe 50 Rs"); totalamount+=50; } if(burger. is. Checked()){ result. append("n. Burger 120 Rs"); totalamount+=120; } result. append("n. Total: "+totalamount+"Rs"); //Displaying the message on the toast Toast. make. Text(get. Application. Context(), result. to. String(), Toast. LENGT H_LONG). show(); } }

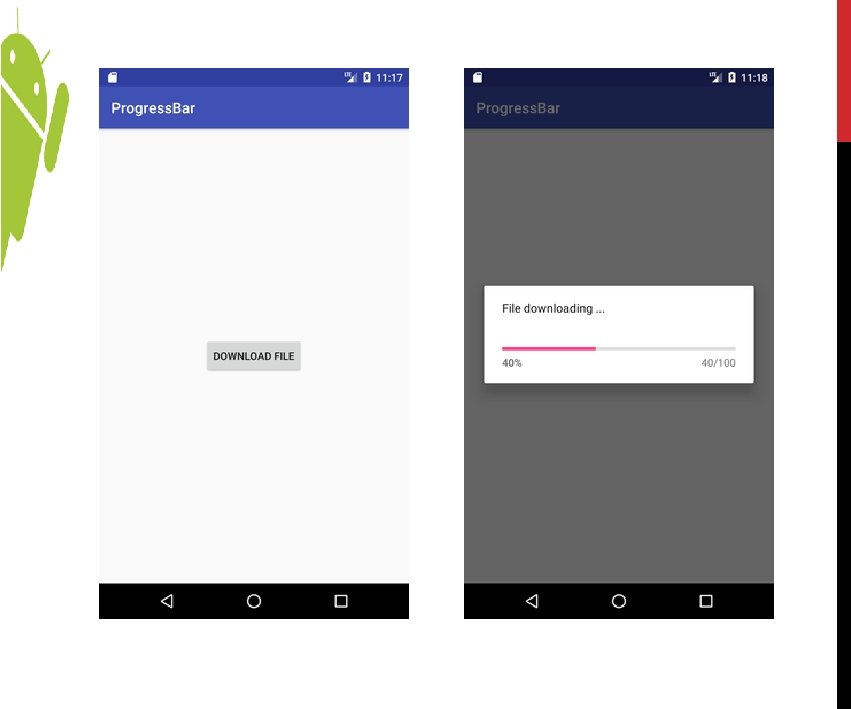
ANDROID UI CONTROLS 7. Progress Bar Progress. Bar is a user interface control which is used to indicate the progress of an operation. Create Android Progress. Bar in XML Layout File <Progress. Bar android: id="@+id/p. Bar 3" style="? android: attr/progress. Bar. Style. Horizontal" android: layout_width="wrap_content" android: layout_height="wrap_content" android: min. Height="50 dp" android: min. Width="250 dp" android: max="100" android: indeterminate="true" android: progress="1" />

activity_main. xml <Relative. Layout xmlns: androclass="http: //schemas. android. com/apk/res/a ndroid" xmlns: tools="http: //schemas. android. com/tools" android: layout_width="match_parent" android: layout_height="match_parent" tools: context=". Main. Activity" > <Button android: id="@+id/button 1" android: layout_width="wrap_content" android: layout_height="wrap_content" android: layout_align. Parent. Top="true" android: layout_center. Horizontal="true" android: layout_margin. Top="116 dp" android: text="download file" /> </Relative. Layout>

Main. Activity. java package example. javatpoint. com. progressbar; import android. app. Progress. Dialog; import android. os. Handler; import android. support. v 7. app. App. Compat. Activity; import android. os. Bundle; import android. view. View; import android. widget. Button; public class Main. Activity extends App. Compat. Activity { Button btn. Start. Progress; Progress. Dialog progress. Bar; private int progress. Bar. Status = 0; private Handler progress. Bar. Handler = new Handler(); private long file. Size = 0; @Override
 { super. on. Create(saved. Instance. State); set.")
protected void on. Create(Bundle saved. Instance. State) { super. on. Create(saved. Instance. State); set. Content. View(R. layout. activity_main); add. Listener. On. Button. Click(); } public void add. Listener. On. Button. Click() { btn. Start. Progress = find. View. By. Id(R. id. button); btn. Start. Progress. set. On. Click. Listener(new View. On. Click. Listener(){ @Override public void on. Click(View v) { // creating progress bar dialog progress. Bar = new Progress. Dialog(v. get. Context()); progress. Bar. set. Cancelable(true); progress. Bar. set. Message("File downloading. . . "); progress. Bar. set. Progress. Style(Progress. Dialog. STYLE_HORIZONTAL); progress. Bar. set. Progress(0); progress. Bar. set. Max(100); progress. Bar. show(); progress. Bar. Status = 0; file. Size = 0;
 { public void run() { while (progress. Bar. Status < 100)")
new Thread(new Runnable() { public void run() { while (progress. Bar. Status < 100) { // performing operation progress. Bar. Status = do. Operation(); try { Thread. sleep(1000); } catch (Interrupted. Exception e) { e. print. Stack. Trace(); } // Updating the progress bar progress. Bar. Handler. post(new Runnable() { public void run() { progress. Bar. set. Progress(progress. Bar. Status); } }); }
 {")
// performing operation if file is downloaded, if (progress. Bar. Status >= 100) { // sleeping for 1 second after operation completed try { Thread. sleep(1000); } catch (Interrupted. Exception e) { e. print. Stack. Trace(); } // close the progress bar dialog progress. Bar. dismiss(); } } }). start(); }//end of on. Click method }); }

// checking how much file is downloaded and updating the filesize public int do. Operation() { //The range of Progress. Dialog starts from 0 to 10000 while (file. Size <= 10000) { file. Size++; if (file. Size == 1000) { return 10; } else if (file. Size == 2000) { return 20; } else if (file. Size == 3000) { return 30; } else if (file. Size == 4000) { return 40; // you can add more else if } /* else { return 100; }*/ }//end of while return 100; }//end of do. Operation }

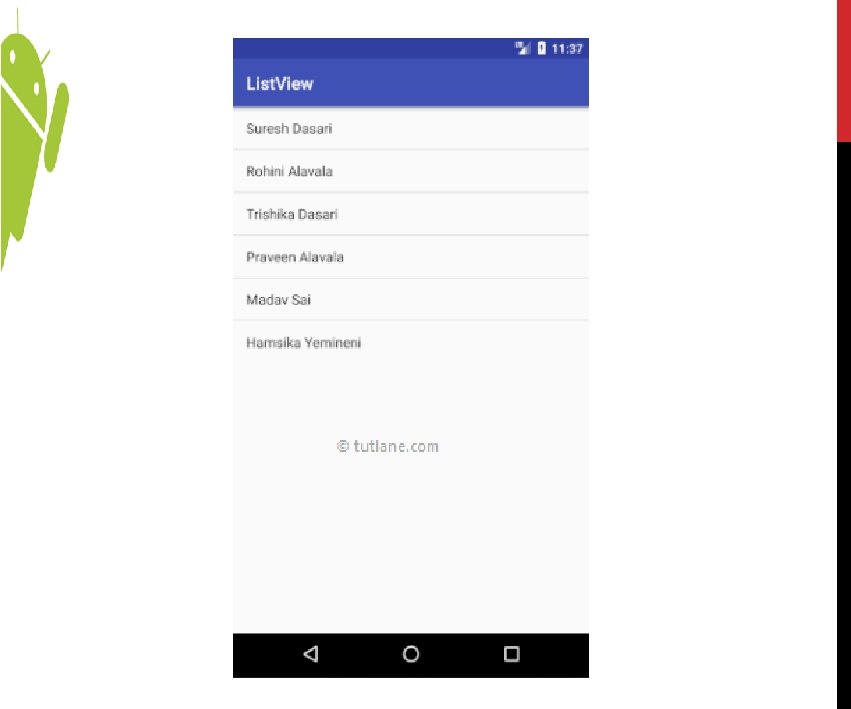
ANDROID UI CONTROLS Adapter Views 1. List. View In android, List. View is a View. Group which is used to display the list of scrollable of items in multiple rows and the list items are automatically inserted to the list using an adapter. Listview is present inside Containers. From there you can drag and drop on virtual mobile screen to create it. Alternatively you can also XML code to create it. Adapter: To fill the data in a List. View we simply use adapters. List items are automatically inserted to a list using an Adapter that pulls the content from a source such as an arraylist, array or database. <List. View xmlns: android="http: //schemas. android. com/apk/res/android" xmlns: tools="http: //schemas. android. com/tools" android: id="@+id/simple. List. View" android: layout_width="match_parent" android: layout_height="wrap_content" > </List. View>

ANDROID UI CONTROLS Attributes of List. View: 1. id: id is used to uniquely identify a List. View. 2. divider: This is a drawable or color to draw between different list items. 3. divider. Height: This specify the height of the divider between list items. This could be in dp(density pixel), sp(scale independent pixel) or px(pixel). 4. list. Selector: list. Selector property is used to set the selector of the list. View. It is generally orange or Sky blue color mostly but you can also define your custom color or an image as a list selector as per your design.

ANDROID UI CONTROLS Adapter Views Adapters Use in List. View: List. View is a subclass of Adapter. View and it can be populated by binding to an Adapter, which retrieves the data from an external source and creates a View that represents each data entry. In android commonly used adapters are: Array Adapter Base Adapter 1. Array Adapter: Whenever you have a list of single items which is backed by an array, you can use Array. Adapter. For instance, list of phone contacts, countries or names. By default, Array. Adapter expects a Layout with a single Text. View, 2. Base Adapter: Base. Adapter is a common base class of a general implementation of an Adapter that can be used in List. View. Base Adapter can be extended to create a custom Adapter for displaying a custom list item.

ANDROID UI CONTROLS activity_main. xml <? xml version="1. 0" encoding="utf-8"? > <Linear. Layout xmlns: android="http: //schemas. android. com/apk/res/android" xmlns: tools="http: //schemas. android. com/tools" android: layout_width="match_parent" android: layout_height="match_parent" android: orientation="vertical"> <List. View android: id="@+id/userlist" android: layout_width="match_parent" android: layout_height="wrap_content" > </List. View> </Linear. Layout>

ANDROID UI CONTROLS Main. Activity. java package com. tutlane. listview; import android. support. v 7. app. App. Compat. Activity; import android. os. Bundle; import android. widget. Array. Adapter; import android. widget. List. View; public class Main. Activity extends App. Compat. Activity { private List. View m. List. View; private Array. Adapter a. Adapter; private String[] users = { "Suresh Dasari", "Rohini Alavala", "Trishika Dasari", "Praveen Alavala", "Madav Sai", "Hamsika Yemineni"}; @Override protected void on. Create(Bundle saved. Instance. State) { super. on. Create(saved. Instance. State); set. Content. View(R. layout. activity_main); m. List. View = (List. View) find. View. By. Id(R. id. userlist); a. Adapter = new Array. Adapter(this, android. R. layout. simple_list_item_1, users); m. List. View. set. Adapter(a. Adapter); } }

ANDROID UI CONTROLS Adapter Views 2. Grid. View In android, Grid View is a View. Group which is used to display items in a two dimensional, scrollable grid and grid items are automatically inserted to the gridview layout using a list adapter.

ANDROID UI CONTROLS activity_main. xml <? xml version="1. 0" encoding="utf-8"? > <Grid. View xmlns: android="http: //schemas. android. com/apk/res/android" android: id="@+id/grid. View 1" android: num. Columns="auto_fit" android: gravity="center" android: column. Width="50 dp" android: stretch. Mode="column. Width" android: layout_width="fill_parent" android: layout_height="fill_parent" > </Grid. View>

ANDROID UI CONTROLS Main. Activity. java import android. app. Activity; import android. os. Bundle; import android. widget. Adapter. View; import android. widget. Array. Adapter; import android. widget. Grid. View; import android. widget. Text. View; import android. widget. Toast; import android. view. View; import android. widget. Adapter. View. On. Item. Click. Listener; public class Grid. View. Activity extends Activity { Grid. View grid. View; static final String[] numbers = new String[] { "A", "B", "C", "D", "E", "F", "G", "H", "I", "J", "K", "L", "M", "N", "O", "P", "Q", "R", "S", "T", "U", "V", "W", "X", "Y", "Z"};
 { super. on.")
ANDROID UI CONTROLS @Override public void on. Create(Bundle saved. Instance. State) { super. on. Create(saved. Instance. State); set. Content. View(R. layout. main); grid. View = (Grid. View) find. View. By. Id(R. id. grid. View 1); Array. Adapter<String> adapter = new Array. Adapter<String>(this, android. R. layout. simple_list_item_1, numbers); grid. View. set. Adapter(adapter); grid. View. set. On. Item. Click. Listener(new On. Item. Click. Listener() { public void on. Item. Click(Adapter. View<? > parent, View v, int position, long id) { Toast. make. Text(get. Application. Context(), ((Text. View) v). get. Text(), Toast. LENGTH_SHORT). show(); } }

ANDROID UI CONTROLS

ANDROID UI CONTROLS Adapter Views 3. Image. View In Android, Image. View class is used to display an image file in application.

ANDROID UI CONTROLS activity_main. xml <? xml version="1. 0" encoding="utf-8"? > <Grid. View xmlns: android="http: //schemas. android. com/apk/res/android" android: id="@+id/grid. View 1" android: num. Columns="auto_fit" android: gravity="center" android: column. Width="50 dp" android: stretch. Mode="column. Width" android: layout_width="fill_parent" android: layout_height="fill_parent" > </Grid. View>

ANDROID UI CONTROLS Main. Activity. java import android. app. Activity; import android. os. Bundle; import android. widget. Adapter. View; import android. widget. Array. Adapter; import android. widget. Grid. View; import android. widget. Text. View; import android. widget. Toast; import android. view. View; import android. widget. Adapter. View. On. Item. Click. Listener; public class Grid. View. Activity extends Activity { Grid. View grid. View; static final String[] numbers = new String[] { "A", "B", "C", "D", "E", "F", "G", "H", "I", "J", "K", "L", "M", "N", "O", "P", "Q", "R", "S", "T", "U", "V", "W", "X", "Y", "Z"};
 { super. on.")
ANDROID UI CONTROLS @Override public void on. Create(Bundle saved. Instance. State) { super. on. Create(saved. Instance. State); set. Content. View(R. layout. main); grid. View = (Grid. View) find. View. By. Id(R. id. grid. View 1); Array. Adapter<String> adapter = new Array. Adapter<String>(this, android. R. layout. simple_list_item_1, numbers); grid. View. set. Adapter(adapter); grid. View. set. On. Item. Click. Listener(new On. Item. Click. Listener() { public void on. Item. Click(Adapter. View<? > parent, View v, int position, long id) { Toast. make. Text(get. Application. Context(), ((Text. View) v). get. Text(), Toast. LENGTH_SHORT). show(); } }

ANDROID UI CONTROLS

- Slides: 72