
Microsoft Word 2016 What you need to know

- Slides: 35
Microsoft Word 2016: What you need to know for your Legal Analysis Writing and Research (LAWR) Class For PC and Mac Terry Mc. Cormack Assoc. Director of Law Library Brian Detweiler Student Services Librarian
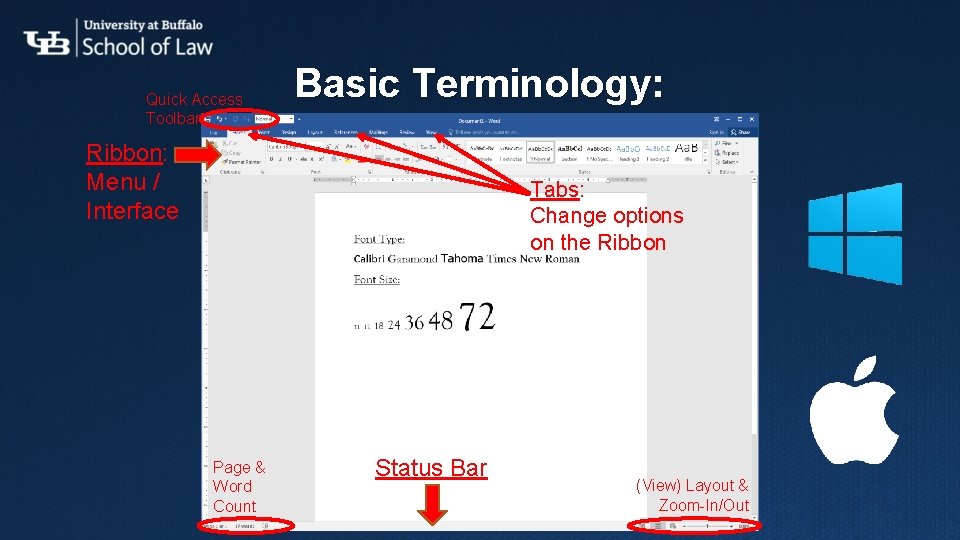
Quick Access Toolbar Basic Terminology: Ribbon: Menu / Interface Tabs: Change options on the Ribbon Page & Word Count Status Bar (View) Layout & Zoom-In/Out
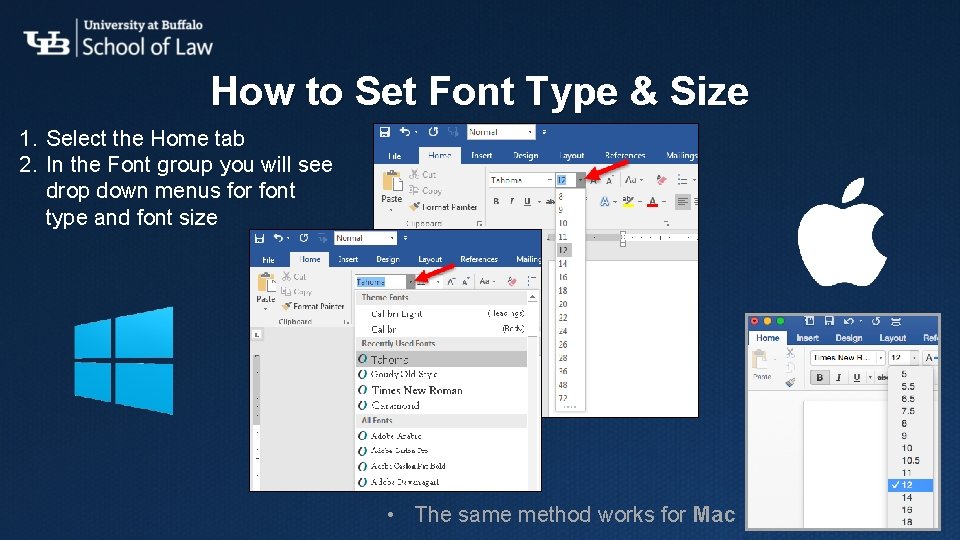
How to Set Font Type & Size 1. Select the Home tab 2. In the Font group you will see drop down menus for font type and font size • The same method works for Mac
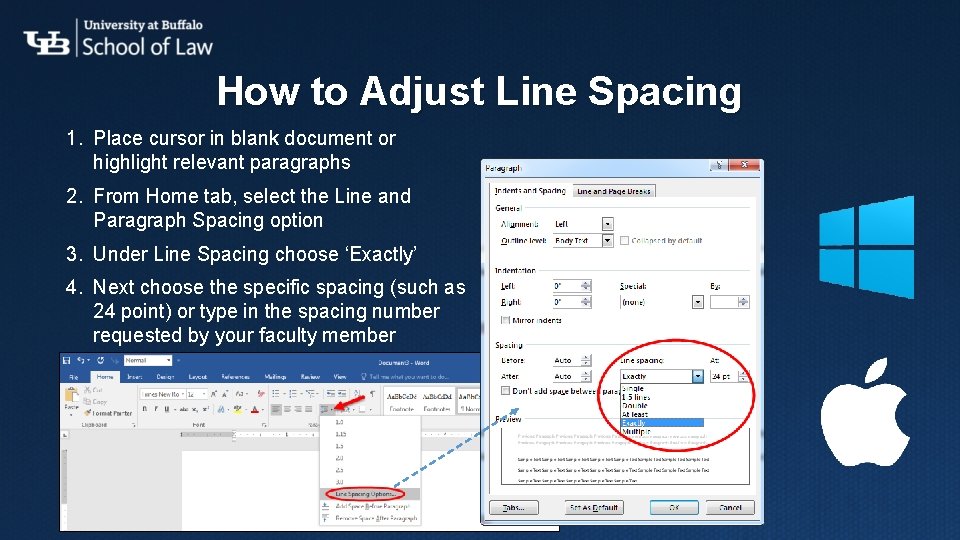
How to Adjust Line Spacing 1. Place cursor in blank document or highlight relevant paragraphs 2. From Home tab, select the Line and Paragraph Spacing option 3. Under Line Spacing choose ‘Exactly’ 4. Next choose the specific spacing (such as 24 point) or type in the spacing number requested by your faculty member
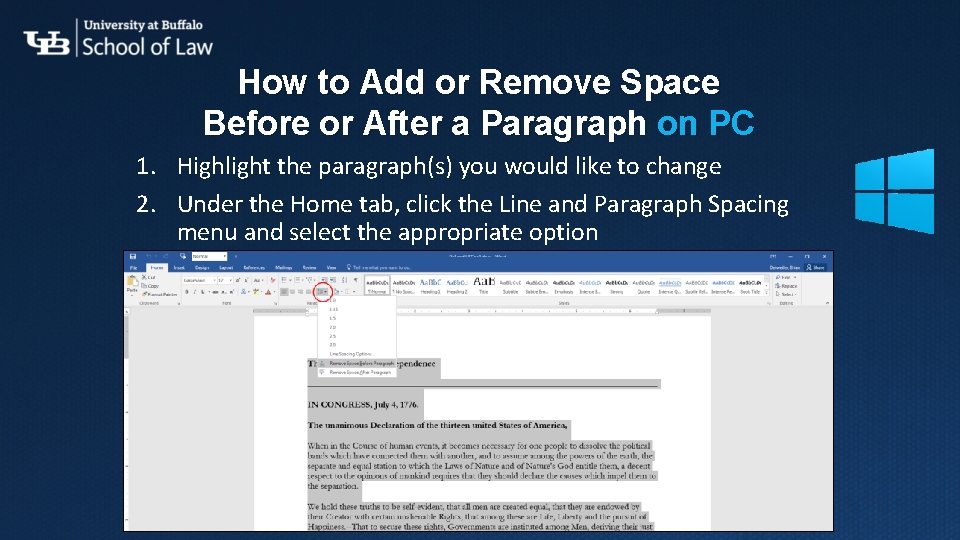
How to Add or Remove Space Before or After a Paragraph on PC 1. Highlight the paragraph(s) you would like to change 2. Under the Home tab, click the Line and Paragraph Spacing menu and select the appropriate option
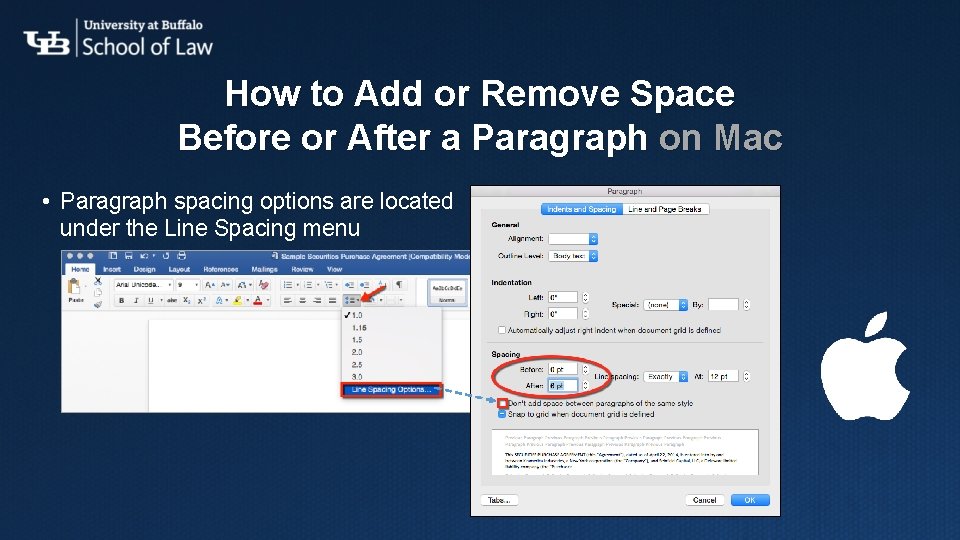
How to Add or Remove Space Before or After a Paragraph on Mac • Paragraph spacing options are located under the Line Spacing menu
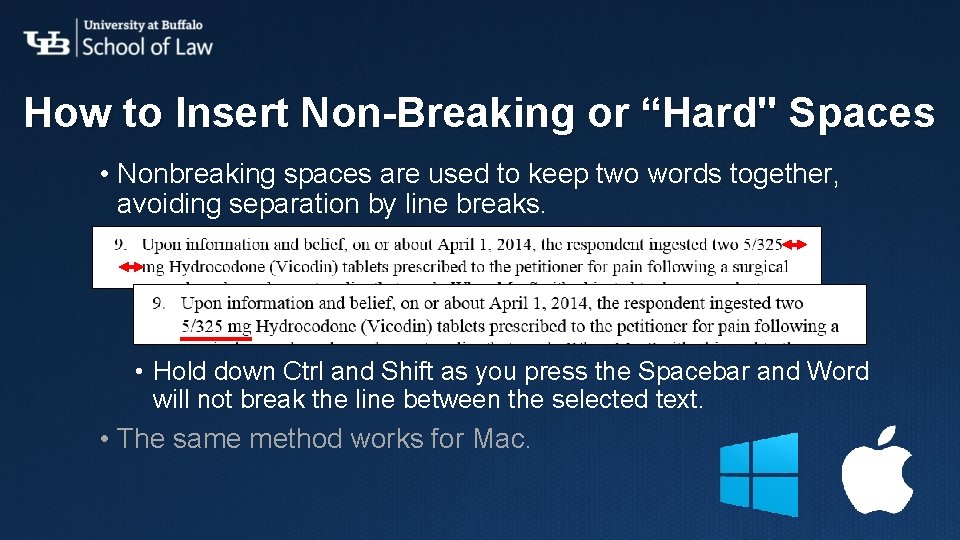
How to Insert Non-Breaking or “Hard" Spaces • Nonbreaking spaces are used to keep two words together, avoiding separation by line breaks. • Hold down Ctrl and Shift as you press the Spacebar and Word will not break the line between the selected text. • The same method works for Mac.
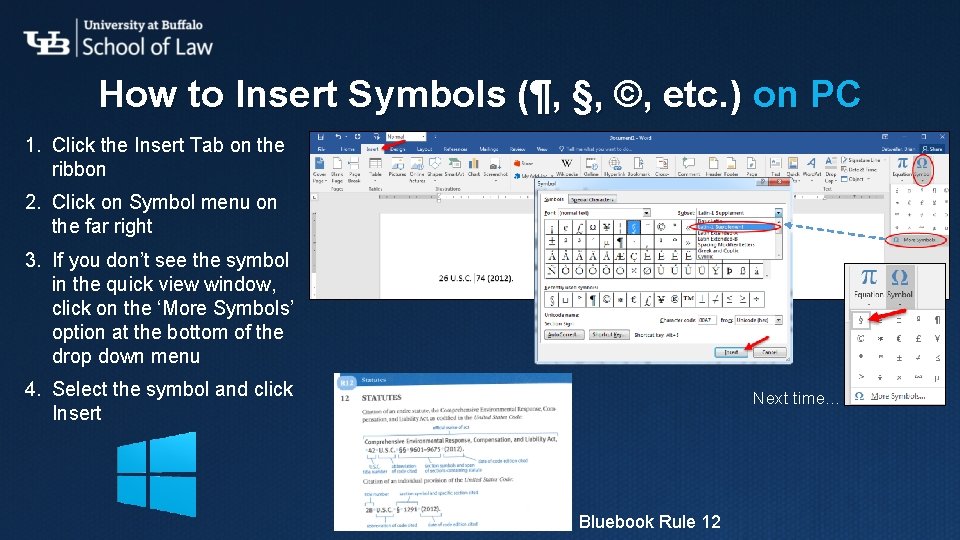
How to Insert Symbols (¶, §, ©, etc. ) on PC 1. Click the Insert Tab on the ribbon 2. Click on Symbol menu on the far right 3. If you don’t see the symbol in the quick view window, click on the ‘More Symbols’ option at the bottom of the drop down menu 4. Select the symbol and click Insert Next time… • Bluebook Rule 12
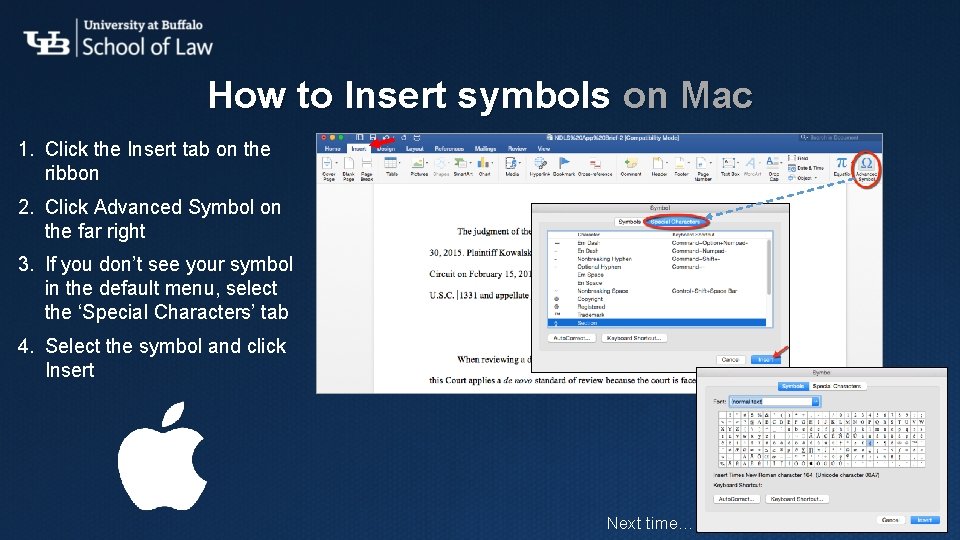
How to Insert symbols on Mac 1. Click the Insert tab on the ribbon 2. Click Advanced Symbol on the far right 3. If you don’t see your symbol in the default menu, select the ‘Special Characters’ tab 4. Select the symbol and click Insert Next time…
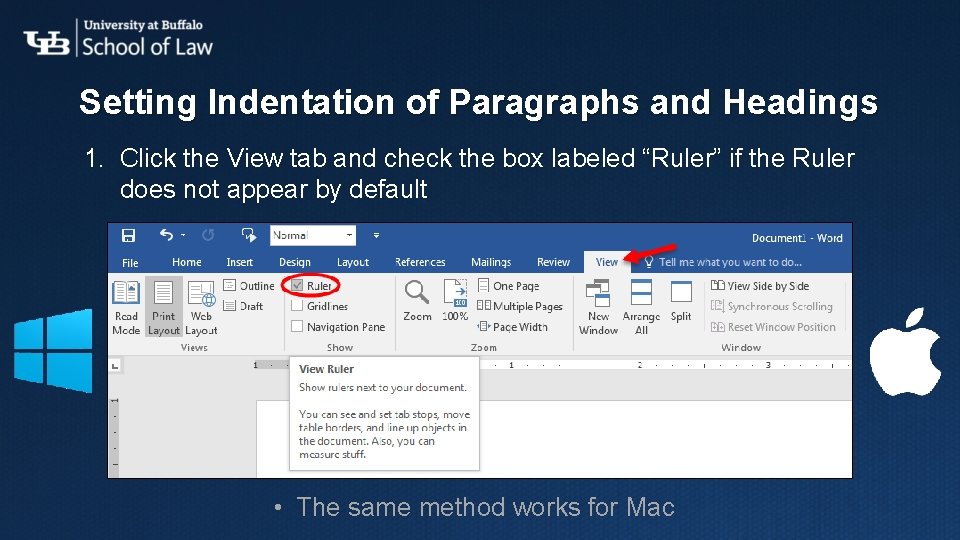
Setting Indentation of Paragraphs and Headings 1. Click the View tab and check the box labeled “Ruler” if the Ruler does not appear by default • The same method works for Mac
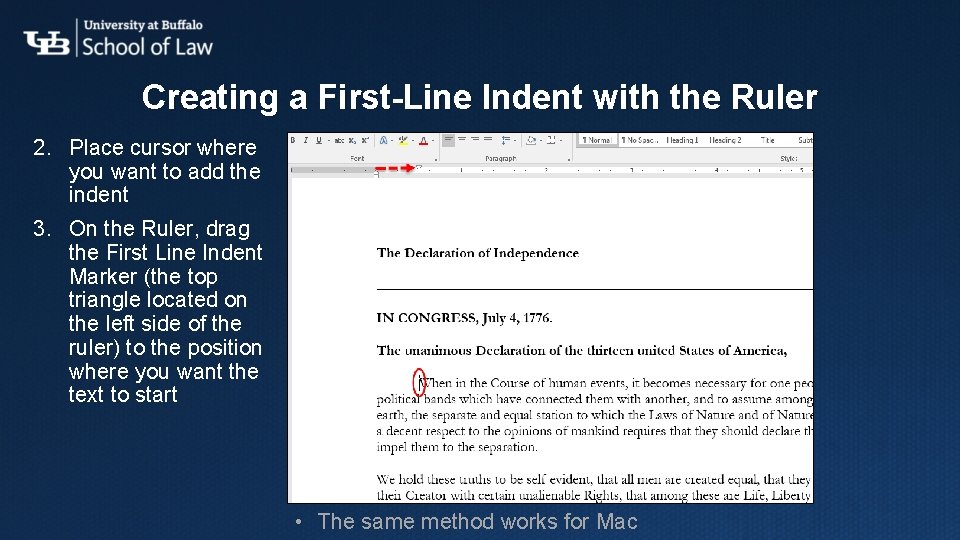
Creating a First-Line Indent with the Ruler 2. Place cursor where you want to add the indent 3. On the Ruler, drag the First Line Indent Marker (the top triangle located on the left side of the ruler) to the position where you want the text to start • The same method works for Mac
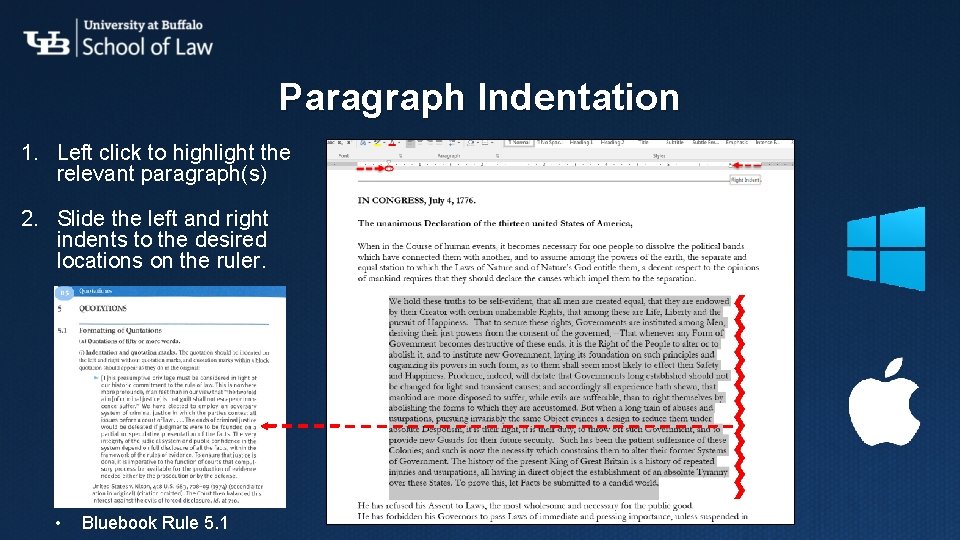
Paragraph Indentation 1. Left click to highlight the relevant paragraph(s) 2. Slide the left and right indents to the desired locations on the ruler. • Bluebook Rule 5. 1
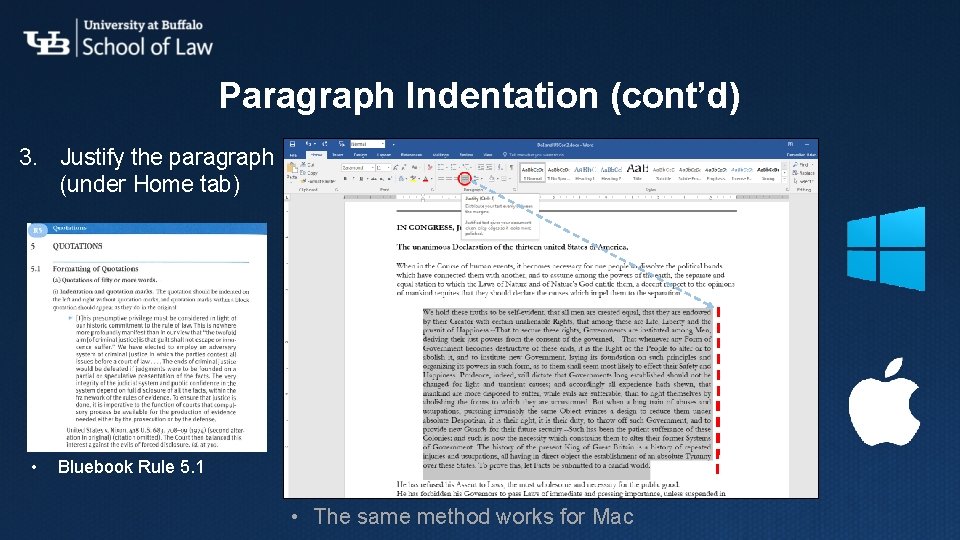
Paragraph Indentation (cont’d) 3. Justify the paragraph (under Home tab) • Bluebook Rule 5. 1 • The same method works for Mac
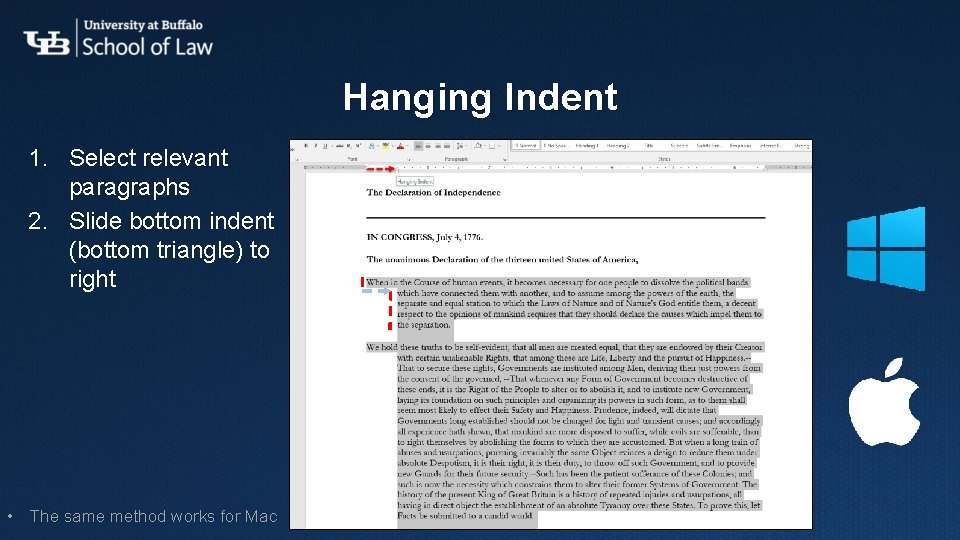
Hanging Indent 1. Select relevant paragraphs 2. Slide bottom indent (bottom triangle) to right • The same method works for Mac
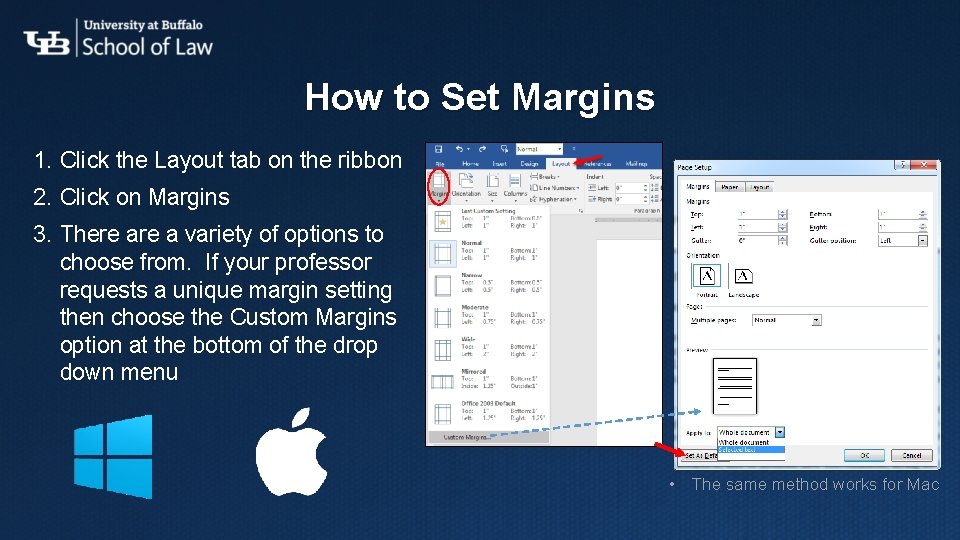
How to Set Margins 1. Click the Layout tab on the ribbon 2. Click on Margins 3. There a variety of options to choose from. If your professor requests a unique margin setting then choose the Custom Margins option at the bottom of the drop down menu • The same method works for Mac
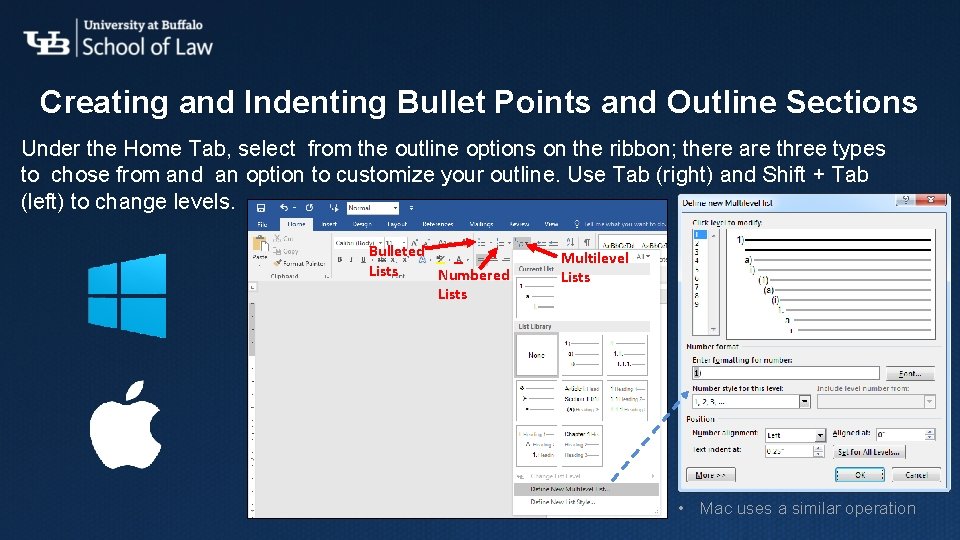
Creating and Indenting Bullet Points and Outline Sections Under the Home Tab, select from the outline options on the ribbon; there are three types to chose from and an option to customize your outline. Use Tab (right) and Shift + Tab (left) to change levels. Bulleted Lists Numbered Lists Multilevel Lists • Mac uses a similar operation
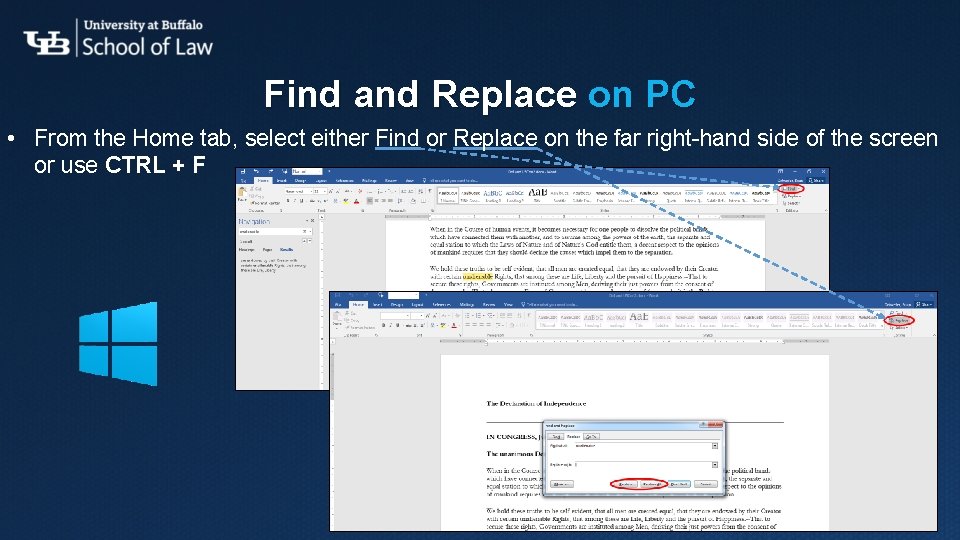
Find and Replace on PC • From the Home tab, select either Find or Replace on the far right-hand side of the screen or use CTRL + F
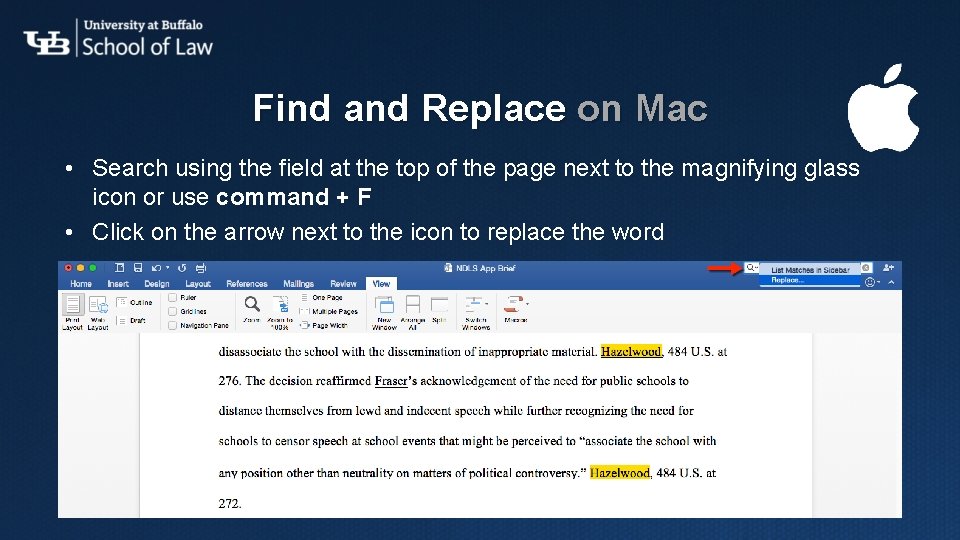
Find and Replace on Mac • Search using the field at the top of the page next to the magnifying glass icon or use command + F • Click on the arrow next to the icon to replace the word
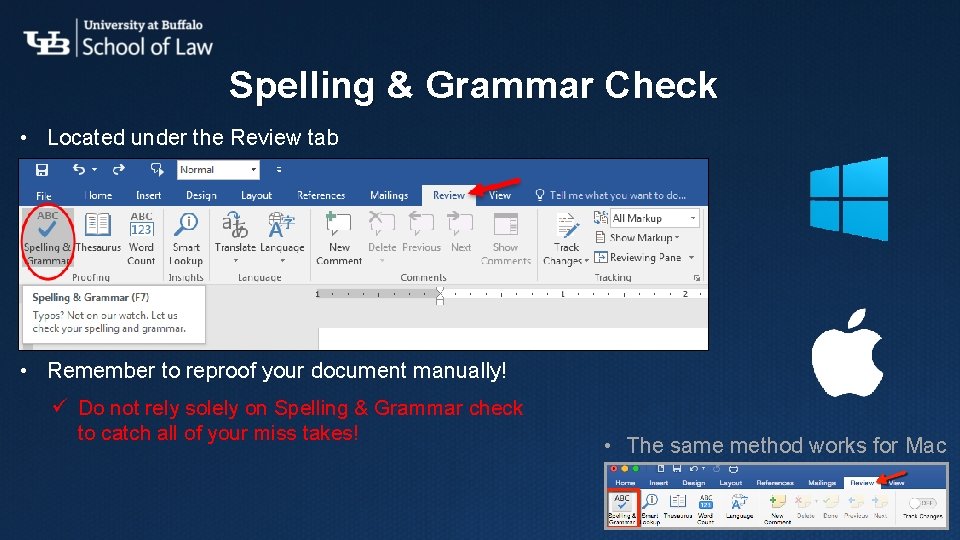
Spelling & Grammar Check • Located under the Review tab • Remember to reproof your document manually! ü Do not rely solely on Spelling & Grammar check to catch all of your miss takes! • The same method works for Mac
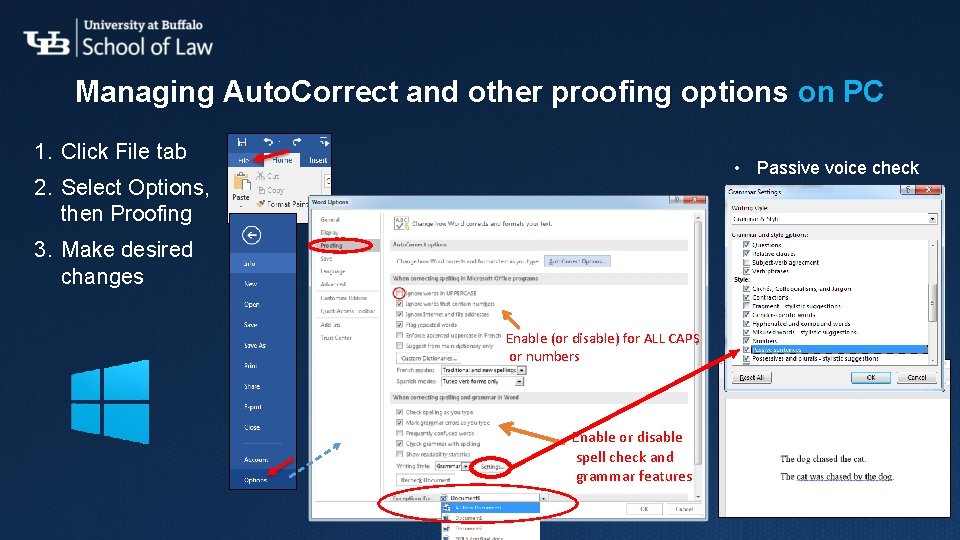
Managing Auto. Correct and other proofing options on PC 1. Click File tab • Passive voice check 2. Select Options, then Proofing 3. Make desired changes Enable (or disable) for ALL CAPS or numbers Enable or disable spell check and grammar features
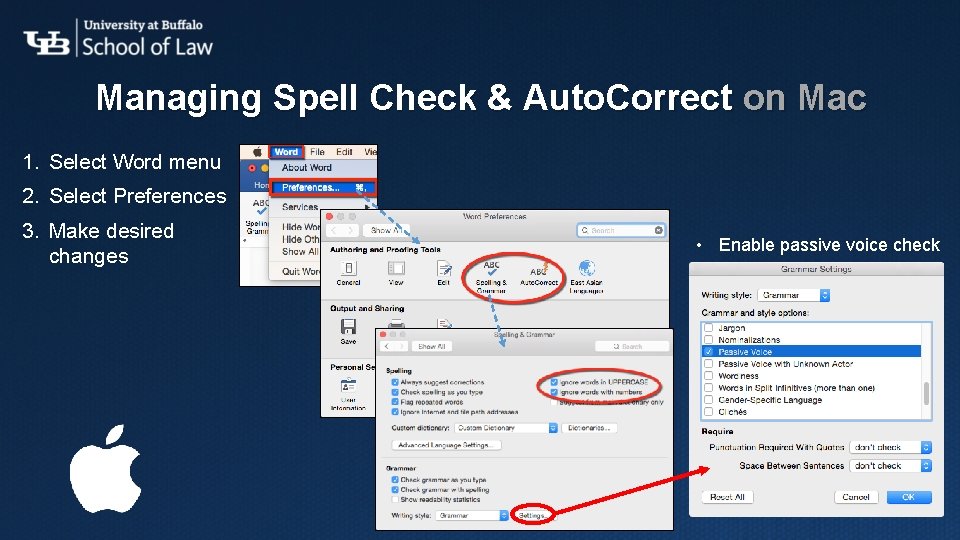
Managing Spell Check & Auto. Correct on Mac 1. Select Word menu 2. Select Preferences 3. Make desired changes • Enable passive voice check
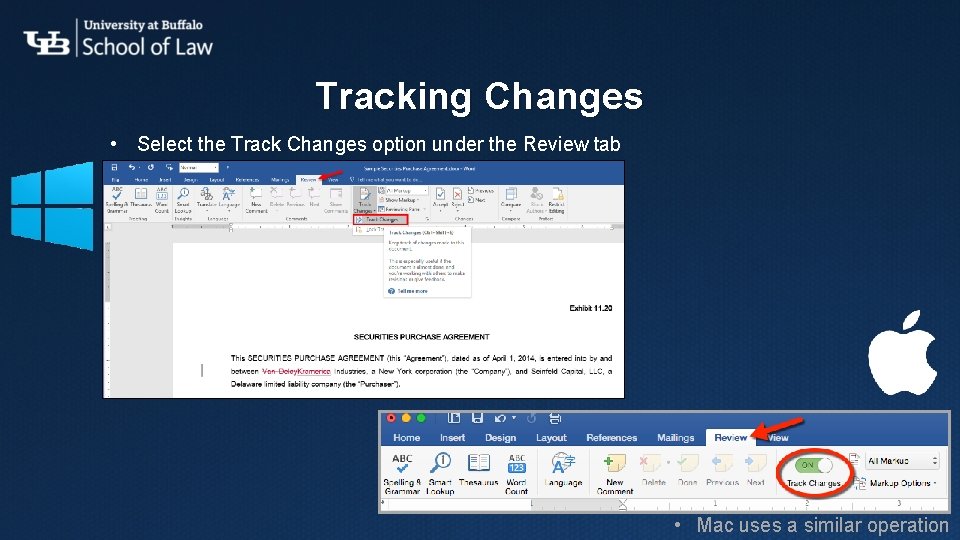
Tracking Changes • Select the Track Changes option under the Review tab • Mac uses a similar operation
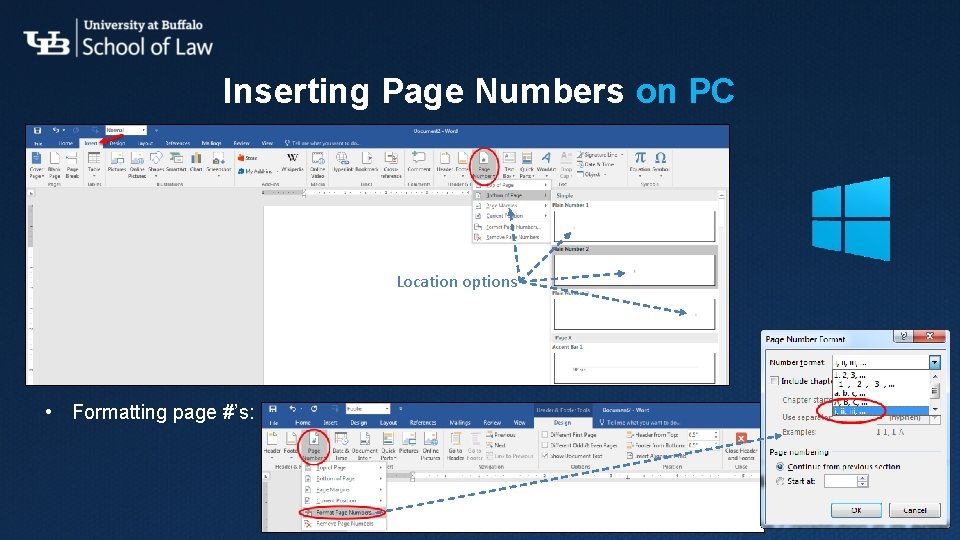
Inserting Page Numbers on PC Location options • Formatting page #’s:
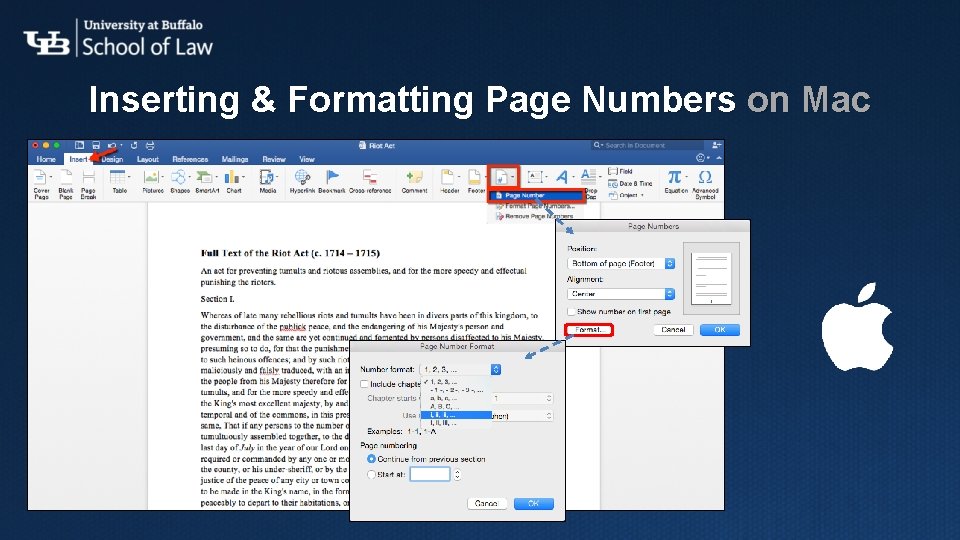
Inserting & Formatting Page Numbers on Mac
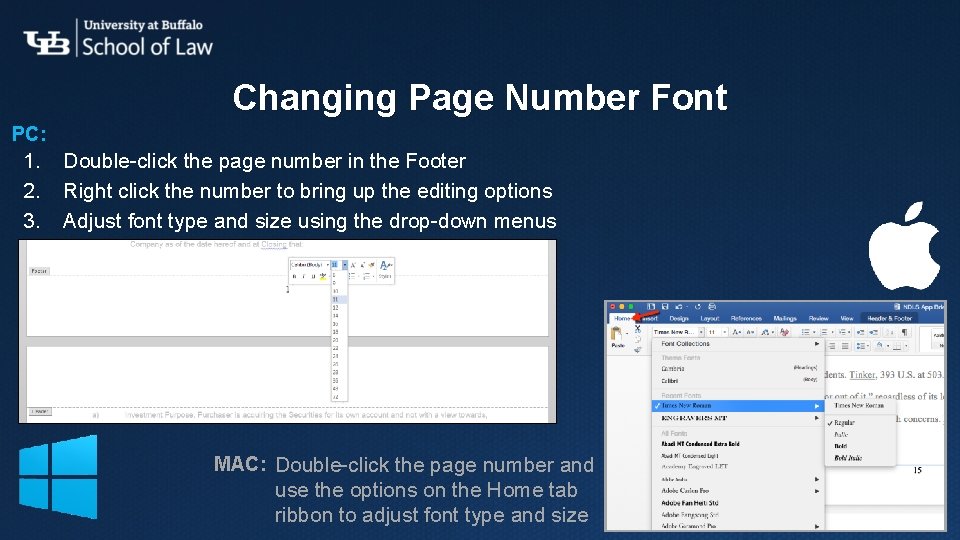
Changing Page Number Font PC: 1. 2. 3. Double-click the page number in the Footer Right click the number to bring up the editing options Adjust font type and size using the drop-down menus MAC: Double-click the page number and use the options on the Home tab ribbon to adjust font type and size
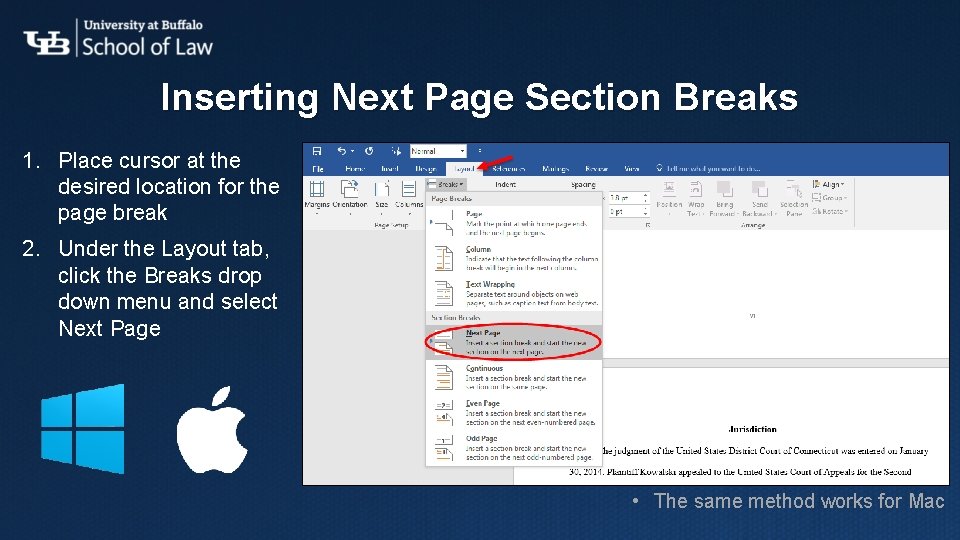
Inserting Next Page Section Breaks 1. Place cursor at the desired location for the page break 2. Under the Layout tab, click the Breaks drop down menu and select Next Page Break Section Break • The same method works for Mac
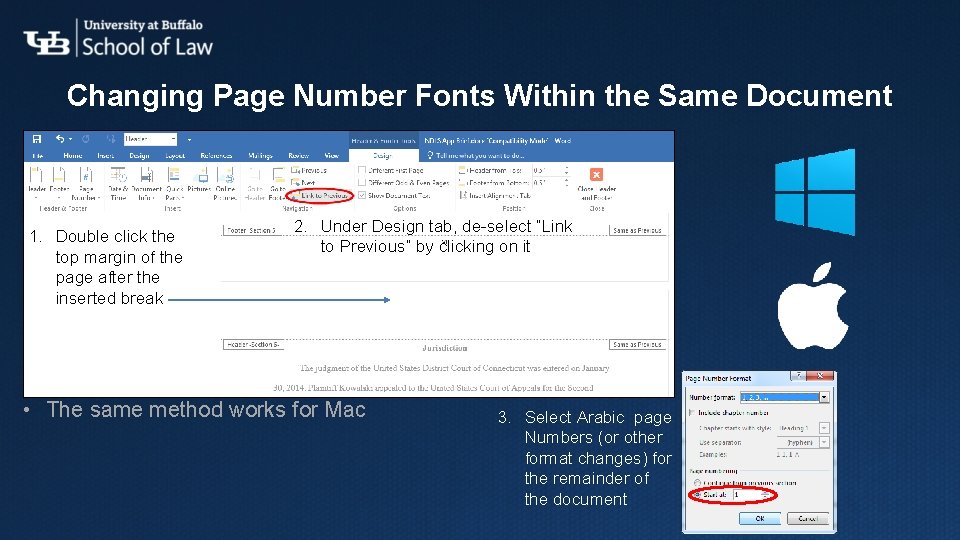
Changing Page Number Fonts Within the Same Document 1. Double click the top margin of the page after the inserted break 2. Under Design tab, de-select “Link to Previous” by clicking on it • The same method works for Mac 3. Select Arabic page Numbers (or other format changes) for the remainder of the document
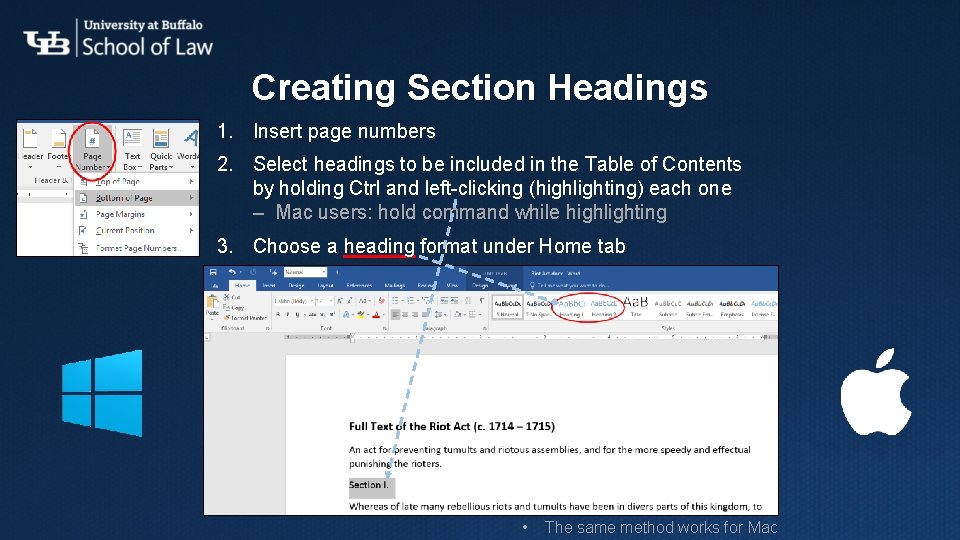
Creating Section Headings 1. Insert page numbers 2. Select headings to be included in the Table of Contents by holding Ctrl and left-clicking (highlighting) each one – Mac users: hold command while highlighting 3. Choose a heading format under Home tab • The same method works for Mac
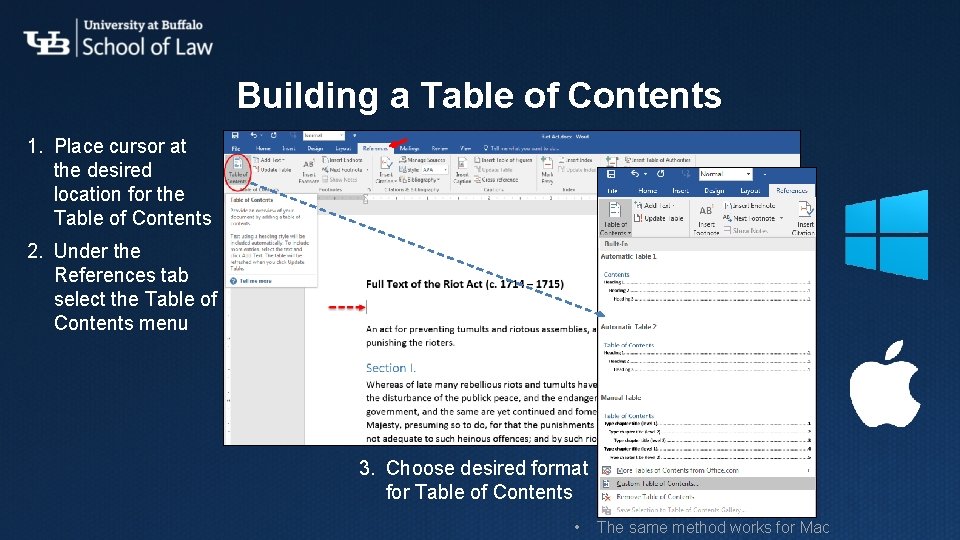
Building a Table of Contents 1. Place cursor at the desired location for the Table of Contents 2. Under the References tab select the Table of Contents menu 3. Choose desired format for Table of Contents • The same method works for Mac
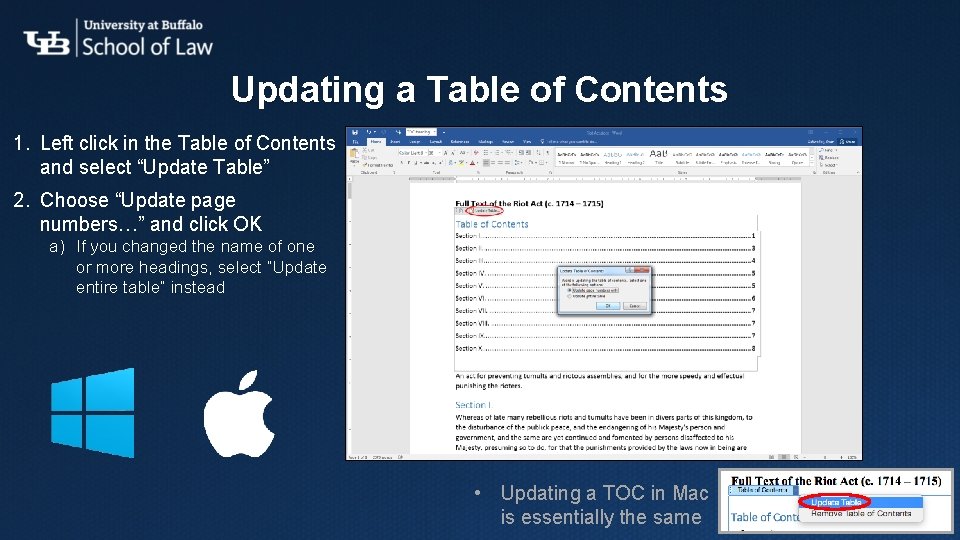
Updating a Table of Contents 1. Left click in the Table of Contents and select “Update Table” 2. Choose “Update page numbers…” and click OK a) If you changed the name of one or more headings, select “Update entire table” instead • Updating a TOC in Mac is essentially the same
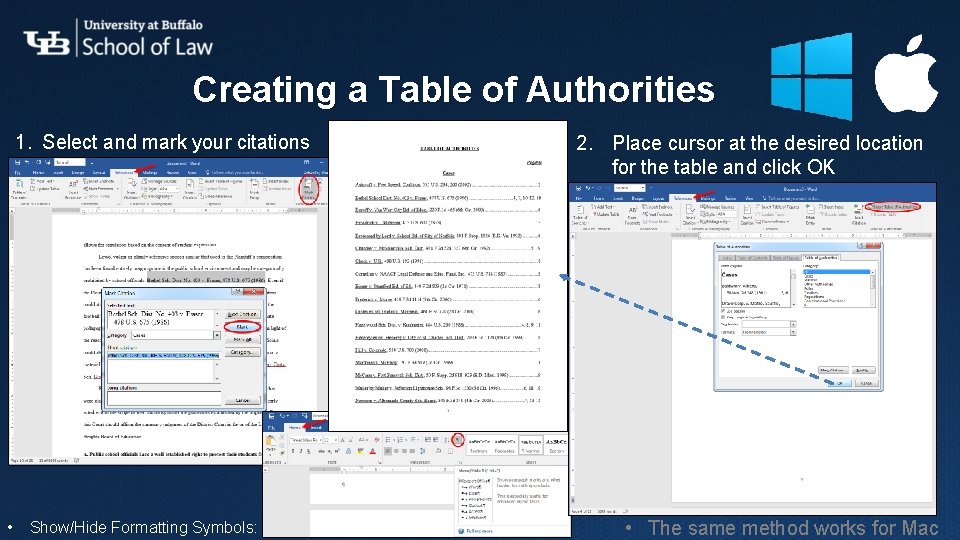
Creating a Table of Authorities 1. Select and mark your citations • Show/Hide Formatting Symbols: 2. Place cursor at the desired location for the table and click OK • The same method works for Mac
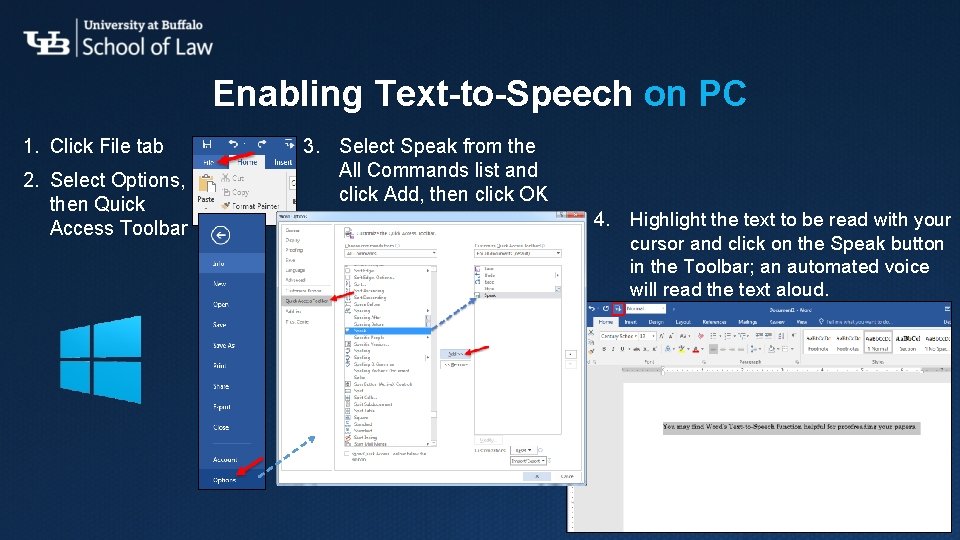
Enabling Text-to-Speech on PC 1. Click File tab 2. Select Options, then Quick Access Toolbar 3. Select Speak from the All Commands list and click Add, then click OK 4. Highlight the text to be read with your cursor and click on the Speak button in the Toolbar; an automated voice will read the text aloud.
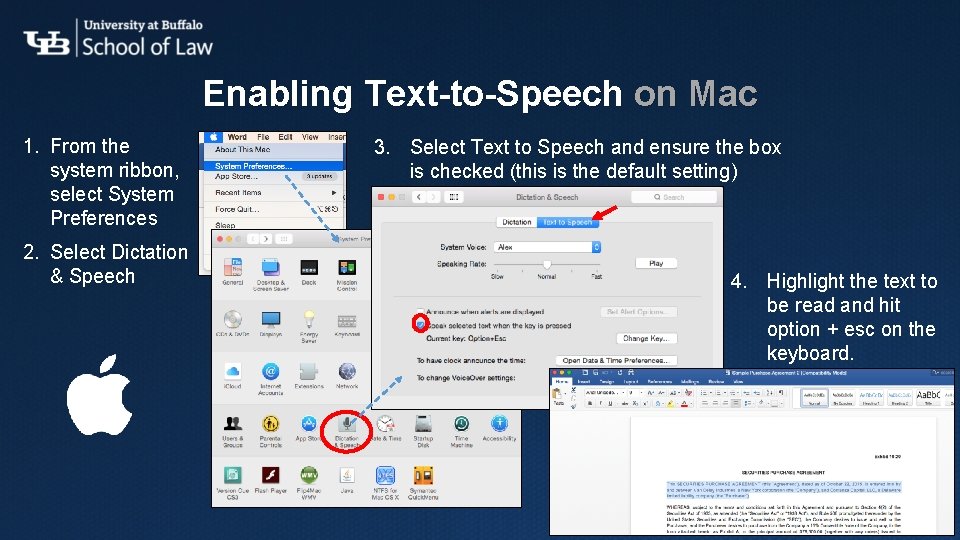
Enabling Text-to-Speech on Mac 1. From the system ribbon, select System Preferences 2. Select Dictation & Speech 3. Select Text to Speech and ensure the box is checked (this is the default setting) 4. Highlight the text to be read and hit option + esc on the keyboard.
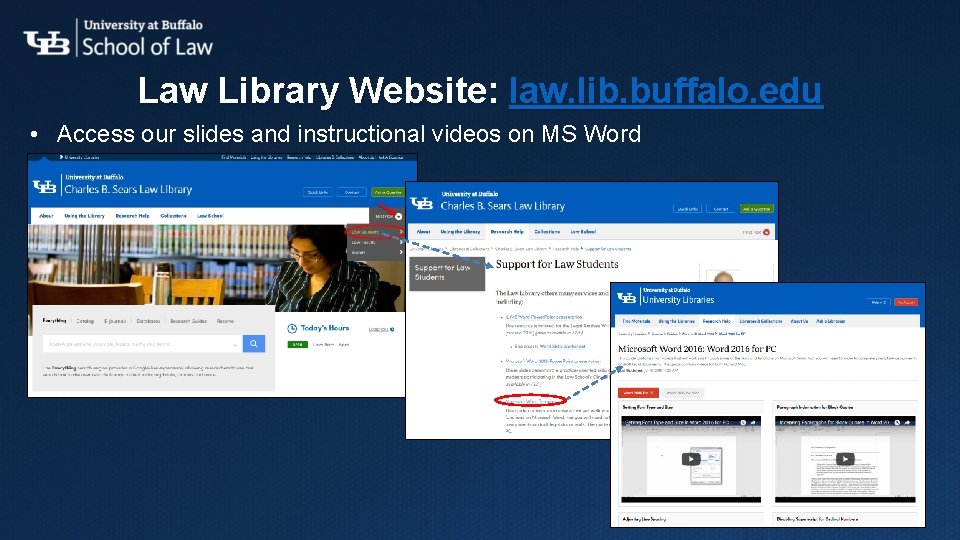
Law Library Website: law. lib. buffalo. edu • Access our slides and instructional videos on MS Word
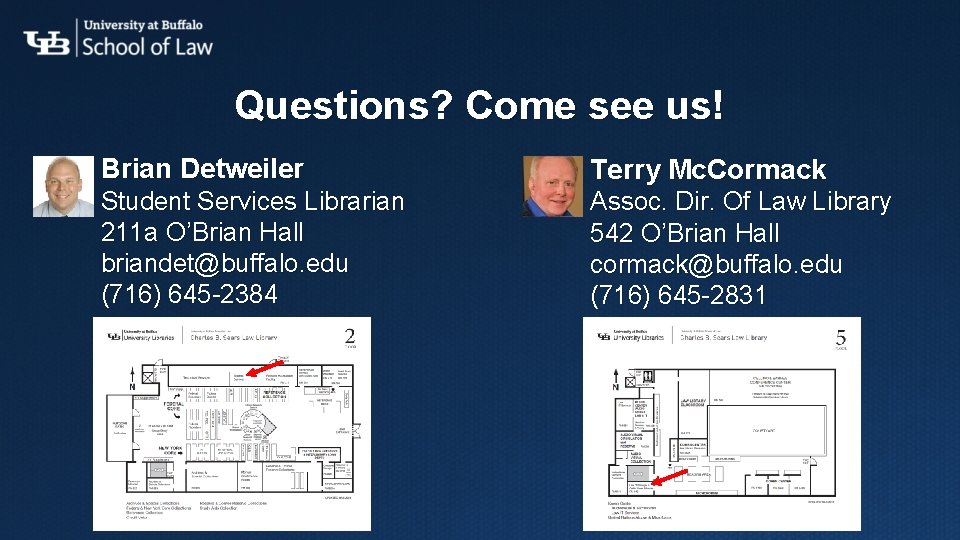
Questions? Come see us! Brian Detweiler Terry Mc. Cormack Student Services Librarian 211 a O’Brian Hall briandet@buffalo. edu (716) 645 -2384 Assoc. Dir. Of Law Library 542 O’Brian Hall cormack@buffalo. edu (716) 645 -2831