Microsoft Word 2013 Lesson 8 Using Illustrations and
- Slides: 86

Microsoft Word 2013 Lesson 8 Using Illustrations and Graphics © 2014, John Wiley & Sons, Inc. Microsoft Official Academic Course, Microsoft Word 2013 1

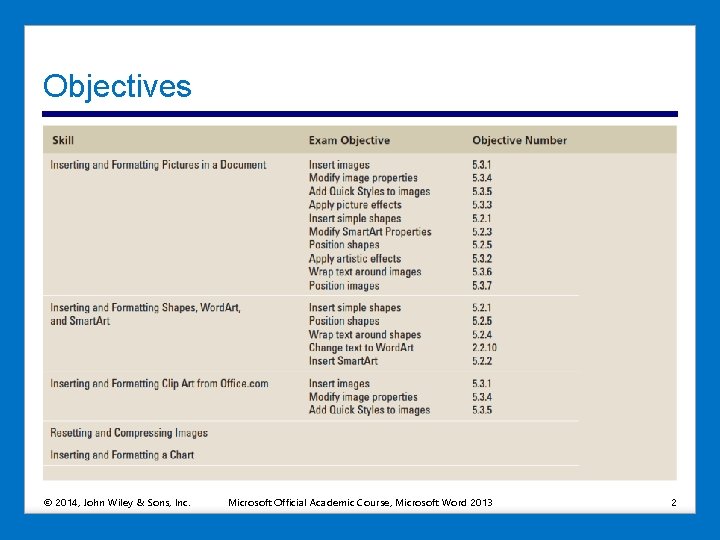
Objectives © 2014, John Wiley & Sons, Inc. Microsoft Official Academic Course, Microsoft Word 2013 2

Step by Step: Insert Pictures • GET READY. Before you begin, be sure to LAUNCH Microsoft Word. 1. On a blank page, key Vacationing with Family. 2. Select the text then right-click to display the Mini toolbar. 3. Change the font of the title to Cambria, and the font size to 28 pt and bold. 4. Center horizontally; then deselect text. 5. Press Enter. 6. Click the Insert tab then click the Pictures button in the Illustrations group. The Insert Picture dialog box appears. © 2014, John Wiley & Sons, Inc. Microsoft Official Academic Course, Microsoft Word 2013 3

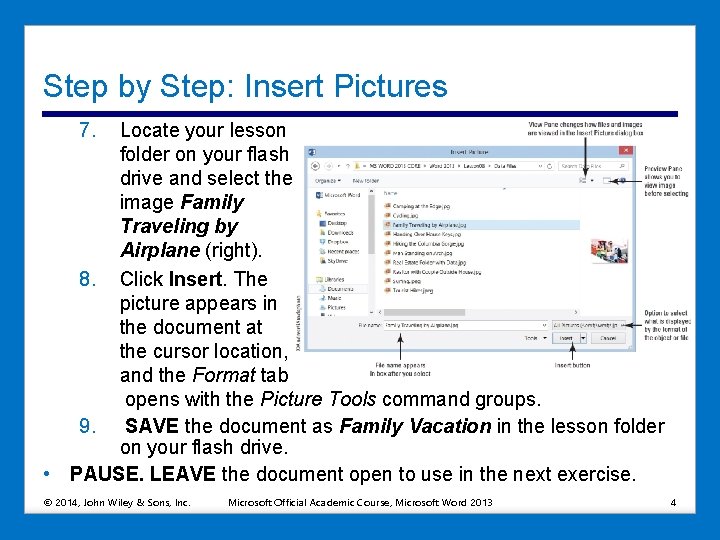
Step by Step: Insert Pictures 7. Locate your lesson folder on your flash drive and select the image Family Traveling by Airplane (right). 8. Click Insert. The picture appears in the document at the cursor location, and the Format tab opens with the Picture Tools command groups. 9. SAVE the document as Family Vacation in the lesson folder on your flash drive. • PAUSE. LEAVE the document open to use in the next exercise. © 2014, John Wiley & Sons, Inc. Microsoft Official Academic Course, Microsoft Word 2013 4

Step by Step: Crop, Resize, Scale, and Rotate a Picture • USE the document you left open from the previous exercise. 1. Select the picture if necessary and in the Size group, adjust the height by using the arrow keys. Change to 4. 9”. As you increased the height, by default the Lock aspect ratio option is selected, so the width of the image also changes to accommodate the new dimensions. © 2014, John Wiley & Sons, Inc. Microsoft Official Academic Course, Microsoft Word 2013 5

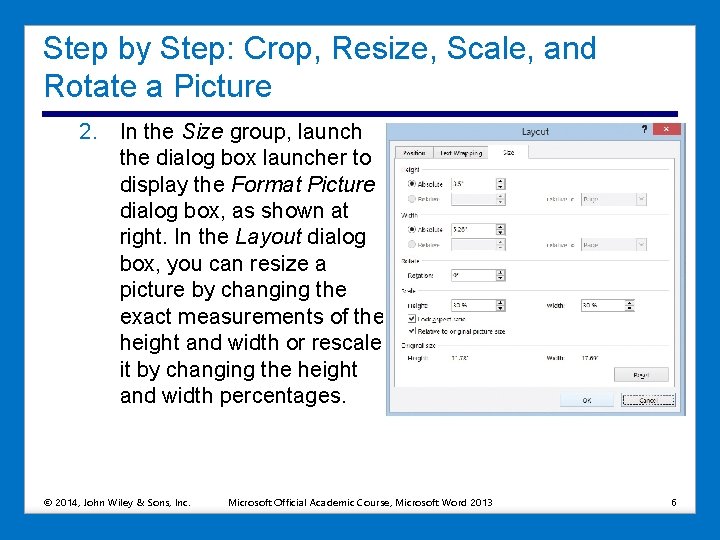
Step by Step: Crop, Resize, Scale, and Rotate a Picture 2. In the Size group, launch the dialog box launcher to display the Format Picture dialog box, as shown at right. In the Layout dialog box, you can resize a picture by changing the exact measurements of the height and width or rescale it by changing the height and width percentages. © 2014, John Wiley & Sons, Inc. Microsoft Official Academic Course, Microsoft Word 2013 6

Step by Step: Crop, Resize, Scale, and Rotate a Picture 3. 4. Key 3. 5” in the Height Absolute text box. When the OK button is selected, the whole height of the picture will be altered. In the Scale section, both the Lock aspect ratio and Relative to original picture size check boxes should be selected. When the Lock Aspect Ratio box is selected, you will be able to scale the picture in proportion by height and width by the same percentage. When the Relative to original picture size box is selected, the scaling Height and Width are comparative to the original size. The original size of the picture is under the Original size section. Under the Scale section, for the Height key 25% then press the Tab key. The scale width of the active picture automatically changes to 25% because Lock aspect ratio is selected. The Absolute Height dimension also changes to 2. 99”, to accommodate the new size compared to the original. © 2014, John Wiley & Sons, Inc. Microsoft Official Academic Course, Microsoft Word 2013 7

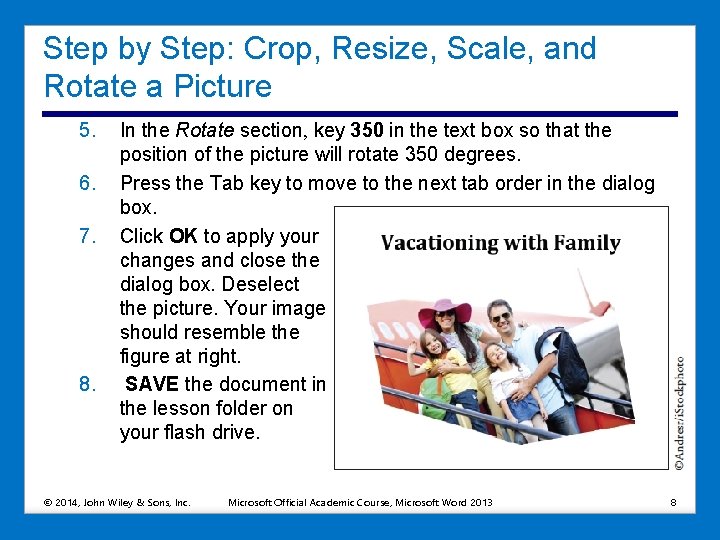
Step by Step: Crop, Resize, Scale, and Rotate a Picture 5. 6. 7. 8. In the Rotate section, key 350 in the text box so that the position of the picture will rotate 350 degrees. Press the Tab key to move to the next tab order in the dialog box. Click OK to apply your changes and close the dialog box. Deselect the picture. Your image should resemble the figure at right. SAVE the document in the lesson folder on your flash drive. © 2014, John Wiley & Sons, Inc. Microsoft Official Academic Course, Microsoft Word 2013 8

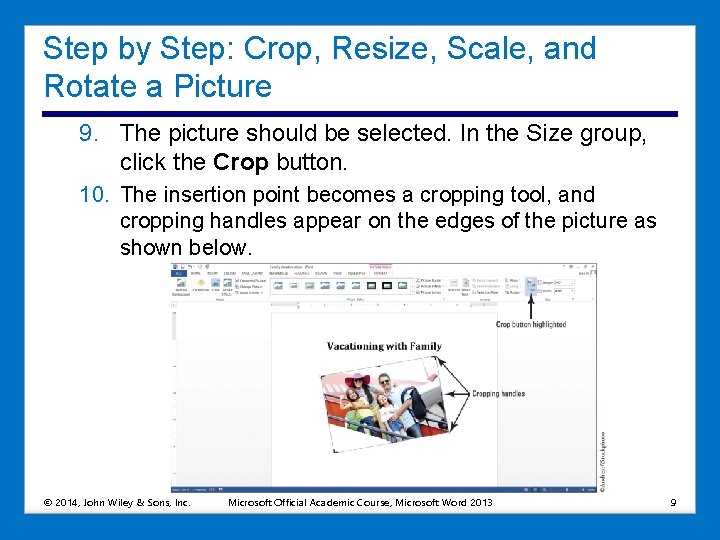
Step by Step: Crop, Resize, Scale, and Rotate a Picture 9. The picture should be selected. In the Size group, click the Crop button. 10. The insertion point becomes a cropping tool, and cropping handles appear on the edges of the picture as shown below. © 2014, John Wiley & Sons, Inc. Microsoft Official Academic Course, Microsoft Word 2013 9

Step by Step: Crop, Resize, Scale, and Rotate a Picture 11. Position the cropping tool over the top cropping handle. Then drag down until it is slightly above the pink hat. 12. Position the mouse in the lower left corner and drag up until it is close to the child’s arm that is waving. 13. Release the mouse button, and then click the Crop button again to remove the cropping handles. 14. The trimmed image has removed the unwanted area and displays only the cropped area. 15. Resize the image for precise measurements to 2. 51” for the height and 3. 88” for the width. 16. SAVE the document as Family Vacation 1 in the lesson folder on your flash drive. • PAUSE. LEAVE the document open to use in the next exercise. © 2014, John Wiley & Sons, Inc. Microsoft Official Academic Course, Microsoft Word 2013 10

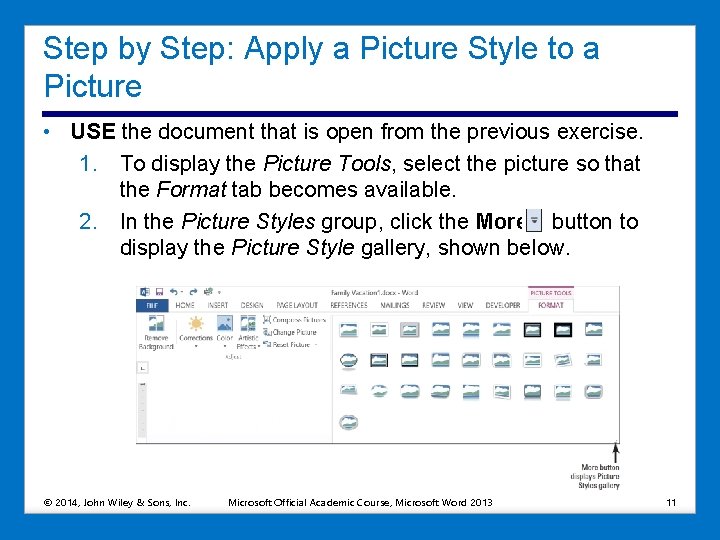
Step by Step: Apply a Picture Style to a Picture • USE the document that is open from the previous exercise. 1. To display the Picture Tools, select the picture so that the Format tab becomes available. 2. In the Picture Styles group, click the More button to display the Picture Style gallery, shown below. © 2014, John Wiley & Sons, Inc. Microsoft Official Academic Course, Microsoft Word 2013 11

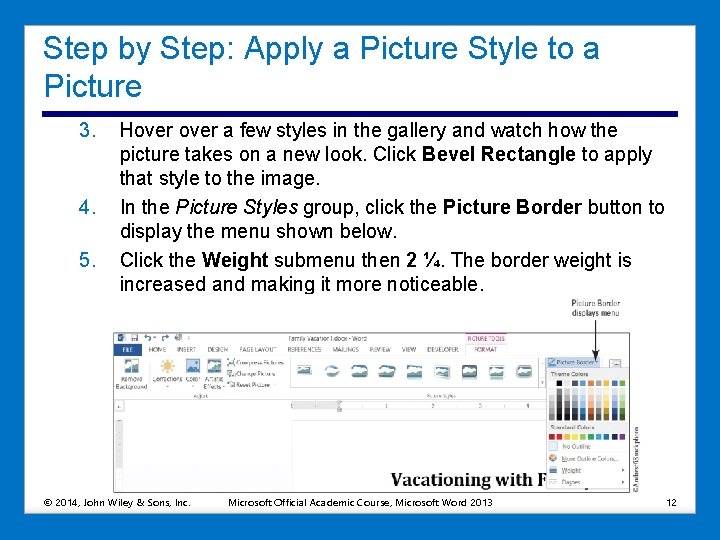
Step by Step: Apply a Picture Style to a Picture 3. 4. 5. Hover a few styles in the gallery and watch how the picture takes on a new look. Click Bevel Rectangle to apply that style to the image. In the Picture Styles group, click the Picture Border button to display the menu shown below. Click the Weight submenu then 2 ¼. The border weight is increased and making it more noticeable. © 2014, John Wiley & Sons, Inc. Microsoft Official Academic Course, Microsoft Word 2013 12

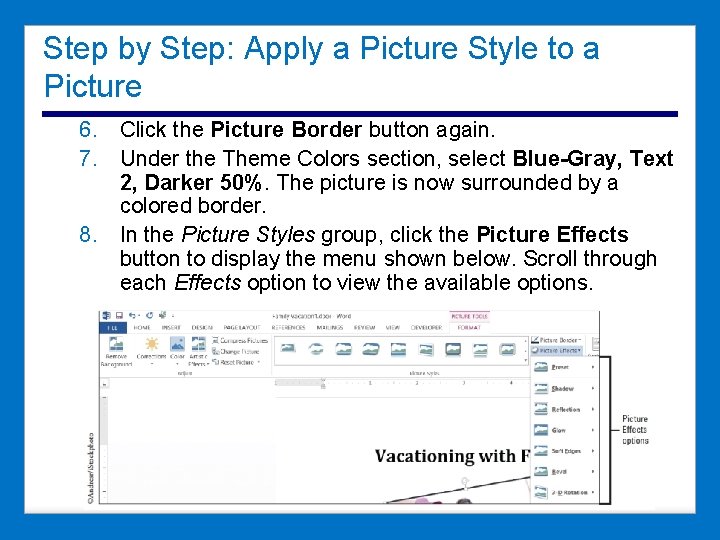
Step by Step: Apply a Picture Style to a Picture 6. Click the Picture Border button again. 7. Under the Theme Colors section, select Blue-Gray, Text 2, Darker 50%. The picture is now surrounded by a colored border. 8. In the Picture Styles group, click the Picture Effects button to display the menu shown below. Scroll through each Effects option to view the available options.

Step by Step: Apply a Picture Style to a Picture 9. Click the Shadow effect option. From the pop-up menu that appears, under the Outer heading, select Offset Top to apply that shadow effect to your image. The picture displays with a shadow on the upper portion of the image. 10. SAVE the document as Family Vacation 2 in the lesson folder on your flash drive. • PAUSE. LEAVE the document open for the next exercise. © 2014, John Wiley & Sons, Inc. Microsoft Official Academic Course, Microsoft Word 2013 14

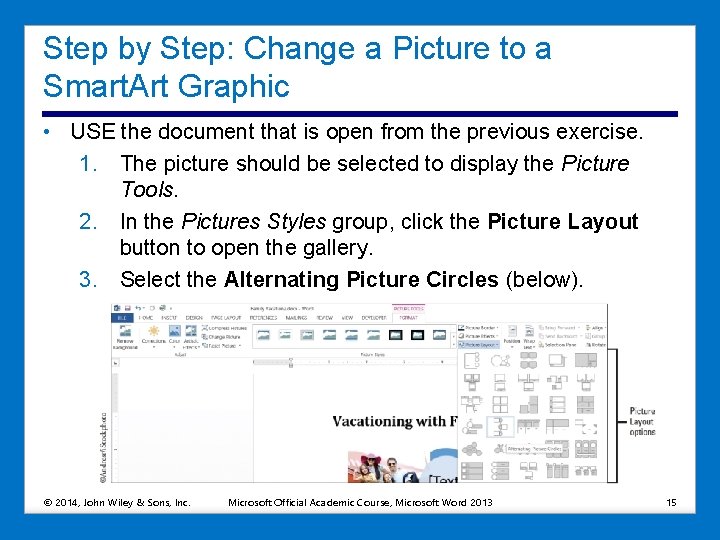
Step by Step: Change a Picture to a Smart. Art Graphic • USE the document that is open from the previous exercise. 1. The picture should be selected to display the Picture Tools. 2. In the Pictures Styles group, click the Picture Layout button to open the gallery. 3. Select the Alternating Picture Circles (below). © 2014, John Wiley & Sons, Inc. Microsoft Official Academic Course, Microsoft Word 2013 15

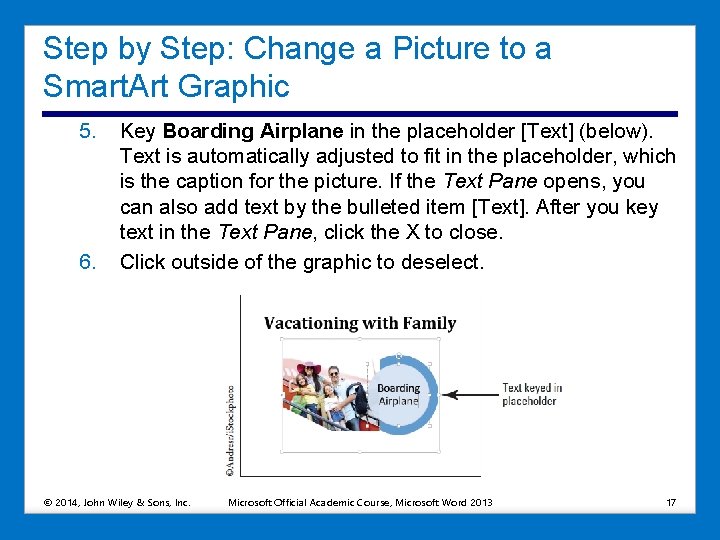
Step by Step: Change a Picture to a Smart. Art Graphic 4. The preset layout appears—each layout enables you to apply a picture with text. You can add a caption in the text area by adding a short description to your picture. The Picture Layout button automatically converts the picture to a Smart. Art graphic and the picture is resized to accommodate a circled caption. The Smart. Art Tools Design tab is activated. © 2014, John Wiley & Sons, Inc. Microsoft Official Academic Course, Microsoft Word 2013 16

Step by Step: Change a Picture to a Smart. Art Graphic 5. 6. Key Boarding Airplane in the placeholder [Text] (below). Text is automatically adjusted to fit in the placeholder, which is the caption for the picture. If the Text Pane opens, you can also add text by the bulleted item [Text]. After you key text in the Text Pane, click the X to close. Click outside of the graphic to deselect. © 2014, John Wiley & Sons, Inc. Microsoft Official Academic Course, Microsoft Word 2013 17

Step by Step: Change a Picture to a Smart. Art Graphic 7. SAVE the document as Family Vacation 3 in the lesson folder on your flash drive. 8. Select the image to continue applying changes to this document. 9. In the Smart Tools, select the Design tab, click the Change Colors button to produce a menu of options. Under the Accent 6 group, select the Colored Fill – Accent 6. The Smart. Art graphic color changes to the new color. 10. Select the circle containing the text, Boarding Airplane then click the Smart Tools, Format tab to change the format of the graphic. In the Shape Style group, click the More button and select the Intense Effect – Gold, Accent 4. The inner circle color is changed to the new style. © 2014, John Wiley & Sons, Inc. Microsoft Official Academic Course, Microsoft Word 2013 18

Step by Step: Change a Picture to a Smart. Art Graphic 11. Select the circling containing the text click the Shape Effects button select Bevel then apply Art Deco. The inner circle has taken on a different shape and is more eye-catching. 12. Select the outside circle then press the Shift key to select the inner circle. Change the width by increasing it to 2. 02”. Make sure you see the selection points around the inner circle before changing the width. 13. SAVE the document as Family Vacation 3 Update in the lesson folder on your flash drive then CLOSE the file. • PAUSE. LEAVE the document open to use in the next exercise. © 2014, John Wiley & Sons, Inc. Microsoft Official Academic Course, Microsoft Word 2013 19

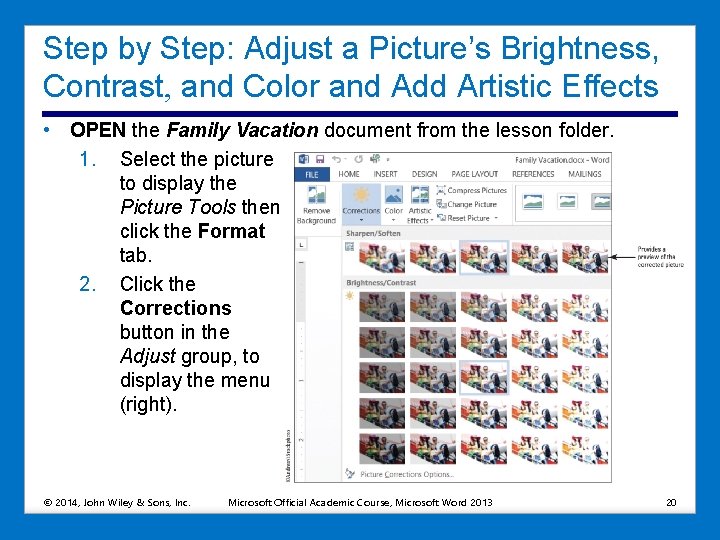
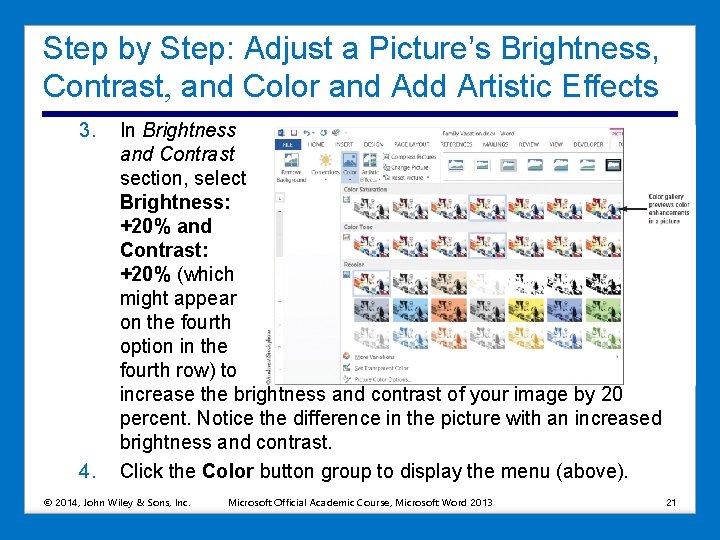
Step by Step: Adjust a Picture’s Brightness, Contrast, and Color and Add Artistic Effects • OPEN the Family Vacation document from the lesson folder. 1. Select the picture to display the Picture Tools then click the Format tab. 2. Click the Corrections button in the Adjust group, to display the menu (right). © 2014, John Wiley & Sons, Inc. Microsoft Official Academic Course, Microsoft Word 2013 20

Step by Step: Adjust a Picture’s Brightness, Contrast, and Color and Add Artistic Effects 3. 4. In Brightness and Contrast section, select Brightness: +20% and Contrast: +20% (which might appear on the fourth option in the fourth row) to increase the brightness and contrast of your image by 20 percent. Notice the difference in the picture with an increased brightness and contrast. Click the Color button group to display the menu (above). © 2014, John Wiley & Sons, Inc. Microsoft Official Academic Course, Microsoft Word 2013 21

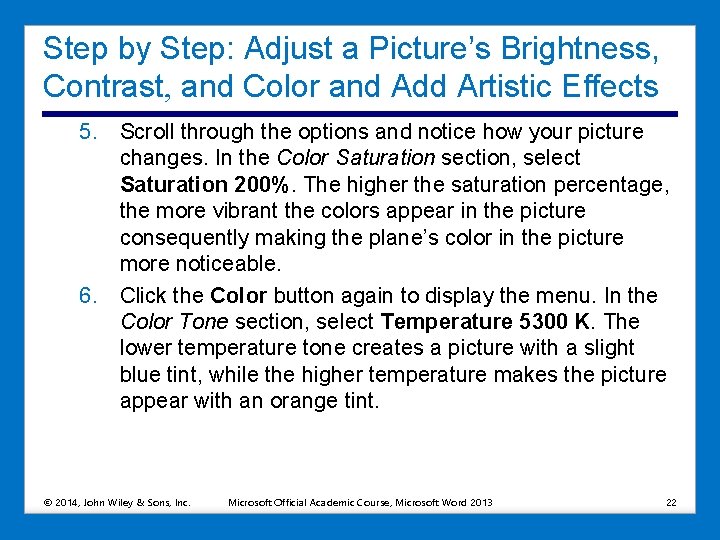
Step by Step: Adjust a Picture’s Brightness, Contrast, and Color and Add Artistic Effects 5. Scroll through the options and notice how your picture changes. In the Color Saturation section, select Saturation 200%. The higher the saturation percentage, the more vibrant the colors appear in the picture consequently making the plane’s color in the picture more noticeable. 6. Click the Color button again to display the menu. In the Color Tone section, select Temperature 5300 K. The lower temperature tone creates a picture with a slight blue tint, while the higher temperature makes the picture appear with an orange tint. © 2014, John Wiley & Sons, Inc. Microsoft Official Academic Course, Microsoft Word 2013 22

Step by Step: Adjust a Picture’s Brightness, Contrast, and Color and Add Artistic Effects 7. Click the Color button again to display the menu. Under Recolor, No Recolor is selected by default. Hover the selection and you can see the changes in live preview. Keep the selection on No Color. 8. SAVE the document as Family Vacation 4 in the lesson folder on your flash drive. © 2014, John Wiley & Sons, Inc. Microsoft Official Academic Course, Microsoft Word 2013 23

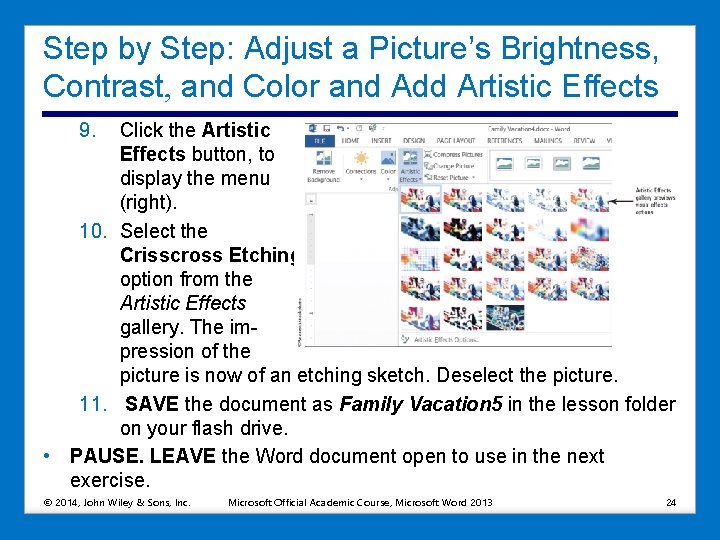
Step by Step: Adjust a Picture’s Brightness, Contrast, and Color and Add Artistic Effects 9. Click the Artistic Effects button, to display the menu (right). 10. Select the Crisscross Etching option from the Artistic Effects gallery. The impression of the picture is now of an etching sketch. Deselect the picture. 11. SAVE the document as Family Vacation 5 in the lesson folder on your flash drive. • PAUSE. LEAVE the Word document open to use in the next exercise. © 2014, John Wiley & Sons, Inc. Microsoft Official Academic Course, Microsoft Word 2013 24

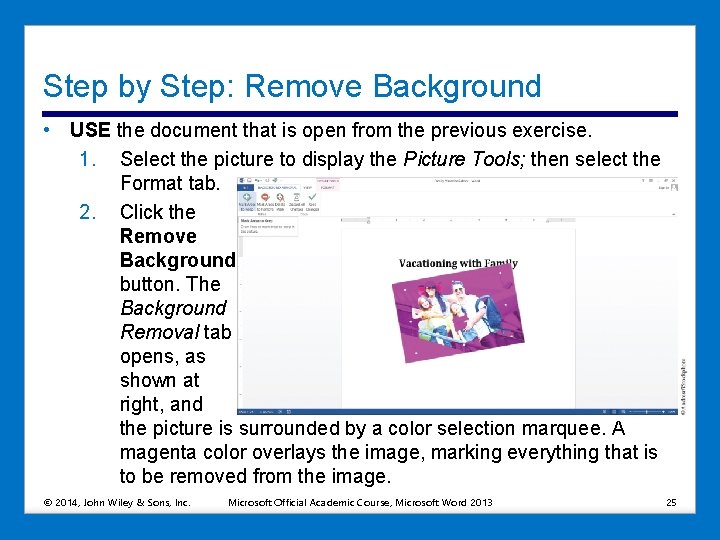
Step by Step: Remove Background • USE the document that is open from the previous exercise. 1. Select the picture to display the Picture Tools; then select the Format tab. 2. Click the Remove Background button. The Background Removal tab opens, as shown at right, and the picture is surrounded by a color selection marquee. A magenta color overlays the image, marking everything that is to be removed from the image. © 2014, John Wiley & Sons, Inc. Microsoft Official Academic Course, Microsoft Word 2013 25

Step by Step: Remove Background 3. To change the area of the picture that will be kept, resize the marquee by dragging the upper-left handle up until it meets the lady’s hat. 4. Drag the right middle-handle towards the bag until it reaches the man’s elbow. Everything outside these boundaries will be removed from the image. © 2014, John Wiley & Sons, Inc. Microsoft Official Academic Course, Microsoft Word 2013 26

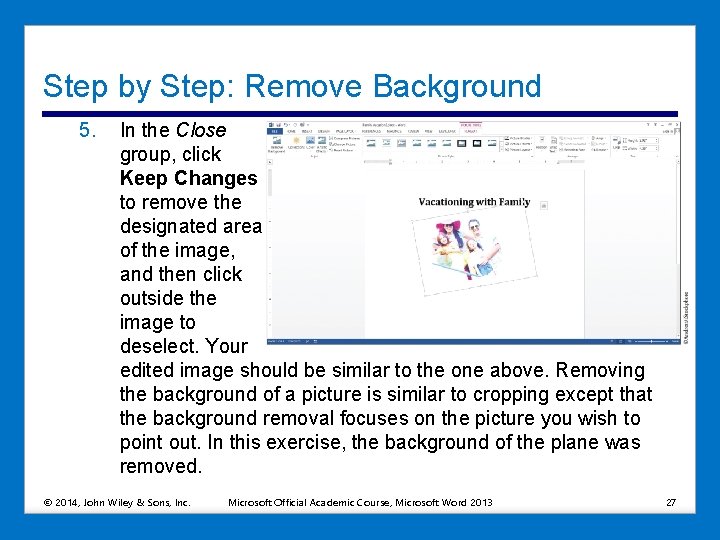
Step by Step: Remove Background 5. In the Close group, click Keep Changes to remove the designated area of the image, and then click outside the image to deselect. Your edited image should be similar to the one above. Removing the background of a picture is similar to cropping except that the background removal focuses on the picture you wish to point out. In this exercise, the background of the plane was removed. © 2014, John Wiley & Sons, Inc. Microsoft Official Academic Course, Microsoft Word 2013 27

Step by Step: Remove Background 6. SAVE the document as Family Vacation 6 in the lesson folder on your flash drive. 7. If necessary, click the Remove Background button again. 8. If you cannot see the hand of the little girl who is waving, click the Mark Areas to Keep button in the Refine group. Press and hold the left mouse button, and draw around the little girl’s hand. As you mark the area to keep, a circle with a plus symbol marks an area to keep. © 2014, John Wiley & Sons, Inc. Microsoft Official Academic Course, Microsoft Word 2013 28

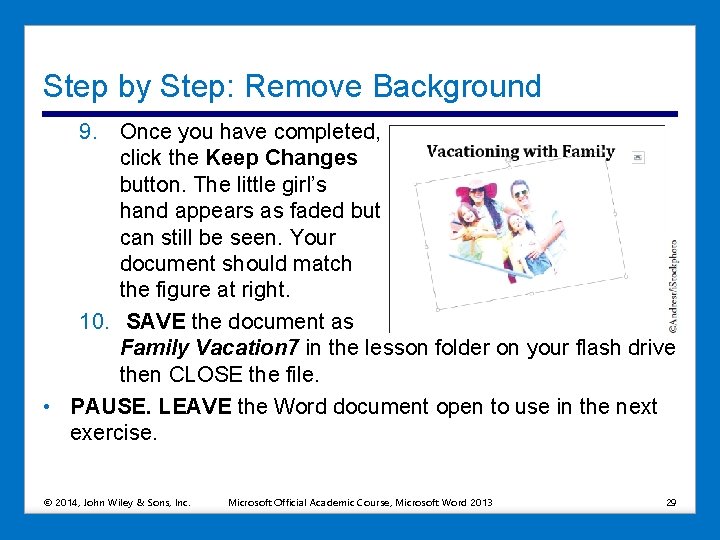
Step by Step: Remove Background 9. Once you have completed, click the Keep Changes button. The little girl’s hand appears as faded but can still be seen. Your document should match the figure at right. 10. SAVE the document as Family Vacation 7 in the lesson folder on your flash drive then CLOSE the file. • PAUSE. LEAVE the Word document open to use in the next exercise. © 2014, John Wiley & Sons, Inc. Microsoft Official Academic Course, Microsoft Word 2013 29

Step by Step: Arrange Text around a Picture • OPEN the Family Vacation 2 document completed earlier in the lesson. 1. If necessary, enable Show/Hide on the Home tab. 2. Place the insertion point by the paragraph mark by the Smart. Art and press Enter. Key the following text: If you are looking for adventure with lots of activities that you can do as a family; then call Margie’s Travel Agency. They will book all tours and outside activities, such as, bike riding, rafting, or zipping. They planned our last vacation, and we had a WONDERFUL time together as a family. Press Enter twice. Don’t wait call! 3. Select the text and change the font size to 16 pt. Deselect the text. © 2014, John Wiley & Sons, Inc. Microsoft Official Academic Course, Microsoft Word 2013 30

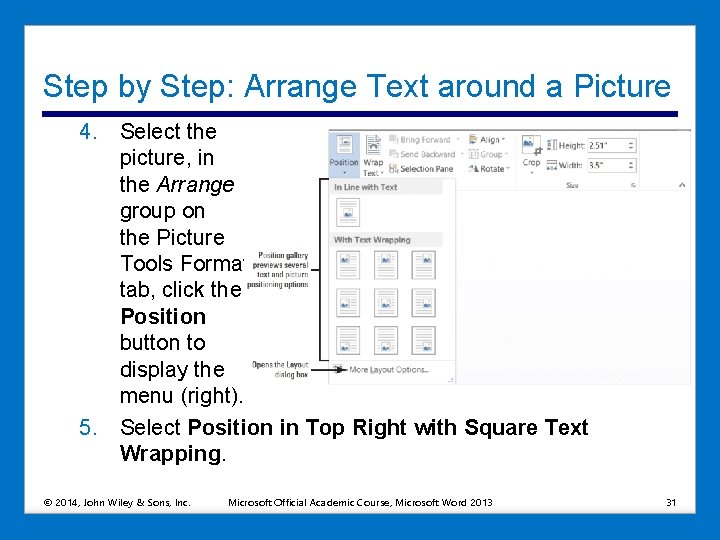
Step by Step: Arrange Text around a Picture 4. Select the picture, in the Arrange group on the Picture Tools Format tab, click the Position button to display the menu (right). 5. Select Position in Top Right with Square Text Wrapping. © 2014, John Wiley & Sons, Inc. Microsoft Official Academic Course, Microsoft Word 2013 31

Step by Step: Arrange Text around a Picture 6. Delete the extra blank line below the heading. 7. Place your insertion point anywhere in the paragraph you keyed in step 1, and press Ctrl+L to align text left. The title is centered to the left of the image and text is positioned at left of the margin and the picture is at the top right. 8. Select the picture again and the Layout Options button appears beside it. Microsoft has added this new feature to make it easy to wrap objects, such as pictures, drawings, Smart. Art, and charts around text. © 2014, John Wiley & Sons, Inc. Microsoft Official Academic Course, Microsoft Word 2013 32

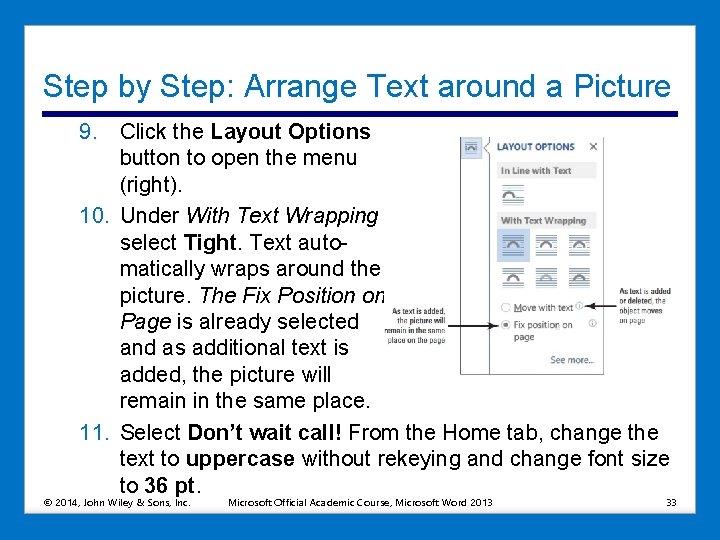
Step by Step: Arrange Text around a Picture 9. Click the Layout Options button to open the menu (right). 10. Under With Text Wrapping select Tight. Text automatically wraps around the picture. The Fix Position on Page is already selected and as additional text is added, the picture will remain in the same place. 11. Select Don’t wait call! From the Home tab, change the text to uppercase without rekeying and change font size to 36 pt. © 2014, John Wiley & Sons, Inc. Microsoft Official Academic Course, Microsoft Word 2013 33

Step by Step: Arrange Text around a Picture 12. Editing can take place anytime while you’re working in a document, and now you want to change the content of the existing heading. Change the title to Family Vacation by selecting the title and keying the new title. Did you notice that the picture stayed in place? That’s because The Fix Position on Page was selected from the Layout Options menu. 13. SAVE the document as Family Vacation 8 in the lesson folder on your flash drive. • PAUSE. LEAVE the document open to use in the next exercise. © 2014, John Wiley & Sons, Inc. Microsoft Official Academic Course, Microsoft Word 2013 34

Step by Step: Insert a Screenshot • USE the document that is open from the previous exercise. 1. On the View tab click the One Page button in the Zoom group so that the entire page is displayed on your screen. Do not minimize the display, or the screenshot will not capture the image of this document. 2. Press Ctrl+N to open a new blank document. © 2014, John Wiley & Sons, Inc. Microsoft Official Academic Course, Microsoft Word 2013 35

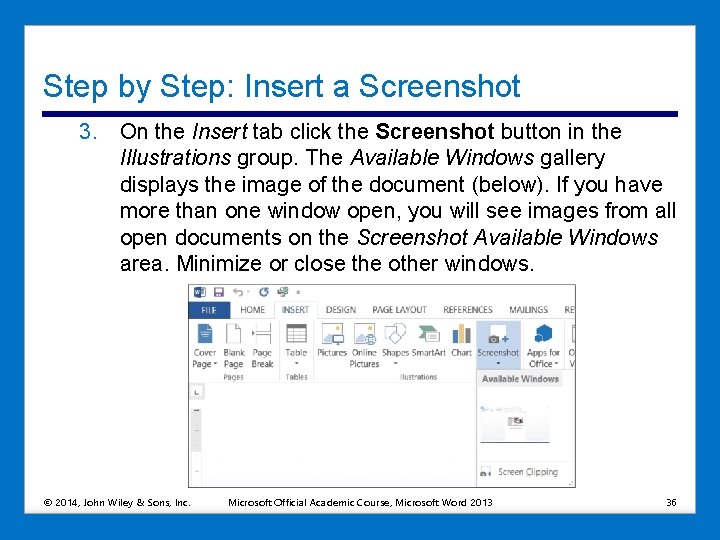
Step by Step: Insert a Screenshot 3. On the Insert tab click the Screenshot button in the Illustrations group. The Available Windows gallery displays the image of the document (below). If you have more than one window open, you will see images from all open documents on the Screenshot Available Windows area. Minimize or close the other windows. © 2014, John Wiley & Sons, Inc. Microsoft Official Academic Course, Microsoft Word 2013 36

Step by Step: Insert a Screenshot 4. Under the Available Windows area, click the screenshot of the Family Vacation 8 document to insert in the blank document. 5. SAVE the document as Family Vacation Screenshot in the lesson folder on your flash drive. • PAUSE. LEAVE the document open to use in the next exercise. © 2014, John Wiley & Sons, Inc. Microsoft Official Academic Course, Microsoft Word 2013 37

Step by Step: Insert a Screen Clipping • USE the document that is open from the previous exercise. 1. Deselect the image then press the Enter key twice. 2. Click the Screenshot button; then select Screen Clipping from the menu. The active document fades away, the Family Vacation 8 document appears in a faded gray and the mouse pointer changes to a crosshair (+). © 2014, John Wiley & Sons, Inc. Microsoft Official Academic Course, Microsoft Word 2013 38

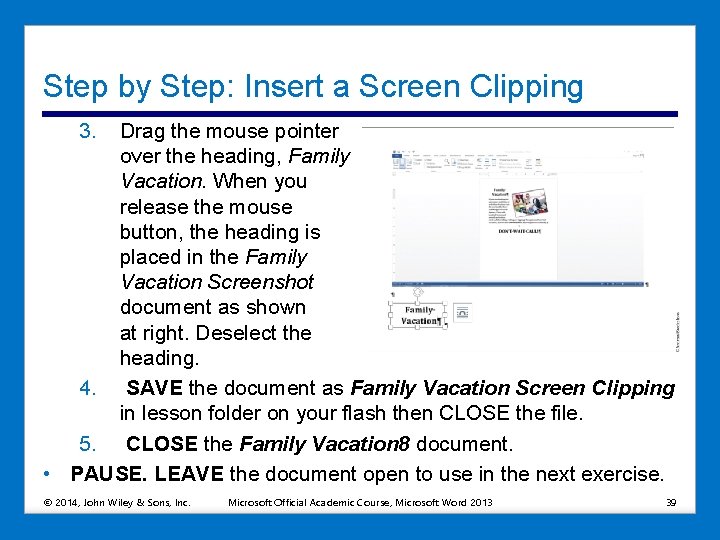
Step by Step: Insert a Screen Clipping 3. Drag the mouse pointer over the heading, Family Vacation. When you release the mouse button, the heading is placed in the Family Vacation Screenshot document as shown at right. Deselect the heading. 4. SAVE the document as Family Vacation Screen Clipping in lesson folder on your flash then CLOSE the file. 5. CLOSE the Family Vacation 8 document. • PAUSE. LEAVE the document open to use in the next exercise. © 2014, John Wiley & Sons, Inc. Microsoft Official Academic Course, Microsoft Word 2013 39

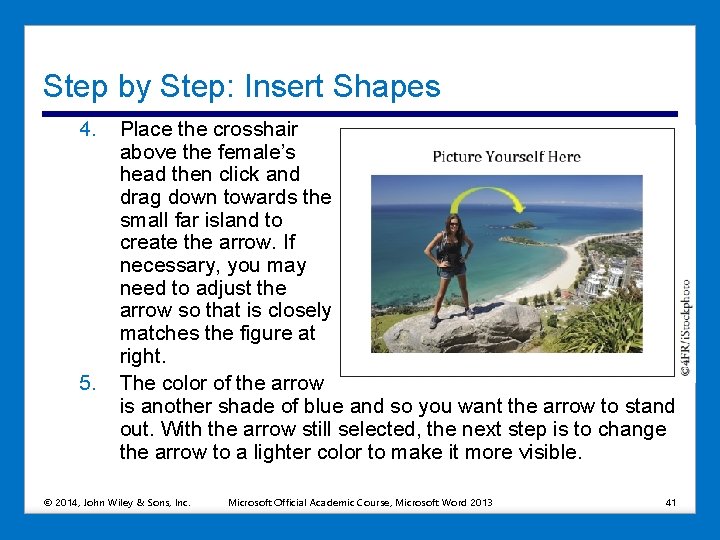
Step by Step: Insert Shapes • OPEN Travel from the data files for this lesson. 1. On the View tab, change the view to 100%. 2. Click the Insert tab then click the Shapes button in the Illustrations group to display the Shapes menu. 3. In the Block Arrows section, click the Curved Down Arrow shape. The insertion point turns into a crosshair (+). © 2014, John Wiley & Sons, Inc. Microsoft Official Academic Course, Microsoft Word 2013 40

Step by Step: Insert Shapes 4. 5. Place the crosshair above the female’s head then click and drag down towards the small far island to create the arrow. If necessary, you may need to adjust the arrow so that is closely matches the figure at right. The color of the arrow is another shade of blue and so you want the arrow to stand out. With the arrow still selected, the next step is to change the arrow to a lighter color to make it more visible. © 2014, John Wiley & Sons, Inc. Microsoft Official Academic Course, Microsoft Word 2013 41

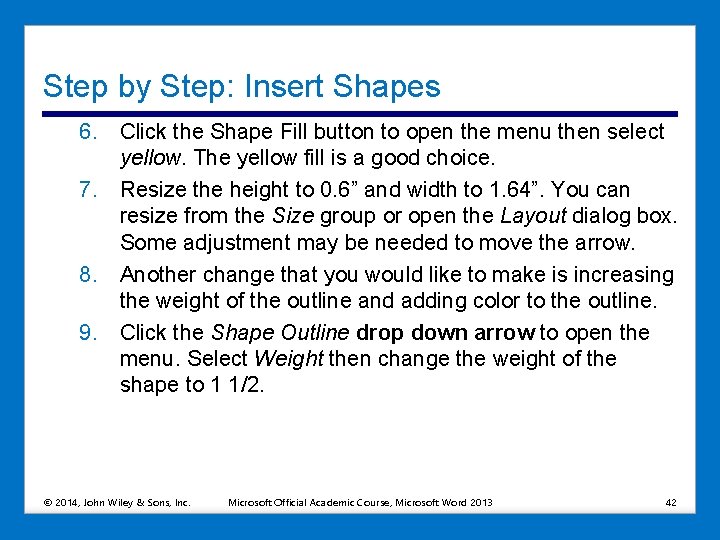
Step by Step: Insert Shapes 6. Click the Shape Fill button to open the menu then select yellow. The yellow fill is a good choice. 7. Resize the height to 0. 6” and width to 1. 64”. You can resize from the Size group or open the Layout dialog box. Some adjustment may be needed to move the arrow. 8. Another change that you would like to make is increasing the weight of the outline and adding color to the outline. 9. Click the Shape Outline drop down arrow to open the menu. Select Weight then change the weight of the shape to 1 1/2. © 2014, John Wiley & Sons, Inc. Microsoft Official Academic Course, Microsoft Word 2013 42

Step by Step: Insert Shapes 10. Click the Shape Outline drop down arrow again. Change the color to Light Green in the Standard Colors. . 11. SAVE the document as Travel Outing in the lesson folder on your flash drive then CLOSE the file. • PAUSE. LEAVE Word open to use in the next exercise. © 2014, John Wiley & Sons, Inc. Microsoft Official Academic Course, Microsoft Word 2013 43

Step by Step: Insert Drawing Canvas and Shapes • OPEN a blank document. 1. At the top of the document, key Margie’s Travel Agency press Shift+Enter to insert a line break. Then key Exciting Places to See. 2. Select the Margie’s Travel Agency and change the font to Cambria and font size to 36 pt. 3. Select Exciting Places to See then change the font size to 24 pt and center. By using the line break, both headings moved to the center. 4. Deselect and press Enter twice. © 2014, John Wiley & Sons, Inc. Microsoft Official Academic Course, Microsoft Word 2013 44

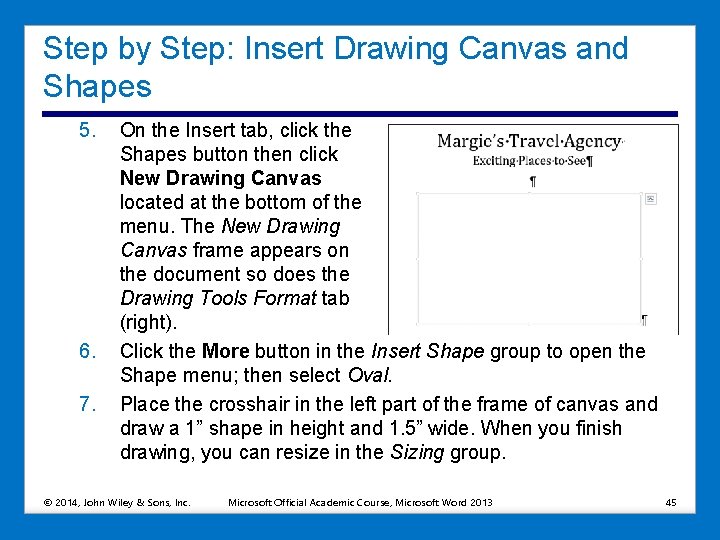
Step by Step: Insert Drawing Canvas and Shapes 5. 6. 7. On the Insert tab, click the Shapes button then click New Drawing Canvas located at the bottom of the menu. The New Drawing Canvas frame appears on the document so does the Drawing Tools Format tab (right). Click the More button in the Insert Shape group to open the Shape menu; then select Oval. Place the crosshair in the left part of the frame of canvas and draw a 1” shape in height and 1. 5” wide. When you finish drawing, you can resize in the Sizing group. © 2014, John Wiley & Sons, Inc. Microsoft Official Academic Course, Microsoft Word 2013 45

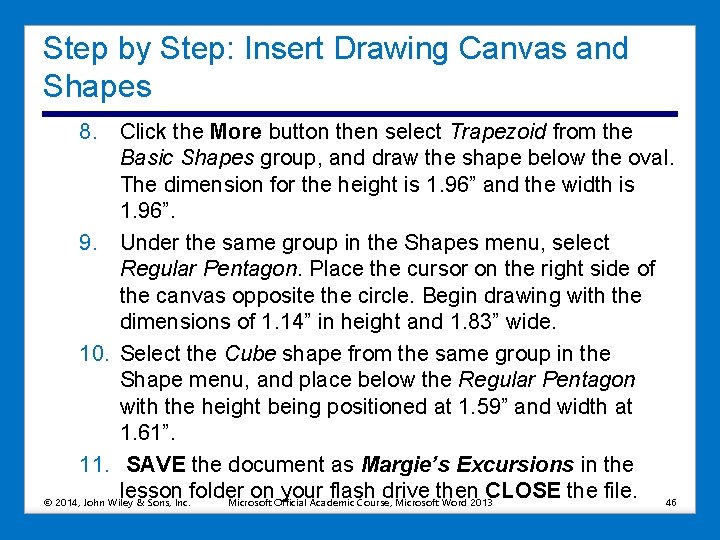
Step by Step: Insert Drawing Canvas and Shapes 8. Click the More button then select Trapezoid from the Basic Shapes group, and draw the shape below the oval. The dimension for the height is 1. 96” and the width is 1. 96”. 9. Under the same group in the Shapes menu, select Regular Pentagon. Place the cursor on the right side of the canvas opposite the circle. Begin drawing with the dimensions of 1. 14” in height and 1. 83” wide. 10. Select the Cube shape from the same group in the Shape menu, and place below the Regular Pentagon with the height being positioned at 1. 59” and width at 1. 61”. 11. SAVE the document as Margie’s Excursions in the lesson folder on your flash drive then CLOSE the file. 46 © 2014, John Wiley & Sons, Inc. Microsoft Official Academic Course, Microsoft Word 2013

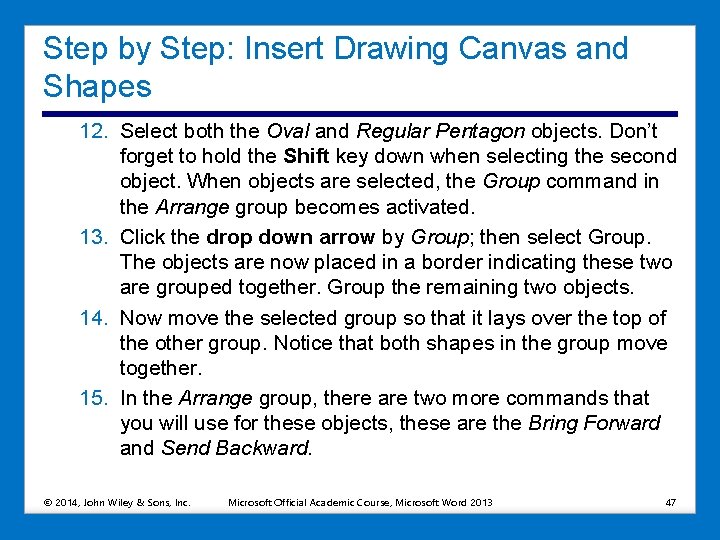
Step by Step: Insert Drawing Canvas and Shapes 12. Select both the Oval and Regular Pentagon objects. Don’t forget to hold the Shift key down when selecting the second object. When objects are selected, the Group command in the Arrange group becomes activated. 13. Click the drop down arrow by Group; then select Group. The objects are now placed in a border indicating these two are grouped together. Group the remaining two objects. 14. Now move the selected group so that it lays over the top of the other group. Notice that both shapes in the group move together. 15. In the Arrange group, there are two more commands that you will use for these objects, these are the Bring Forward and Send Backward. © 2014, John Wiley & Sons, Inc. Microsoft Official Academic Course, Microsoft Word 2013 47

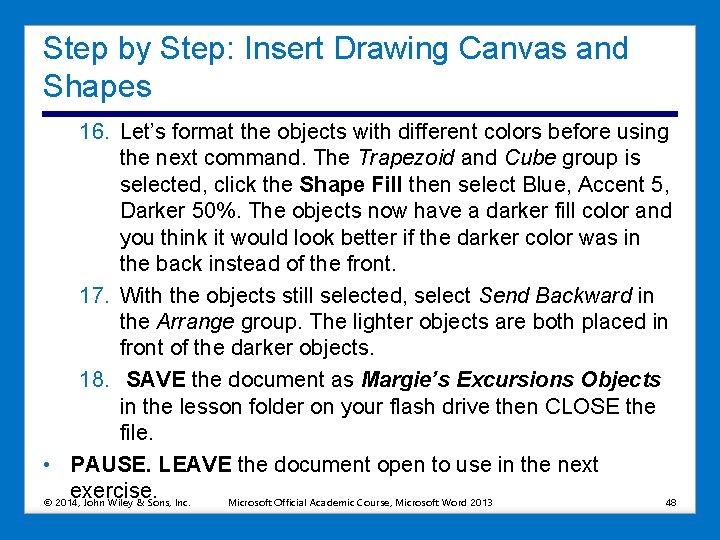
Step by Step: Insert Drawing Canvas and Shapes 16. Let’s format the objects with different colors before using the next command. The Trapezoid and Cube group is selected, click the Shape Fill then select Blue, Accent 5, Darker 50%. The objects now have a darker fill color and you think it would look better if the darker color was in the back instead of the front. 17. With the objects still selected, select Send Backward in the Arrange group. The lighter objects are both placed in front of the darker objects. 18. SAVE the document as Margie’s Excursions Objects in the lesson folder on your flash drive then CLOSE the file. • PAUSE. LEAVE the document open to use in the next exercise. © 2014, John Wiley & Sons, Inc. Microsoft Official Academic Course, Microsoft Word 2013 48

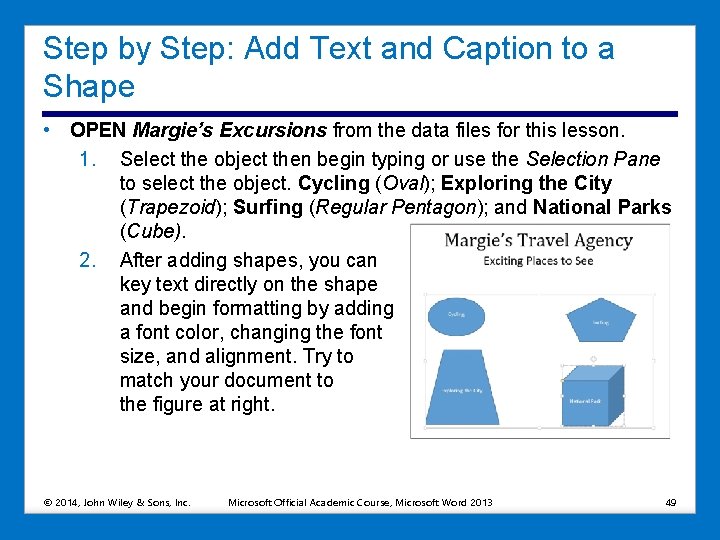
Step by Step: Add Text and Caption to a Shape • OPEN Margie’s Excursions from the data files for this lesson. 1. Select the object then begin typing or use the Selection Pane to select the object. Cycling (Oval); Exploring the City (Trapezoid); Surfing (Regular Pentagon); and National Parks (Cube). 2. After adding shapes, you can key text directly on the shape and begin formatting by adding a font color, changing the font size, and alignment. Try to match your document to the figure at right. © 2014, John Wiley & Sons, Inc. Microsoft Official Academic Course, Microsoft Word 2013 49

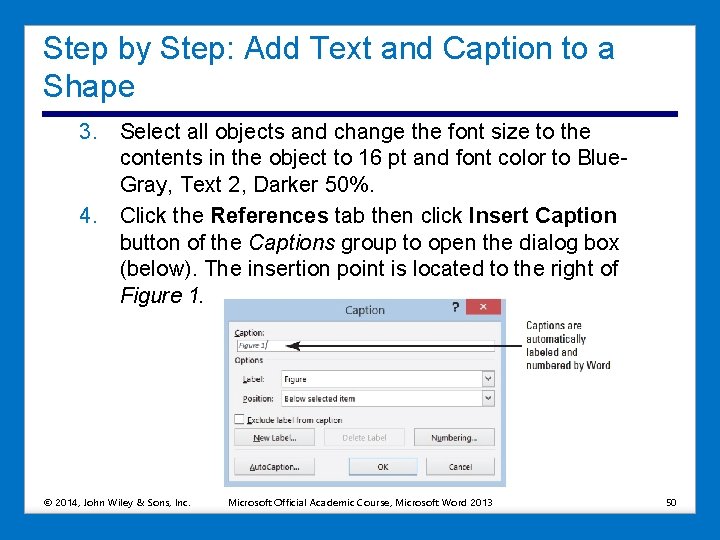
Step by Step: Add Text and Caption to a Shape 3. Select all objects and change the font size to the contents in the object to 16 pt and font color to Blue. Gray, Text 2, Darker 50%. 4. Click the References tab then click Insert Caption button of the Captions group to open the dialog box (below). The insertion point is located to the right of Figure 1. © 2014, John Wiley & Sons, Inc. Microsoft Official Academic Course, Microsoft Word 2013 50

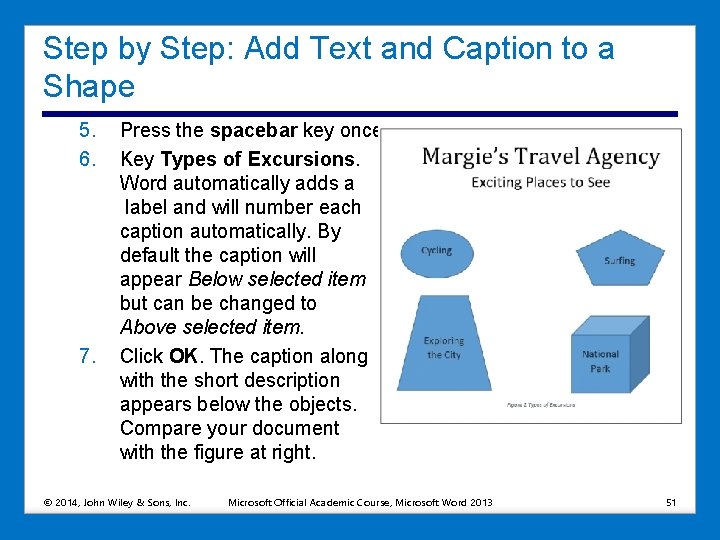
Step by Step: Add Text and Caption to a Shape 5. 6. 7. Press the spacebar key once. Key Types of Excursions. Word automatically adds a label and will number each caption automatically. By default the caption will appear Below selected item but can be changed to Above selected item. Click OK. The caption along with the short description appears below the objects. Compare your document with the figure at right. © 2014, John Wiley & Sons, Inc. Microsoft Official Academic Course, Microsoft Word 2013 51

Step by Step: Add Text and Caption to a Shape 8. SAVE the document as Margie’s Excursions 1 in the lesson folder on your flash drive. • PAUSE. LEAVE the Word document open to use in the next exercise. © 2014, John Wiley & Sons, Inc. Microsoft Official Academic Course, Microsoft Word 2013 52

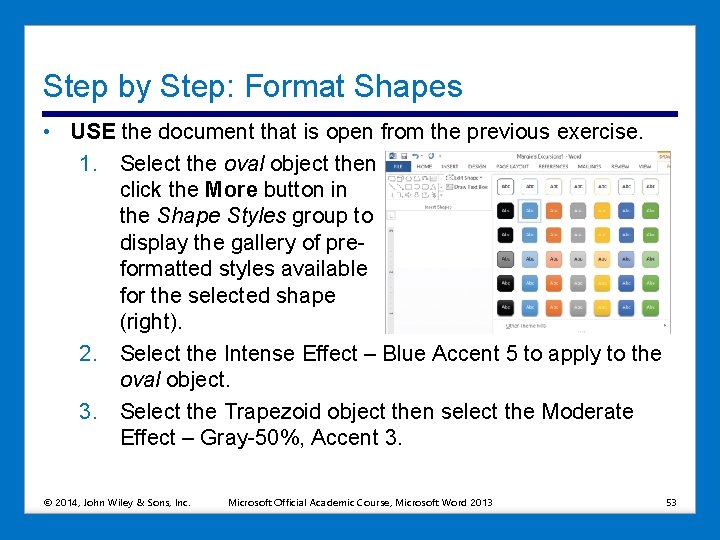
Step by Step: Format Shapes • USE the document that is open from the previous exercise. 1. Select the oval object then click the More button in the Shape Styles group to display the gallery of preformatted styles available for the selected shape (right). 2. Select the Intense Effect – Blue Accent 5 to apply to the oval object. 3. Select the Trapezoid object then select the Moderate Effect – Gray-50%, Accent 3. © 2014, John Wiley & Sons, Inc. Microsoft Official Academic Course, Microsoft Word 2013 53

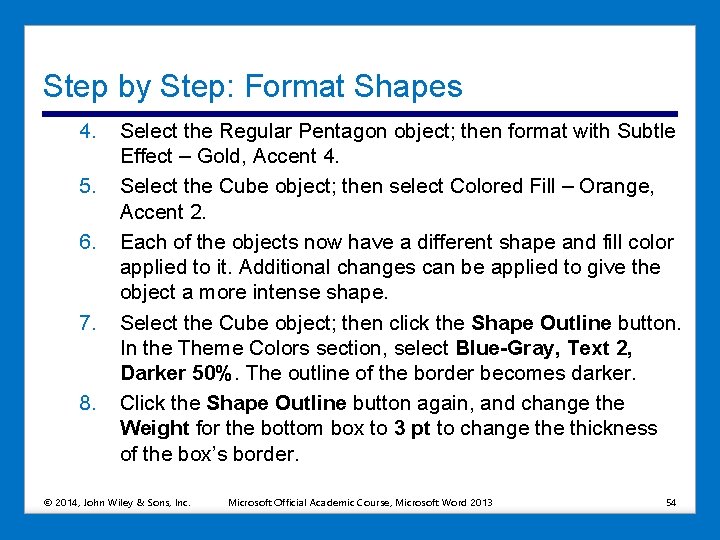
Step by Step: Format Shapes 4. 5. 6. 7. 8. Select the Regular Pentagon object; then format with Subtle Effect – Gold, Accent 4. Select the Cube object; then select Colored Fill – Orange, Accent 2. Each of the objects now have a different shape and fill color applied to it. Additional changes can be applied to give the object a more intense shape. Select the Cube object; then click the Shape Outline button. In the Theme Colors section, select Blue-Gray, Text 2, Darker 50%. The outline of the border becomes darker. Click the Shape Outline button again, and change the Weight for the bottom box to 3 pt to change thickness of the box’s border. © 2014, John Wiley & Sons, Inc. Microsoft Official Academic Course, Microsoft Word 2013 54

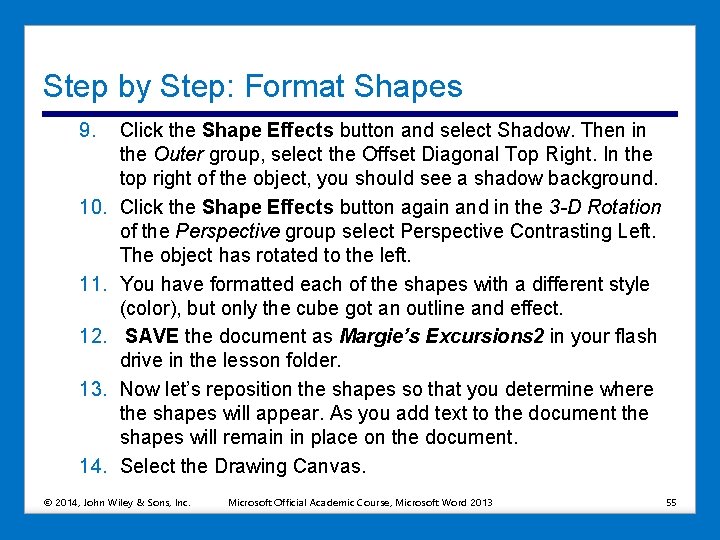
Step by Step: Format Shapes 9. 10. 11. 12. 13. 14. Click the Shape Effects button and select Shadow. Then in the Outer group, select the Offset Diagonal Top Right. In the top right of the object, you should see a shadow background. Click the Shape Effects button again and in the 3 -D Rotation of the Perspective group select Perspective Contrasting Left. The object has rotated to the left. You have formatted each of the shapes with a different style (color), but only the cube got an outline and effect. SAVE the document as Margie’s Excursions 2 in your flash drive in the lesson folder. Now let’s reposition the shapes so that you determine where the shapes will appear. As you add text to the document the shapes will remain in place on the document. Select the Drawing Canvas. © 2014, John Wiley & Sons, Inc. Microsoft Official Academic Course, Microsoft Word 2013 55

Step by Step: Format Shapes 15. In the Arrange group on the Drawing Tools Format tab, click the Position button and select Middle Left with Square Text Wrapping. The caption moves above the shapes. 16. For this step, OPEN the Family Vacation 8 document from the lesson folder. Select the text beginning with “If you are …as a family” then copy and return to the previous document. [Hint: to avoid selecting the picture, do not select the paragraph mark] 17. Place the insertion point above the caption then paste. Did you notice that the shapes remained in their position when text was inserted in the document? © 2014, John Wiley & Sons, Inc. Microsoft Official Academic Course, Microsoft Word 2013 56

Step by Step: Format Shapes 18. Reposition the objects so that the document appears better arranged. Select the Position button then select Position – Bottom Right with Square Text Wrapping. 19. Change the document’s view to one-page. The shapes are at the bottom of the page while text is at the top. 20. SAVE the document as Margie’s Excursions 3 in your flash drive in the lesson folder. 21. CLOSE the Family Vacation 8 file. © 2014, John Wiley & Sons, Inc. Microsoft Official Academic Course, Microsoft Word 2013 57

Step by Step: Format Shapes 22. Margie’s Excursions 3 file should still opened. Delete all shapes by selecting the Drawing Canvas and the caption at the top of the page. 23. Position the insertion point at the beginning of the paragraph and insert the smiley face shape. Draw the shape with the height at 1. 28” by 1. 24” wide. 24. Apply a shape style and select the Light 1, Outline, Colored Fill – Gold, Accent 4 to give the smiley face a new look. 25. In the Arrange group, click the Wrap Text button and select Tight. The text wraps around the shape. 26. SAVE the document as Margie’s Excursions 4 in your flash drive in the lesson folder then CLOSE the file. • PAUSE. LEAVE Word open to use in the next exercise. © 2014, John Wiley & Sons, Inc. Microsoft Official Academic Course, Microsoft Word 2013 58

Step by Step: Insert Word. Art • OPEN Margie’s Excursions 2 document completed earlier in the lesson. 1. Select the text Margie’s Travel Agency. 2. On the Insert tab click the Word. Art button to display the menu. 3. Select Fill – Gray-25%, Background 2, Inner Shadow. The lettering for Margie’s Travel Agency heading takes on a new appearance and style. 4. Remove the line break to move the paragraph mark by the heading. 5. Select the Word. Art, and click the Text Effects button then select Transform. Under the Warp group select Wave 1. This changes the Word. Art to a wavy text. © 2014, John Wiley & Sons, Inc. Microsoft Official Academic Course, Microsoft Word 2013 59

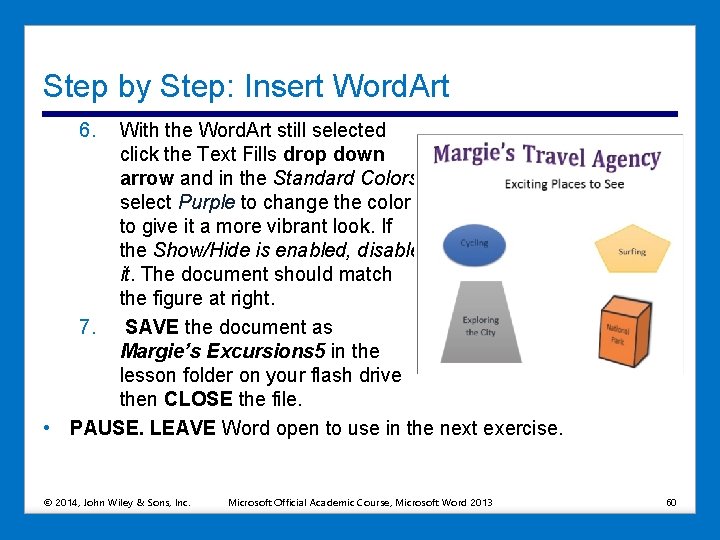
Step by Step: Insert Word. Art 6. With the Word. Art still selected click the Text Fills drop down arrow and in the Standard Colors, select Purple to change the color to give it a more vibrant look. If the Show/Hide is enabled, disable it. The document should match the figure at right. 7. SAVE the document as Margie’s Excursions 5 in the lesson folder on your flash drive then CLOSE the file. • PAUSE. LEAVE Word open to use in the next exercise. © 2014, John Wiley & Sons, Inc. Microsoft Official Academic Course, Microsoft Word 2013 60

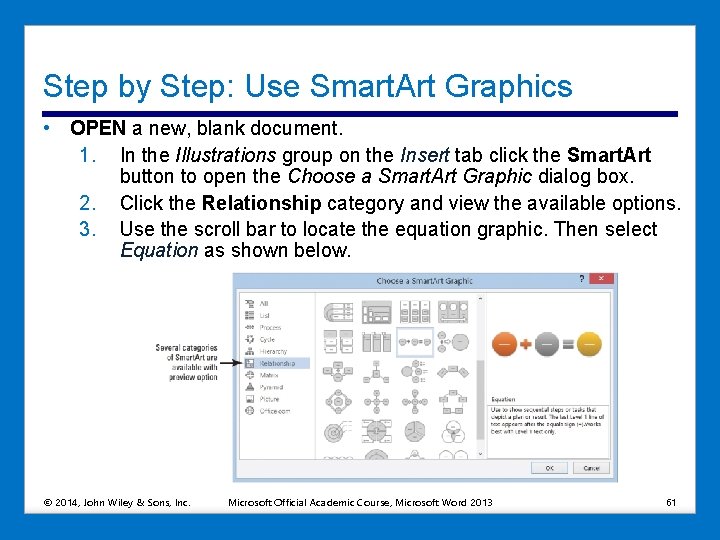
Step by Step: Use Smart. Art Graphics • OPEN a new, blank document. 1. In the Illustrations group on the Insert tab click the Smart. Art button to open the Choose a Smart. Art Graphic dialog box. 2. Click the Relationship category and view the available options. 3. Use the scroll bar to locate the equation graphic. Then select Equation as shown below. © 2014, John Wiley & Sons, Inc. Microsoft Official Academic Course, Microsoft Word 2013 61

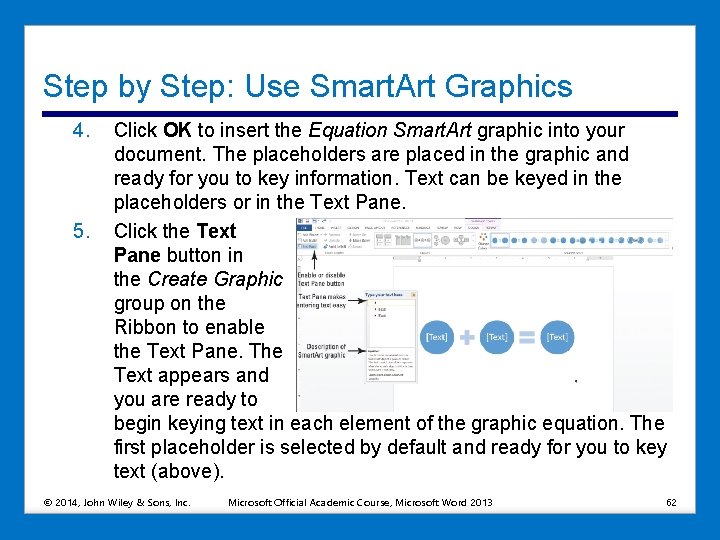
Step by Step: Use Smart. Art Graphics 4. 5. Click OK to insert the Equation Smart. Art graphic into your document. The placeholders are placed in the graphic and ready for you to key information. Text can be keyed in the placeholders or in the Text Pane. Click the Text Pane button in the Create Graphic group on the Ribbon to enable the Text Pane. The Text appears and you are ready to begin keying text in each element of the graphic equation. The first placeholder is selected by default and ready for you to key text (above). © 2014, John Wiley & Sons, Inc. Microsoft Official Academic Course, Microsoft Word 2013 62

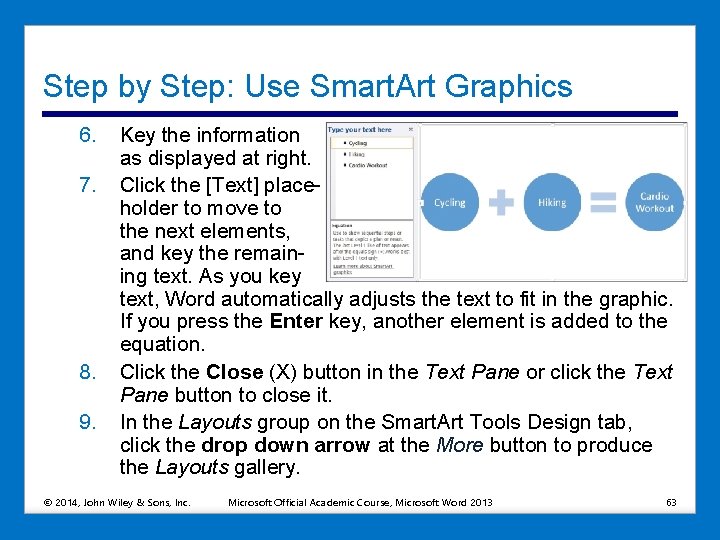
Step by Step: Use Smart. Art Graphics 6. 7. 8. 9. Key the information as displayed at right. Click the [Text] placeholder to move to the next elements, and key the remaining text. As you key text, Word automatically adjusts the text to fit in the graphic. If you press the Enter key, another element is added to the equation. Click the Close (X) button in the Text Pane or click the Text Pane button to close it. In the Layouts group on the Smart. Art Tools Design tab, click the drop down arrow at the More button to produce the Layouts gallery. © 2014, John Wiley & Sons, Inc. Microsoft Official Academic Course, Microsoft Word 2013 63

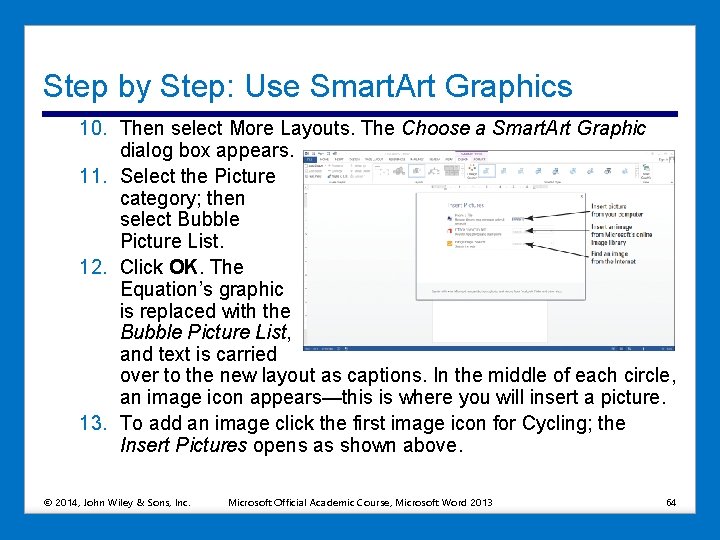
Step by Step: Use Smart. Art Graphics 10. Then select More Layouts. The Choose a Smart. Art Graphic dialog box appears. 11. Select the Picture category; then select Bubble Picture List. 12. Click OK. The Equation’s graphic is replaced with the Bubble Picture List, and text is carried over to the new layout as captions. In the middle of each circle, an image icon appears—this is where you will insert a picture. 13. To add an image click the first image icon for Cycling; the Insert Pictures opens as shown above. © 2014, John Wiley & Sons, Inc. Microsoft Official Academic Course, Microsoft Word 2013 64

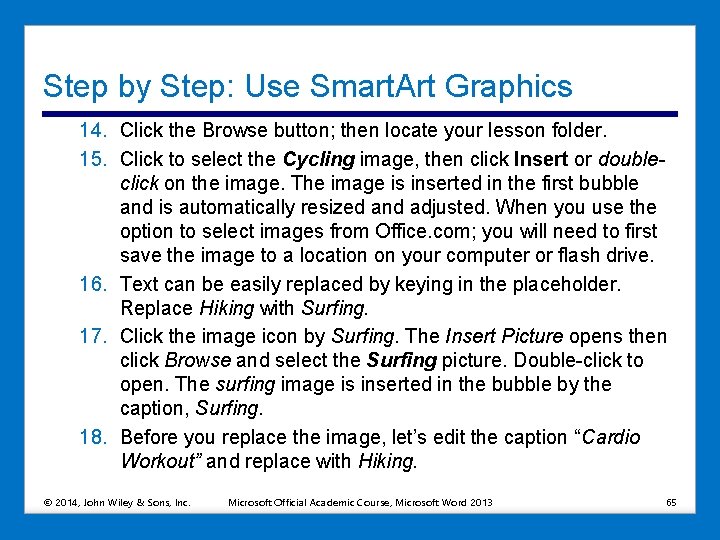
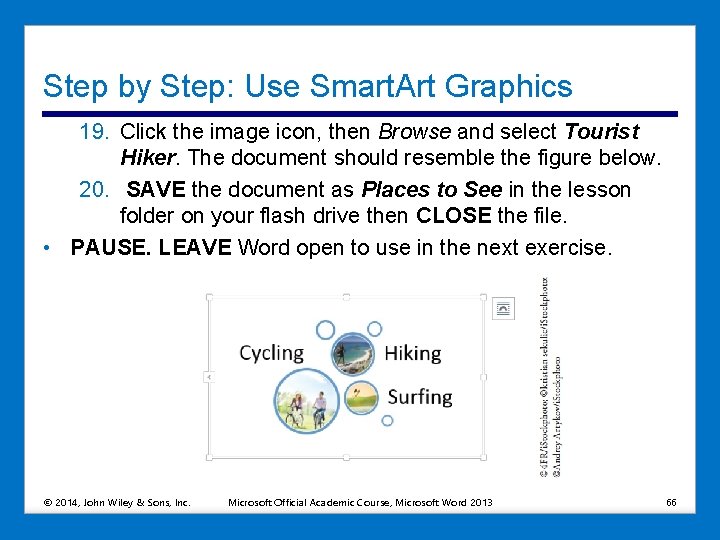
Step by Step: Use Smart. Art Graphics 14. Click the Browse button; then locate your lesson folder. 15. Click to select the Cycling image, then click Insert or doubleclick on the image. The image is inserted in the first bubble and is automatically resized and adjusted. When you use the option to select images from Office. com; you will need to first save the image to a location on your computer or flash drive. 16. Text can be easily replaced by keying in the placeholder. Replace Hiking with Surfing. 17. Click the image icon by Surfing. The Insert Picture opens then click Browse and select the Surfing picture. Double-click to open. The surfing image is inserted in the bubble by the caption, Surfing. 18. Before you replace the image, let’s edit the caption “Cardio Workout” and replace with Hiking. © 2014, John Wiley & Sons, Inc. Microsoft Official Academic Course, Microsoft Word 2013 65

Step by Step: Use Smart. Art Graphics 19. Click the image icon, then Browse and select Tourist Hiker. The document should resemble the figure below. 20. SAVE the document as Places to See in the lesson folder on your flash drive then CLOSE the file. • PAUSE. LEAVE Word open to use in the next exercise. © 2014, John Wiley & Sons, Inc. Microsoft Official Academic Course, Microsoft Word 2013 66

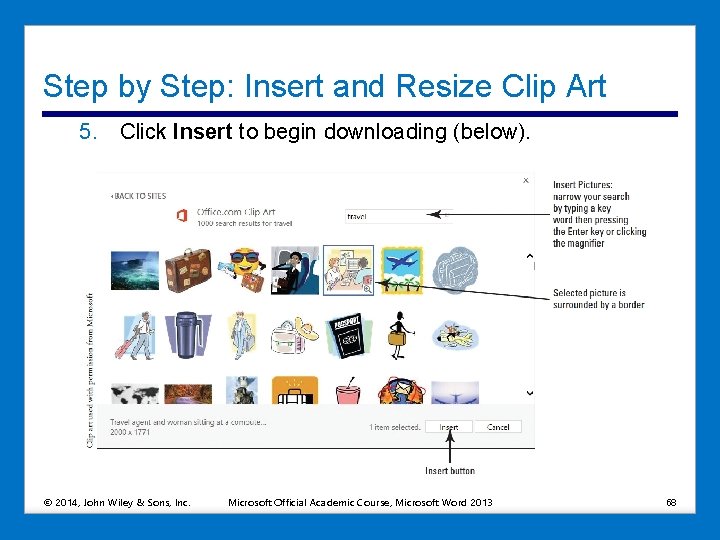
Step by Step: Insert and Resize Clip Art • OPEN a blank document. 1. Key Explore the World and change the font to Cambria, font size to 36 pt, and center then deselect. 2. Press Enter to move the insertion point below the new heading. 3. In the Illustrations group on the Insert tab, click Online Pictures button. Open the Insert Pictures). 4. In the Search box by Office. com Clip Art, key travel and begin the search by pressing Enter. Pictures, illustrations, and clip art appears in the box below with many options to select from. A border is placed around the selected the clip art to show that it is the selected item. © 2014, John Wiley & Sons, Inc. Microsoft Official Academic Course, Microsoft Word 2013 67

Step by Step: Insert and Resize Clip Art 5. Click Insert to begin downloading (below). © 2014, John Wiley & Sons, Inc. Microsoft Official Academic Course, Microsoft Word 2013 68

Step by Step: Insert and Resize Clip Art 6. Resize the clip art using the Size group and change the height to 3. 12” and width to 3. 52”. 7. SAVE the document as Travel Plans in the lesson folder on your flash drive. • PAUSE. LEAVE the document open to use in the next exercise. © 2014, John Wiley & Sons, Inc. Microsoft Official Academic Course, Microsoft Word 2013 69

Step by Step: Format Clip Art • USE the document that is open from the previous exercise. 1. Select the clip art image you inserted into the document during the preceding exercise to display the Picture Tools Format tab. 2. Right-click then select Edit Picture from the shortcut menu. Word automatically moves the clip art to the upper -left corner of the document to begin formatting. © 2014, John Wiley & Sons, Inc. Microsoft Official Academic Course, Microsoft Word 2013 70

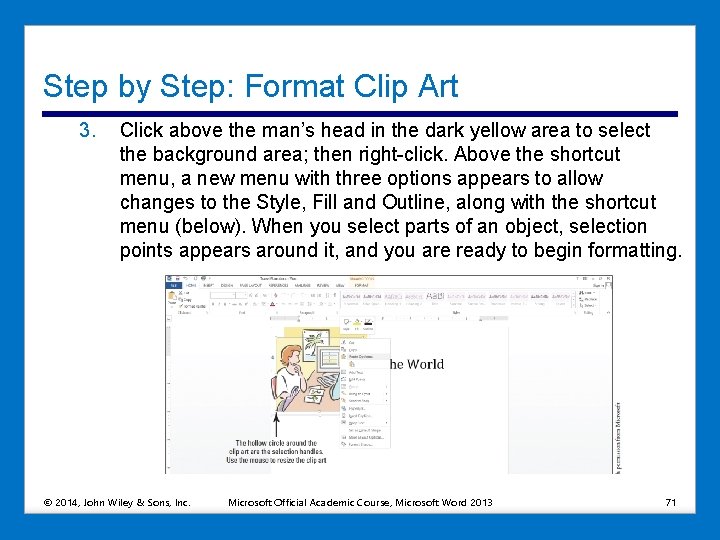
Step by Step: Format Clip Art 3. Click above the man’s head in the dark yellow area to select the background area; then right-click. Above the shortcut menu, a new menu with three options appears to allow changes to the Style, Fill and Outline, along with the shortcut menu (below). When you select parts of an object, selection points appears around it, and you are ready to begin formatting. © 2014, John Wiley & Sons, Inc. Microsoft Official Academic Course, Microsoft Word 2013 71

Step by Step: Format Clip Art 4. 5. 6. 7. Click the Fill button to produce the color palette and select the Blue-Gray, Text 2, Lighter 80% to change the background color. Select the palm tree within the frame to change the color of the palms to a darker green. The selection points surround the palms. Right-click, and then apply the Green, Accent 6, Darker 50% from the Fill menu. Select the female’s head to change her color to yellow using the Fill menu. Make sure the selection points surround the area of her head. Now that you have made changes, let’s apply the other formatting options available. Position the insertion point in the background area located in the upper-right of the clip art; right-click then click the Style button to produce the style gallery. Select the Colored Fill Black, Dark 1 to apply this background color behind the wall of the clip art. © 2014, John Wiley & Sons, Inc. Microsoft Official Academic Course, Microsoft Word 2013 72

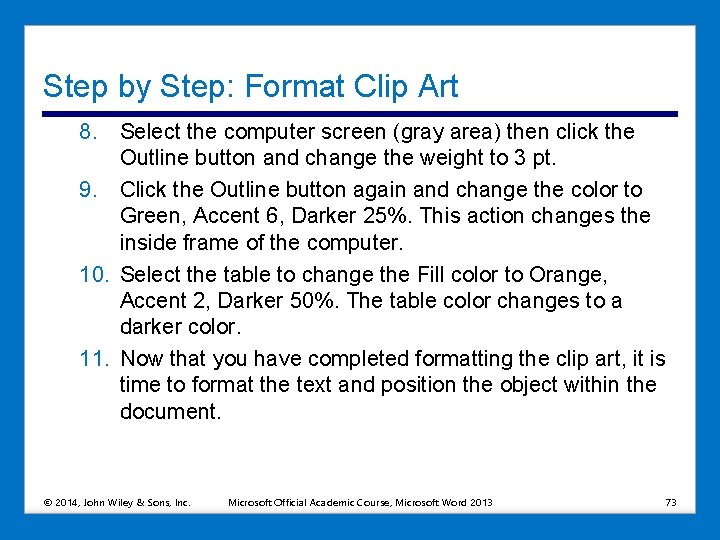
Step by Step: Format Clip Art 8. Select the computer screen (gray area) then click the Outline button and change the weight to 3 pt. 9. Click the Outline button again and change the color to Green, Accent 6, Darker 25%. This action changes the inside frame of the computer. 10. Select the table to change the Fill color to Orange, Accent 2, Darker 50%. The table color changes to a darker color. 11. Now that you have completed formatting the clip art, it is time to format the text and position the object within the document. © 2014, John Wiley & Sons, Inc. Microsoft Official Academic Course, Microsoft Word 2013 73

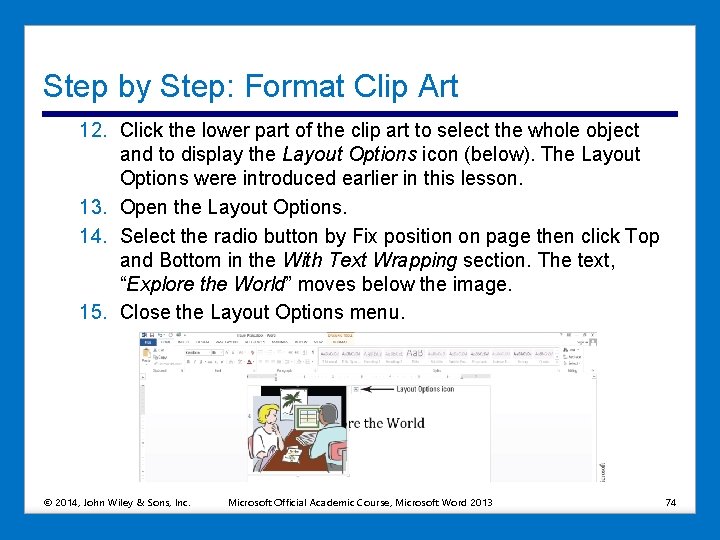
Step by Step: Format Clip Art 12. Click the lower part of the clip art to select the whole object and to display the Layout Options icon (below). The Layout Options were introduced earlier in this lesson. 13. Open the Layout Options. 14. Select the radio button by Fix position on page then click Top and Bottom in the With Text Wrapping section. The text, “Explore the World” moves below the image. 15. Close the Layout Options menu. © 2014, John Wiley & Sons, Inc. Microsoft Official Academic Course, Microsoft Word 2013 74

Step by Step: Format Clip Art 16. Select the text without the paragraph mark. If the paragraph mark is selected so is the object. 17. Apply Word. Art and select Fill – Black, Text 1, Shadow. 18. Adjust the Word. Art and drag to the right of the margin keeping it centered. Disable the Show/Hide. 19. SAVE the document as Formatted Clip Art in the lesson folder on your flash drive then CLOSE the file. • PAUSE. LEAVE the program open for the next exercise. © 2014, John Wiley & Sons, Inc. Microsoft Official Academic Course, Microsoft Word 2013 75

Step by Step: Reset an Image • OPEN the Family Vacation 5 document from the lesson folder. You completed this exercise earlier in the lesson. 1. Changes were made to this picture and now you want to reset the picture using the Picture Tools. Select the picture. 2. Click the Format tab. 3. In the Adjust group, click the drop down arrow to display the Reset Picture menu; then select Reset Picture and Size. Formatting changes you made to the picture earlier are discarded. 4. SAVE the document as Family Vacation 5. Reset to your flash drive in the lesson folder. • PAUSE. LEAVE the document open to use in the next © 2014, John Wiley & Sons, Inc. Microsoft Official Academic Course, Microsoft Word 2013 76 exercise.

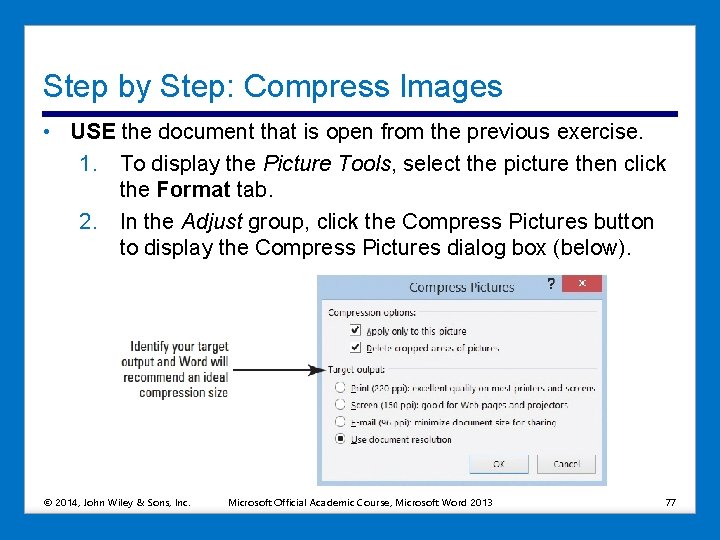
Step by Step: Compress Images • USE the document that is open from the previous exercise. 1. To display the Picture Tools, select the picture then click the Format tab. 2. In the Adjust group, click the Compress Pictures button to display the Compress Pictures dialog box (below). © 2014, John Wiley & Sons, Inc. Microsoft Official Academic Course, Microsoft Word 2013 77

Step by Step: Compress Images 3. In the Compression Options section, check marks indicate which features are activated—in this case, both are turned on. 4. In the Target Output section, select the radio button by E-mail (96 ppi): minimize document size for sharing. By selecting this radio button, the picture file size will be compressed to make the document ready for sharing via email. The other options available are to compress the picture at a quality still acceptable for printing correctly on printers and to ensure screen quality when viewing on web pages and projectors. 5. Click OK. 6. SAVE the document as Family Vacation 5. Compress in the lesson folder on your flash drive then CLOSE the file. • PAUSE. LEAVE Word open to use in the next exercise. © 2014, John Wiley & Sons, Inc. Microsoft Official Academic Course, Microsoft Word 2013 78

Step by Step: Insert a Chart • OPEN the Family Vacation 5 document from the lesson folder. You completed this exercise earlier in the lesson. 1. Place the insertion point at the end of the document, and press the Enter key. © 2014, John Wiley & Sons, Inc. Microsoft Official Academic Course, Microsoft Word 2013 79

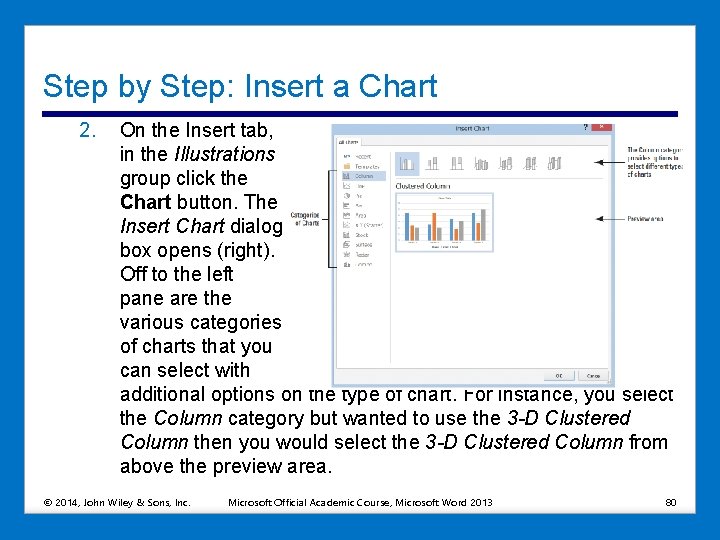
Step by Step: Insert a Chart 2. On the Insert tab, in the Illustrations group click the Chart button. The Insert Chart dialog box opens (right). Off to the left pane are the various categories of charts that you can select with additional options on the type of chart. For instance, you select the Column category but wanted to use the 3 -D Clustered Column then you would select the 3 -D Clustered Column from above the preview area. © 2014, John Wiley & Sons, Inc. Microsoft Official Academic Course, Microsoft Word 2013 80

Step by Step: Insert a Chart 3. Click the 3 -D Clustered Column. In the preview area, the 3 -D Clustered Column appears. 4. Hover the chart, and watch how it increases in size. 5. Click OK. © 2014, John Wiley & Sons, Inc. Microsoft Official Academic Course, Microsoft Word 2013 81

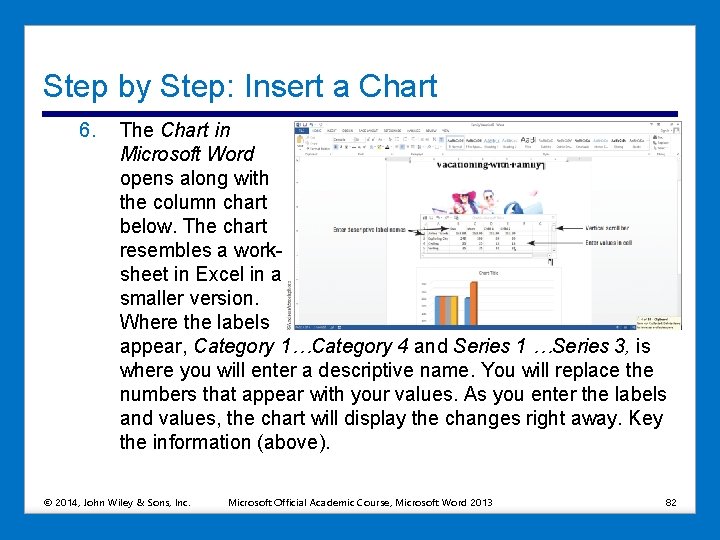
Step by Step: Insert a Chart 6. The Chart in Microsoft Word opens along with the column chart below. The chart resembles a worksheet in Excel in a smaller version. Where the labels appear, Category 1…Category 4 and Series 1 …Series 3, is where you will enter a descriptive name. You will replace the numbers that appear with your values. As you enter the labels and values, the chart will display the changes right away. Key the information (above). © 2014, John Wiley & Sons, Inc. Microsoft Official Academic Course, Microsoft Word 2013 82

Step by Step: Insert a Chart 7. Column A needs to be adjusted so that you can see the full label name. Place your insertion point between columns A and B, wait until you see a double-sided arrow, and then double click to quickly adjust. Now that you’ve entered the data, click the close button to close the Chart in Microsoft Word. 8. Use the vertical scroll bar to view the graph. 9. SAVE the document as Expenses for Vacation in the lesson folder on your flash drive. • PAUSE. LEAVE Word open for the next exercise. © 2014, John Wiley & Sons, Inc. Microsoft Official Academic Course, Microsoft Word 2013 83

Step by Step: Formatting a Chart • USE the document that is open from the previous exercise. 1. Click inside the chart to activate the Chart Tools. Once The Design and Format tabs become visible then click the Design tab. The Design tab provides many options on formatting the chart such as applying a layout, styles, changing the chart type, and more. For this exercise, basic formatting will be applied. 2. In the Chart Layout group select the Quick Layout to display the gallery, and hover each item to preview. © 2014, John Wiley & Sons, Inc. Microsoft Official Academic Course, Microsoft Word 2013 84

Step by Step: Formatting a Chart 3. You determine that Layout 10 will work best for you. Select that layout. 4. In the Chart Styles, select Style 4. More options are available when you click the More button. 5. Select the text where Chart Title appears and key Vacation Expenses. For now, this is the only formatting that will be done to this chart. 6. SAVE the document as Expenses for Vacation. Update in the lesson folder on your flash drive then CLOSE the file. • CLOSE Word. © 2014, John Wiley & Sons, Inc. Microsoft Official Academic Course, Microsoft Word 2013 85

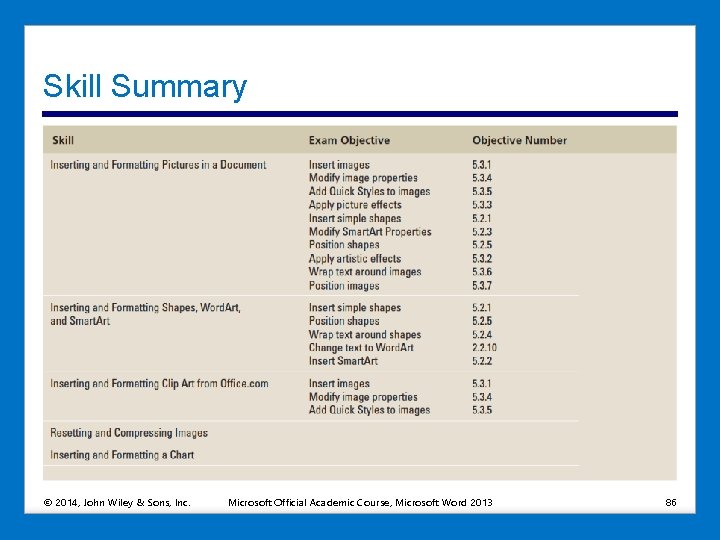
Skill Summary © 2014, John Wiley & Sons, Inc. Microsoft Official Academic Course, Microsoft Word 2013 86