Microsoft Power Point What is Microsoft Power Point


- Slides: 24
Microsoft Power. Point
What is Microsoft Power. Point? • A complete presentation graphics program. • Allows you to produce professional looking presentations. • Can be used for: • • In person presentations Web presentations Notes Kiosks
Presentations • The basic unit of a presentation is a slide • A slide will contain one or more objects such as title, text, graphics tables and so on.
Main Views 1. 2. 3. 4. 5. Normal Slide Sorter Notes pages Reading view Slide Show f 5 Master views: Notes Page, Handout Master, Notes Master, Slide Master
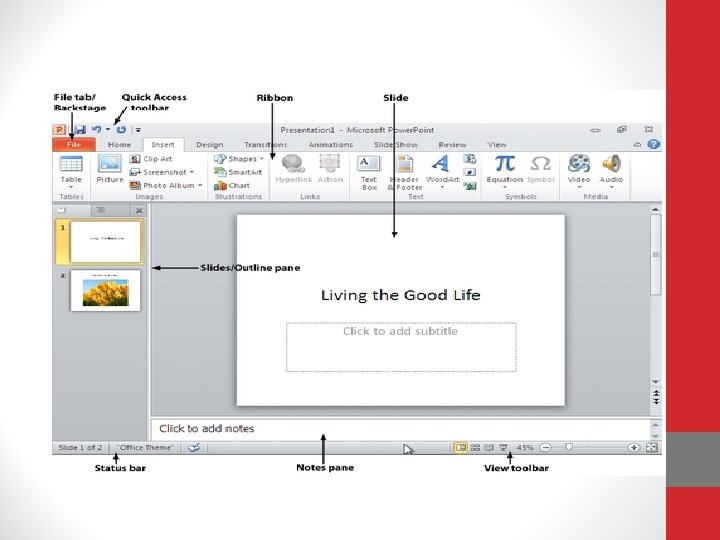
Power Point Window • Status bar. -what number it is in the presentation and what design theme it's using. • View toolbar-right of the screen lets you choose among a variety of views, including Slide Sorter, Reading View and Slide Show. There's also a slider that lets you zoom in or out of your document. • notes pane- type speaker notes.
Tabs • Home: This contains the most commonly used Power. Point features, including creating new slides, changing layouts, formatting text and paragraphs, inserting shapes, performing search and replace operations, and creating drawings. • Insert: insert into a presentation, such as pictures, clip art, charts, tables, videos, audio clips, equations, photo albums, headers and footers, and text boxes.
Tabs • Design: Here's where you'll apply different themes to your presentation; change colors, fonts and • effects; select background styles; change the slide orientation and page setup; and so on. • • TRANSITIONS-create transitions between slides, such as cuts, fades and wipes, as well as a number of 3 D slide transitions.
Tabs • Animations: This lets you add animation effects to your slides. Animations are effects on the slide itself. • Review: Here's the place to turn to for checking spelling and grammar, looking up a word in a thesaurus, marking up a presentation with comments and reviewing other people's markups.
One. Note Integration • Linked Note Taking, an automatic feature when One. Note is docked to the desktop. • Please see article below • http: //blogs. office. com/2010/04/13/onenote -2010 -and-powerpoint-2010 -easy-notetaking-while-reading-presentations/
Presentation Development • Avoid death by Power. Point
Presentation Development • Consider using Word outline view to develop the structure of your presentation. • Import or convert outline to Presentation. • Determine graphic, animation and slide transitions • Use sparingly • Use video as required • Determine theme
Slide Master Use a slide master A slide master is the top slide in a hierarchy of slides that stores information about theme and slide layouts of a presentation, including the background, color, fonts, effects, placeholder sizes, and positioning. Every presentation contains at least one slide master. The key benefit to modifying and using slide masters is that you can make universal style changes to every slide in your presentation, including ones added later to the presentation. Because slide masters affect the look of your entire presentation, when you create and edit a slide master or corresponding layouts, you work in Slide Master view. https: //support. office. com/en-us/article/What-is-a-slide-masterb 9 abb 2 a 0 -7 aef-4257 -a 14 e-4329 c 904 da 54
Presentation Development • Use graphs and images instead of bullets • Sales: • • • vs North. East 162617. 47 South. East 385414. 91 Midwest 219783. 64 South 281297. 15
Number of Slides • Minimize the number of slides. • Maintain a clear message. • Keep your audience attentive and interested.
Avoid Multiple Lines • Keep your text simple by using bullet points or short sentences • try to keep each to point one line • minimize text wrapping • You can remove "a" and "the" to help reduce the word count on a line.
Font Appearance Choose a font style that your audience can read. Avoid narrow fonts, such as Arial Narrow, and avoid fonts that include fancy edges, such as Times. Use theme fonts (theme fonts: A set of major and minor fonts that is applied to a file. Theme fonts, theme colors, and theme effects compose a theme. ) in your presentation. Use the same fonts through out presentation.
Slide Back Grounds • Make slide backgrounds subtle and keep them consistent. • Choose an appealing consistent template • (template: A file or set of files that contains information about theme, layout, and other elements of a finished presentation. ) • Use high contrast between background color and text color.
Links and buttons • Use objects within Power. Point to navigate: • Locations in Power. Point • Other applications • Web sites • Hyper. Link or Action • Will make for smooth transitions
The Day of the Presentation • Show up early and verify that your equipment works properly. • Don't assume that your presentation will work fine on another computer. • Ensure audio works • Make sure that you have the appropriate files and versions of software that you need. • Ensure all files are accounted for when you copy them to a USB or network drive and carry them to your presentation location. • 3 copy rule
The Day of the Presentation • Use the Presenter View • Use speaker notes
The Day of the Presentation Verify that the projector's resolution is the same as the computer on which you created your presentation. If the resolutions don't match, your slides may be cropped, or other display problems can occur. Turn your screen saver off.
During the Presentation • Do not read the presentation. Practice the presentation so that you can speak from bullet points. • Keep your audience focused on the content of your presentation. • Ask your audience to hold questions until the end as required.
During the Presentation • Avoid moving the pointer unconsciously. • Be aware of time. • Monitor your audience's behavior. • Have a question period at the end. • Use sound recordings when sending a presentation electronically.