Microscopy Light and Electron Microscopy The History n


 Body Tube (Image Focuses) Objective Lens")


 House ant Lactobacillus (SEM) Avian influenza virus")
")


- Slides: 29
Microscopy Light and Electron Microscopy
The History n Many people experimented with making microscopes n Was the microscope originally made by accident? (Most people were creating telescopes) n The first microscope was 6 feet long!!! n The Greeks & Romans used “lenses” to magnify objects over 1000 years ago.
The First Light Microscopes n n Around 1590 Zaccharias and Hans Janssen experimented with lenses in a tube, leading to the forerunner of the microscope and the telescope In the late 1600’s, Anton van Leeuwenhoek was the first to see bacteria, yeast, and many other microbes using a microscope
The History Zacharias Jansen 1588 -1631 The “First” Microscope
The History Hans and Zacharias Janssen of Holland in the 1590’s created the “first” compound microscope n Anthony van Leeuwenhoek and Robert Hooke made improvements by working on the lenses n Anthony van Leeuwenhoek 1632 -1723 Hooke Microscope Robert Hooke 1635 -1703
How a Microscope Works Ocular Lens (Magnifies Image) Body Tube (Image Focuses) Objective Lens (Gathers Light, Magnifies And Focuses Image Inside Body Tube) • Bending Light: The objective (bottom) convex lens magnifies and focuses (bends) the image inside the body tube and the ocular convex (top) lens of a microscope magnifies it (again).
How to Use A Light Microscope n First, the objective lens gathers light from the specimen and magnifies the image n n The ocular lens in the eyepiece magnifies and transmits the image to your eye n n Most microscopes have several objective lenses that can be rotated into position to provide different levels of magnification (4 X, 10 X, 40 X) The magnification of the ocular lens is 10 X To find the total magnification of the microscope you are using, multiply the magnification of the objective lens by the magnification of the ocular lens.
The Parts of a Light Microscope n n n Light source: Could be a mirror, but most likely it is a bulb built into the base Diaphragm: Adjusts the amount of light striking an object Objective lens: Gathers light and magnifies image Ocular lens (eyepiece): Magnifies objects and focuses light to your eye Stage: Holds slide n n n Can be moved using the coarse or fine adjustment knobs to bring the object into focus Stage clips: Hold slide in place Base and arm: Structural support for the microscope
Can you name the parts? Start on the left side and work from the top down. Then go to the right side and work from the top down. Ocular lens (eyepiece) Arm Objective Lenses Stage clip Stage Course adjustment Diaphragm Fine adjustment Light Source Base Nice Job !
Images Produced by Light Microscopes Amoeba Streptococcus bacteria Anthrax bacteria Human cheek cells Plant cells Yeast cells
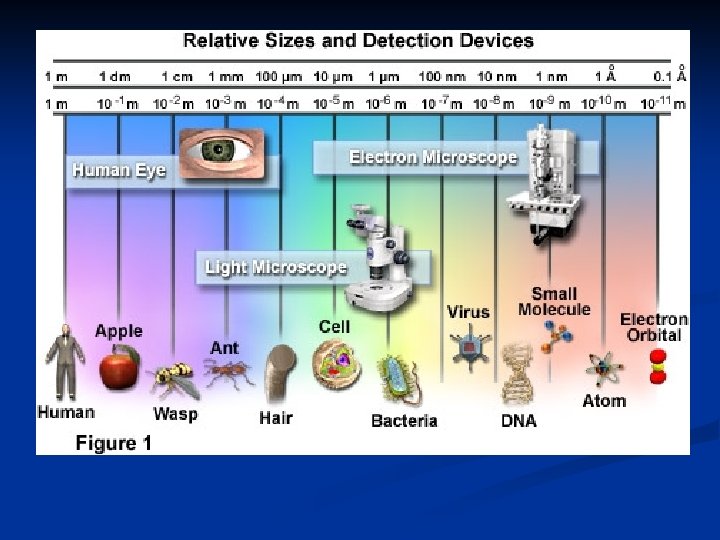
Resolution pp. 18 -19 n Resolution : the ability to distinguish between two objects that are very close together
Beyond Light Microscopes n Light microscopes are limited by their resolution. n n Light microscopes cannot produce clear images of objects smaller than 0. 2 micrometers The electron microscope was invented in the 1930’s by Max Knott and Ernst Ruska n n Electron microscopes use beams of electrons, rather than light, to produce images Electron microscopes can view objects as small as the diameter of an atom
Types of Electron Microscopes n Specimens from electron microscopy must be preserved and dehydrated, so living cells cannot be viewed n Transmission electron microscopes (TEMs) pass a beam of electron through a thin specimen n Scanning electron microscopes (SEMs) scan a beam of electrons over the surface of a specimen
Images Produced by Electron Microscopes Cyanobacteria (TEM) House ant Lactobacillus (SEM) Avian influenza virus Campylobacter (SEM) Human eyelash Deinococcus (SEM) Yeast
Using Microscopes to Visualize the Three Shapes of Bacteria n n n Cocci (round) Bacilli (rod) Spirilla (spiral) Three shapes of bacteria taken with an SEM Light microscope: Cocci Bacilli Spirilla
Magnification To determine your magnification…you just multiply the ocular lens by the objective lens n Ocular 10 x Objective 40 x: 10 x 40 = 400 n So the object is 400 times “larger” Objective Lens have their magnification written on them. Ocular lenses usually magnifies by 10 x
Caring for a Microscope n Clean only with a soft cloth/tissue n Make sure it’s on a flat surface n Don’t bang it n Carry it with 2 HANDS…one on the arm and the other on the base
Carry a Microscope Correctly
Using a Microscope Start on the lowest magnification n Don’t use the coarse adjustment knob on high magnification…you’ll break the slide!!! n Place slide on stage and lock clips n Adjust light source (if it’s a mirror…don’t stand in front of it!) n Use fine adjustment to focus n
Calculations n n Field of View : whole circular area that you see when you look through the microscope Total Magnification : ocular (10 x) times the objective lens n n Low power : 10 x * 4 x = 40 x Medium power : 10 x * 10 x = 100 x High power : 10 x * 40 x = 400 x Field Diameter : distance across the field of view n n n Low power [40 x] = 4. 5 mm = 4 500 μm Medium power [100 x] = 1. 8 mm = 1 800 μm High power [400 x] = 0. 45 mm = 450 μm
Finding Field Diameter n If you find field diameter on a low power magnification, you can use this to calculate the field diameter at higher magnifications
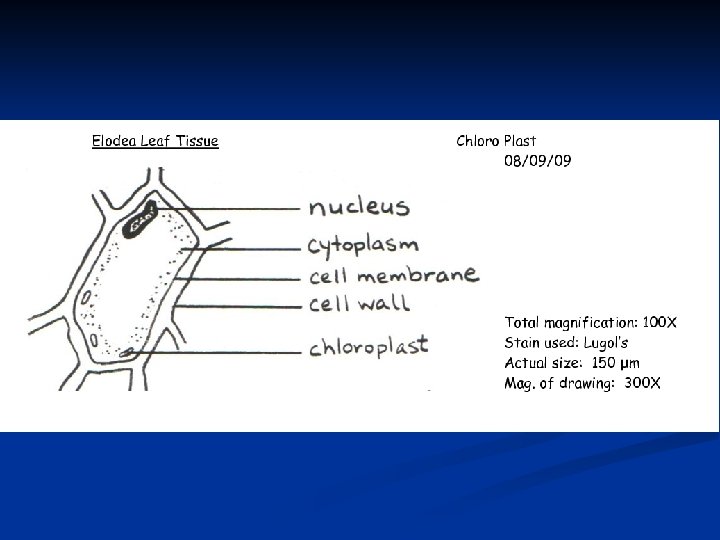
Calculating Estimated Actual Size of a Specimen Field diameter • Determine by evaluating which objective lens was used to view specimen • Ensure units are μm # of specimens fitting across field diameter • Estimate how many specimens fit across the field diameter width wise
Calculating Estimated Actual Size of a Specimen Field diameter • Viewed under medium power • Field of View is 1 800 μm # of specimens fitting across field diameter • estimate 3 times across
Calculating Magnification of a Drawing Width of drawing • Use a ruler to measure your drawing width-wise • Convert you units to μm Actual size of specimen • See previous slides
Biological Drawings n What you need: Blank paper n Sharp pencil n Ruler n n n Use firm clear lines n No shading/colour Large drawing Underline titles n n Labels Neatly printed n To the right n Even column n Parallel lines/do not cross n n n Top right corner: name & date Bottom right corner: total magnification
References n n n http: //education. denniskunkel. com/catalog/product_info. ph p? products_id=1123 http: //micro. magnet. fsu. edu/ http: //inventors. about. com/library/inventors/blroberthooke. htm http: //www. cerebromente. org. br/n 17/history/neurons 1_i. ht m Google Images http: //science. howstuffworks. com/light-microscope 1. htm