Microscopes History of the Microscope 1590 first compound


 �Can magnify up to 250, 000")

 �Can magnify up to 100, 000")


- Slides: 23
Microscopes
History of the Microscope � 1590 –first compound microscope
History of the Microscope � 1655 – Robert Hooke used a compound microscope to observe pores in cork. �He called them “cells”
History of the Microscope � Antoine van Leeuwenhoek st � 1 to see single-celled organisms in pond water
Types of Microscopes � 1. Compound Light Microscope st � 1 type of microscope, most widely used � light passes through 2 lenses � Can magnify up to 2000 x
Types of Microscopes � 2. Electron Microscope �Used to observe VERY small objects: viruses, DNA, parts of cells �Uses beams of electrons rather than light �Much more powerful
Types of Electron Microscopes �Transmission Electron Microscope (TEM) �Can magnify up to 250, 000 x
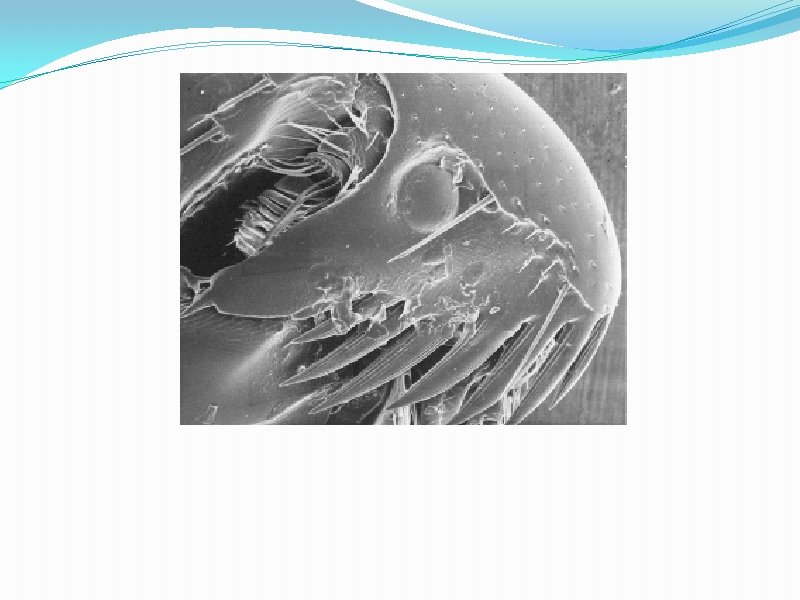
Types of Electron Microscopes �Scanning Electron Microscope (SEM) �Can magnify up to 100, 000 x
The Light Microscope Guidelines for Use • • Always carry with 2 hands Only use lens paper for cleaning Do not force knobs Always store covered
Eyepiece Body Tube Revolving Nosepiece Objective Lens Stage Clips Diaphragm Light Arm Stage Coarse Focus Fine Focus Base
Microscope Vocabulary � Magnification: increase of an object’s apparent size � Resolution: power to show details clearly � Both are needed to see a clear image
Magnification Your microscope has 3 magnifications: Scanning, Low and High. Each objective will have written the magnification. In addition to this, the ocular lens (eyepiece) has a magnification. The total magnification is the ocular x objective
General Procedures 1. Make sure all backpacks and materials are out of the aisles and off the tops of desks. 2. Plug your microscope in to the outlet. 3. Store with cord wrapped around microscope and the scanning objective clicked into place. 4. Carry by the base and arm with both hands.
Focusing Specimens 1. Always start with the scanning objective. Use the Coarse Knob to focus and then the fine adjustment knob until clear, image may be small at this magnification. 2. Once you've focused on Scanning, switch to Low Power. Use the Coarse Knob to refocus, then fine adjustment until clear. Now switch to High Power. . At this point, ONLY use the Fine Adjustment Knob to focus specimens.
• Your slide MUST be focused on low power before attempting this step • Click the nosepiece to the longest objective • Do NOT use the Coarse Focusing Knob, this could crack the slide or the lens • Use the Fine Focus Knob to bring the slide
Drawing Specimens 1. Use pencil - you can erase and shade areas 2. All drawings should include clear and proper labels (and be large enough to view details). Drawings should be labeled with the specimen name and magnification. 3. Labels should be written on the outside of the circle. The circle indicates the viewing field as seen through the eyepiece, specimens should be drawn to scale - ie. . if your specimen takes up the whole viewing field, make sure your drawing reflects that.
Cleanup 1. Store microscopes with the scanning objective in place. 2. Wrap cords and cover microscopes. *Double check to make sure you didn't leave a slide 3. Place microscopes in their designated location (probably a cabinet)
Troubleshooting Occasionally you may have trouble with working your microscope. Here are some common problems and solutions. 1. Image is too dark! Adjust the diaphragm, make sure your light is on. 2. There's a spot in my viewing field, even when I move the slide the spot stays in the same place! Your lens is dirty. Use lens paper, and only lens paper to carefully clean the objective and ocular lens. The ocular lens can be removed to clean the inside. The spot is probably a spec of dust. 3. I can't see anything under high power! Remember the steps, if you can't focus under scanning and then low power, you won't be able to focus anything under high power. Start at scanning and walk through the steps again. 4. Only half of my viewing field is lit, it looks like there's a half-moon in there! You probably don't have your objective fully clicked into place. .
Practice Labeling the Parts
Quiz Over the Microscope 1. When focusing a specimen, you should always start with the __________ objective. 2. When using the high power objective, only the ______ knob should be used. 3. The type of microscope used in most science classes is the _________ microscope 4. What part of the microscope can adjust the amount of light that hits the slide? _______________
5. You should carry the microscope by the ____ and the _____. 6. The objectives are attached to what part of the microscope (it can be rotated to click the lenses into place): ________________ 7. You should always store you microscope with the ________ objective in place. 8. A microscope has an ocular objective of 10 x and a high power objective of 50 x. What is this microscope's total magnification? ______