Microscope 1 Eyepiece ocular lens 2 bodytube 13

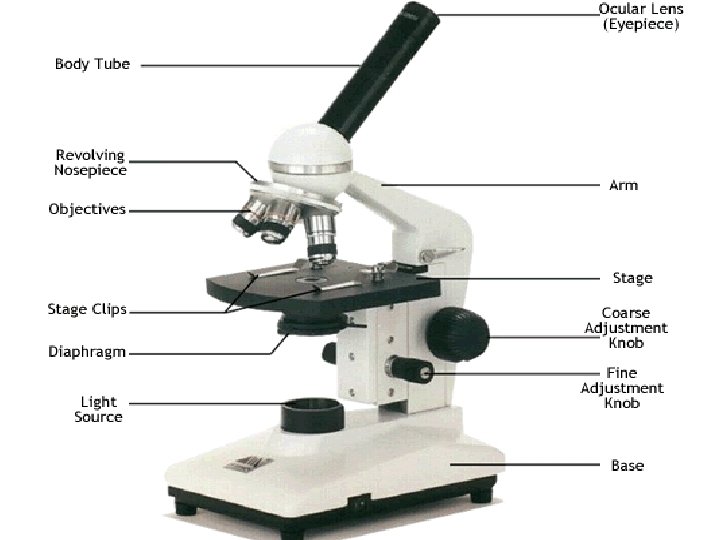
Microscope 1 Eyepiece, ocular lens 2 bodytube 13 Revolving nosepiece arm 12 Objective lens 3 4 Stage clips stage 11 5 Course adjustment 10 diaphragm 6 Fine adjustment 9 Light switch 8 light 7 base

Types of Microscopes Binocular microscope Electron microscope Light microscope

Making a slide Goal: clean slides, no air bubbles, no sloppy water on slide

Getting into Focus • 1. Plug in the microscope and press the light button. • 2. Click the low power objective (10 x) into position. • 3. Place the slide and specimen directly over the hole on the stage. • 4. Use the coarse adj. (large knob) make sure the objective is down as far as it will go. • 5. Look into the eyepiece with one eye, keeping both eyes open. • 6. Using the coarse adjustment, slowly move the objective upward to focus the image. You may have to move the slide to find the image. If the image is not in focus at this point, repeat step 4 -6.

Getting into Focus • 7. Check the diaphragm setting for the best light contrast. • 8. Center the image in the low power field of view. • 9. Place the stage clips over the slide. • 10. Finish focusing the fine adjustment (small knob).

To magnify the image more, use the high power objective • Looking from the side, swing the high power objective into position. • DO NOT TOUCH THE COARSE ADJUSTMENT • Use the fine adjustment to focus the image • Adjust the diaphragm • If you should lose the focus, repeat steps 4 -10

Video: “Incredible World” • What piece of technology improved the lives of humans? – What advancements in the technology occurred? – How were humans helped?

Microscope Terms • 1. Image • What we see under the microscope • 2. Magnification • Ratio of image size to object size • 3. Resolution • Sharpness of image • 4. Micrometer (micron) • Unit of measurement for microscopes • Symbol: µ • 1 mm = 1000 µ

Micron Lab Directions Field of View Measure the width at the thinnest part of the maple leaf
- Slides: 10