MEMS 5 in1 RM Slide Set 3 Reference
- Slides: 22

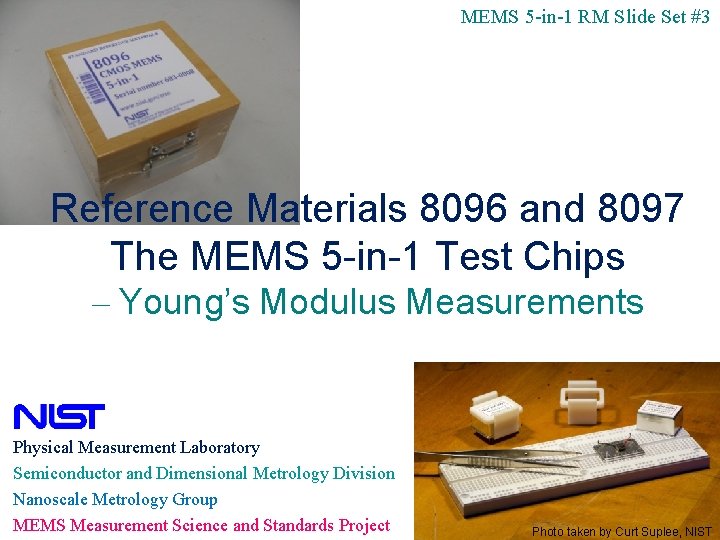
MEMS 5 -in-1 RM Slide Set #3 Reference Materials 8096 and 8097 The MEMS 5 -in-1 Test Chips – Young’s Modulus Measurements Physical Measurement Laboratory Semiconductor and Dimensional Metrology Division Nanoscale Metrology Group MEMS Measurement Science and Standards Project 1 Photo taken by Curt Suplee, NIST

List of MEMS 5 -in-1 RM Slide Sets Slide Set # Title of Slide Set 1 OVERVIEW OF THE MEMS 5 -IN-1 RMs 2 PRELIMINARY DETAILS THE MEASUREMENTS: 11 3 Young’s modulus measurements 4 Residual strain measurements 5 Strain gradient measurements 6 Step height measurements 7 In-plane length measurements 8 Residual stress and stress gradient calculations 9 Thickness measurements (for RM 8096) 10 Thickness measurements (for RM 8097) REMAINING DETAILS 2

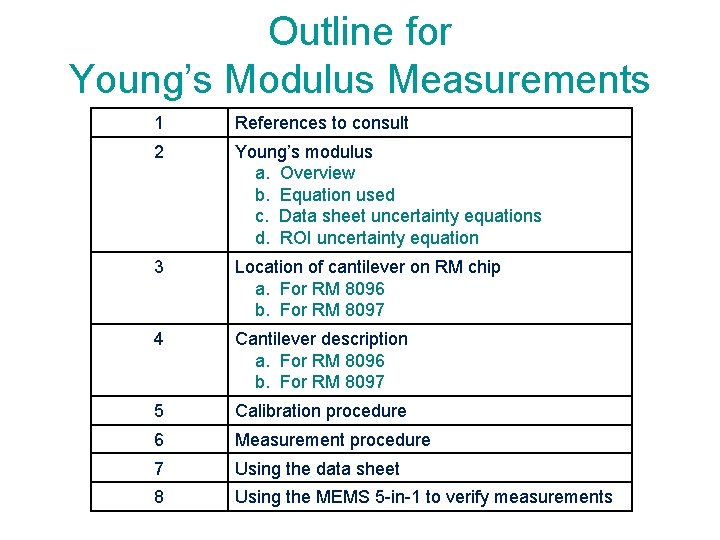
Outline for Young’s Modulus Measurements 1 References to consult 2 Young’s modulus a. Overview b. Equation used c. Data sheet uncertainty equations d. ROI uncertainty equation 3 Location of cantilever on RM chip a. For RM 8096 b. For RM 8097 4 Cantilever description a. For RM 8096 b. For RM 8097 5 Calibration procedure 6 Measurement procedure 7 Using the data sheet 8 Using the MEMS 5 -in-1 to verify measurements 3

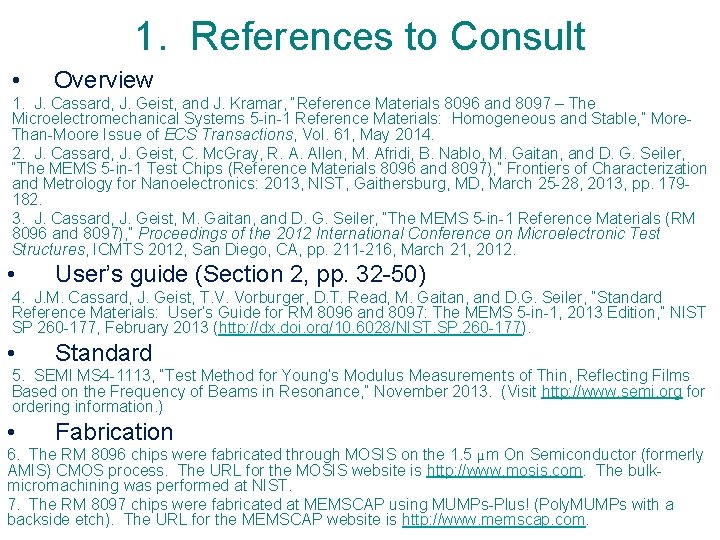
1. References to Consult • Overview 1. J. Cassard, J. Geist, and J. Kramar, “Reference Materials 8096 and 8097 – The Microelectromechanical Systems 5 -in-1 Reference Materials: Homogeneous and Stable, ” More. Than-Moore Issue of ECS Transactions, Vol. 61, May 2014. 2. J. Cassard, J. Geist, C. Mc. Gray, R. A. Allen, M. Afridi, B. Nablo, M. Gaitan, and D. G. Seiler, “The MEMS 5 -in-1 Test Chips (Reference Materials 8096 and 8097), ” Frontiers of Characterization and Metrology for Nanoelectronics: 2013, NIST, Gaithersburg, MD, March 25 -28, 2013, pp. 179182. 3. J. Cassard, J. Geist, M. Gaitan, and D. G. Seiler, “The MEMS 5 -in-1 Reference Materials (RM 8096 and 8097), ” Proceedings of the 2012 International Conference on Microelectronic Test Structures, ICMTS 2012, San Diego, CA, pp. 211 -216, March 21, 2012. • User’s guide (Section 2, pp. 32 -50) 4. J. M. Cassard, J. Geist, T. V. Vorburger, D. T. Read, M. Gaitan, and D. G. Seiler, “Standard Reference Materials: User’s Guide for RM 8096 and 8097: The MEMS 5 -in-1, 2013 Edition, ” NIST SP 260 -177, February 2013 (http: //dx. doi. org/10. 6028/NIST. SP. 260 -177). • Standard 5. SEMI MS 4 -1113, “Test Method for Young’s Modulus Measurements of Thin, Reflecting Films Based on the Frequency of Beams in Resonance, ” November 2013. (Visit http: //www. semi. org for ordering information. ) • Fabrication 6. The RM 8096 chips were fabricated through MOSIS on the 1. 5 µm On Semiconductor (formerly AMIS) CMOS process. The URL for the MOSIS website is http: //www. mosis. com. The bulkmicromachining was performed at NIST. 7. The RM 8097 chips were fabricated at MEMSCAP using MUMPs-Plus! (Poly. MUMPs with a 4 backside etch). The URL for the MEMSCAP website is http: //www. memscap. com.

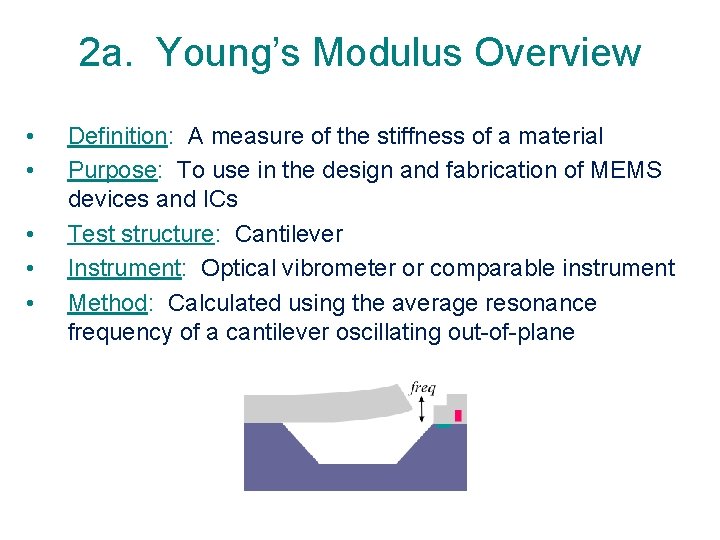
2 a. Young’s Modulus Overview • • • Definition: A measure of the stiffness of a material Purpose: To use in the design and fabrication of MEMS devices and ICs Test structure: Cantilever Instrument: Optical vibrometer or comparable instrument Method: Calculated using the average resonance frequency of a cantilever oscillating out-of-plane 5

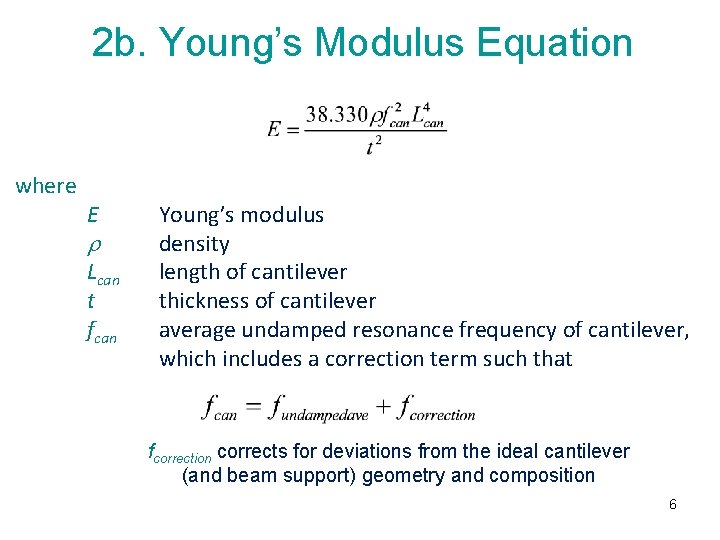
2 b. Young’s Modulus Equation where E Lcan t fcan Young’s modulus density length of cantilever thickness of cantilever average undamped resonance frequency of cantilever, which includes a correction term such that fcorrection corrects for deviations from the ideal cantilever (and beam support) geometry and composition 6

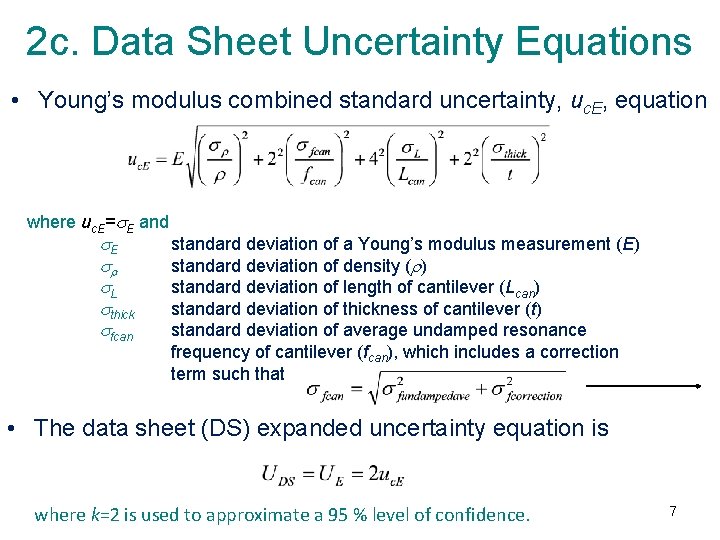
2 c. Data Sheet Uncertainty Equations • Young’s modulus combined standard uncertainty, uc. E, equation where uc. E= E and E L thick fcan standard deviation of a Young’s modulus measurement (E) standard deviation of density ( ) standard deviation of length of cantilever (Lcan) standard deviation of thickness of cantilever (t) standard deviation of average undamped resonance frequency of cantilever (fcan), which includes a correction term such that • The data sheet (DS) expanded uncertainty equation is where k=2 is used to approximate a 95 % level of confidence. 7

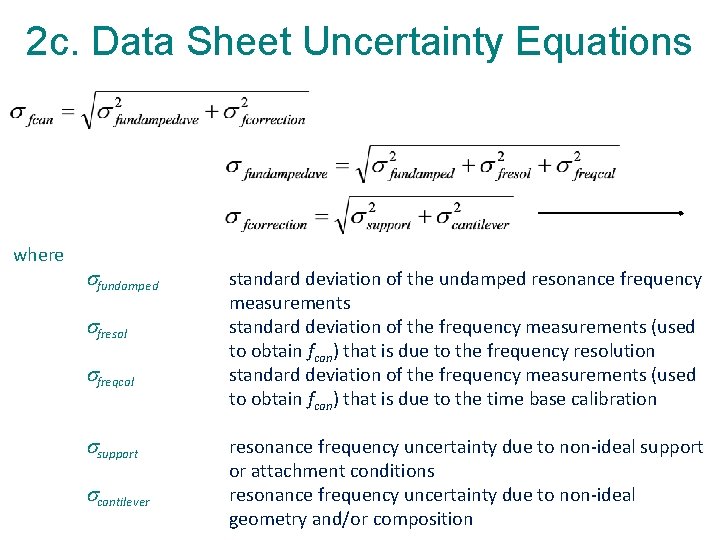
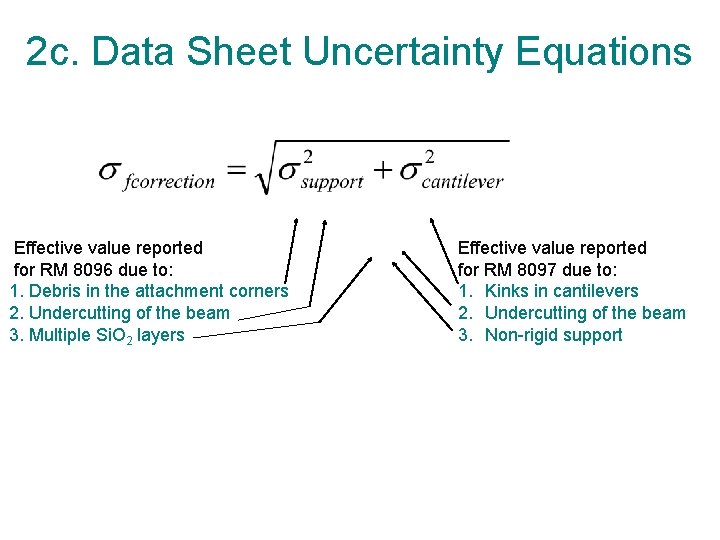
2 c. Data Sheet Uncertainty Equations where fundamped fresol freqcal support cantilever standard deviation of the undamped resonance frequency measurements standard deviation of the frequency measurements (used to obtain fcan) that is due to the frequency resolution standard deviation of the frequency measurements (used to obtain fcan) that is due to the time base calibration resonance frequency uncertainty due to non-ideal support or attachment conditions resonance frequency uncertainty due to non-ideal geometry and/or composition

2 c. Data Sheet Uncertainty Equations Effective value reported for RM 8096 due to: 1. Debris in the attachment corners 2. Undercutting of the beam 3. Multiple Si. O 2 layers Effective value reported for RM 8097 due to: 1. Kinks in cantilevers 2. Undercutting of the beam 9 3. Non-rigid support

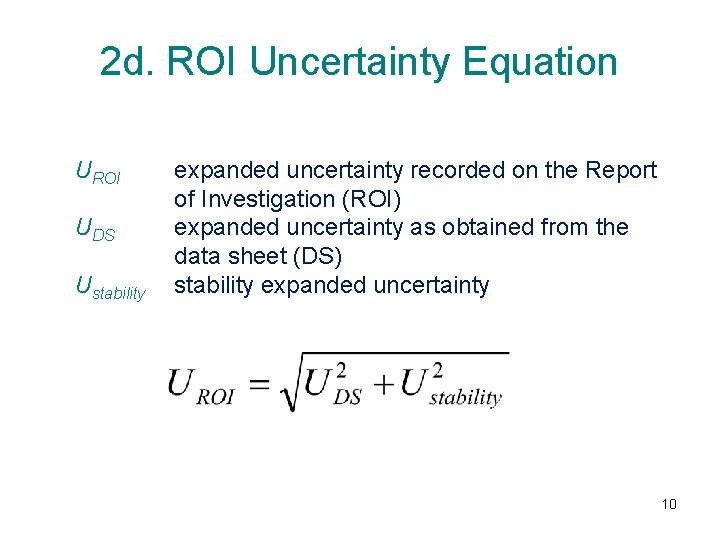
2 d. ROI Uncertainty Equation UROI UDS Ustability expanded uncertainty recorded on the Report of Investigation (ROI) expanded uncertainty as obtained from the data sheet (DS) stability expanded uncertainty 10

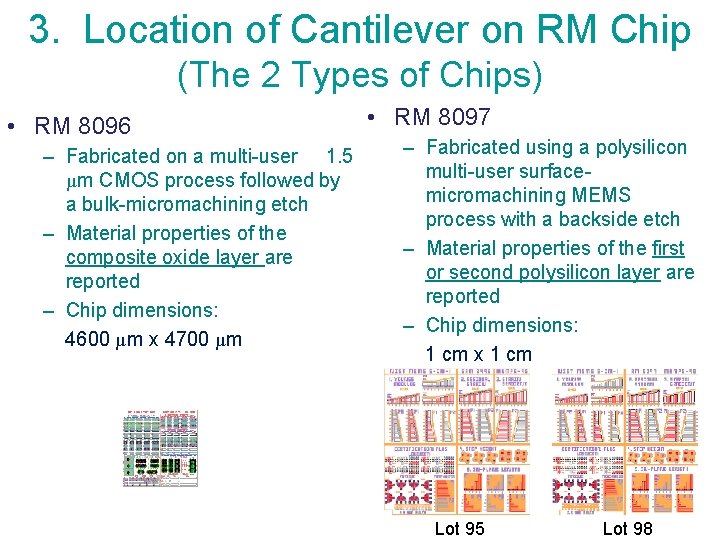
3. Location of Cantilever on RM Chip (The 2 Types of Chips) • RM 8096 – Fabricated on a multi-user 1. 5 µm CMOS process followed by a bulk-micromachining etch – Material properties of the composite oxide layer are reported – Chip dimensions: 4600 µm x 4700 µm • RM 8097 – Fabricated using a polysilicon multi-user surfacemicromachining MEMS process with a backside etch – Material properties of the first or second polysilicon layer are reported – Chip dimensions: 1 cm x 1 cm 11 Lot 95 Lot 98

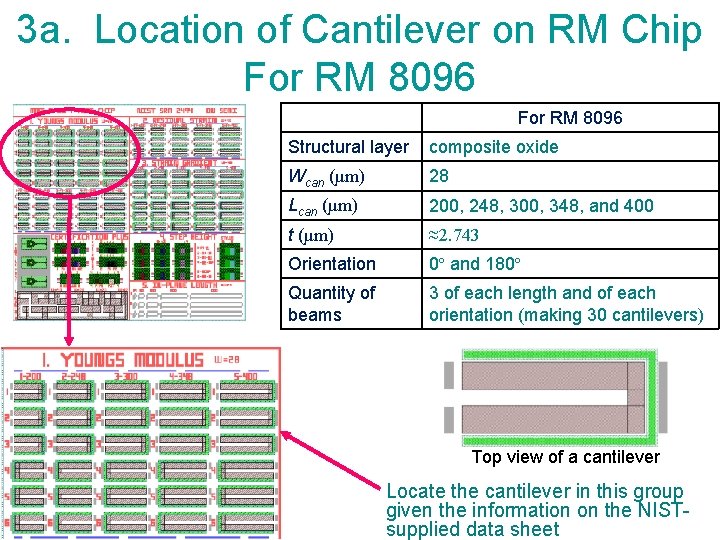
3 a. Location of Cantilever on RM Chip For RM 8096 Structural layer composite oxide Wcan (µm) 28 Lcan (µm) 200, 248, 300, 348, and 400 t (µm) ≈2. 743 Orientation 0º and 180º Quantity of beams 3 of each length and of each orientation (making 30 cantilevers) Top view of a cantilever Locate the cantilever in this group 12 given the information on the NISTsupplied data sheet

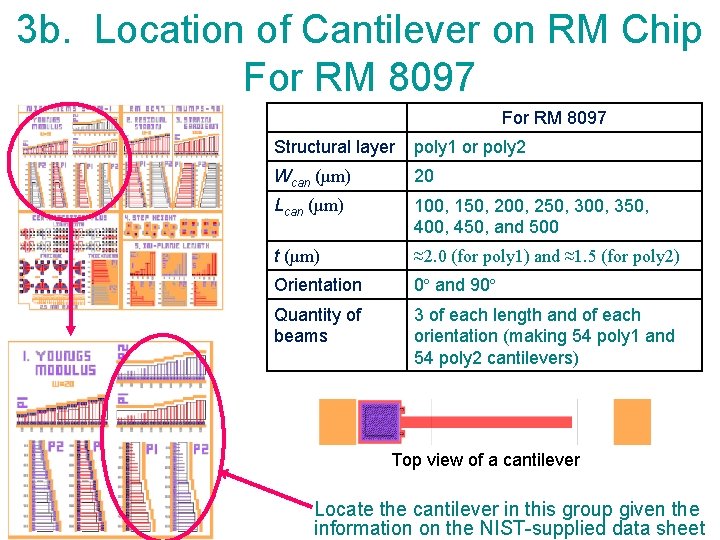
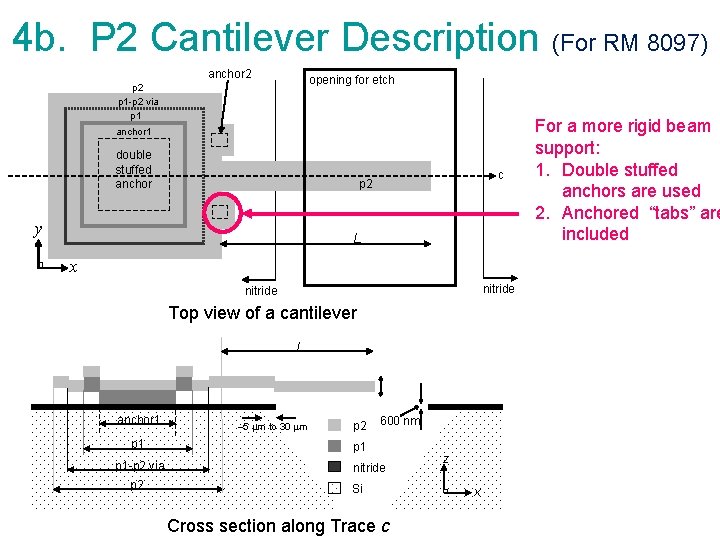
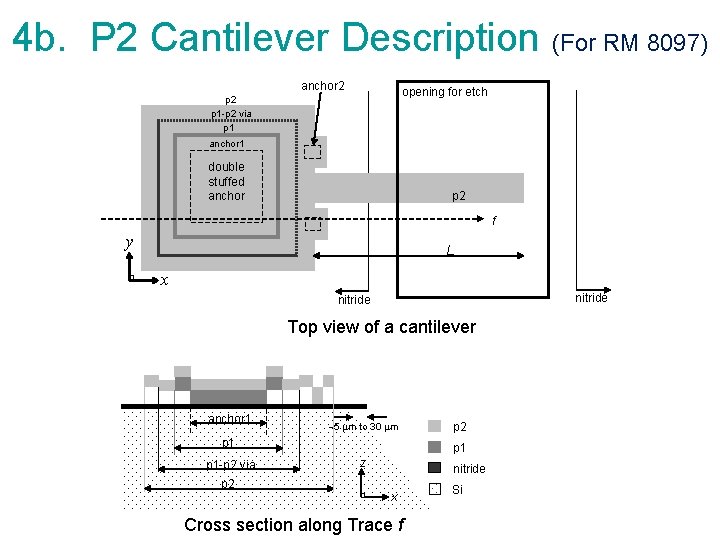
3 b. Location of Cantilever on RM Chip For RM 8097 Structural layer poly 1 or poly 2 Wcan (µm) 20 Lcan (µm) 100, 150, 200, 250, 300, 350, 400, 450, and 500 t (µm) ≈2. 0 (for poly 1) and ≈1. 5 (for poly 2) Orientation 0º and 90º Quantity of beams 3 of each length and of each orientation (making 54 poly 1 and 54 poly 2 cantilevers) Top view of a cantilever Locate the cantilever in this group given 13 the information on the NIST-supplied data sheet

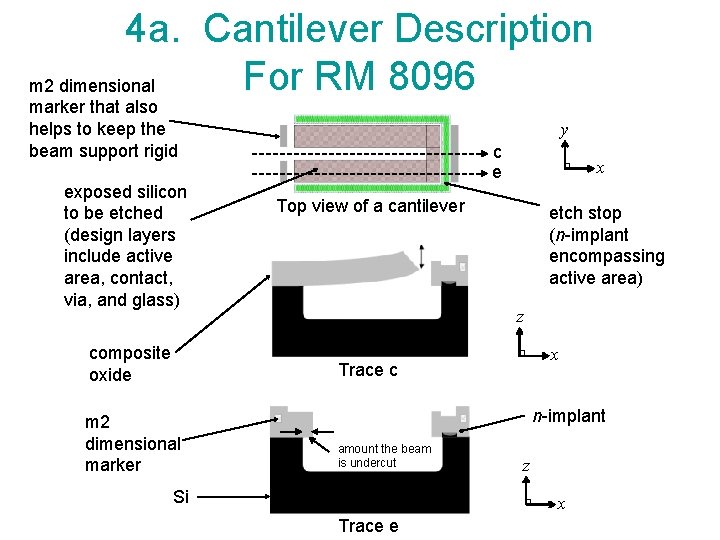
4 a. Cantilever Description For RM 8096 m 2 dimensional marker that also helps to keep the beam support rigid exposed silicon to be etched (design layers include active area, contact, via, and glass) composite oxide y c e x Top view of a cantilever etch stop (n-implant encompassing active area) z x Trace c m 2 dimensional marker n-implant amount the beam is undercut Si z x Trace e 14

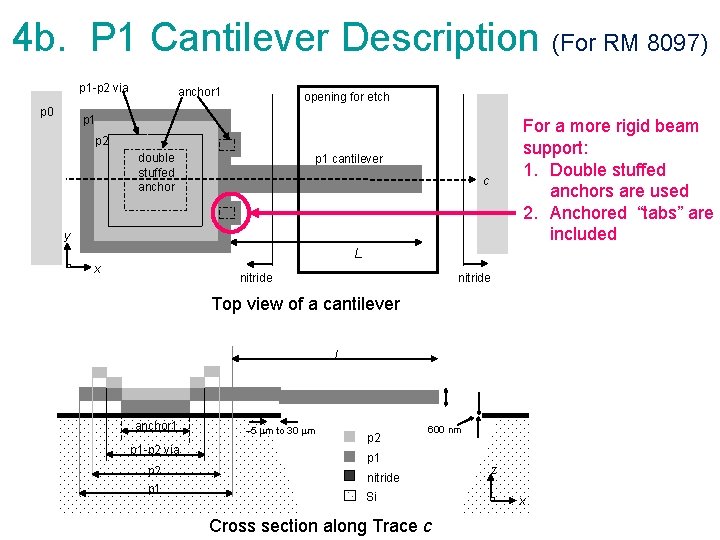
4 b. P 1 Cantilever Description (For RM 8097) p 1 -p 2 via p 0 anchor 1 opening for etch p 1 For a more rigid beam support: 1. Double stuffed anchors are used 2. Anchored “tabs” are included p 2 double stuffed anchor p 1 cantilever c y L x nitride Top view of a cantilever L anchor 1 p 1 -p 2 via p 2 p 1 -5 mm to 30 mm p 2 600 nm p 1 nitride Si Cross section along Trace c z x 15

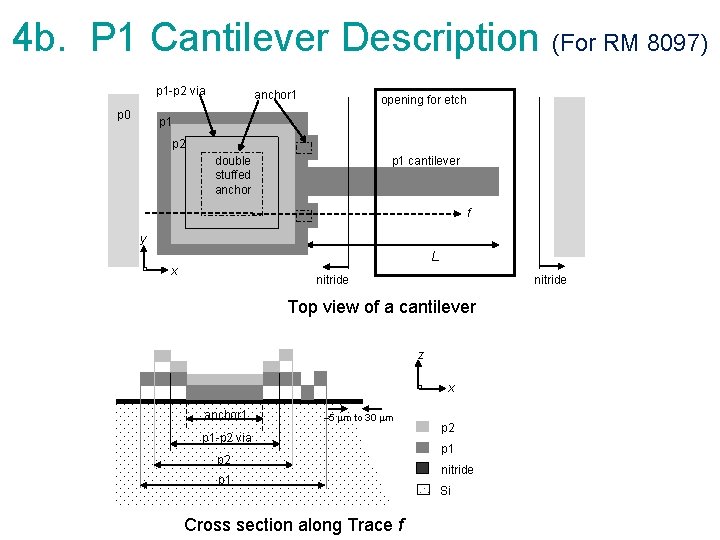
4 b. P 1 Cantilever Description (For RM 8097) p 1 -p 2 via p 0 anchor 1 opening for etch p 1 p 2 double stuffed anchor p 1 cantilever f y L x nitride Top view of a cantilever z x anchor 1 -5 mm to 30 mm p 1 -p 2 via p 2 p 1 Cross section along Trace f p 2 p 1 nitride Si

4 b. P 2 Cantilever Description (For RM 8097) anchor 2 opening for etch p 2 p 1 -p 2 via p 1 anchor 1 double stuffed anchor c p 2 y L For a more rigid beam support: 1. Double stuffed anchors are used 2. Anchored “tabs” are included x nitride Top view of a cantilever L anchor 1 p 1 -p 2 via p 2 -5 mm to 30 mm p 2 600 nm p 1 nitride Si Cross section along Trace c z x 17

4 b. P 2 Cantilever Description (For RM 8097) anchor 2 opening for etch p 2 p 1 -p 2 via p 1 anchor 1 double stuffed anchor p 2 f y L x nitride Top view of a cantilever anchor 1 -5 mm to 30 mm p 1 -p 2 via p 2 p 1 z nitride x Cross section along Trace f Si

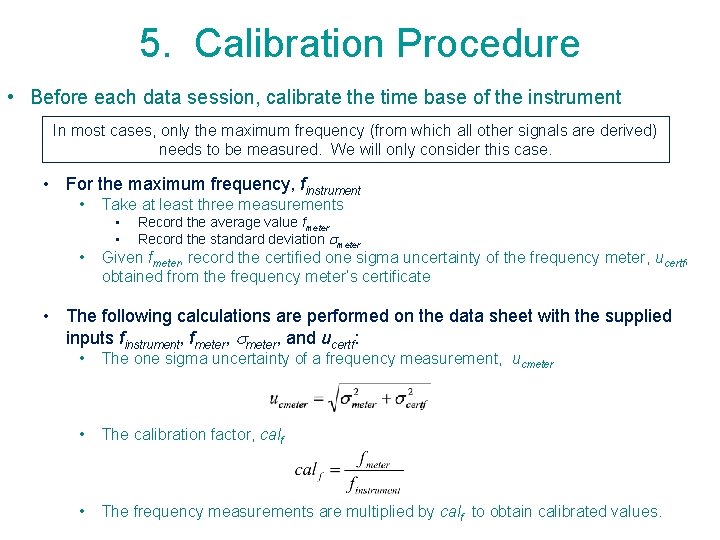
5. Calibration Procedure • Before each data session, calibrate the time base of the instrument In most cases, only the maximum frequency (from which all other signals are derived) needs to be measured. We will only consider this case. • For the maximum frequency, finstrument • Take at least three measurements • • • Record the average value fmeter Record the standard deviation meter Given fmeter, record the certified one sigma uncertainty of the frequency meter, ucertf, obtained from the frequency meter’s certificate • The following calculations are performed on the data sheet with the supplied inputs finstrument, fmeter, and ucertf: • The one sigma uncertainty of a frequency measurement, ucmeter • The calibration factor, calf • The frequency measurements are multiplied by calf to obtain calibrated values. 19

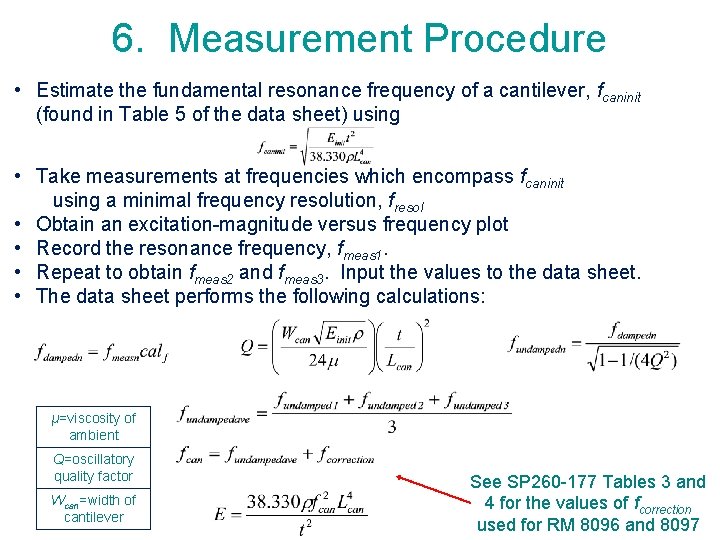
6. Measurement Procedure • Estimate the fundamental resonance frequency of a cantilever, fcaninit (found in Table 5 of the data sheet) using • Take measurements at frequencies which encompass fcaninit using a minimal frequency resolution, fresol • Obtain an excitation-magnitude versus frequency plot • Record the resonance frequency, fmeas 1. • Repeat to obtain fmeas 2 and fmeas 3. Input the values to the data sheet. • The data sheet performs the following calculations: µ=viscosity of ambient Q=oscillatory quality factor Wcan=width of cantilever See SP 260 -177 Tables 3 and 20 4 for the values of fcorrection used for RM 8096 and 8097

7. Using the Data Sheet • Find Data Sheet YM. 3 – – • On the MEMS Calculator website (Standard Reference Database 166) accessible via the NIST Data Gateway (http: //srdata. nist. gov/gateway/) with the keyword “MEMS Calculator” Note the symbol next to this data sheet. This symbol denotes items used with the MEMS 5 -in-1 RMs. Using Data Sheet YM. 3 – – – Click “Reset this form” Supply INPUTS to Tables 1 and 2 Click “Calculate and Verify” At the bottom of the data sheet, make sure all the pertinent boxes say “ok. ” If a pertinent box says “wait, ” address the issue and “recalculate. ” Compare both the inputs and outputs with the NIST-supplied values 21

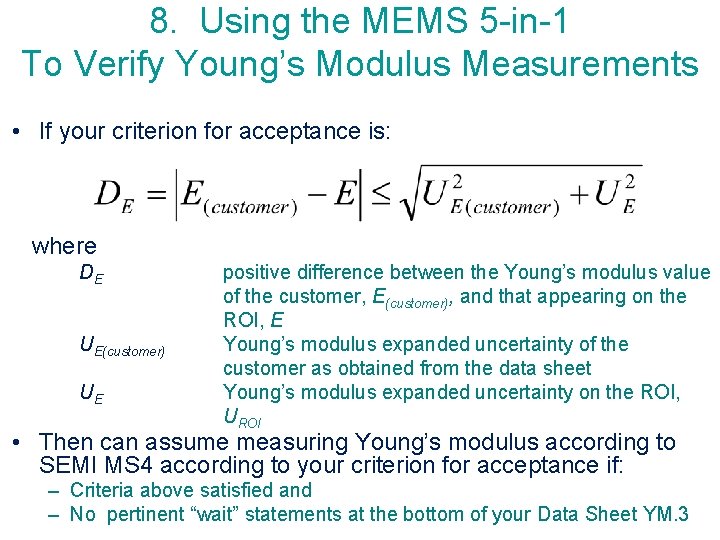
8. Using the MEMS 5 -in-1 To Verify Young’s Modulus Measurements • If your criterion for acceptance is: where DE UE(customer) UE positive difference between the Young’s modulus value of the customer, E(customer), and that appearing on the ROI, E Young’s modulus expanded uncertainty of the customer as obtained from the data sheet Young’s modulus expanded uncertainty on the ROI, UROI • Then can assume measuring Young’s modulus according to SEMI MS 4 according to your criterion for acceptance if: – Criteria above satisfied and 22 – No pertinent “wait” statements at the bottom of your Data Sheet YM. 3