Mechanisms and Algorithms Lab Lego Levers Shafts and

Mechanisms and Algorithms Lab: Lego Levers, Shafts and Cranks

Lab Philosophy Electronics Mechanisms Lego 80/20 Plans Schematic Drawings Assemblies Items Resistors, etc Beams, etc Acquisition Radio Shack Mc. Master-Carr Lego Store 80/20 Store Drawing Orcad Pro/E MLCAD Plug-ins Simulating Spice Pro/E Quick-connect Test/Evaluate Breadboarding • Plans: read drawings, understand part roles and part connections • Items: Learn proper name of parts and what parts exist • Acquisition: Learn vendors for Bill of Materials (BOM) • Drawing: Communicating and Archiving your designs • Simulation: Rapid prototyping • T&E: Learn to physically construct, identify challenges and learn troubleshooting

Lab Experiments 1. Introduction to Lego Fundamentals 2. Reciprocating Motion: Simple Crank 3. Reciprocating Motion: 3 -Bar Crank (Isogawa Pg. 61) 4. Reciprocating Motion: Crankshaft (Isogawa Pg. 63) Homework: Reciprocating Motion: Slider-Crank (Isogawa Pg. 62)

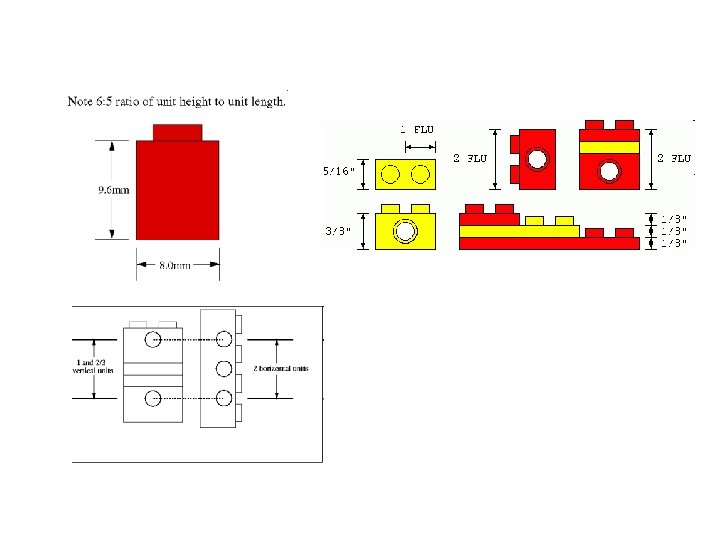
Exercise 1: Introduction to Lego Fundamentals In Lego: Vertical > Horizontal. We have a 6: 5 ratio important: Naïve approaches yield weak and unsound connections: Stacking (naïve approach) Bracing (best practice) versus Structural weak (try it) 5: 6 ratio demands 2 plates for aligning holes

Motivation for Plates From example: the 5: 6 rule demands 2 plates • Two stacked bricks = 1 vertical unit • 1 plate = 1/3 vertical unit 1 vertical unit + 2*1/3 vertical units = 5/3 vertical units 5: 6 ratio states 6 vertical units = 5 horizontal units Hence: Aligning holes Exercise 1 -1: What do you need to stack to align holes with a 5 -hole beam Note: space between aligning holes = 4 horizontal units 4 vertically stacked bricks = 3 vertical units. Hence need plate
")
Plate Equation : Number of full-height vertical units (i. e. N bricks - 1) : Number of 1/3 -height vertical units (i. e. plates) : Number horizontal units between holes Exercise 1 -2: Construct the following and complete the following table Full height vertical units 1/3 -height vertical units Horizontal Units 1 2 2 3 1 4 6 6 8

Answer: Full height vertical units 1/3 -height vertical units Horizontal Units 1 2 2 3 1 4 5 6 6 2 8 8 1 10
![Gears NB: tan (smooth), blue (snug) Gear Teeth [number] Gear Radius [horiz units] 8](http://slidetodoc.com/presentation_image_h2/5213228386ddff7c555d22c228f420c6/image-8.jpg "Gears NB: tan (smooth), blue (snug) Gear Teeth [number] Gear Radius [horiz units] 8")
Gears NB: tan (smooth), blue (snug) Gear Teeth [number] Gear Radius [horiz units] 8 0. 5 16 1 24 1. 5 40 2. 5 Gear size in horizontal units demands integer-sized spacing:

Gears: Getting away with non-integer spacing Recall that 2 stacked bricks = 1 vertical unit Recall that for a beam, space between holes = 1 horiz unit Thus diagonal space = i. e. close enough for a 16: 8 or 2: 1 gear ratio Exercise 1 -3: Construct a 3: 2 gear train Answer: Hint: Use a plate to space two beams. Use 24 T and 16 T gears

Exercise 1 -4: Construct a 9: 1 gear train Answer: Hint: Use two 3: 1 gear trains

Exercise 2: Simple Crank Lego Simple Crank Video

Axle 3 4519 Axle 4 3705 Axle 10 3707 Beam 7 32524 3 x Bush 3713 Pin with Friction 4459 2 x 1 x 2 Axle/Pin 6556 Gear 24 Tooth 3648 Step 1: Parts for Simple Crank (seen on bottom) Step 3: Mount Axle/Pin on Gear with Pin Step 2: Pin the Gear to Beam. Bush Axle 4 to Beam Step 4: Pass Axle 10 thru Axle/Pin and mount on assembly

Exercises 2 -1 Replace Beam with Brick to re-construct a simple cran Simple Crank using Brick
")
Exercises 2 -2 Construct the following crank (more complex)

Exercise 3: The Crank and 3 -Bar Linkage Isogawa’s Lego Crank 3 -Bar Linkage Video

2 x Beam 7 32524 Beam 5 32316 Axle 3 4519 Bush 3713 Gear 24 Tooth 3 x Pin 3648 with Friction 4459 Step 1: Parts. NB: Contrast parts 4459 and 3673 Step 3: Pin Beam 7 and Gear to Beam 5 Step 2: Pin the Gear. Join Beam 5 and Beam 7 Step 4: Axle and bush the Gear. Join 2 Beam 7 s.
")
MLCAD Building Instructions and POV Rendering Rendered Image Bill of Materials (BOM)

Exercises 3 -1 Replace Beams with Bricks to construct the following 3 -Bar Crank (left) 3 -2 Construct the following 3 -Bar Crank (right) 1 x Technic Brick 1 x 6 with holes 3894 2 x Technic Brick 1 x 8 with holes 3702 Left: 3 -Bar Crank using Bricks Right: 3 -Bar with Crank near Middle

Exercise 4: The Crankshaft Isogawa’s Lego Crankshaft Video

Bush 3713 Gear 24 Tooth 3648 Axle 3 4519 4 x Pin with Friction 4459 Angle Connector #2 (180) 32034 Axle 2 Notched 32062 3 x 1 x 2 Axle/Pin 6556 Beam 5 32316 Axle 5 32073 Beam 11 32525 Step 1: Parts. Step 3: Pin Axle/Pins to Beams 5 and 11 Step 2: Pin the Gear to Beam 11 Step 4: Thread Axle 5 thru Angle Connector. Pin Beam
 4")
Exercises 4 -1 Replace Beams with Bricks to construct the following Crankshaft (left) 4 -2 Construct the following (right). Rotate Grey Gear. Black Gear output? 1 x Technic Brick 1 x 16 with holes 3703 Left: Double Crankshaft using Bricks Right: Crank and Lever (front and rear views)
- Slides: 22