Measurement Systems Analysis If you cant measure it



- Slides: 27

Measurement Systems Analysis If you can’t measure it, you can’t reliably improve it

Fully Crossed Designs, Youden Plot Continuous Data, Stable Characteristics

Experimental Procedure: Continuous Data 30 units that span the range of variation are selected. Each unit is tested twice by each operator or by each operator/gage combination. The test order must be random. • The appraiser/equipment repeatability is calculated/plotted • The appraiser reproducibility is calculated/plotted • The system bias is calculated/plotted. 3 © 2020 IDEXX Laboratories, Inc. All rights reserved.

Operator Repeatability Each operator’s individual repeatability is calculated first. Estimates of reproducibility and bias are not reliable until repeatability is established. 4 © 2020 IDEXX Laboratories, Inc. All rights reserved.

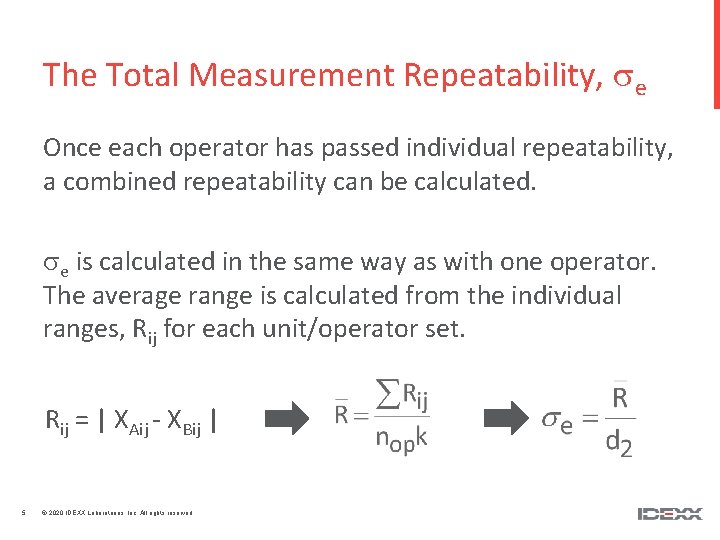
The Total Measurement Repeatability, e Once each operator has passed individual repeatability, a combined repeatability can be calculated. e is calculated in the same way as with one operator. The average range is calculated from the individual ranges, Rij for each unit/operator set. Rij = | XAij - XBij | 5 © 2020 IDEXX Laboratories, Inc. All rights reserved.

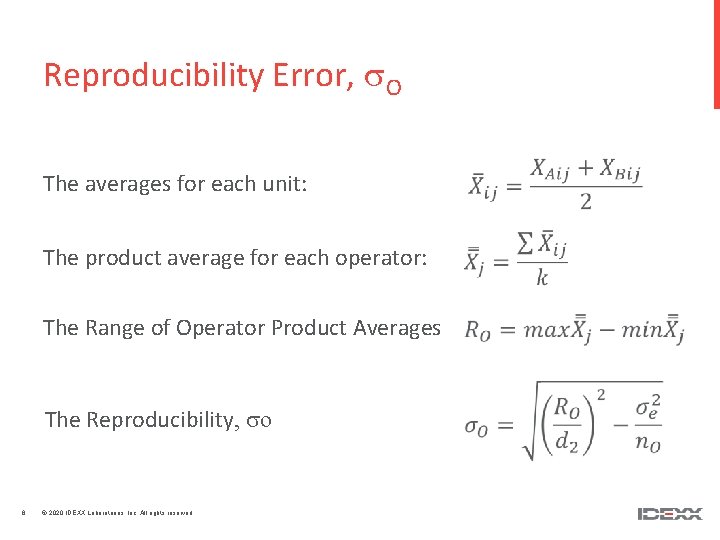
Reproducibility Error, O The averages for each unit: The product average for each operator: The Range of Operator Product Averages The Reproducibility, o 6 © 2020 IDEXX Laboratories, Inc. All rights reserved.

Statistical Significance of Reproducibility Since every operator will have some inherent differences from other operators, it is essential to determine if the differences are significant and important. In order to do this a small reproducibility decision chart can be constructed. The product averages for each operator are plotted against the following decision limits: 7 © 2020 IDEXX Laboratories, Inc. All rights reserved.

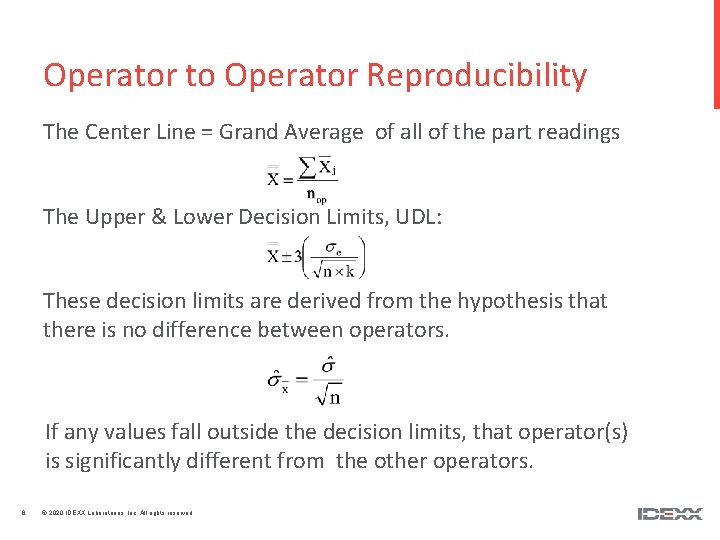
Operator to Operator Reproducibility The Center Line = Grand Average of all of the part readings The Upper & Lower Decision Limits, UDL: These decision limits are derived from the hypothesis that there is no difference between operators. If any values fall outside the decision limits, that operator(s) is significantly different from the other operators. 8 © 2020 IDEXX Laboratories, Inc. All rights reserved.

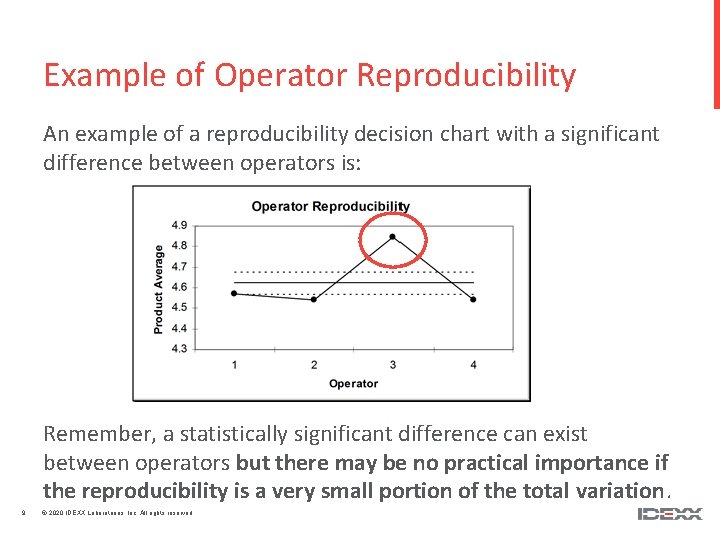
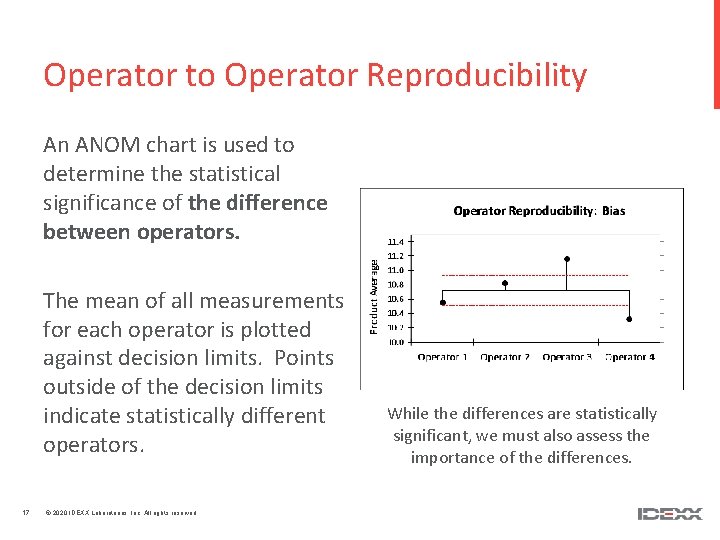
Example of Operator Reproducibility An example of a reproducibility decision chart with a significant difference between operators is: Remember, a statistically significant difference can exist between operators but there may be no practical importance if the reproducibility is a very small portion of the total variation. 9 © 2020 IDEXX Laboratories, Inc. All rights reserved.

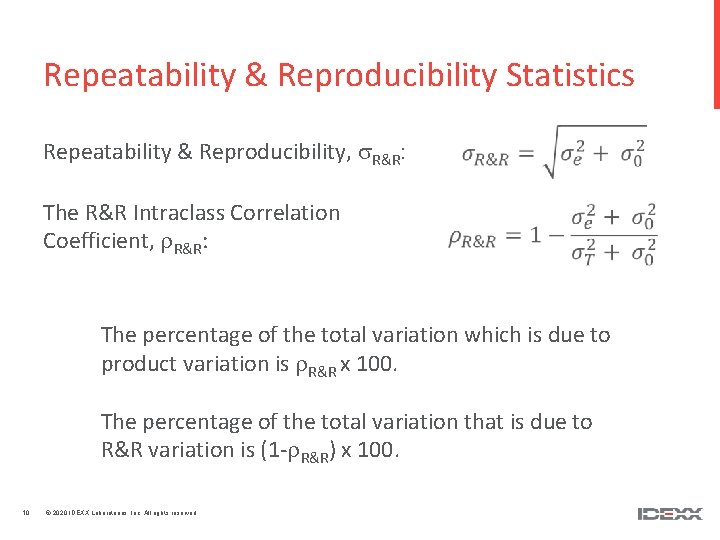
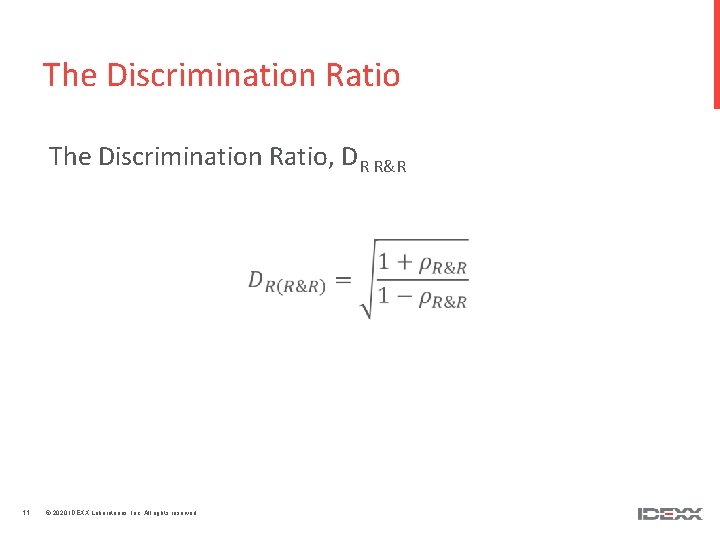
Repeatability & Reproducibility Statistics Repeatability & Reproducibility, R&R: The R&R Intraclass Correlation Coefficient, r. R&R: The percentage of the total variation which is due to product variation is r. R&R x 100. The percentage of the total variation that is due to R&R variation is (1 -r. R&R) x 100. 10 © 2020 IDEXX Laboratories, Inc. All rights reserved.

The Discrimination Ratio, DR R&R 11 © 2020 IDEXX Laboratories, Inc. All rights reserved.

Caution on Reproducibility Calculations System repeatability, e has meaning even when multiple operators are used. Operator reproducibility, so and the Reproducibility R&R number has no real meaning. Reproducibility errors occur only in conjunction with repeatability errors. So we only calculate a total R&R number…We need to use the “Control Chart” approach to determine if there is a significant and important difference between operators. . . 12 © 2020 IDEXX Laboratories, Inc. All rights reserved.

Reproducibility: More Fake Math The use of 3 operators is essentially a fixed effect. If there is a difference between the operators it will be systemic by definition. Standard deviations can only be calculated for random variation. 13 © 2020 IDEXX Laboratories, Inc. All rights reserved.

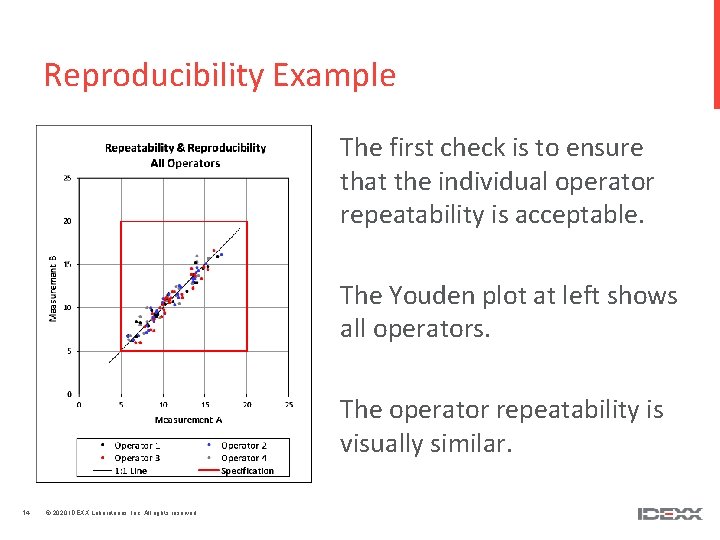
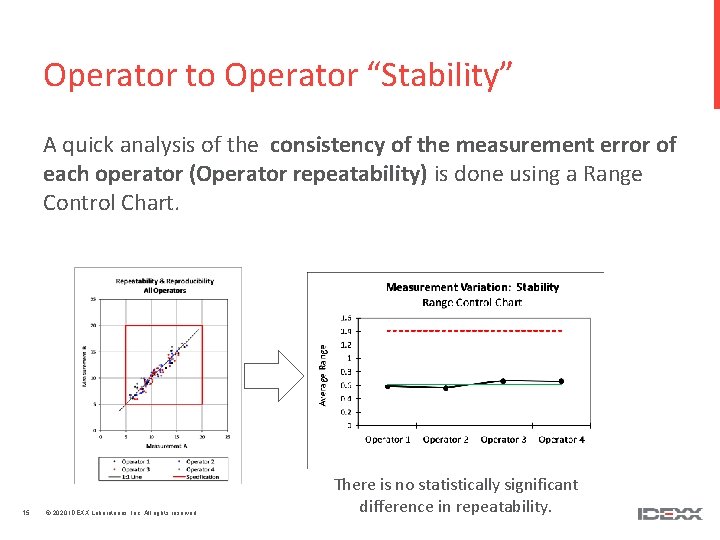
Reproducibility Example The first check is to ensure that the individual operator repeatability is acceptable. The Youden plot at left shows all operators. The operator repeatability is visually similar. 14 © 2020 IDEXX Laboratories, Inc. All rights reserved.

Operator to Operator “Stability” A quick analysis of the consistency of the measurement error of each operator (Operator repeatability) is done using a Range Control Chart. 15 © 2020 IDEXX Laboratories, Inc. All rights reserved. There is no statistically significant difference in repeatability.

Operator to Operator “Stability” It is possible to fix both repeatability and any systemic bias at the same time. The mathematical rule is that any reproducibility number is meaningless unless the operator repeatability is consistent and acceptable. 16 © 2020 IDEXX Laboratories, Inc. All rights reserved.

Operator to Operator Reproducibility An ANOM chart is used to determine the statistical significance of the difference between operators. The mean of all measurements for each operator is plotted against decision limits. Points outside of the decision limits indicate statistically different operators. 17 © 2020 IDEXX Laboratories, Inc. All rights reserved. While the differences are statistically significant, we must also assess the importance of the differences.

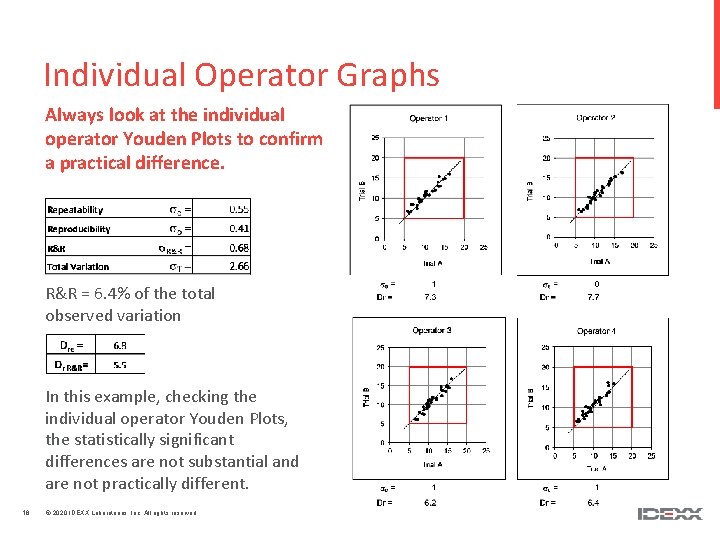
Individual Operator Graphs Always look at the individual operator Youden Plots to confirm a practical difference. R&R = 6. 4% of the total observed variation In this example, checking the individual operator Youden Plots, the statistically significant differences are not substantial and are not practically different. 18 © 2020 IDEXX Laboratories, Inc. All rights reserved.

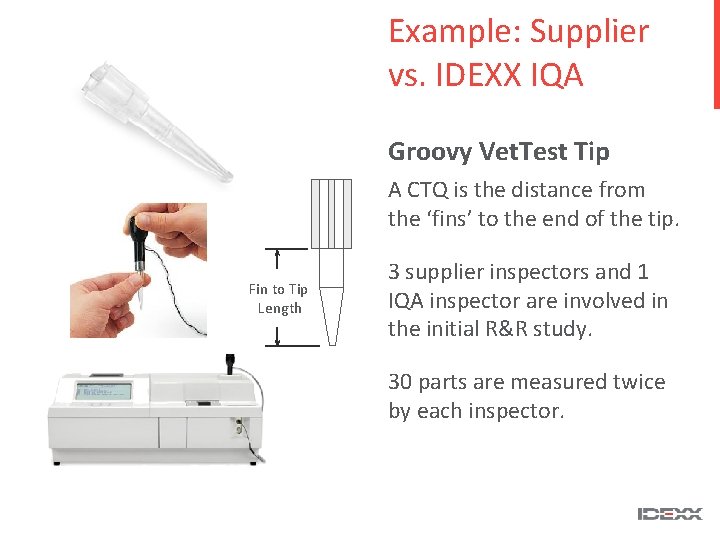
Example: Supplier vs. IDEXX IQA Groovy Vet. Test Tip A CTQ is the distance from the ‘fins’ to the end of the tip. Fin to Tip Length 3 supplier inspectors and 1 IQA inspector are involved in the initial R&R study. 30 parts are measured twice by each inspector. 19 © 2020 IDEXX Laboratories, Inc. All rights reserved.

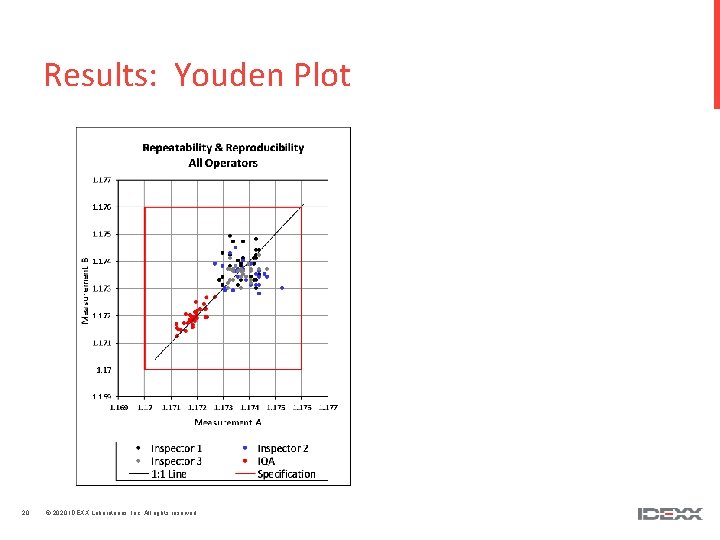
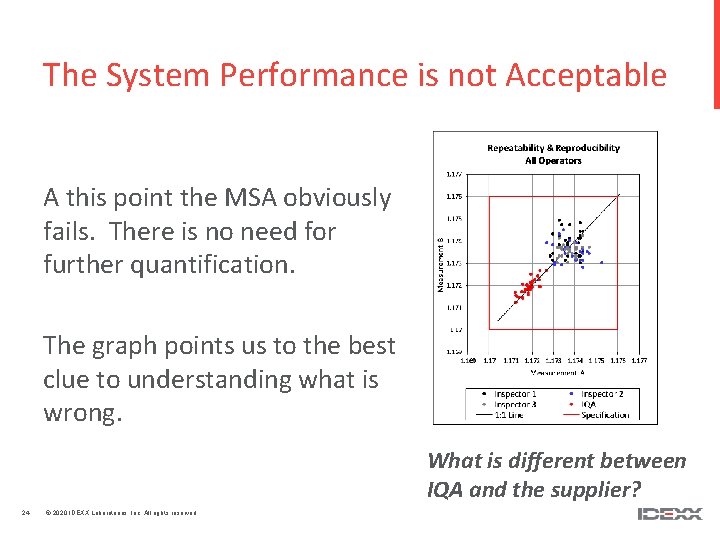
Results: Youden Plot 20 © 2020 IDEXX Laboratories, Inc. All rights reserved.

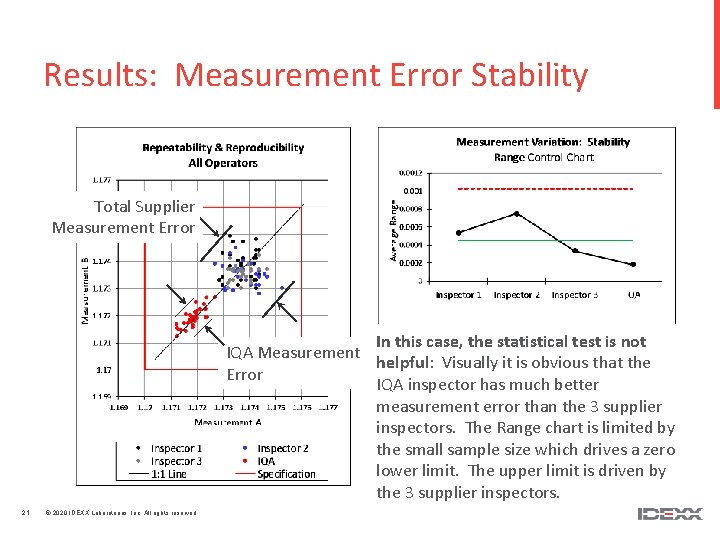
Results: Measurement Error Stability Total Supplier Measurement Error In this case, the statistical test is not IQA Measurement helpful: Visually it is obvious that the Error IQA inspector has much better measurement error than the 3 supplier inspectors. The Range chart is limited by the small sample size which drives a zero lower limit. The upper limit is driven by the 3 supplier inspectors. 21 © 2020 IDEXX Laboratories, Inc. All rights reserved.

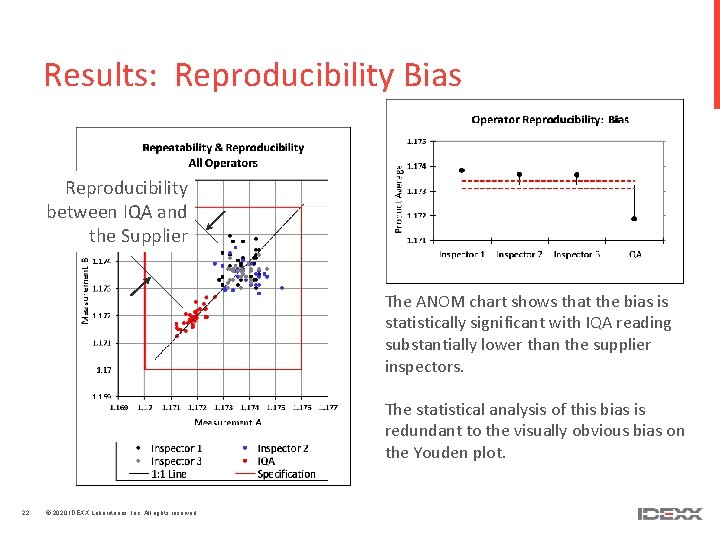
Results: Reproducibility Bias Reproducibility between IQA and the Supplier The ANOM chart shows that the bias is statistically significant with IQA reading substantially lower than the supplier inspectors. The statistical analysis of this bias is redundant to the visually obvious bias on the Youden plot. 22 © 2020 IDEXX Laboratories, Inc. All rights reserved.

“Plot your data and think about your data” Ellis Ott 23 © 2020 IDEXX Laboratories, Inc. All rights reserved.

The System Performance is not Acceptable A this point the MSA obviously fails. There is no need for further quantification. The graph points us to the best clue to understanding what is wrong. What is different between IQA and the supplier? 24 © 2020 IDEXX Laboratories, Inc. All rights reserved.

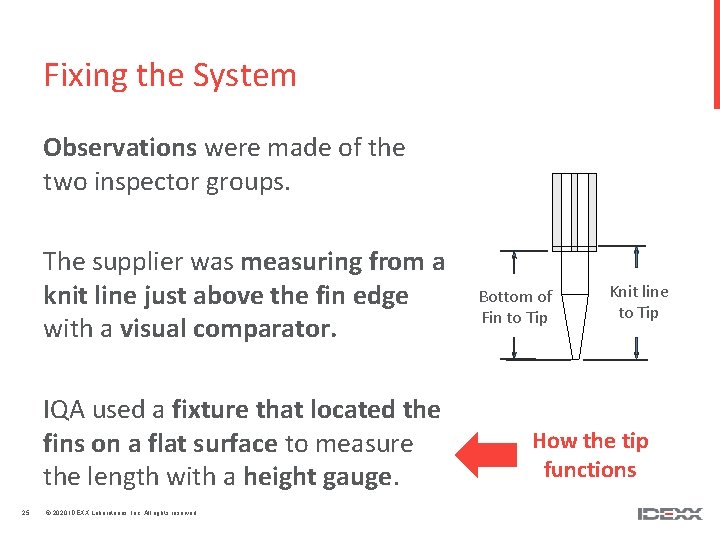
Fixing the System Observations were made of the two inspector groups. The supplier was measuring from a knit line just above the fin edge with a visual comparator. IQA used a fixture that located the fins on a flat surface to measure the length with a height gauge. 25 © 2020 IDEXX Laboratories, Inc. All rights reserved. Bottom of Fin to Tip Knit line to Tip How the tip functions

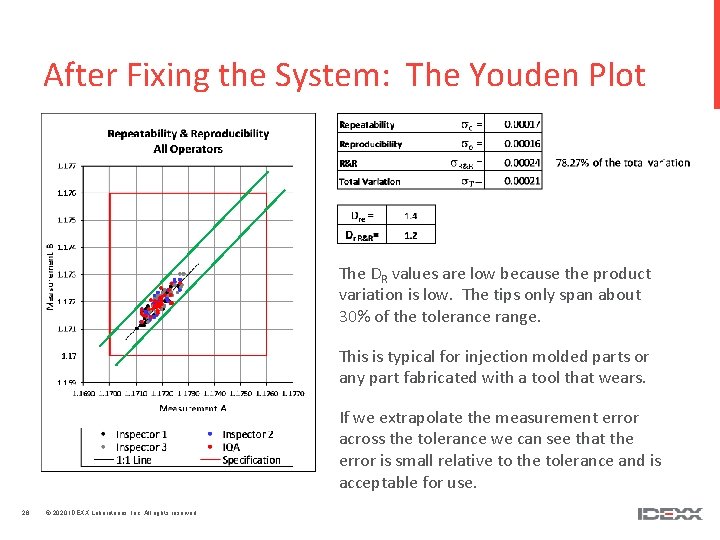
After Fixing the System: The Youden Plot The DR values are low because the product variation is low. The tips only span about 30% of the tolerance range. This is typical for injection molded parts or any part fabricated with a tool that wears. If we extrapolate the measurement error across the tolerance we can see that the error is small relative to the tolerance and is acceptable for use. 26 © 2020 IDEXX Laboratories, Inc. All rights reserved.

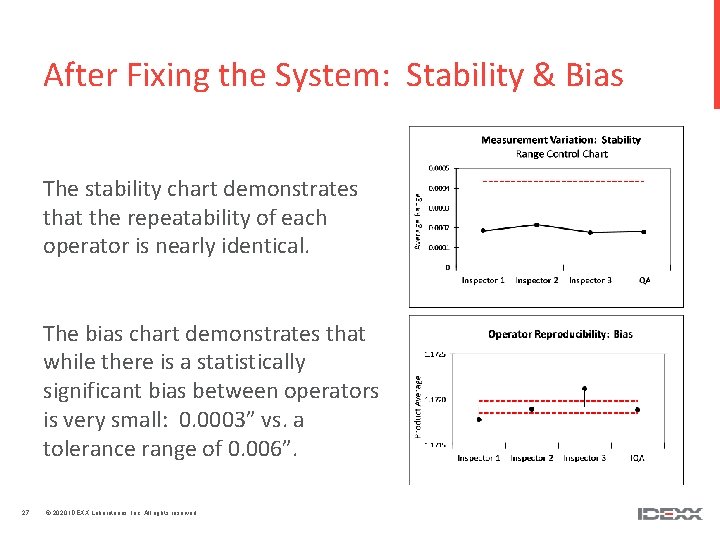
After Fixing the System: Stability & Bias The stability chart demonstrates that the repeatability of each operator is nearly identical. The bias chart demonstrates that while there is a statistically significant bias between operators is very small: 0. 0003” vs. a tolerance range of 0. 006”. 27 © 2020 IDEXX Laboratories, Inc. All rights reserved.