Measure Phase Measurement System Analysis Measurement System Analysis

- Slides: 63

Measure Phase Measurement System Analysis

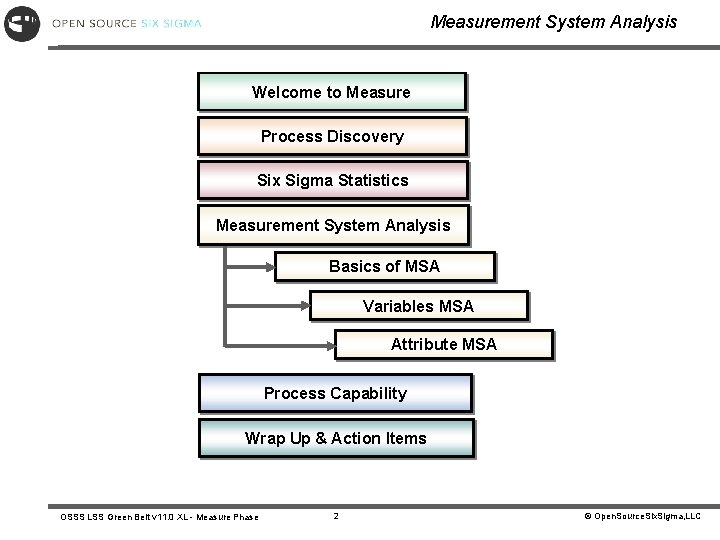
Measurement System Analysis Welcome to Measure Process Discovery Six Sigma Statistics Measurement System Analysis Basics of MSA Variables MSA Attribute MSA Process Capability Wrap Up & Action Items OSSS LSS Green Belt v 11. 0 XL - Measure Phase 2 © Open. Source. Six. Sigma, LLC

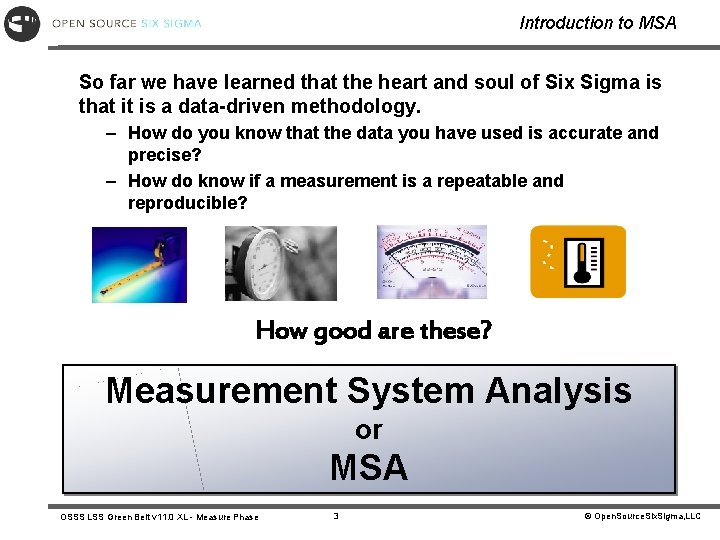
Introduction to MSA So far we have learned that the heart and soul of Six Sigma is that it is a data-driven methodology. – How do you know that the data you have used is accurate and precise? – How do know if a measurement is a repeatable and reproducible? How good are these? Measurement System Analysis or MSA OSSS LSS Green Belt v 11. 0 XL - Measure Phase 3 © Open. Source. Six. Sigma, LLC

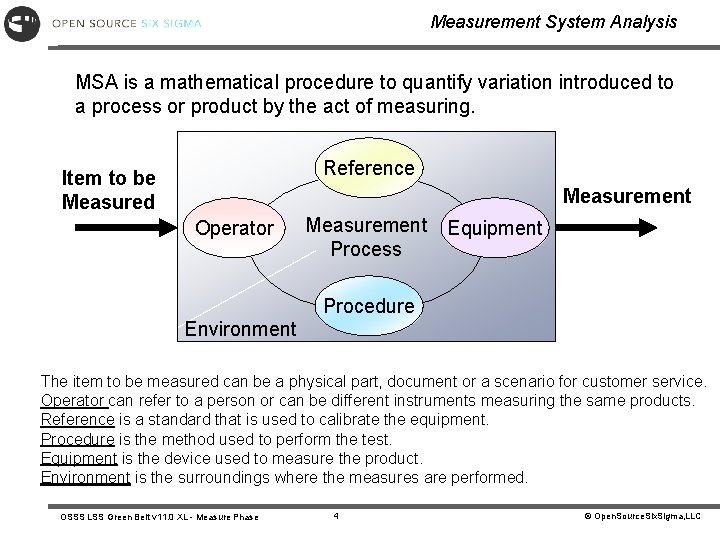
Measurement System Analysis MSA is a mathematical procedure to quantify variation introduced to a process or product by the act of measuring. Reference Item to be Measured Measurement Operator Measurement Process Equipment Procedure Environment The item to be measured can be a physical part, document or a scenario for customer service. Operator can refer to a person or can be different instruments measuring the same products. Reference is a standard that is used to calibrate the equipment. Procedure is the method used to perform the test. Equipment is the device used to measure the product. Environment is the surroundings where the measures are performed. OSSS LSS Green Belt v 11. 0 XL - Measure Phase 4 © Open. Source. Six. Sigma, LLC

Measurement Purpose In order to be worth collecting, measurements must provide value that is, they must provide us with information and ultimately, knowledge The question… What do I need to know? …must be answered before we begin to consider issues of measurements, metrics, statistics, or data collection systems Too often, organizations build complex data collection and information management systems without truly understanding how the data collected and metrics calculated actually benefit the organization. OSSS LSS Green Belt v 11. 0 XL - Measure Phase 5 © Open. Source. Six. Sigma, LLC

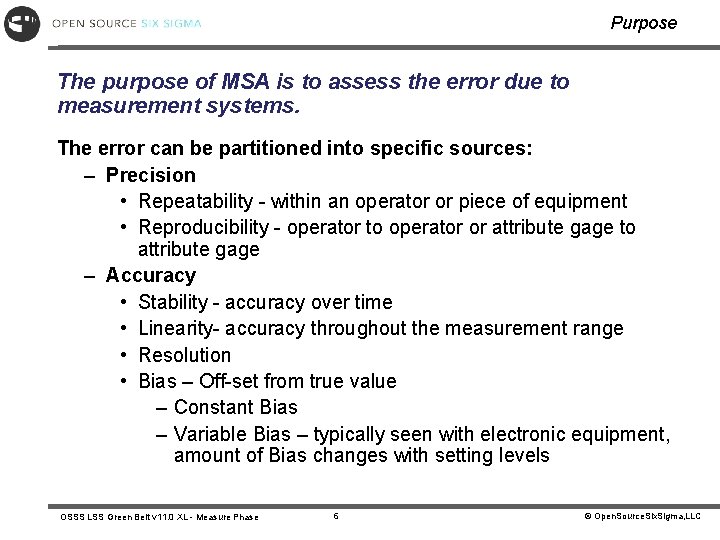
Purpose The purpose of MSA is to assess the error due to measurement systems. The error can be partitioned into specific sources: – Precision • Repeatability - within an operator or piece of equipment • Reproducibility - operator to operator or attribute gage to attribute gage – Accuracy • Stability - accuracy over time • Linearity- accuracy throughout the measurement range • Resolution • Bias – Off-set from true value – Constant Bias – Variable Bias – typically seen with electronic equipment, amount of Bias changes with setting levels OSSS LSS Green Belt v 11. 0 XL - Measure Phase 6 © Open. Source. Six. Sigma, LLC

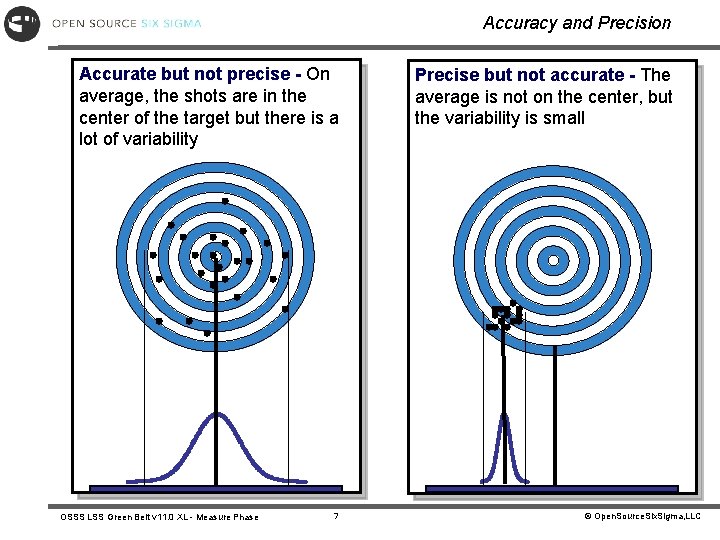
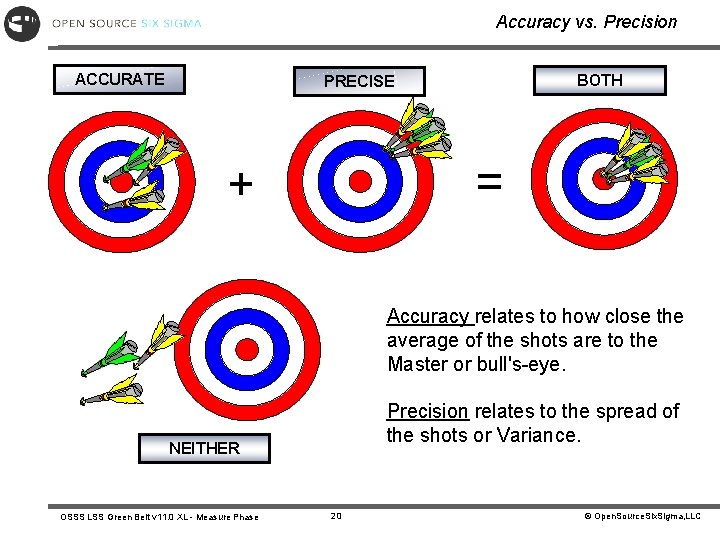
Accuracy and Precision Accurate but not precise - On average, the shots are in the center of the target but there is a lot of variability OSSS LSS Green Belt v 11. 0 XL - Measure Phase 7 Precise but not accurate - The average is not on the center, but the variability is small © Open. Source. Six. Sigma, LLC

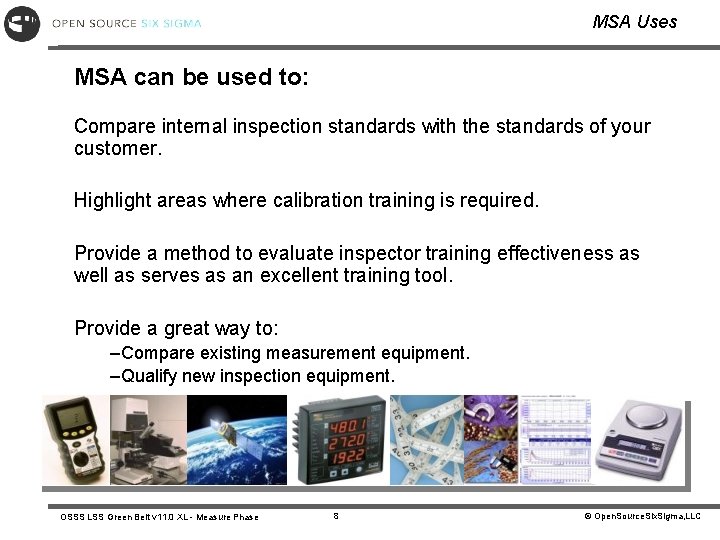
MSA Uses MSA can be used to: Compare internal inspection standards with the standards of your customer. Highlight areas where calibration training is required. Provide a method to evaluate inspector training effectiveness as well as serves as an excellent training tool. Provide a great way to: –Compare existing measurement equipment. –Qualify new inspection equipment. OSSS LSS Green Belt v 11. 0 XL - Measure Phase 8 © Open. Source. Six. Sigma, LLC

Why MSA? Measurement System Analysis is important to: • Study the % of variation in our process that is caused by our measurement system. • Compare measurements between operators. • Compare measurements between two (or more) measurement devices. • Provide criteria to accept new measurement systems (consider new equipment). • Evaluate a suspect gage. • Evaluate a gage before and after repair. • Determine true process variation. • Evaluate effectiveness of training program. OSSS LSS Green Belt v 11. 0 XL - Measure Phase 9 © Open. Source. Six. Sigma, LLC

Appropriate Measures are: • Sufficient – available to be measured regularly • Relevant –help to understand/isolate the problems • Representative - of the process across shifts and people • Contextual – collected with other relevant information that might explain process variability. OSSS LSS Green Belt v 11. 0 XL - Measure Phase 10 © Open. Source. Six. Sigma, LLC

Poor Measures can result from: • Poor or non-existent operational definitions • Difficult measures • Poor sampling • Lack of understanding of the definitions • Inaccurate, insufficient or non-calibrated measurement devices Measurement Error compromises decisions that affect: – Customers – Producers – Suppliers OSSS LSS Green Belt v 11. 0 XL - Measure Phase 11 © Open. Source. Six. Sigma, LLC

Examples of What to Measure Examples of what and when to measure: • Primary and secondary metrics • Decision points in Process Maps • Any and all gauges, measurement devices, instruments, etc • “X’s” in the process • Prior to Hypothesis Testing • Prior to modeling • Prior to planning designed experiments • Before and after process changes • To qualify operators MSA is a Show Stopper!!! OSSS LSS Green Belt v 11. 0 XL - Measure Phase 12 © Open. Source. Six. Sigma, LLC

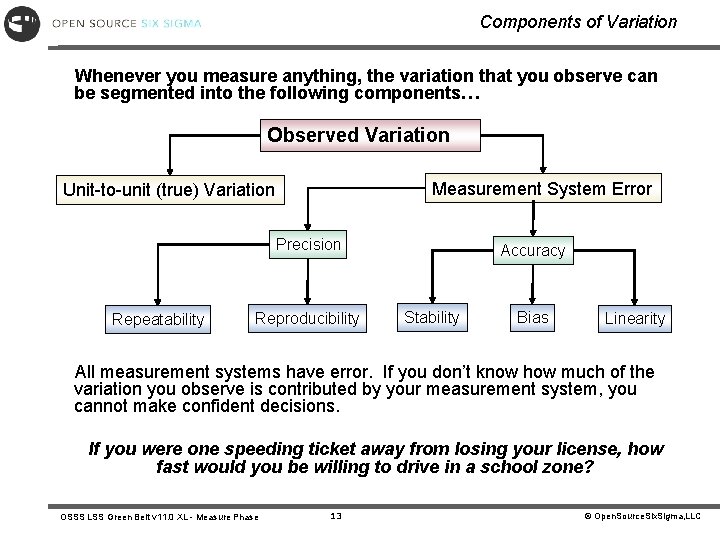
Components of Variation Whenever you measure anything, the variation that you observe can be segmented into the following components… Observed Variation Measurement System Error Unit-to-unit (true) Variation Precision Repeatability Reproducibility Accuracy Stability Bias Linearity All measurement systems have error. If you don’t know how much of the variation you observe is contributed by your measurement system, you cannot make confident decisions. If you were one speeding ticket away from losing your license, how fast would you be willing to drive in a school zone? OSSS LSS Green Belt v 11. 0 XL - Measure Phase 13 © Open. Source. Six. Sigma, LLC

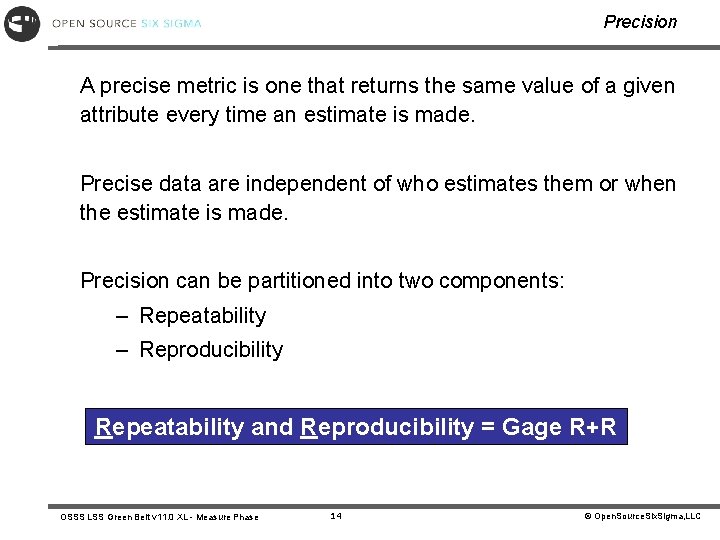
Precision A precise metric is one that returns the same value of a given attribute every time an estimate is made. Precise data are independent of who estimates them or when the estimate is made. Precision can be partitioned into two components: – Repeatability – Reproducibility Repeatability and Reproducibility = Gage R+R OSSS LSS Green Belt v 11. 0 XL - Measure Phase 14 © Open. Source. Six. Sigma, LLC

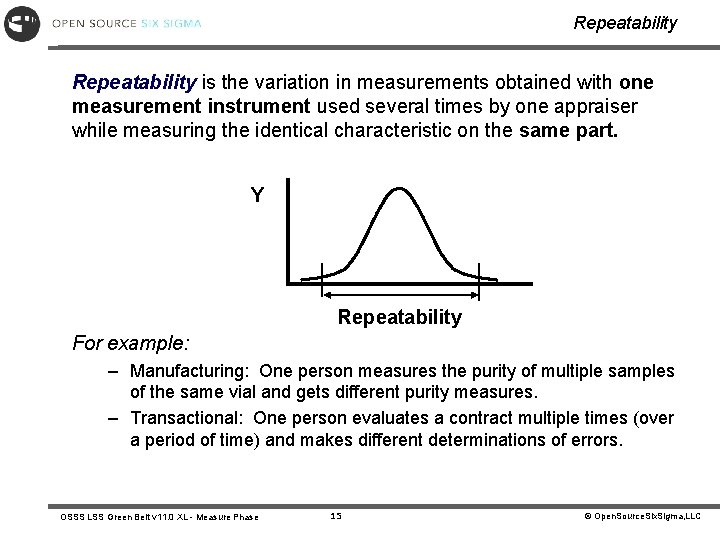
Repeatability is the variation in measurements obtained with one measurement instrument used several times by one appraiser while measuring the identical characteristic on the same part. Y Repeatability For example: – Manufacturing: One person measures the purity of multiple samples of the same vial and gets different purity measures. – Transactional: One person evaluates a contract multiple times (over a period of time) and makes different determinations of errors. OSSS LSS Green Belt v 11. 0 XL - Measure Phase 15 © Open. Source. Six. Sigma, LLC

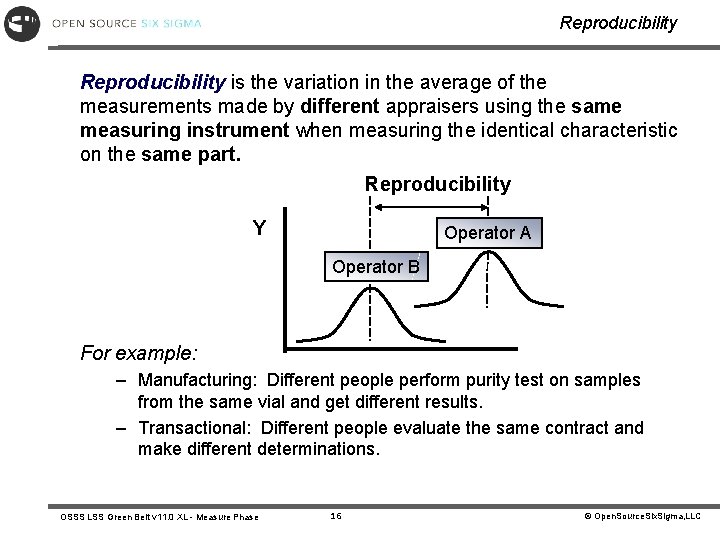
Reproducibility is the variation in the average of the measurements made by different appraisers using the same measuring instrument when measuring the identical characteristic on the same part. Reproducibility Y Operator A Operator B For example: – Manufacturing: Different people perform purity test on samples from the same vial and get different results. – Transactional: Different people evaluate the same contract and make different determinations. OSSS LSS Green Belt v 11. 0 XL - Measure Phase 16 © Open. Source. Six. Sigma, LLC

Time Estimate Exercise objective: Demonstrate how well you can estimate a 10 second time interval. 1. Pair up with an associate. 2. One person will say start and stop to indicate how long they think the 10 seconds last. Do this 6 times. 3. The other person will have a watch with a second hand to actually measure the duration of the estimate. Record the value where your partner can’t see it. 4. Switch tasks with partner and do it 6 times also. 5. Record all estimates, what do you notice? OSSS LSS Green Belt v 11. 0 XL - Measure Phase 17 © Open. Source. Six. Sigma, LLC

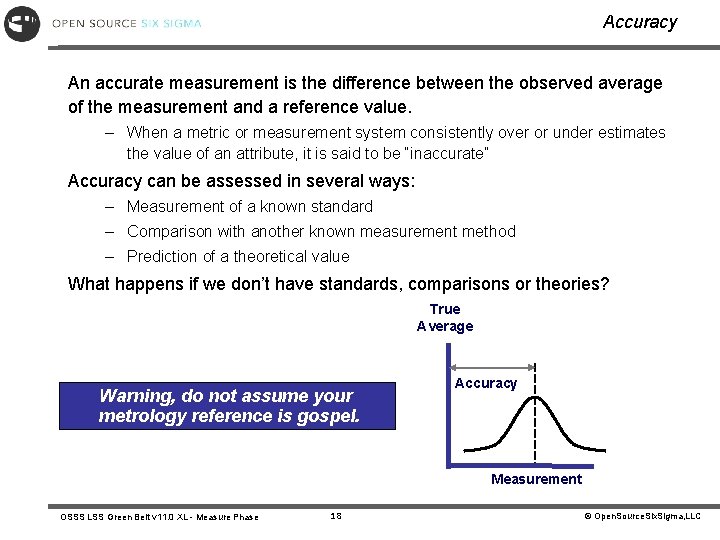
Accuracy An accurate measurement is the difference between the observed average of the measurement and a reference value. – When a metric or measurement system consistently over or under estimates the value of an attribute, it is said to be “inaccurate” Accuracy can be assessed in several ways: – Measurement of a known standard – Comparison with another known measurement method – Prediction of a theoretical value What happens if we don’t have standards, comparisons or theories? True Average Warning, do not assume your metrology reference is gospel. Accuracy Measurement OSSS LSS Green Belt v 11. 0 XL - Measure Phase 18 © Open. Source. Six. Sigma, LLC

Accuracy Against a Known Standard In transactional processes, the measurement system can consist of a database query. – For example, you may be interested in measuring product returns where you will want to analyze the details of the returns over some time period. – The query will provide you all the transaction details. However, before you invest a lot of time analyzing the data, you must ensure the data has integrity. – The analysis should include a comparison with known reference points. – For the example of product returns, the transaction details should add up to the same number that appears on financial reports, such as the income statement. OSSS LSS Green Belt v 11. 0 XL - Measure Phase 19 © Open. Source. Six. Sigma, LLC

Accuracy vs. Precision ACCURATE BOTH PRECISE = + Accuracy relates to how close the average of the shots are to the Master or bull's-eye. Precision relates to the spread of the shots or Variance. NEITHER OSSS LSS Green Belt v 11. 0 XL - Measure Phase 20 © Open. Source. Six. Sigma, LLC

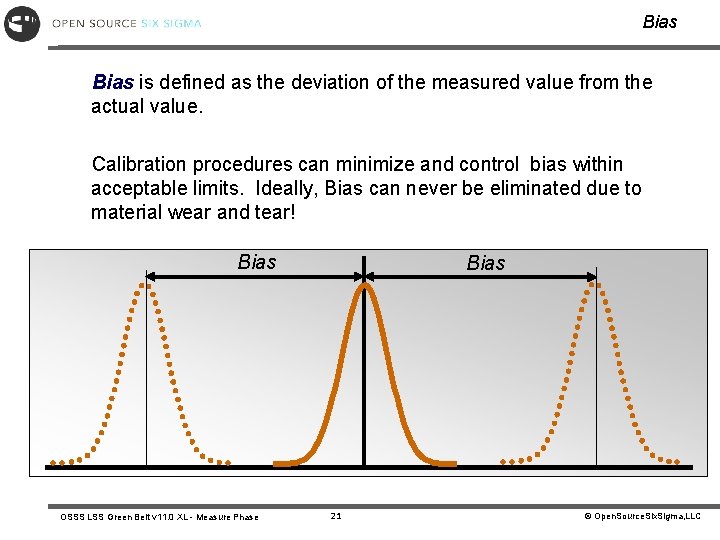
Bias is defined as the deviation of the measured value from the actual value. Calibration procedures can minimize and control bias within acceptable limits. Ideally, Bias can never be eliminated due to material wear and tear! Bias OSSS LSS Green Belt v 11. 0 XL - Measure Phase Bias 21 © Open. Source. Six. Sigma, LLC

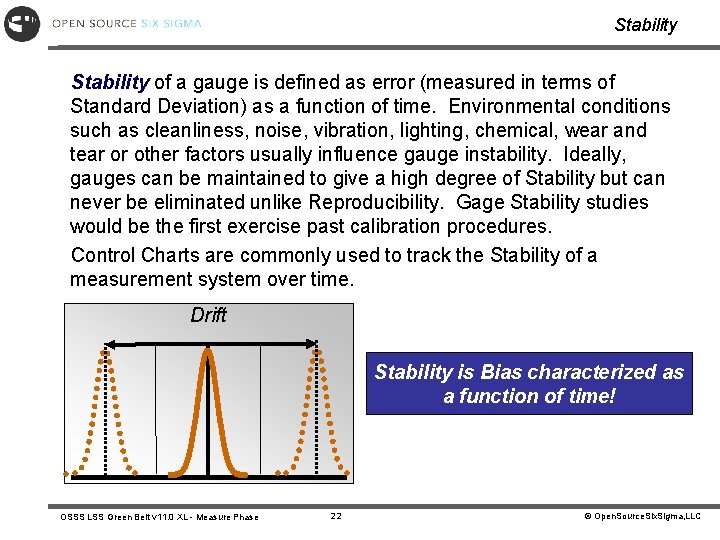
Stability of a gauge is defined as error (measured in terms of Standard Deviation) as a function of time. Environmental conditions such as cleanliness, noise, vibration, lighting, chemical, wear and tear or other factors usually influence gauge instability. Ideally, gauges can be maintained to give a high degree of Stability but can never be eliminated unlike Reproducibility. Gage Stability studies would be the first exercise past calibration procedures. Control Charts are commonly used to track the Stability of a measurement system over time. Drift Stability is Bias characterized as a function of time! OSSS LSS Green Belt v 11. 0 XL - Measure Phase 22 © Open. Source. Six. Sigma, LLC

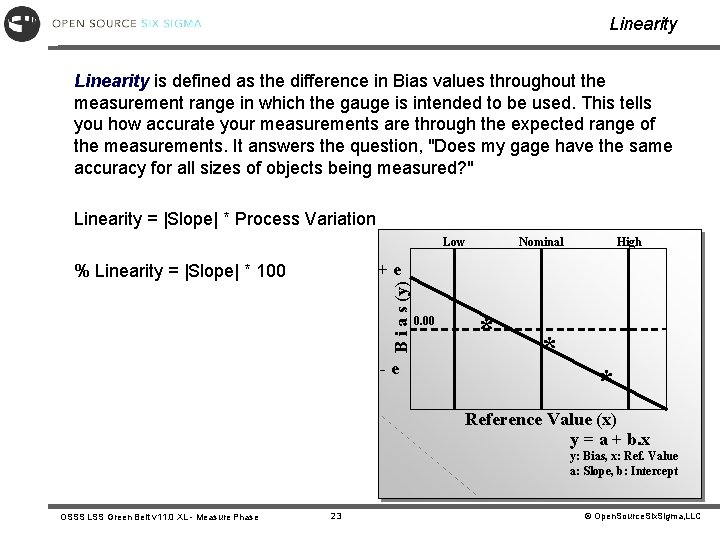
Linearity is defined as the difference in Bias values throughout the measurement range in which the gauge is intended to be used. This tells you how accurate your measurements are through the expected range of the measurements. It answers the question, "Does my gage have the same accuracy for all sizes of objects being measured? " Linearity = |Slope| * Process Variation Low Nominal High +e B i a s (y) % Linearity = |Slope| * 100 -e 0. 00 * * * Reference Value (x) y = a + b. x y: Bias, x: Ref. Value a: Slope, b: Intercept OSSS LSS Green Belt v 11. 0 XL - Measure Phase 23 © Open. Source. Six. Sigma, LLC

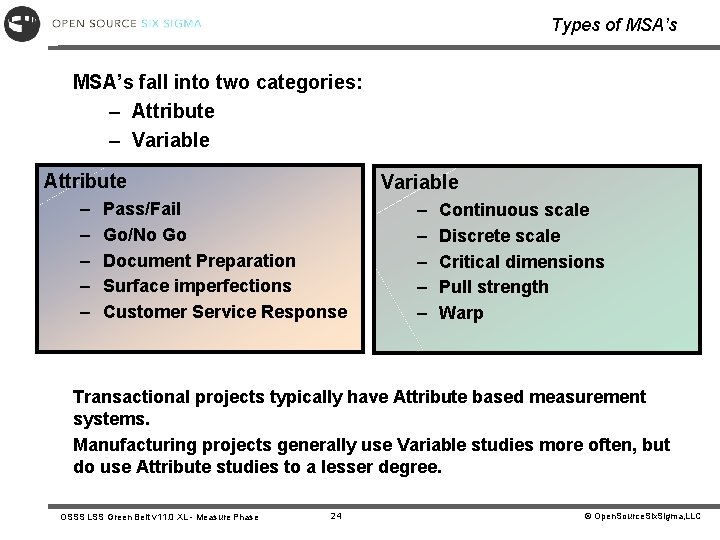
Types of MSA’s fall into two categories: – Attribute – Variable Attribute Variable – – – – – Pass/Fail Go/No Go Document Preparation Surface imperfections Customer Service Response Continuous scale Discrete scale Critical dimensions Pull strength Warp Transactional projects typically have Attribute based measurement systems. Manufacturing projects generally use Variable studies more often, but do use Attribute studies to a lesser degree. OSSS LSS Green Belt v 11. 0 XL - Measure Phase 24 © Open. Source. Six. Sigma, LLC

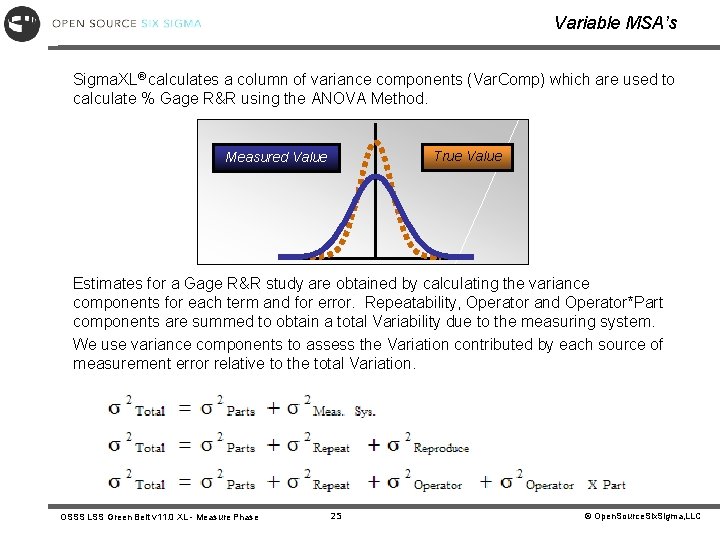
Variable MSA’s Sigma. XL® calculates a column of variance components (Var. Comp) which are used to calculate % Gage R&R using the ANOVA Method. True Value Measured Value Estimates for a Gage R&R study are obtained by calculating the variance components for each term and for error. Repeatability, Operator and Operator*Part components are summed to obtain a total Variability due to the measuring system. We use variance components to assess the Variation contributed by each source of measurement error relative to the total Variation. OSSS LSS Green Belt v 11. 0 XL - Measure Phase 25 © Open. Source. Six. Sigma, LLC

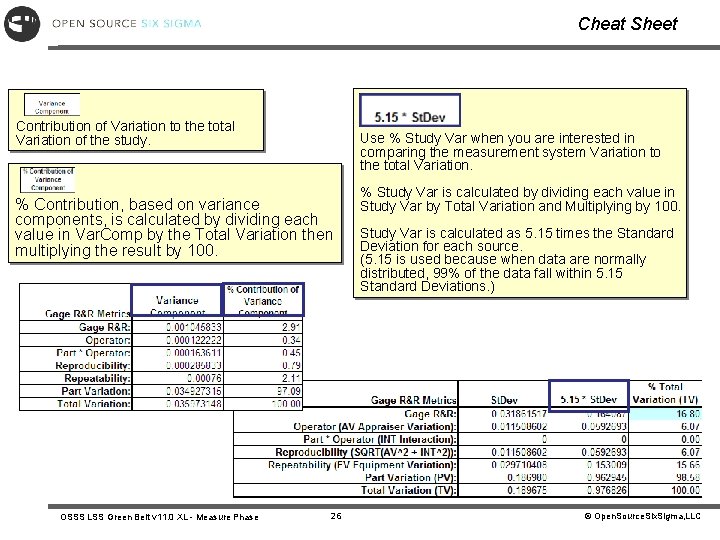
Cheat Sheet Contribution of Variation to the total Variation of the study. Use % Study Var when you are interested in comparing the measurement system Variation to the total Variation. % Contribution, based on variance components, is calculated by dividing each value in Var. Comp by the Total Variation then multiplying the result by 100. OSSS LSS Green Belt v 11. 0 XL - Measure Phase 26 % Study Var is calculated by dividing each value in Study Var by Total Variation and Multiplying by 100. Study Var is calculated as 5. 15 times the Standard Deviation for each source. (5. 15 is used because when data are normally distributed, 99% of the data fall within 5. 15 Standard Deviations. ) © Open. Source. Six. Sigma, LLC

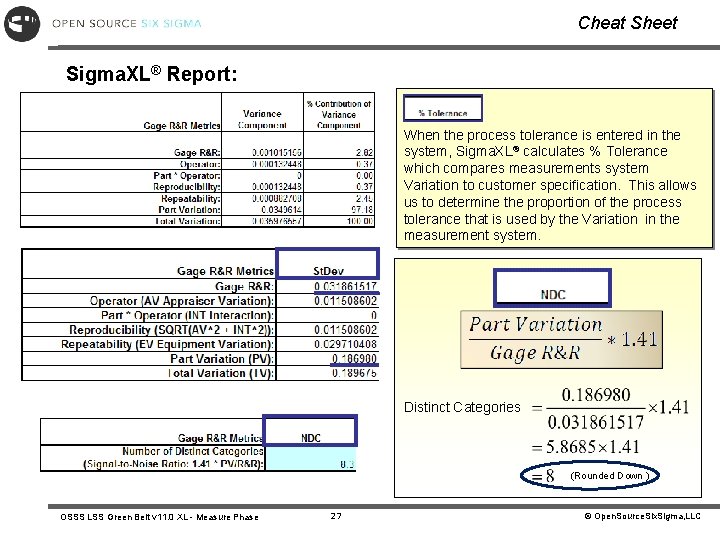
Cheat Sheet Sigma. XL® Report: When the process tolerance is entered in the system, Sigma. XL® calculates % Tolerance which compares measurements system Variation to customer specification. This allows us to determine the proportion of the process tolerance that is used by the Variation in the measurement system. Distinct Categories (Rounded Down ) OSSS LSS Green Belt v 11. 0 XL - Measure Phase 27 © Open. Source. Six. Sigma, LLC

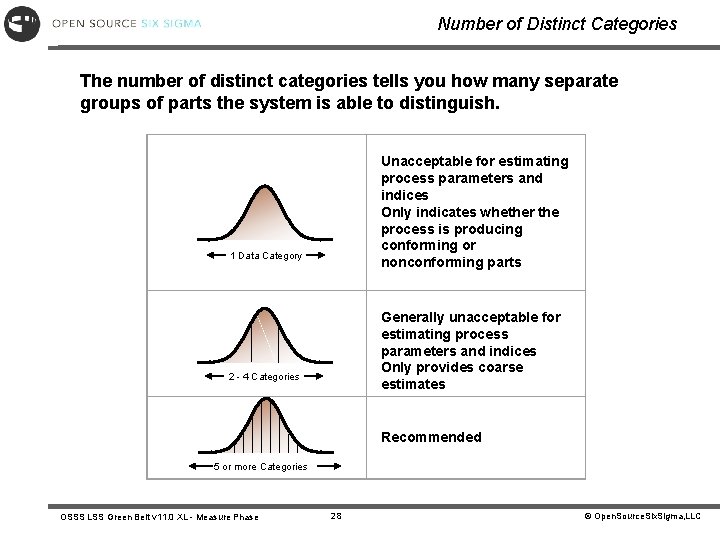
Number of Distinct Categories The number of distinct categories tells you how many separate groups of parts the system is able to distinguish. Unacceptable for estimating process parameters and indices Only indicates whether the process is producing conforming or nonconforming parts 1 Data Category Generally unacceptable for estimating process parameters and indices Only provides coarse estimates 2 - 4 Categories Recommended 5 or more Categories OSSS LSS Green Belt v 11. 0 XL - Measure Phase 28 © Open. Source. Six. Sigma, LLC

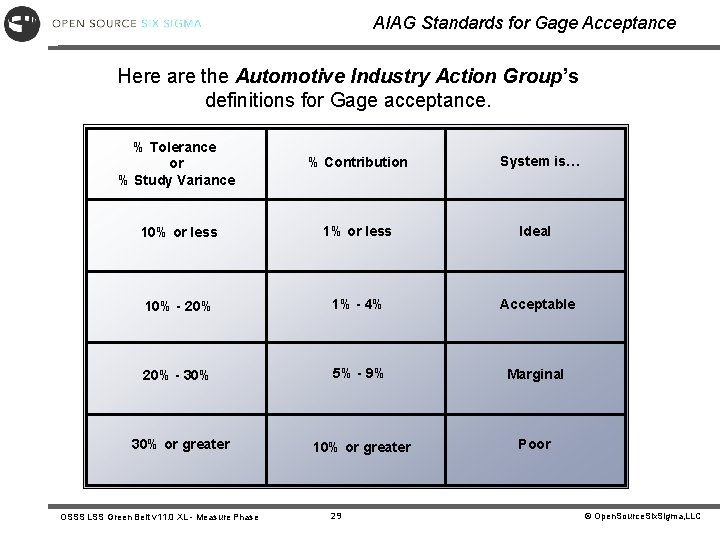
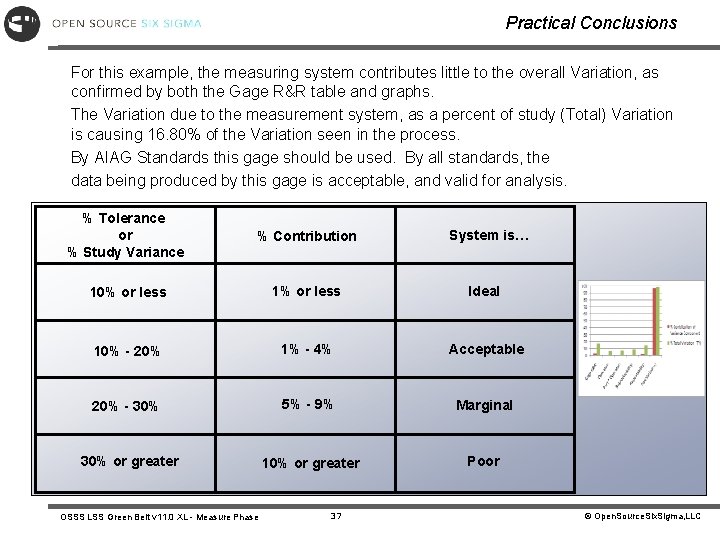
AIAG Standards for Gage Acceptance Here are the Automotive Industry Action Group’s definitions for Gage acceptance. % Tolerance or % Study Variance % Contribution 10% or less 1% or less Ideal 10% - 20% 1% - 4% Acceptable 20% - 30% 5% - 9% Marginal 30% or greater 10% or greater Poor OSSS LSS Green Belt v 11. 0 XL - Measure Phase 29 System is… © Open. Source. Six. Sigma, LLC

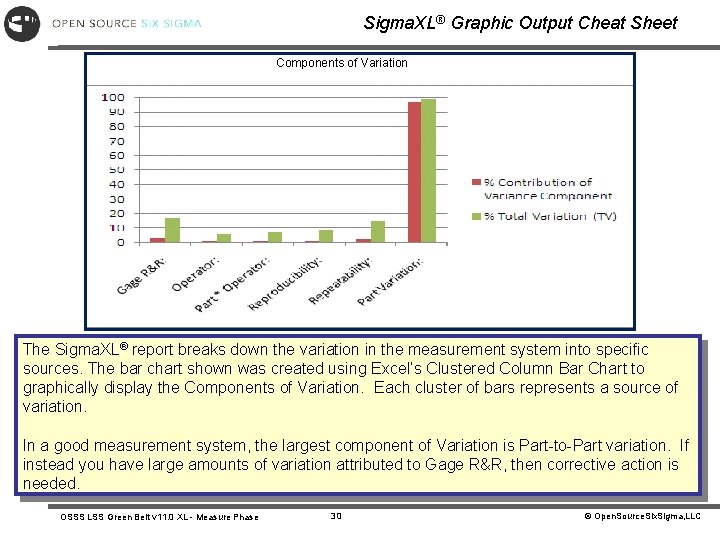
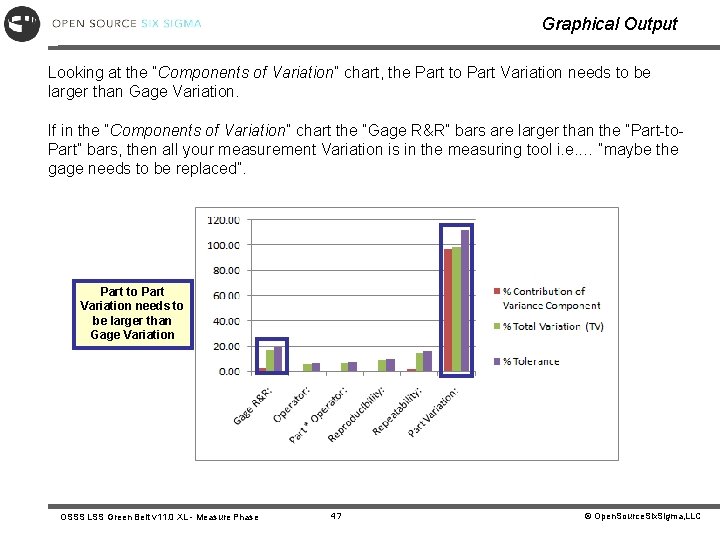
Sigma. XL® Graphic Output Cheat Sheet Components of Variation The Sigma. XL® report breaks down the variation in the measurement system into specific sources. The bar chart shown was created using Excel’s Clustered Column Bar Chart to graphically display the Components of Variation. Each cluster of bars represents a source of variation. In a good measurement system, the largest component of Variation is Part-to-Part variation. If instead you have large amounts of variation attributed to Gage R&R, then corrective action is needed. OSSS LSS Green Belt v 11. 0 XL - Measure Phase 30 © Open. Source. Six. Sigma, LLC

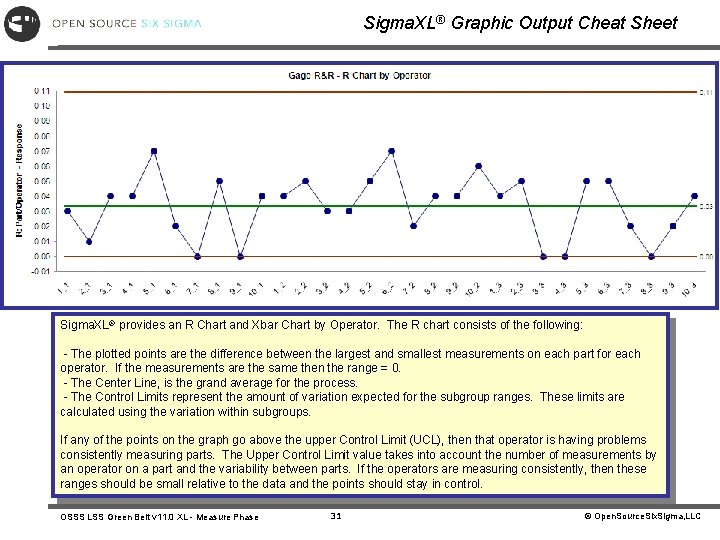
Sigma. XL® Graphic Output Cheat Sheet Sigma. XL® provides an R Chart and Xbar Chart by Operator. The R chart consists of the following: - The plotted points are the difference between the largest and smallest measurements on each part for each operator. If the measurements are the same then the range = 0. - The Center Line, is the grand average for the process. - The Control Limits represent the amount of variation expected for the subgroup ranges. These limits are calculated using the variation within subgroups. If any of the points on the graph go above the upper Control Limit (UCL), then that operator is having problems consistently measuring parts. The Upper Control Limit value takes into account the number of measurements by an operator on a part and the variability between parts. If the operators are measuring consistently, then these ranges should be small relative to the data and the points should stay in control. OSSS LSS Green Belt v 11. 0 XL - Measure Phase 31 © Open. Source. Six. Sigma, LLC

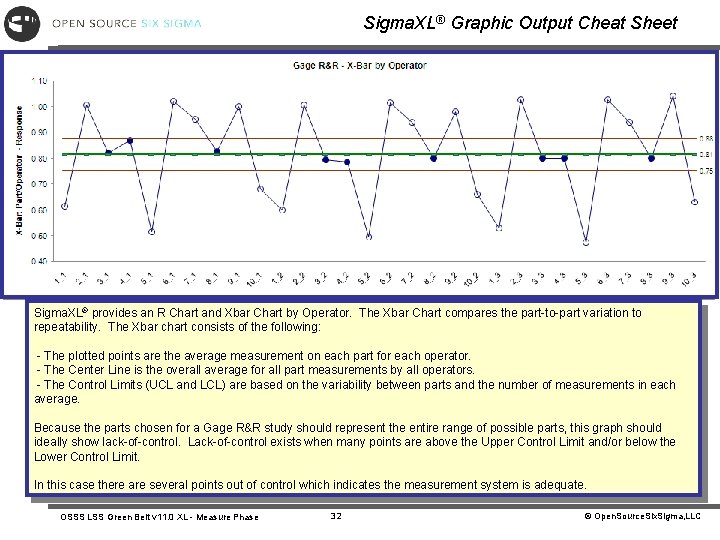
Sigma. XL® Graphic Output Cheat Sheet Sigma. XL® provides an R Chart and Xbar Chart by Operator. The Xbar Chart compares the part-to-part variation to repeatability. The Xbar chart consists of the following: - The plotted points are the average measurement on each part for each operator. - The Center Line is the overall average for all part measurements by all operators. - The Control Limits (UCL and LCL) are based on the variability between parts and the number of measurements in each average. Because the parts chosen for a Gage R&R study should represent the entire range of possible parts, this graph should ideally show lack-of-control. Lack-of-control exists when many points are above the Upper Control Limit and/or below the Lower Control Limit. In this case there are several points out of control which indicates the measurement system is adequate. OSSS LSS Green Belt v 11. 0 XL - Measure Phase 32 © Open. Source. Six. Sigma, LLC

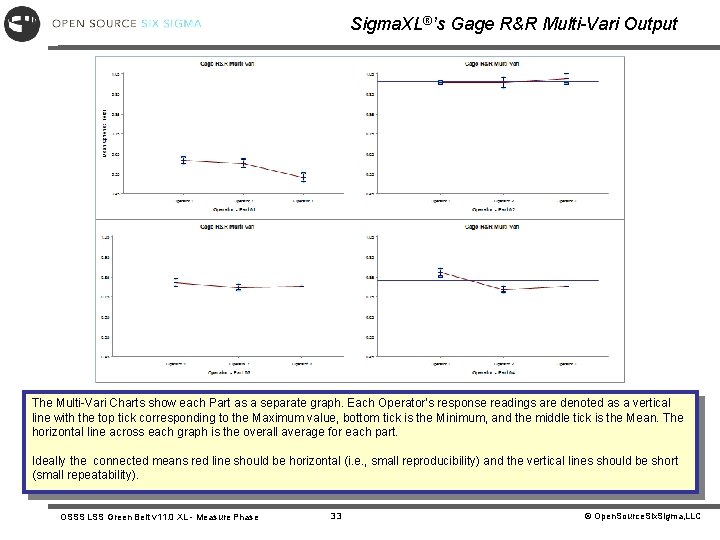
Sigma. XL®’s Gage R&R Multi-Vari Output The Multi-Vari Charts show each Part as a separate graph. Each Operator’s response readings are denoted as a vertical line with the top tick corresponding to the Maximum value, bottom tick is the Minimum, and the middle tick is the Mean. The horizontal line across each graph is the overall average for each part. Ideally the connected means red line should be horizontal (i. e. , small reproducibility) and the vertical lines should be short (small repeatability). OSSS LSS Green Belt v 11. 0 XL - Measure Phase 33 © Open. Source. Six. Sigma, LLC

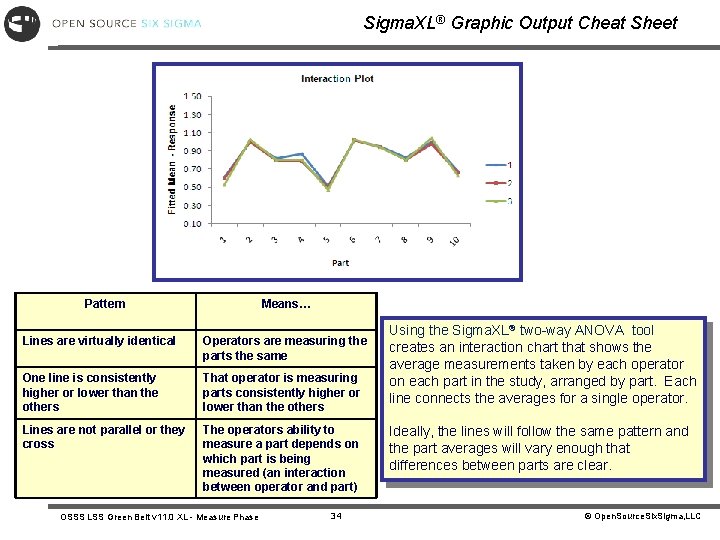
Sigma. XL® Graphic Output Cheat Sheet Pattern Means… Lines are virtually identical Operators are measuring the parts the same One line is consistently higher or lower than the others That operator is measuring parts consistently higher or lower than the others Lines are not parallel or they cross The operators ability to measure a part depends on which part is being measured (an interaction between operator and part) OSSS LSS Green Belt v 11. 0 XL - Measure Phase 34 Using the Sigma. XL® two-way ANOVA tool creates an interaction chart that shows the average measurements taken by each operator on each part in the study, arranged by part. Each line connects the averages for a single operator. Ideally, the lines will follow the same pattern and the part averages will vary enough that differences between parts are clear. © Open. Source. Six. Sigma, LLC

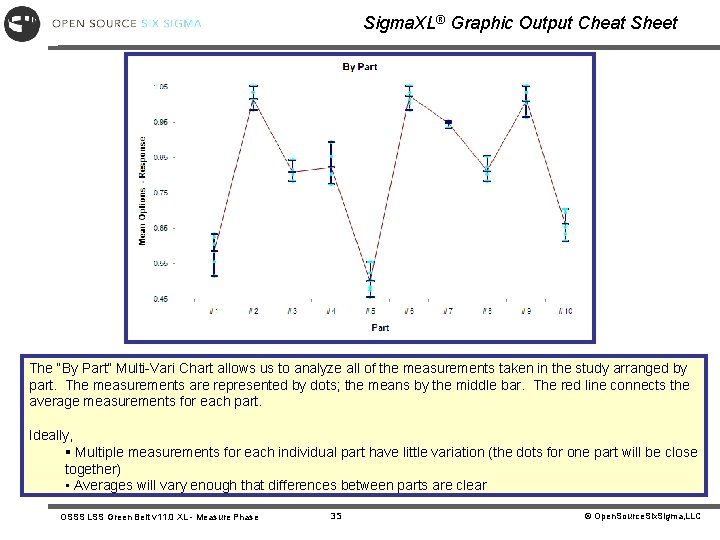
Sigma. XL® Graphic Output Cheat Sheet The “By Part” Multi-Vari Chart allows us to analyze all of the measurements taken in the study arranged by part. The measurements are represented by dots; the means by the middle bar. The red line connects the average measurements for each part. Ideally, § Multiple measurements for each individual part have little variation (the dots for one part will be close together) • Averages will vary enough that differences between parts are clear OSSS LSS Green Belt v 11. 0 XL - Measure Phase 35 © Open. Source. Six. Sigma, LLC

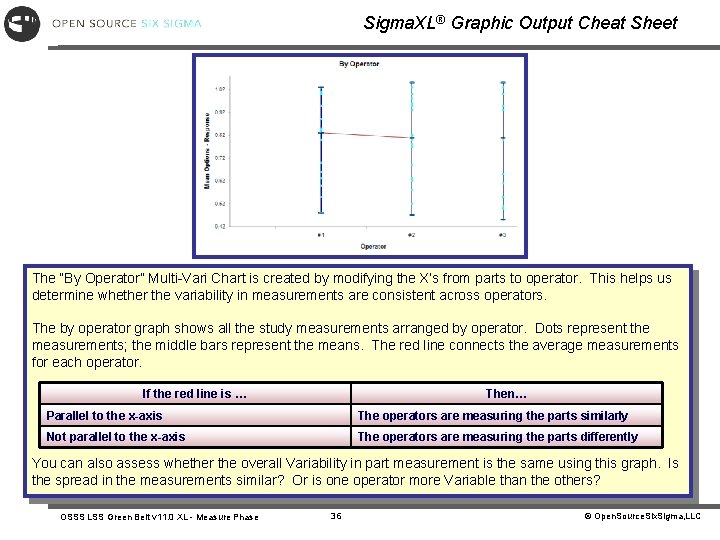
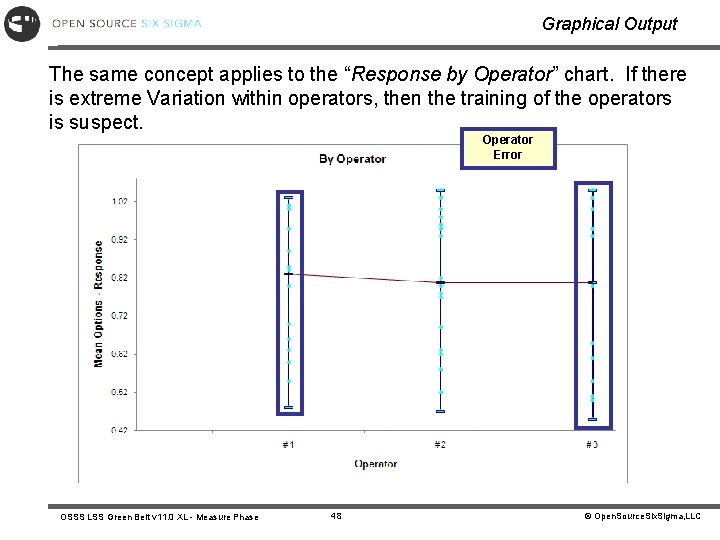
Sigma. XL® Graphic Output Cheat Sheet The “By Operator” Multi-Vari Chart is created by modifying the X’s from parts to operator. This helps us determine whether the variability in measurements are consistent across operators. The by operator graph shows all the study measurements arranged by operator. Dots represent the measurements; the middle bars represent the means. The red line connects the average measurements for each operator. If the red line is … Then… Parallel to the x-axis The operators are measuring the parts similarly Not parallel to the x-axis The operators are measuring the parts differently You can also assess whether the overall Variability in part measurement is the same using this graph. Is the spread in the measurements similar? Or is one operator more Variable than the others? OSSS LSS Green Belt v 11. 0 XL - Measure Phase 36 © Open. Source. Six. Sigma, LLC

Practical Conclusions For this example, the measuring system contributes little to the overall Variation, as confirmed by both the Gage R&R table and graphs. The Variation due to the measurement system, as a percent of study (Total) Variation is causing 16. 80% of the Variation seen in the process. By AIAG Standards this gage should be used. By all standards, the data being produced by this gage is acceptable, and valid for analysis. % Tolerance or % Study Variance % Contribution 10% or less 1% or less Ideal 10% - 20% 1% - 4% Acceptable 20% - 30% 5% - 9% Marginal 30% or greater 10% or greater Poor OSSS LSS Green Belt v 11. 0 XL - Measure Phase 37 System is… © Open. Source. Six. Sigma, LLC

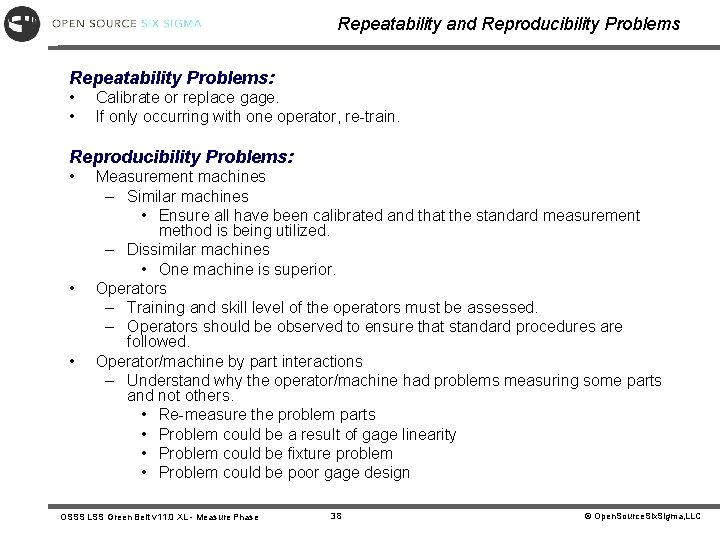
Repeatability and Reproducibility Problems Repeatability Problems: • • Calibrate or replace gage. If only occurring with one operator, re-train. Reproducibility Problems: • • • Measurement machines – Similar machines • Ensure all have been calibrated and that the standard measurement method is being utilized. – Dissimilar machines • One machine is superior. Operators – Training and skill level of the operators must be assessed. – Operators should be observed to ensure that standard procedures are followed. Operator/machine by part interactions – Understand why the operator/machine had problems measuring some parts and not others. • Re-measure the problem parts • Problem could be a result of gage linearity • Problem could be fixture problem • Problem could be poor gage design OSSS LSS Green Belt v 11. 0 XL - Measure Phase 38 © Open. Source. Six. Sigma, LLC

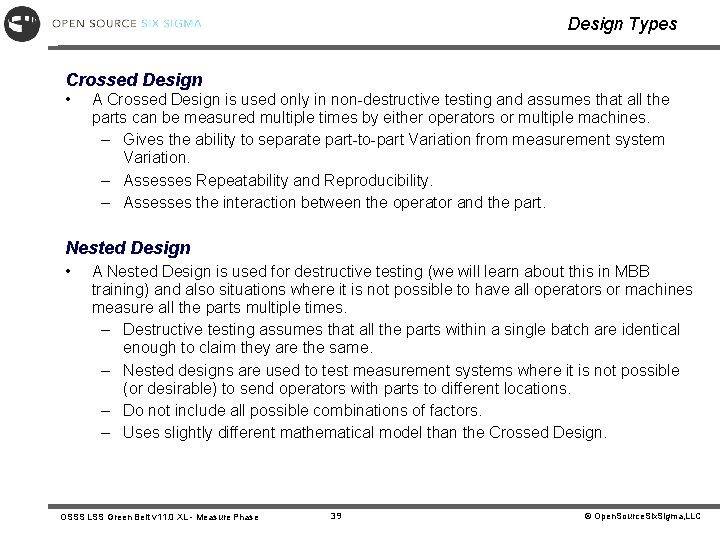
Design Types Crossed Design • A Crossed Design is used only in non-destructive testing and assumes that all the parts can be measured multiple times by either operators or multiple machines. – Gives the ability to separate part-to-part Variation from measurement system Variation. – Assesses Repeatability and Reproducibility. – Assesses the interaction between the operator and the part. Nested Design • A Nested Design is used for destructive testing (we will learn about this in MBB training) and also situations where it is not possible to have all operators or machines measure all the parts multiple times. – Destructive testing assumes that all the parts within a single batch are identical enough to claim they are the same. – Nested designs are used to test measurement systems where it is not possible (or desirable) to send operators with parts to different locations. – Do not include all possible combinations of factors. – Uses slightly different mathematical model than the Crossed Design. OSSS LSS Green Belt v 11. 0 XL - Measure Phase 39 © Open. Source. Six. Sigma, LLC

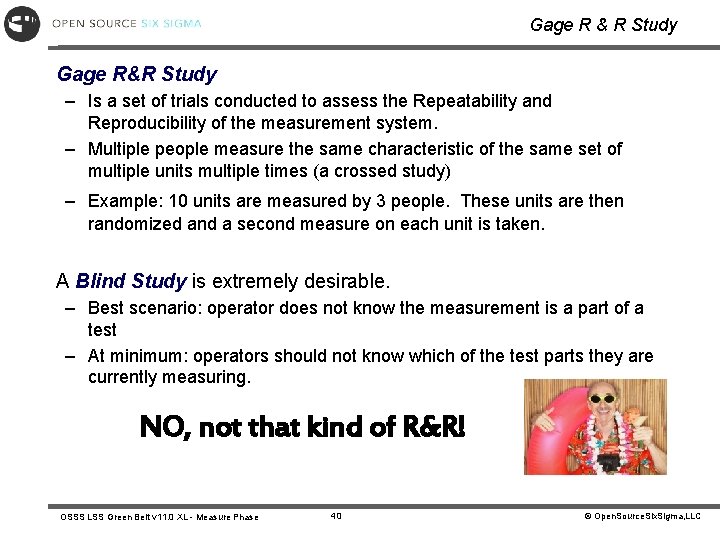
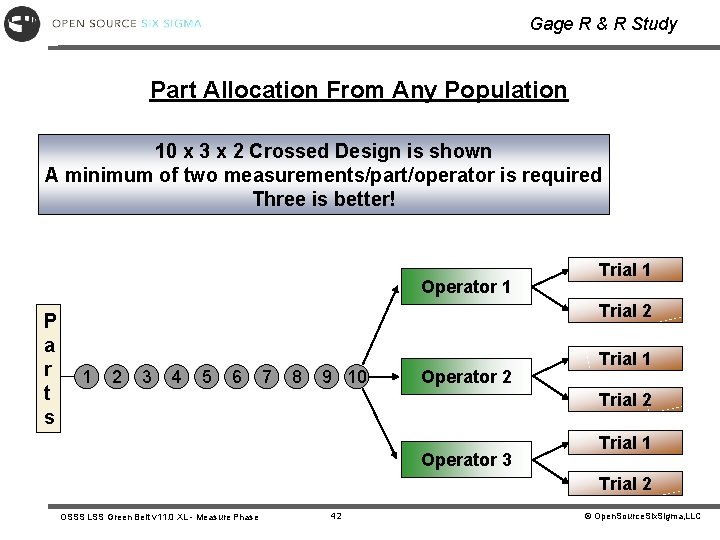
Gage R & R Study Gage R&R Study – Is a set of trials conducted to assess the Repeatability and Reproducibility of the measurement system. – Multiple people measure the same characteristic of the same set of multiple units multiple times (a crossed study) – Example: 10 units are measured by 3 people. These units are then randomized and a second measure on each unit is taken. A Blind Study is extremely desirable. – Best scenario: operator does not know the measurement is a part of a test – At minimum: operators should not know which of the test parts they are currently measuring. NO, not that kind of R&R! OSSS LSS Green Belt v 11. 0 XL - Measure Phase 40 © Open. Source. Six. Sigma, LLC

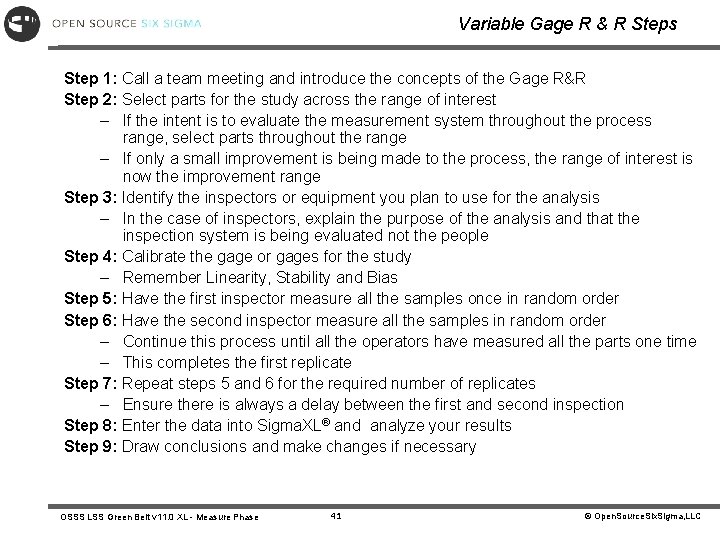
Variable Gage R & R Steps Step 1: Call a team meeting and introduce the concepts of the Gage R&R Step 2: Select parts for the study across the range of interest – If the intent is to evaluate the measurement system throughout the process range, select parts throughout the range – If only a small improvement is being made to the process, the range of interest is now the improvement range Step 3: Identify the inspectors or equipment you plan to use for the analysis – In the case of inspectors, explain the purpose of the analysis and that the inspection system is being evaluated not the people Step 4: Calibrate the gage or gages for the study – Remember Linearity, Stability and Bias Step 5: Have the first inspector measure all the samples once in random order Step 6: Have the second inspector measure all the samples in random order – Continue this process until all the operators have measured all the parts one time – This completes the first replicate Step 7: Repeat steps 5 and 6 for the required number of replicates – Ensure there is always a delay between the first and second inspection Step 8: Enter the data into Sigma. XL® and analyze your results Step 9: Draw conclusions and make changes if necessary OSSS LSS Green Belt v 11. 0 XL - Measure Phase 41 © Open. Source. Six. Sigma, LLC

Gage R & R Study Part Allocation From Any Population 10 x 3 x 2 Crossed Design is shown A minimum of two measurements/part/operator is required Three is better! Operator 1 P a r t s Trial 1 Trial 2 1 2 3 4 5 6 7 8 9 10 Operator 2 Trial 1 Trial 2 Operator 3 Trial 1 Trial 2 OSSS LSS Green Belt v 11. 0 XL - Measure Phase 42 © Open. Source. Six. Sigma, LLC

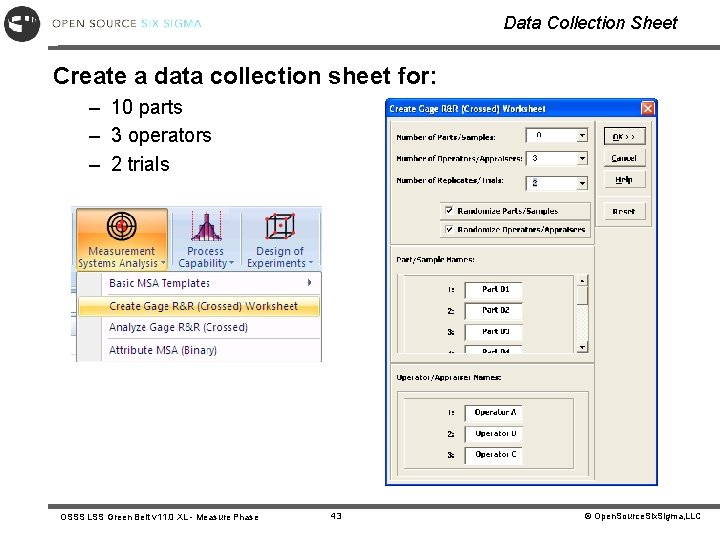
Data Collection Sheet Create a data collection sheet for: – 10 parts – 3 operators – 2 trials OSSS LSS Green Belt v 11. 0 XL - Measure Phase 43 © Open. Source. Six. Sigma, LLC

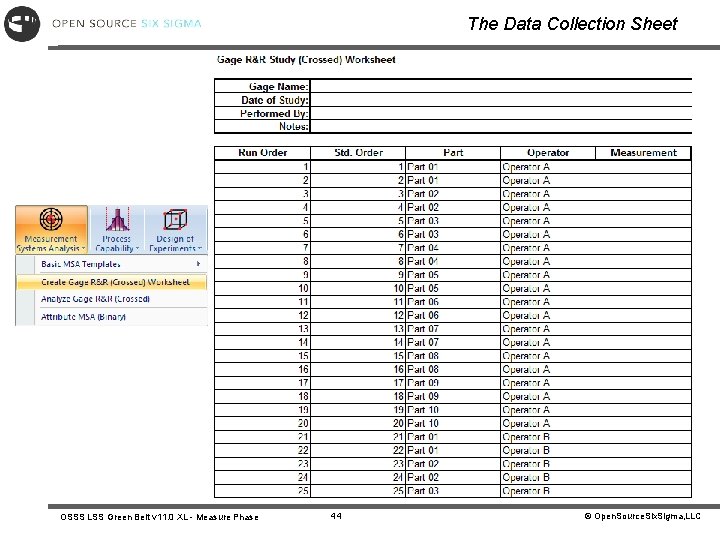
The Data Collection Sheet OSSS LSS Green Belt v 11. 0 XL - Measure Phase 44 © Open. Source. Six. Sigma, LLC

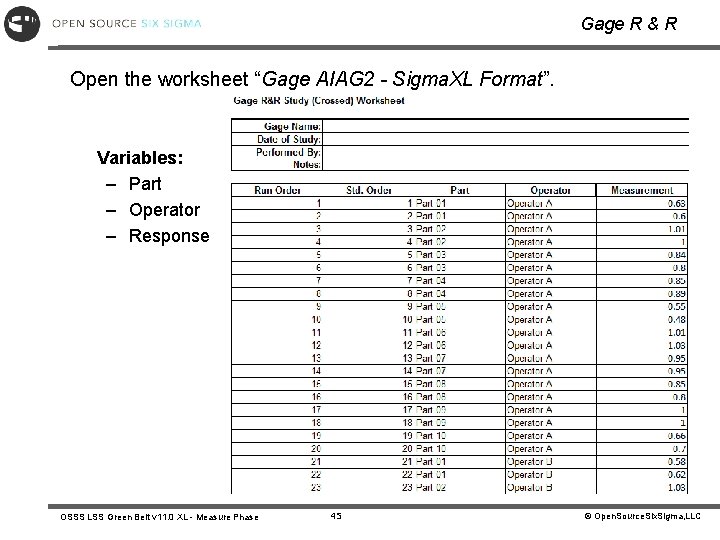
Gage R & R Open the worksheet “Gage AIAG 2 - Sigma. XL Format”. Variables: – Part – Operator – Response OSSS LSS Green Belt v 11. 0 XL - Measure Phase 45 © Open. Source. Six. Sigma, LLC

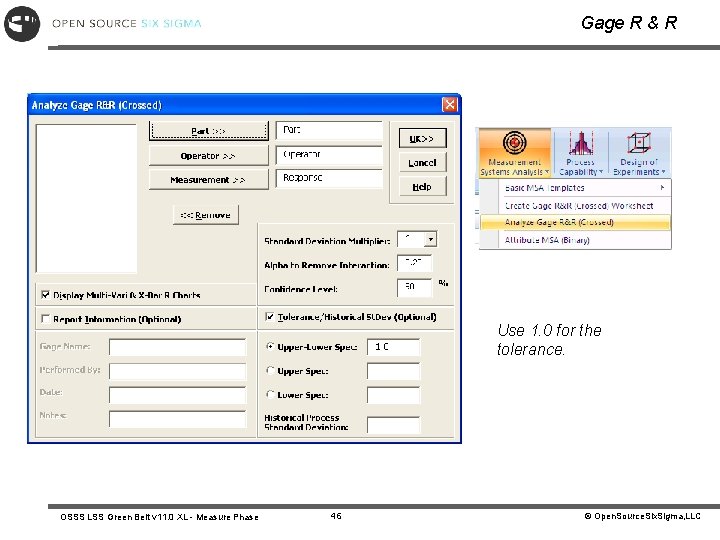
Gage R & R Use 1. 0 for the tolerance. OSSS LSS Green Belt v 11. 0 XL - Measure Phase 46 © Open. Source. Six. Sigma, LLC

Graphical Output Looking at the “Components of Variation” chart, the Part to Part Variation needs to be larger than Gage Variation. If in the “Components of Variation” chart the “Gage R&R” bars are larger than the “Part-to. Part” bars, then all your measurement Variation is in the measuring tool i. e. … “maybe the gage needs to be replaced”. Part to Part Variation needs to be larger than Gage Variation OSSS LSS Green Belt v 11. 0 XL - Measure Phase 47 © Open. Source. Six. Sigma, LLC

Graphical Output The same concept applies to the “Response by Operator” chart. If there is extreme Variation within operators, then the training of the operators is suspect. Operator Error OSSS LSS Green Belt v 11. 0 XL - Measure Phase 48 © Open. Source. Six. Sigma, LLC

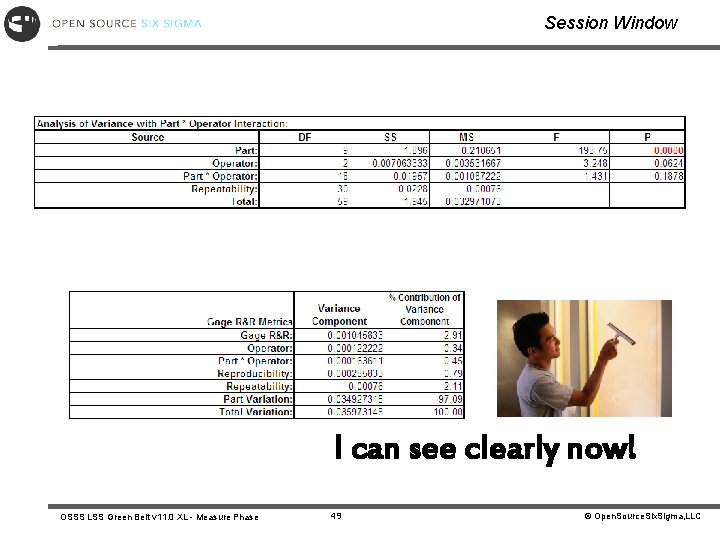
Session Window I can see clearly now! OSSS LSS Green Belt v 11. 0 XL - Measure Phase 49 © Open. Source. Six. Sigma, LLC

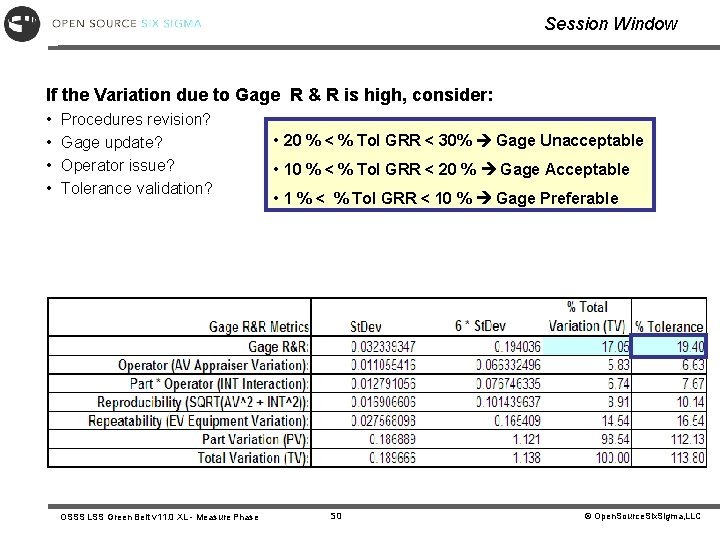
Session Window If the Variation due to Gage R & R is high, consider: • Procedures revision? • Gage update? • Operator issue? • Tolerance validation? OSSS LSS Green Belt v 11. 0 XL - Measure Phase • 20 % < % Tol GRR < 30% Gage Unacceptable • 10 % < % Tol GRR < 20 % Gage Acceptable • 1 % < % Tol GRR < 10 % Gage Preferable 50 © Open. Source. Six. Sigma, LLC

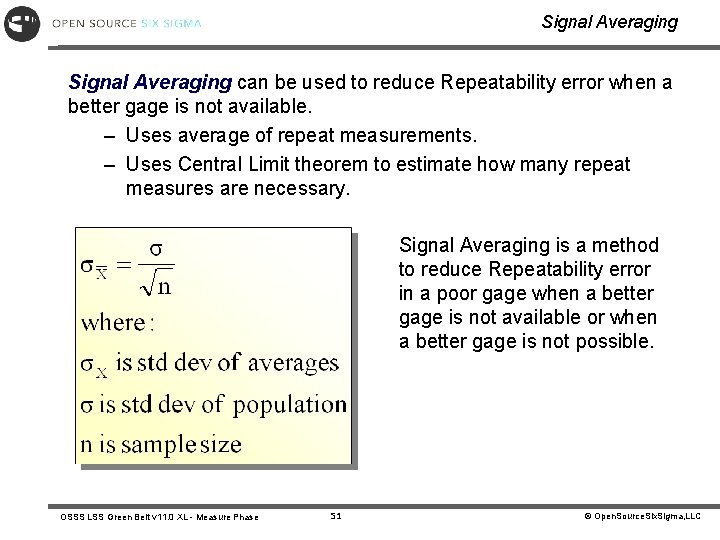
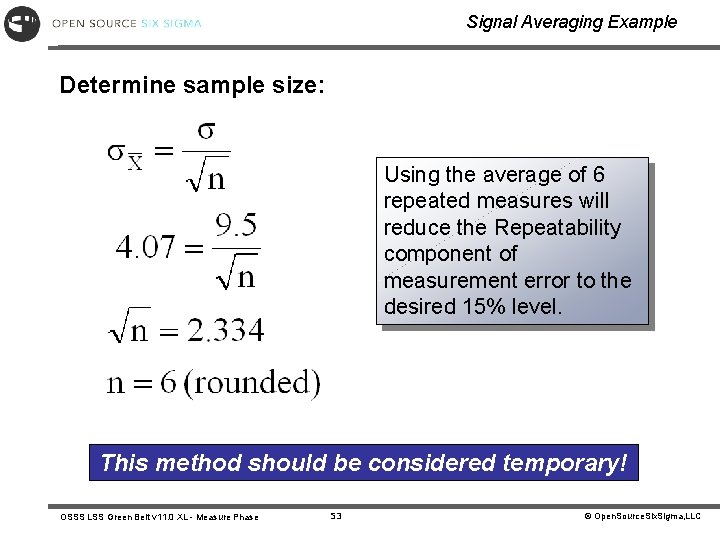
Signal Averaging can be used to reduce Repeatability error when a better gage is not available. – Uses average of repeat measurements. – Uses Central Limit theorem to estimate how many repeat measures are necessary. Signal Averaging is a method to reduce Repeatability error in a poor gage when a better gage is not available or when a better gage is not possible. OSSS LSS Green Belt v 11. 0 XL - Measure Phase 51 © Open. Source. Six. Sigma, LLC

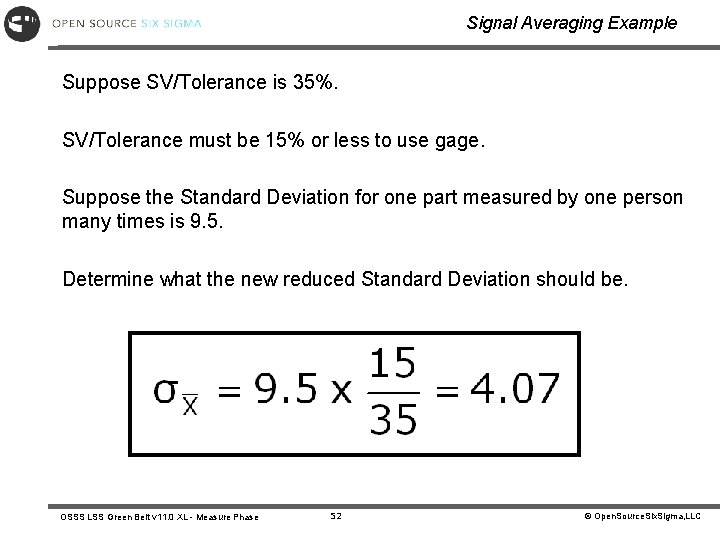
Signal Averaging Example Suppose SV/Tolerance is 35%. SV/Tolerance must be 15% or less to use gage. Suppose the Standard Deviation for one part measured by one person many times is 9. 5. Determine what the new reduced Standard Deviation should be. OSSS LSS Green Belt v 11. 0 XL - Measure Phase 52 © Open. Source. Six. Sigma, LLC

Signal Averaging Example Determine sample size: Using the average of 6 repeated measures will reduce the Repeatability component of measurement error to the desired 15% level. This method should be considered temporary! OSSS LSS Green Belt v 11. 0 XL - Measure Phase 53 © Open. Source. Six. Sigma, LLC

Paper Cutting Exercise objective: Perform and Analyze a variable MSA Study. 1. Cut a piece of paper into 12 different lengths that are all fairly close to one another but not too uniform. Label the back of the piece of paper to designate its “part number” 2. Perform a variable gage R&R study as outlined in this module. Use the following guidelines: – Number of parts: 12 – Number of inspectors: 3 – Number of trials: 5 3. Create a Sigma. XL® data sheet and enter the data into the sheet as each inspector performs a measurement. If possible, assign one person to data collection. 4. Analyze the results and discuss with your mentor. OSSS LSS Green Belt v 11. 0 XL - Measure Phase 54 © Open. Source. Six. Sigma, LLC

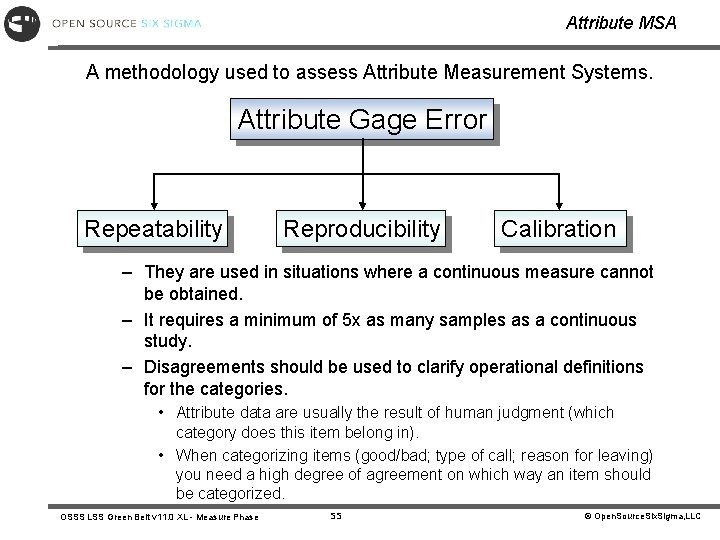
Attribute MSA A methodology used to assess Attribute Measurement Systems. Attribute Gage Error Repeatability Reproducibility Calibration – They are used in situations where a continuous measure cannot be obtained. – It requires a minimum of 5 x as many samples as a continuous study. – Disagreements should be used to clarify operational definitions for the categories. • Attribute data are usually the result of human judgment (which category does this item belong in). • When categorizing items (good/bad; type of call; reason for leaving) you need a high degree of agreement on which way an item should be categorized. OSSS LSS Green Belt v 11. 0 XL - Measure Phase 55 © Open. Source. Six. Sigma, LLC

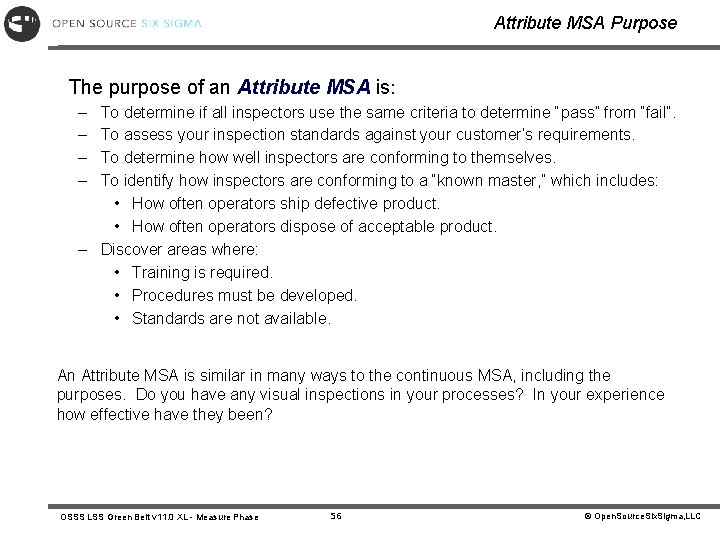
Attribute MSA Purpose The purpose of an Attribute MSA is: – – To determine if all inspectors use the same criteria to determine “pass” from “fail”. To assess your inspection standards against your customer’s requirements. To determine how well inspectors are conforming to themselves. To identify how inspectors are conforming to a “known master, ” which includes: • How often operators ship defective product. • How often operators dispose of acceptable product. – Discover areas where: • Training is required. • Procedures must be developed. • Standards are not available. An Attribute MSA is similar in many ways to the continuous MSA, including the purposes. Do you have any visual inspections in your processes? In your experience how effective have they been? OSSS LSS Green Belt v 11. 0 XL - Measure Phase 56 © Open. Source. Six. Sigma, LLC

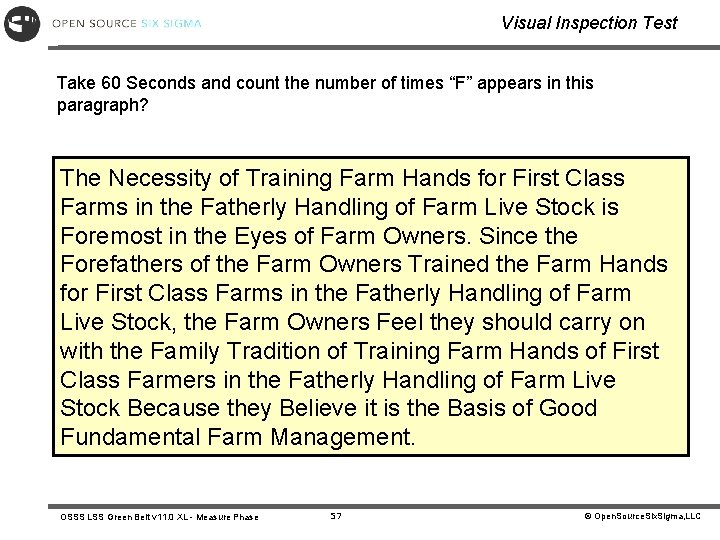
Visual Inspection Test Take 60 Seconds and count the number of times “F” appears in this paragraph? The Necessity of Training Farm Hands for First Class Farms in the Fatherly Handling of Farm Live Stock is Foremost in the Eyes of Farm Owners. Since the Forefathers of the Farm Owners Trained the Farm Hands for First Class Farms in the Fatherly Handling of Farm Live Stock, the Farm Owners Feel they should carry on with the Family Tradition of Training Farm Hands of First Class Farmers in the Fatherly Handling of Farm Live Stock Because they Believe it is the Basis of Good Fundamental Farm Management. OSSS LSS Green Belt v 11. 0 XL - Measure Phase 57 © Open. Source. Six. Sigma, LLC

How can we Improve Visual Inspection? Visual Inspection can be improved by: • Operator Training & Certification • Develop Visual Aids/Boundary Samples • Establish Standards • Establish Set-Up Procedures • Establish Evaluation Procedures – Evaluation of the same location on each part. – Each evaluation performed under the same lighting. – Ensure all evaluations are made with the same standard. Look closely now! OSSS LSS Green Belt v 11. 0 XL - Measure Phase 58 © Open. Source. Six. Sigma, LLC

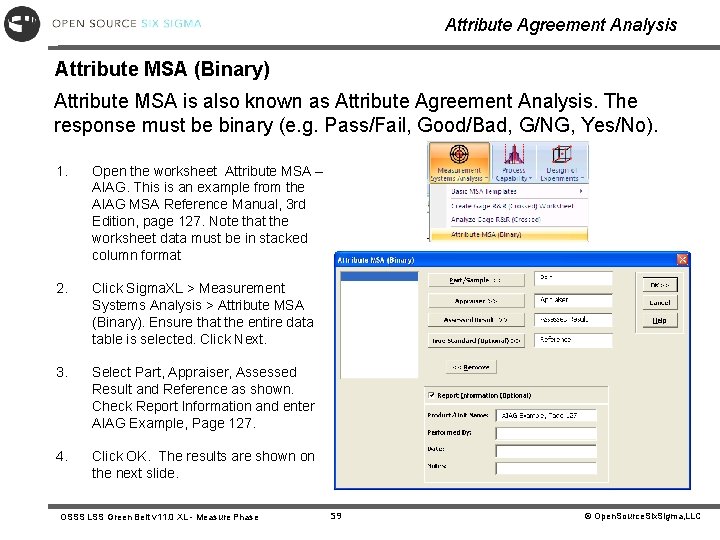
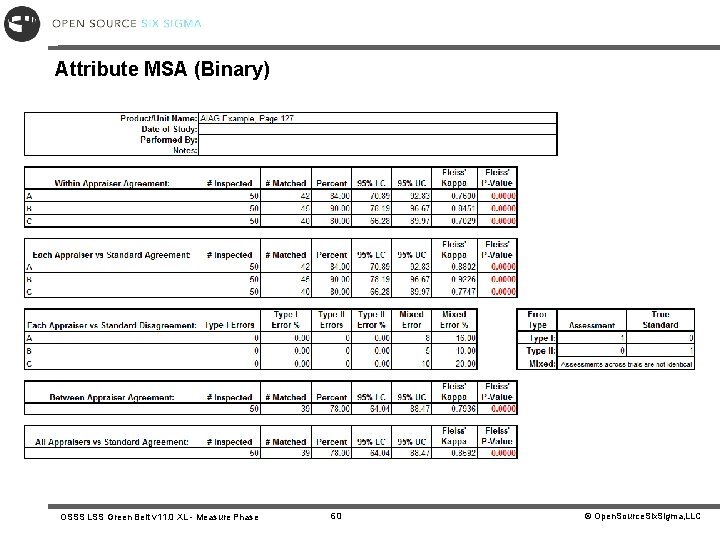
Attribute Agreement Analysis Attribute MSA (Binary) Attribute MSA is also known as Attribute Agreement Analysis. The response must be binary (e. g. Pass/Fail, Good/Bad, G/NG, Yes/No). 1. Open the worksheet Attribute MSA – AIAG. This is an example from the AIAG MSA Reference Manual, 3 rd Edition, page 127. Note that the worksheet data must be in stacked column format 2. Click Sigma. XL > Measurement Systems Analysis > Attribute MSA (Binary). Ensure that the entire data table is selected. Click Next. 3. Select Part, Appraiser, Assessed Result and Reference as shown. Check Report Information and enter AIAG Example, Page 127. 4. Click OK. The results are shown on the next slide. OSSS LSS Green Belt v 11. 0 XL - Measure Phase 59 © Open. Source. Six. Sigma, LLC

Attribute MSA (Binary) OSSS LSS Green Belt v 11. 0 XL - Measure Phase 60 © Open. Source. Six. Sigma, LLC

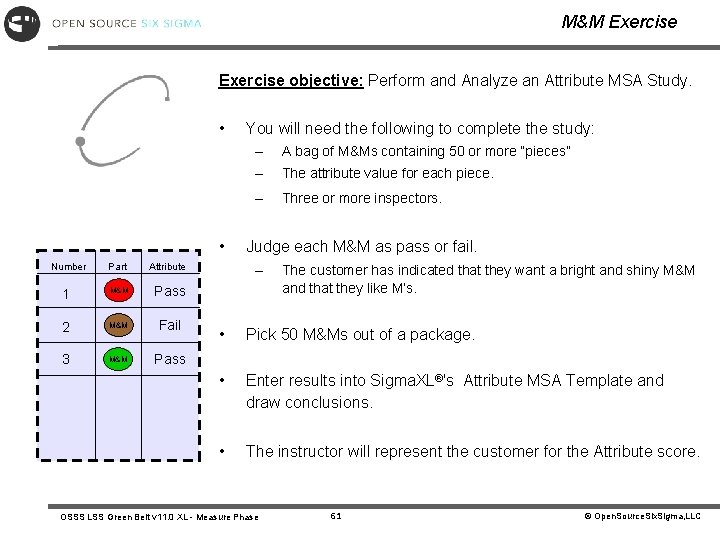
M&M Exercise objective: Perform and Analyze an Attribute MSA Study. • • Number Part Attribute 1 M&M Pass 2 M&M Fail 3 M&M Pass You will need the following to complete the study: – A bag of M&Ms containing 50 or more “pieces” – The attribute value for each piece. – Three or more inspectors. Judge each M&M as pass or fail. – The customer has indicated that they want a bright and shiny M&M and that they like M’s. • Pick 50 M&Ms out of a package. • Enter results into Sigma. XL®'s Attribute MSA Template and draw conclusions. • The instructor will represent the customer for the Attribute score. OSSS LSS Green Belt v 11. 0 XL - Measure Phase 61 © Open. Source. Six. Sigma, LLC

Summary At this point, you should be able to: • Understand Precision & Accuracy • Understand Bias, Linearity and Stability • Understand Repeatability & Reproducibility • Understand the impact of poor gage capability on product quality • Identify the various components of Variation • Perform the step by step methodology in Variable and Attribute MSA’s OSSS LSS Green Belt v 11. 0 XL - Measure Phase 62 © Open. Source. Six. Sigma, LLC

The Certified Lean Six Sigma Green Belt Assessment The Certified Lean Six Sigma Green Belt (CLSSGB) tests are useful for assessing Green Belt’s knowledge of Lean Six Sigma. The CLSSGB can be used in preparation for the ASQ or IASSC Certified Six Sigma Green Belt (CSSGB) exam or for any number of other certifications, including private company certifications. The Lean Six Sigma Green Belt Course Manual Open Source Six Sigma Course Manuals are professionally designed and formatted manuals used by Belt’s during training and for reference guides afterwards. The OSSS manuals complement the OSSS Training Materials and consist of slide content, instructional notes data sets and templates. Get the latest products at… www. opensourcesixsigma. com OSSS LSS Green Belt v 11. 0 XL - Measure Phase 63 © Open. Source. Six. Sigma, LLC