ME 612 Metal Forming and Theory of Plasticity

- Slides: 44

ME 612 Metal Forming and Theory of Plasticity 2. Definitions Assoc. Prof. Dr. Ahmet Zafer Şenalp e-mail: azsenalp@gmail. com Mechanical Engineering Department Gebze Technical University

2. 1. Basic Thoughts in Metal Plasticity Modeling 2. Definitions 1)Decomposition of strain into elastic and plastic parts. 2)Yield criteria: Determines when the metal will behave elastically or plastically. 3)Work hardening rules: Controls the shape of the stress-strain curve in plastic region. 4) Plastic flow rule: Determines the stress-plastic strain relation in multiaxial loading. 5) Elastic unloading criteria: Models the irreversible behavior. Dr. Ahmet Zafer Şenalp ME 612 Mechanical Engineering Department, GTU 2

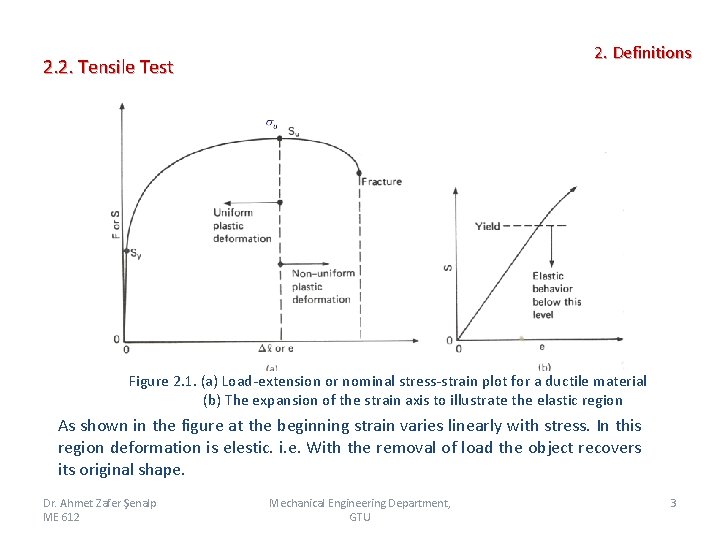
2. Definitions 2. 2. Tensile Test Figure 2. 1. (a) Load-extension or nominal stress-strain plot for a ductile material (b) The expansion of the strain axis to illustrate the elastic region As shown in the figure at the beginning strain varies linearly with stress. In this region deformation is elestic. i. e. With the removal of load the object recovers its original shape. Dr. Ahmet Zafer Şenalp ME 612 Mechanical Engineering Department, GTU 3

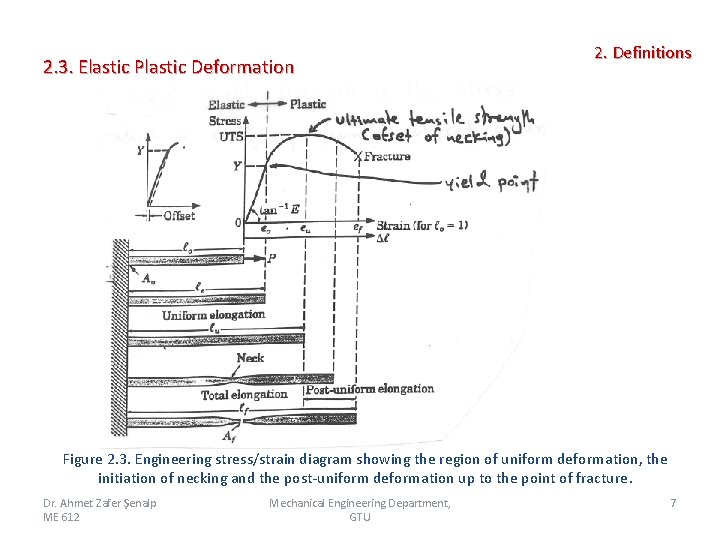
2. Definitions 2. 2. Tensile Test The slope of the line is shown by E and elasticity modulus is called Young modulus. Along the line Hooke’s Law is valid; (2. 1) In tensile test as the specimen elongates the cross sectional area decreases. is denoted as yield point. After yield point Hooke’s law is not valid. point is the maximum stress value at which permanent deformation is not observed. is the point of maximum load application or maximum stress value. After this value if the load is not removed the specimen goes to fracture with decreasing load. Dr. Ahmet Zafer Şenalp ME 612 Mechanical Engineering Department, GTU 4

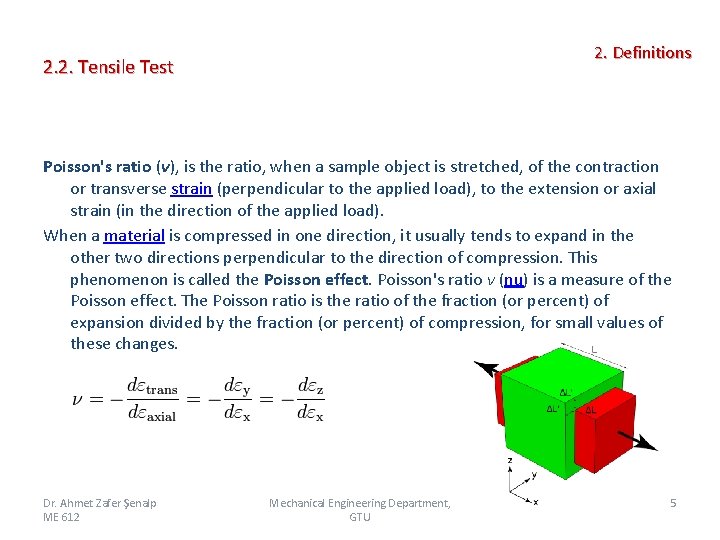
2. Definitions 2. 2. Tensile Test Poisson's ratio (ν), is the ratio, when a sample object is stretched, of the contraction or transverse strain (perpendicular to the applied load), to the extension or axial strain (in the direction of the applied load). When a material is compressed in one direction, it usually tends to expand in the other two directions perpendicular to the direction of compression. This phenomenon is called the Poisson effect. Poisson's ratio ν (nu) is a measure of the Poisson effect. The Poisson ratio is the ratio of the fraction (or percent) of expansion divided by the fraction (or percent) of compression, for small values of these changes. Dr. Ahmet Zafer Şenalp ME 612 Mechanical Engineering Department, GTU 5

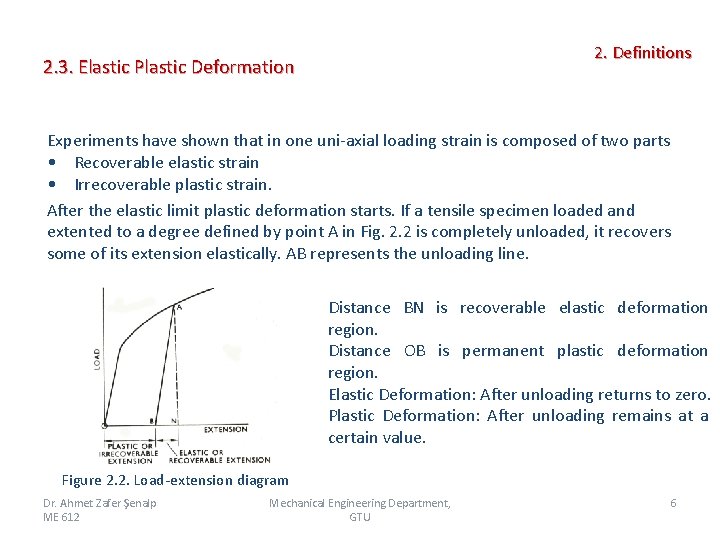
2. Definitions 2. 3. Elastic Plastic Deformation Experiments have shown that in one uni-axial loading strain is composed of two parts • Recoverable elastic strain • Irrecoverable plastic strain. After the elastic limit plastic deformation starts. If a tensile specimen loaded and extented to a degree defined by point A in Fig. 2. 2 is completely unloaded, it recovers some of its extension elastically. AB represents the unloading line. Distance BN is recoverable elastic deformation region. Distance OB is permanent plastic deformation region. Elastic Deformation: After unloading returns to zero. Plastic Deformation: After unloading remains at a certain value. Figure 2. 2. Load-extension diagram Dr. Ahmet Zafer Şenalp ME 612 Mechanical Engineering Department, GTU 6

2. 3. Elastic Plastic Deformation 2. Definitions Figure 2. 3. Engineering stress/strain diagram showing the region of uniform deformation, the initiation of necking and the post-uniform deformation up to the point of fracture. Dr. Ahmet Zafer Şenalp ME 612 Mechanical Engineering Department, GTU 7

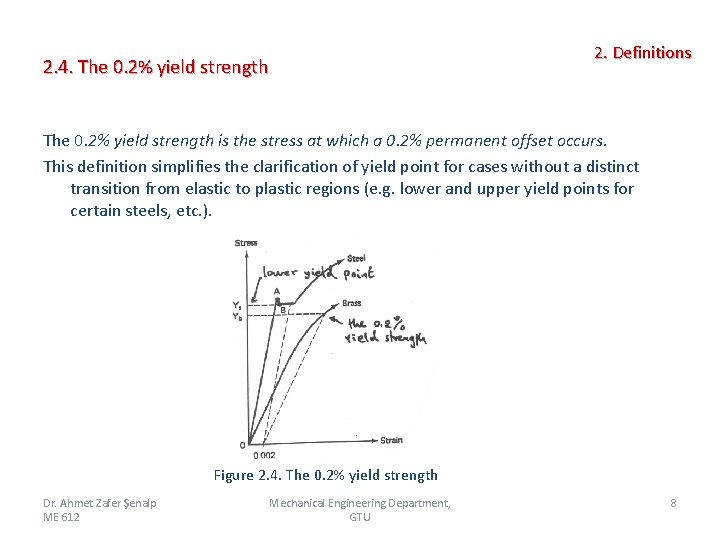
2. 4. The 0. 2% yield strength 2. Definitions The 0. 2% yield strength is the stress at which a 0. 2% permanent offset occurs. This definition simplifies the clarification of yield point for cases without a distinct transition from elastic to plastic regions (e. g. lower and upper yield points for certain steels, etc. ). Figure 2. 4. The 0. 2% yield strength Dr. Ahmet Zafer Şenalp ME 612 Mechanical Engineering Department, GTU 8

2. 5. Work Hardening, Ductility, Toughness and Hardness 2. Definitions 2. 5. 1. Work hardening, also known as strain hardening, is the strengthening of a metal by plastic deformation. This strengthening occurs because of dislocation movements within the crystal structure of the material. Metal exceeds elastic region and plastic deformation takes place and strength and hardness values increase in work hardening. 2. 5. 2. Ductility is a mechanical property that describes the extent in which solid materials can be plastically deformed without fracture. Elongation up to rupture is a measure of ductility. How much the elongation, the material is that much ductile. Opposite of ductile material is brittle material. Ductility is defined as: Dr. Ahmet Zafer Şenalp ME 612 Mechanical Engineering Department, GTU 9

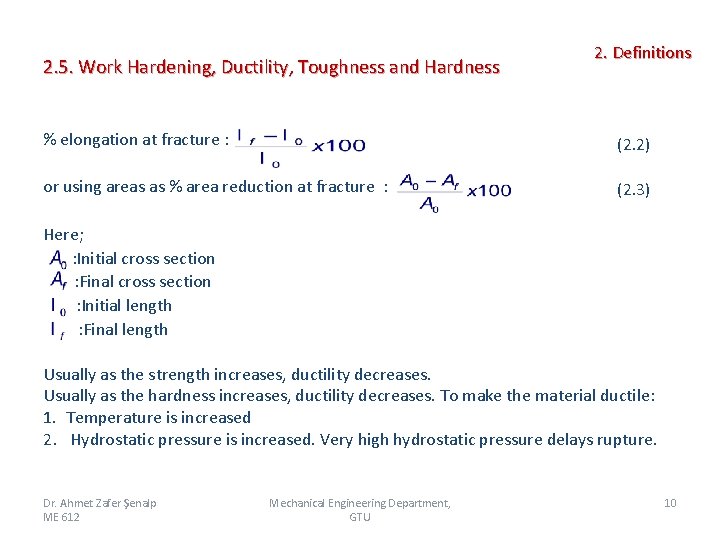
2. 5. Work Hardening, Ductility, Toughness and Hardness 2. Definitions % elongation at fracture : (2. 2) or using areas as % area reduction at fracture : (2. 3) Here; : Initial cross section : Final cross section : Initial length : Final length Usually as the strength increases, ductility decreases. Usually as the hardness increases, ductility decreases. To make the material ductile: 1. Temperature is increased 2. Hydrostatic pressure is increased. Very high hydrostatic pressure delays rupture. Dr. Ahmet Zafer Şenalp ME 612 Mechanical Engineering Department, GTU 10

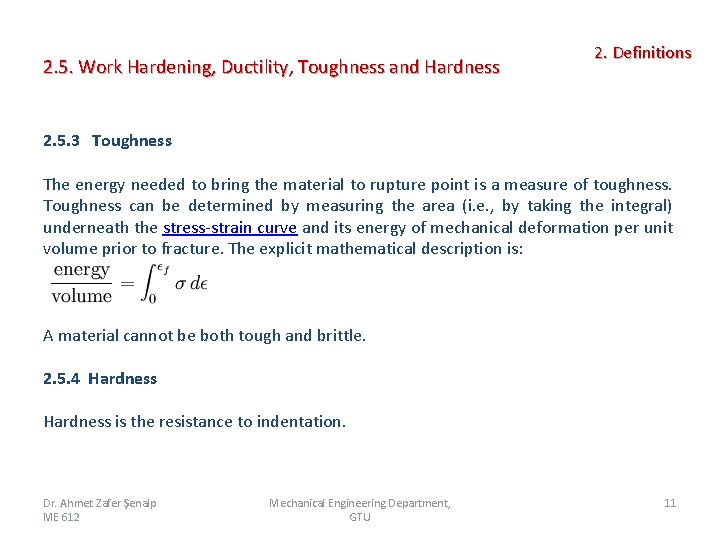
2. 5. Work Hardening, Ductility, Toughness and Hardness 2. Definitions 2. 5. 3 Toughness The energy needed to bring the material to rupture point is a measure of toughness. Toughness can be determined by measuring the area (i. e. , by taking the integral) underneath the stress-strain curve and its energy of mechanical deformation per unit volume prior to fracture. The explicit mathematical description is: A material cannot be both tough and brittle. 2. 5. 4 Hardness is the resistance to indentation. Dr. Ahmet Zafer Şenalp ME 612 Mechanical Engineering Department, GTU 11

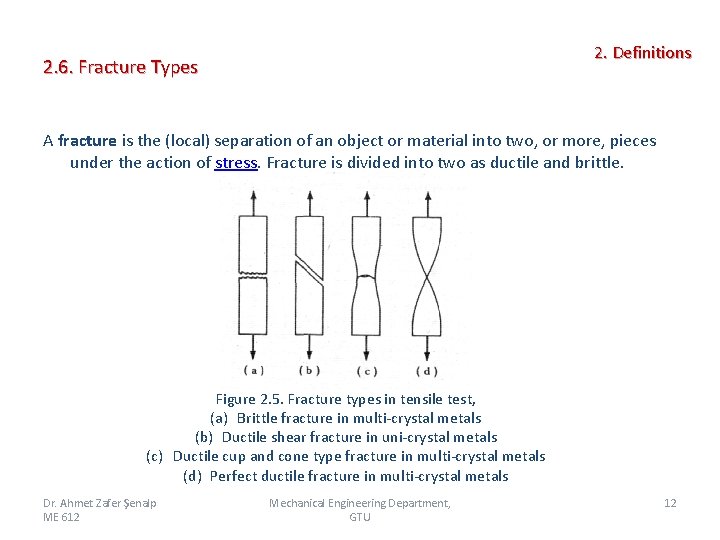
2. Definitions 2. 6. Fracture Types A fracture is the (local) separation of an object or material into two, or more, pieces under the action of stress. Fracture is divided into two as ductile and brittle. Figure 2. 5. Fracture types in tensile test, (a) Brittle fracture in multi-crystal metals (b) Ductile shear fracture in uni-crystal metals (c) Ductile cup and cone type fracture in multi-crystal metals (d) Perfect ductile fracture in multi-crystal metals Dr. Ahmet Zafer Şenalp ME 612 Mechanical Engineering Department, GTU 12

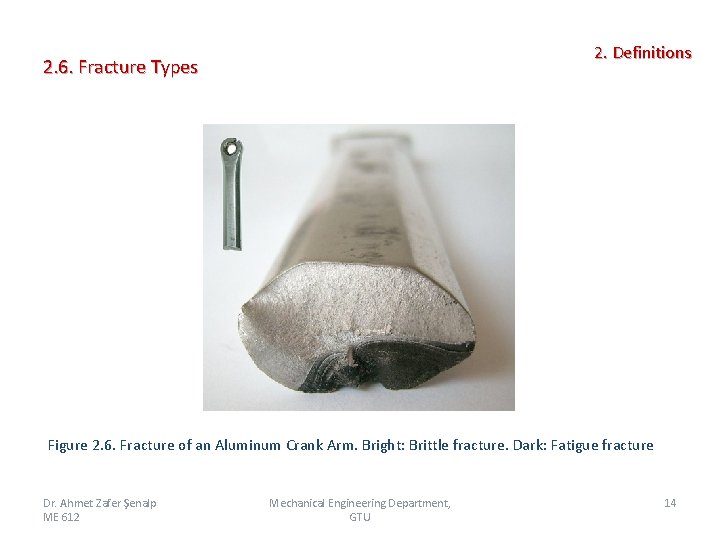
2. Definitions 2. 6. Fracture Types 2. 6. 1. Brittle Fracture In brittle fracture, no apparent plastic deformation takes place before fracture. In brittle crystalline materials, fracture can occur by cleavage as the result of tensile stress acting normal to crystallographic planes with low bonding (cleavage planes). Generally low temperature and high strain rate are the encouraging factors for brittle fracture. In face centered cubic metals generally britlle fracture is not seen. Contrarily to this in body centered cubic and hexagonal closed-packed metals brittle fracture can occur. Dr. Ahmet Zafer Şenalp ME 612 Mechanical Engineering Department, GTU 13

2. Definitions 2. 6. Fracture Types Figure 2. 6. Fracture of an Aluminum Crank Arm. Bright: Brittle fracture. Dark: Fatigue fracture Dr. Ahmet Zafer Şenalp ME 612 Mechanical Engineering Department, GTU 14

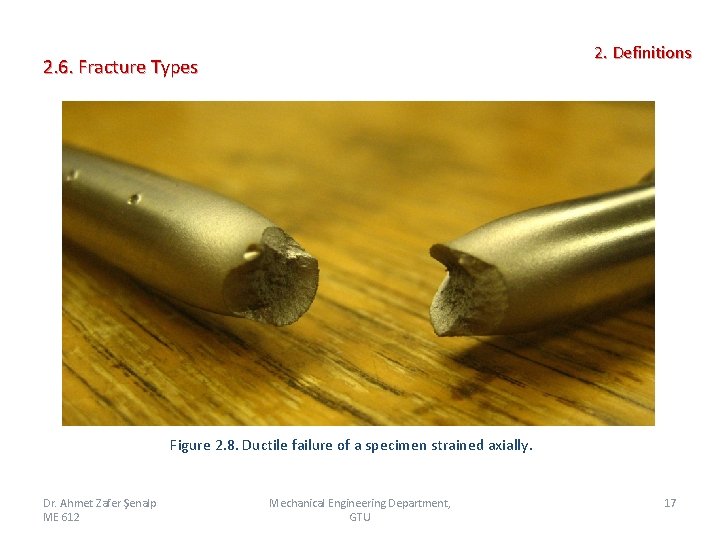
2. Definitions 2. 6. Fracture Types 2. 6. 2 Ductile Fracture In ductile fracture, extensive plastic deformation takes place before fracture. The terms rupture or ductile rupture describe the ultimate failure of tough ductile materials loaded in tension. Rather than cracking, the material "pulls apart, " generally leaving a rough surface. In this case there is slow propagation and an absorption of a large amount energy before fracture. Ductile fracture generally occurs along the planes where shear stress is maximum. Due to its shape ductile fracture is also called as cup and cone type fracture. Compounds like oxide, sulphur, carbide, silicate cause gaps in metal and alloy which effects ductility and ductile fracture. This fact is not good for the formability of metals. Dr. Ahmet Zafer Şenalp ME 612 Mechanical Engineering Department, GTU 15

2. Definitions 2. 6. Fracture Types Figure 2. 7. Cup and cone type of fracture in tensile test (R. E. Reed-Hill, Physical Metallurgy Principles, D. Van Nostrand Company, Inc. , Princeton, N. J. , 1964. p. 555). Dr. Ahmet Zafer Şenalp ME 612 Mechanical Engineering Department, GTU 16

2. Definitions 2. 6. Fracture Types Figure 2. 8. Ductile failure of a specimen strained axially. Dr. Ahmet Zafer Şenalp ME 612 Mechanical Engineering Department, GTU 17

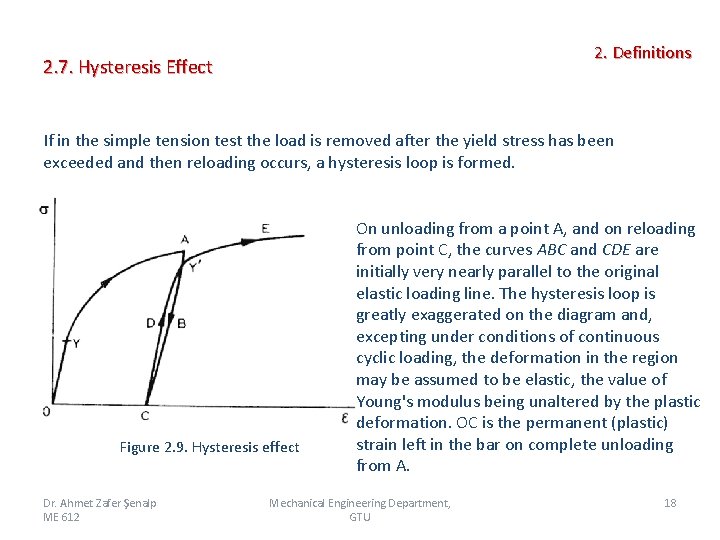
2. Definitions 2. 7. Hysteresis Effect If in the simple tension test the load is removed after the yield stress has been exceeded and then reloading occurs, a hysteresis loop is formed. Figure 2. 9. Hysteresis effect Dr. Ahmet Zafer Şenalp ME 612 On unloading from a point A, and on reloading from point C, the curves ABC and CDE are initially very nearly parallel to the original elastic loading line. The hysteresis loop is greatly exaggerated on the diagram and, excepting under conditions of continuous cyclic loading, the deformation in the region may be assumed to be elastic, the value of Young's modulus being unaltered by the plastic deformation. OC is the permanent (plastic) strain left in the bar on complete unloading from A. Mechanical Engineering Department, GTU 18

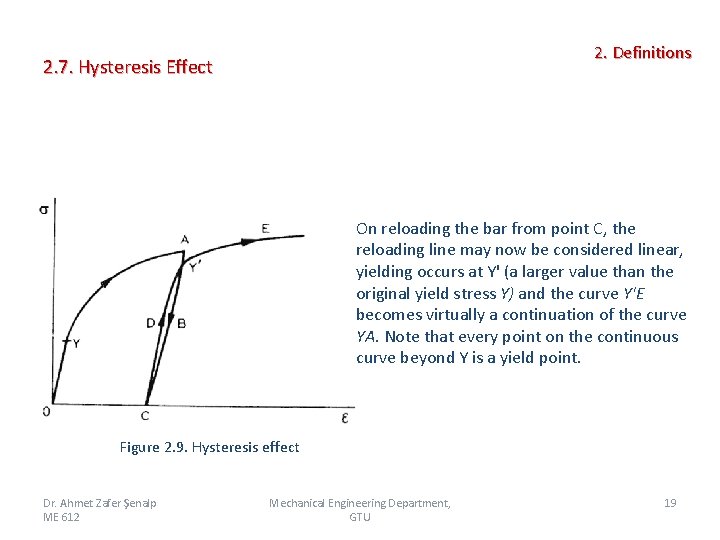
2. Definitions 2. 7. Hysteresis Effect On reloading the bar from point C, the reloading line may now be considered linear, yielding occurs at Y' (a larger value than the original yield stress Y) and the curve Y'E becomes virtually a continuation of the curve YA. Note that every point on the continuous curve beyond Y is a yield point. Figure 2. 9. Hysteresis effect Dr. Ahmet Zafer Şenalp ME 612 Mechanical Engineering Department, GTU 19

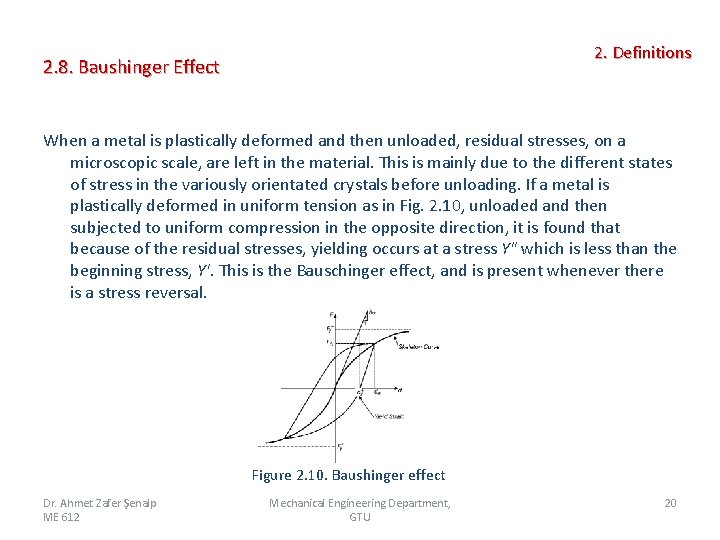
2. Definitions 2. 8. Baushinger Effect When a metal is plastically deformed and then unloaded, residual stresses, on a microscopic scale, are left in the material. This is mainly due to the different states of stress in the variously orientated crystals before unloading. If a metal is plastically deformed in uniform tension as in Fig. 2. 10, unloaded and then subjected to uniform compression in the opposite direction, it is found that because of the residual stresses, yielding occurs at a stress Y" which is less than the beginning stress, Y'. This is the Bauschinger effect, and is present whenever there is a stress reversal. Figure 2. 10. Baushinger effect Dr. Ahmet Zafer Şenalp ME 612 Mechanical Engineering Department, GTU 20

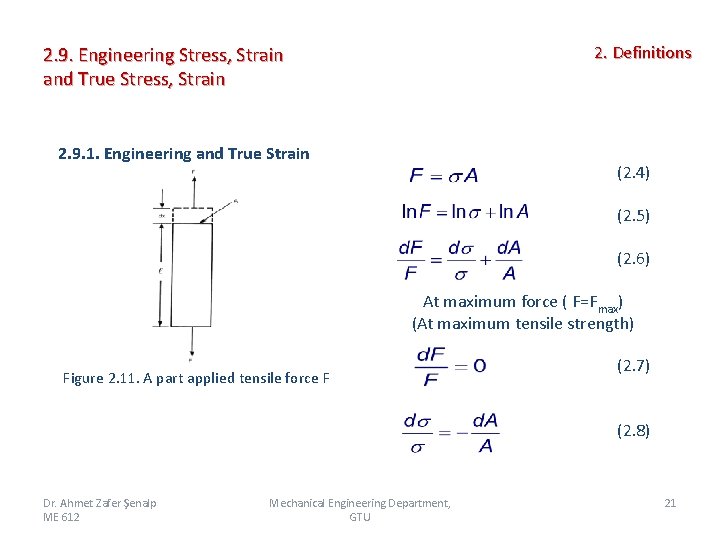
2. Definitions 2. 9. Engineering Stress, Strain and True Stress, Strain 2. 9. 1. Engineering and True Strain (2. 4) (2. 5) (2. 6) At maximum force ( F=Fmax) (At maximum tensile strength) Figure 2. 11. A part applied tensile force F (2. 7) (2. 8) Dr. Ahmet Zafer Şenalp ME 612 Mechanical Engineering Department, GTU 21

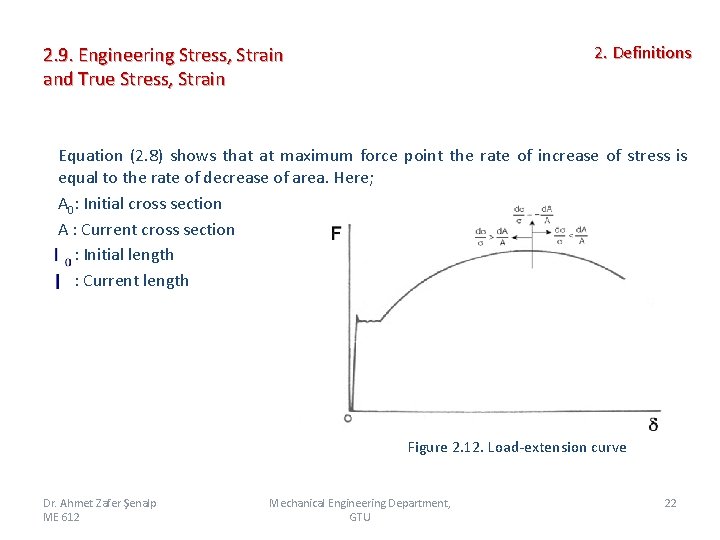
2. Definitions 2. 9. Engineering Stress, Strain and True Stress, Strain Equation (2. 8) shows that at maximum force point the rate of increase of stress is equal to the rate of decrease of area. Here; A 0: Initial cross section A : Current cross section : Initial length : Current length Figure 2. 12. Load-extension curve Dr. Ahmet Zafer Şenalp ME 612 Mechanical Engineering Department, GTU 22

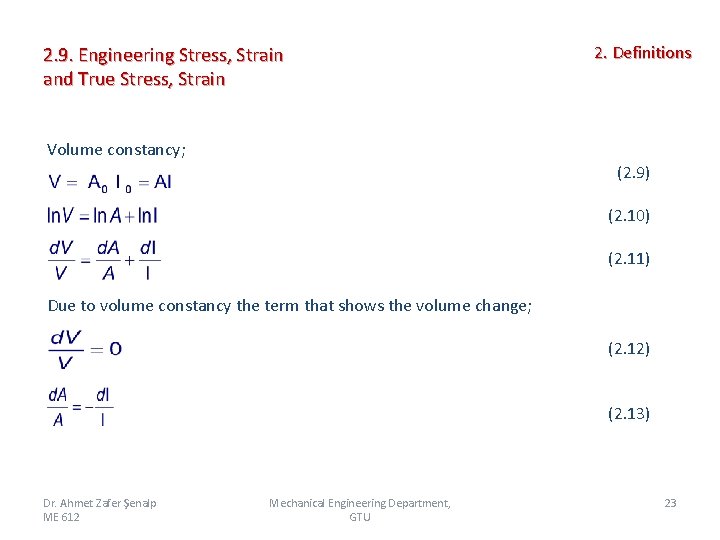
2. 9. Engineering Stress, Strain and True Stress, Strain 2. Definitions Volume constancy; (2. 9) (2. 10) (2. 11) Due to volume constancy the term that shows the volume change; (2. 12) (2. 13) Dr. Ahmet Zafer Şenalp ME 612 Mechanical Engineering Department, GTU 23

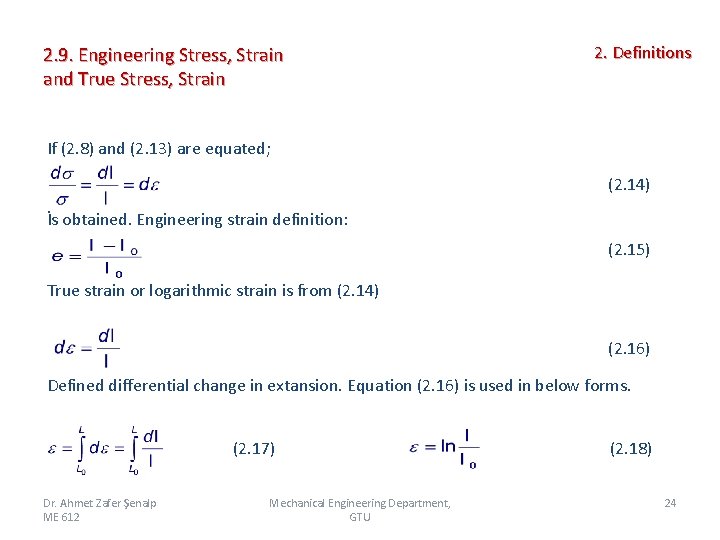
2. 9. Engineering Stress, Strain and True Stress, Strain 2. Definitions If (2. 8) and (2. 13) are equated; (2. 14) İs obtained. Engineering strain definition: (2. 15) True strain or logarithmic strain is from (2. 14) (2. 16) Defined differential change in extansion. Equation (2. 16) is used in below forms. (2. 17) Dr. Ahmet Zafer Şenalp ME 612 Mechanical Engineering Department, GTU (2. 18) 24

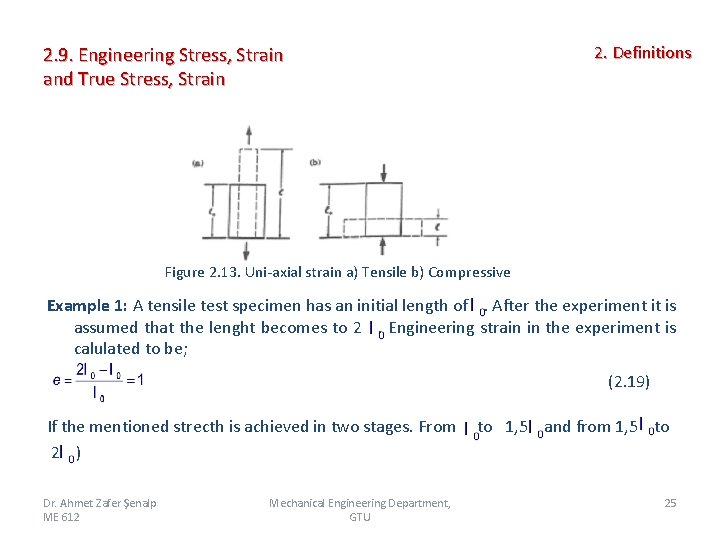
2. Definitions 2. 9. Engineering Stress, Strain and True Stress, Strain Figure 2. 13. Uni-axial strain a) Tensile b) Compressive Example 1: A tensile test specimen has an initial length of. After the experiment it is assumed that the lenght becomes to 2. Engineering strain in the experiment is calulated to be; (2. 19) If the mentioned strecth is achieved in two stages. From 2 ) Dr. Ahmet Zafer Şenalp ME 612 Mechanical Engineering Department, GTU to 1, 5 and from 1, 5 to 25

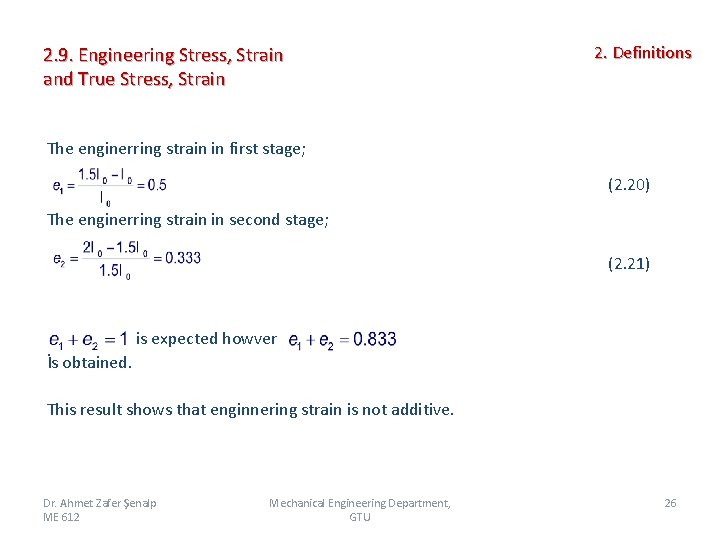
2. 9. Engineering Stress, Strain and True Stress, Strain 2. Definitions The enginerring strain in first stage; (2. 20) The enginerring strain in second stage; (2. 21) is expected howver İs obtained. This result shows that enginnering strain is not additive. Dr. Ahmet Zafer Şenalp ME 612 Mechanical Engineering Department, GTU 26

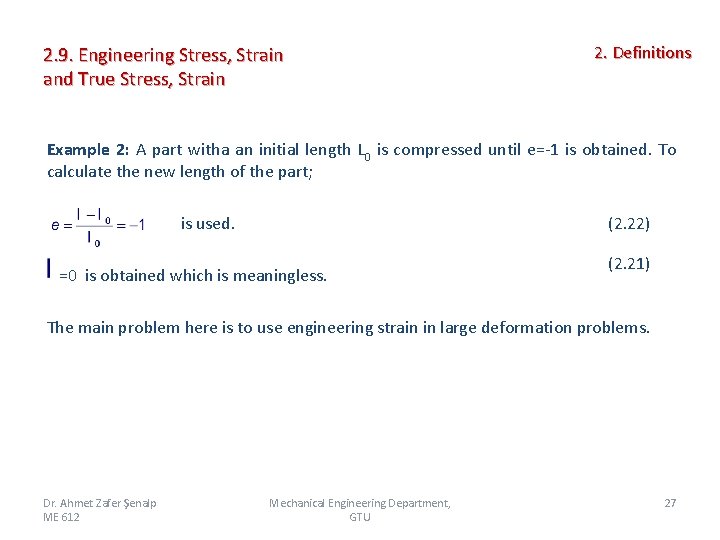
2. 9. Engineering Stress, Strain and True Stress, Strain 2. Definitions Example 2: A part witha an initial length L 0 is compressed until e=-1 is obtained. To calculate the new length of the part; (2. 22) is used. =0 is obtained which is meaningless. (2. 21) The main problem here is to use engineering strain in large deformation problems. Dr. Ahmet Zafer Şenalp ME 612 Mechanical Engineering Department, GTU 27

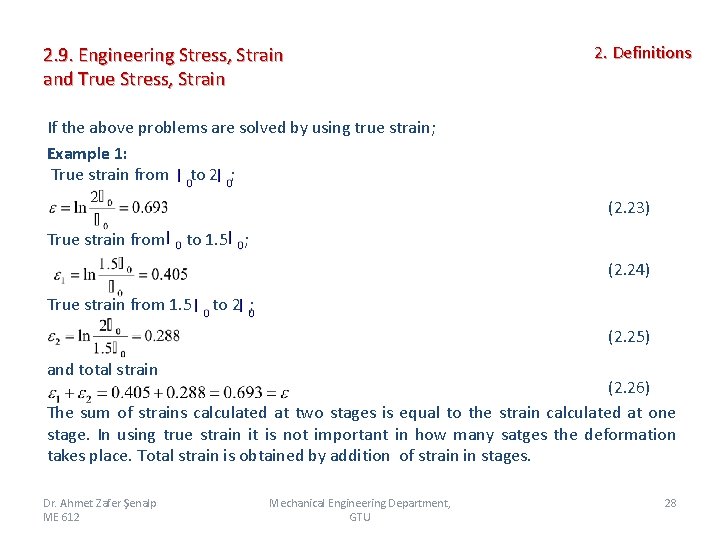
2. 9. Engineering Stress, Strain and True Stress, Strain 2. Definitions If the above problems are solved by using true strain; Example 1: True strain from to 2 ; (2. 23) True strain from to 1. 5 ; (2. 24) True strain from 1. 5 to 2 ; (2. 25) and total strain (2. 26) The sum of strains calculated at two stages is equal to the strain calculated at one stage. In using true strain it is not important in how many satges the deformation takes place. Total strain is obtained by addition of strain in stages. Dr. Ahmet Zafer Şenalp ME 612 Mechanical Engineering Department, GTU 28

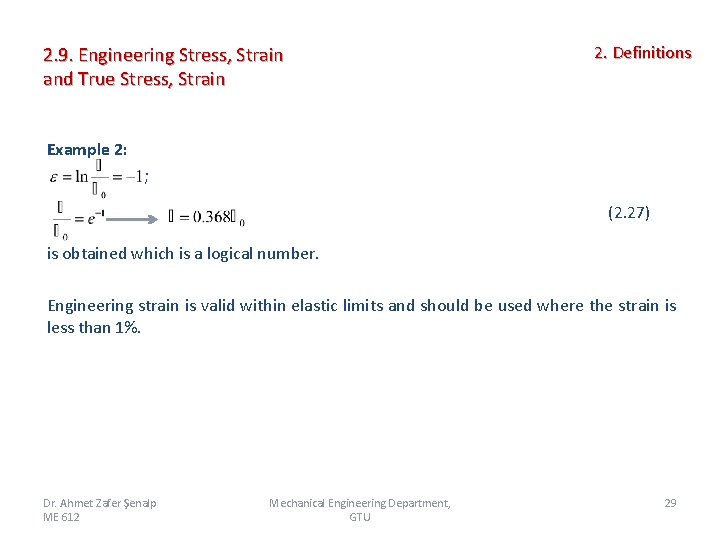
2. 9. Engineering Stress, Strain and True Stress, Strain 2. Definitions Example 2: ; (2. 27) is obtained which is a logical number. Engineering strain is valid within elastic limits and should be used where the strain is less than 1%. Dr. Ahmet Zafer Şenalp ME 612 Mechanical Engineering Department, GTU 29

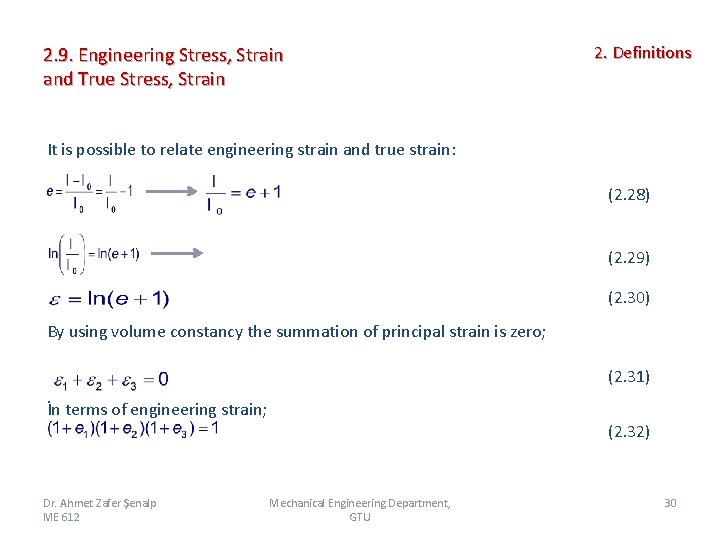
2. 9. Engineering Stress, Strain and True Stress, Strain 2. Definitions It is possible to relate engineering strain and true strain: (2. 28) (2. 29) (2. 30) By using volume constancy the summation of principal strain is zero; (2. 31) İn terms of engineering strain; (2. 32) Dr. Ahmet Zafer Şenalp ME 612 Mechanical Engineering Department, GTU 30

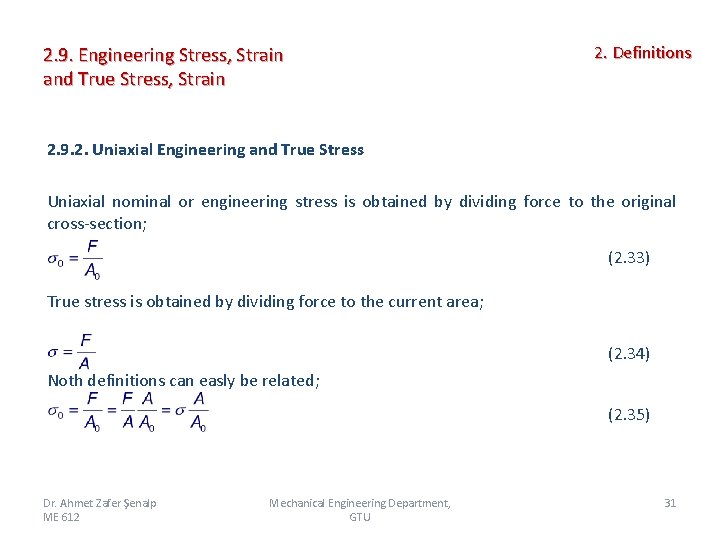
2. 9. Engineering Stress, Strain and True Stress, Strain 2. Definitions 2. 9. 2. Uniaxial Engineering and True Stress Uniaxial nominal or engineering stress is obtained by dividing force to the original cross-section; (2. 33) True stress is obtained by dividing force to the current area; (2. 34) Noth definitions can easly be related; (2. 35) Dr. Ahmet Zafer Şenalp ME 612 Mechanical Engineering Department, GTU 31

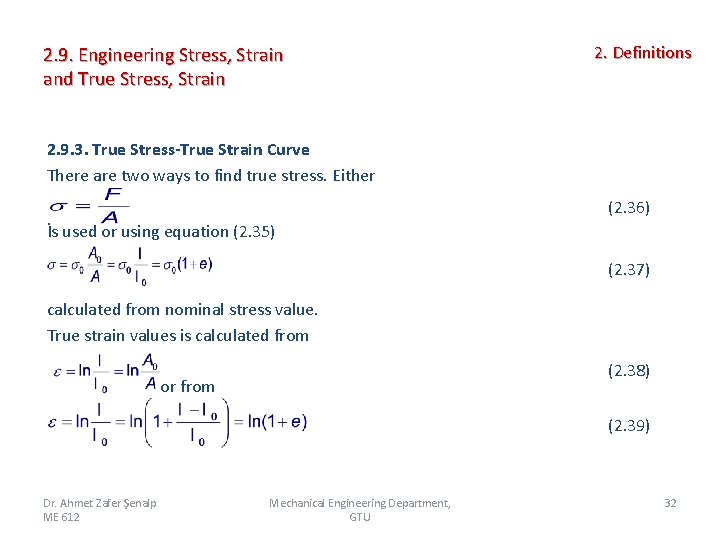
2. 9. Engineering Stress, Strain and True Stress, Strain 2. Definitions 2. 9. 3. True Stress-True Strain Curve There are two ways to find true stress. Either (2. 36) İs used or using equation (2. 35) (2. 37) calculated from nominal stress value. True strain values is calculated from (2. 38) or from (2. 39) Dr. Ahmet Zafer Şenalp ME 612 Mechanical Engineering Department, GTU 32

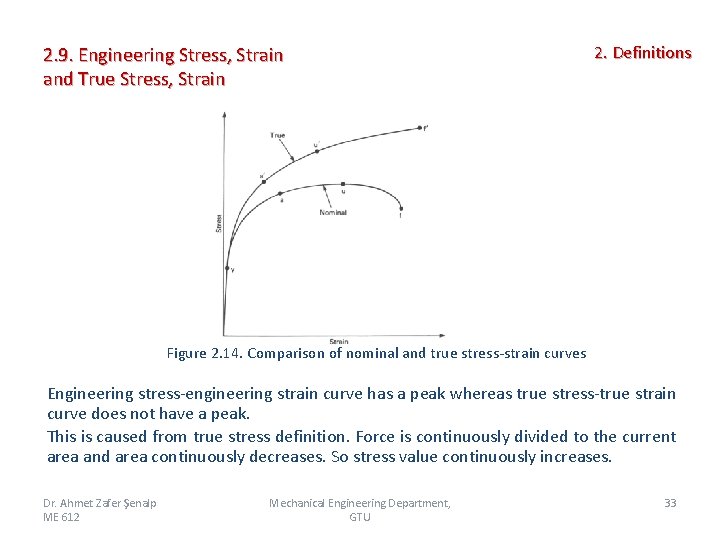
2. 9. Engineering Stress, Strain and True Stress, Strain 2. Definitions Figure 2. 14. Comparison of nominal and true stress-strain curves Engineering stress-engineering strain curve has a peak whereas true stress-true strain curve does not have a peak. This is caused from true stress definition. Force is continuously divided to the current area and area continuously decreases. So stress value continuously increases. Dr. Ahmet Zafer Şenalp ME 612 Mechanical Engineering Department, GTU 33

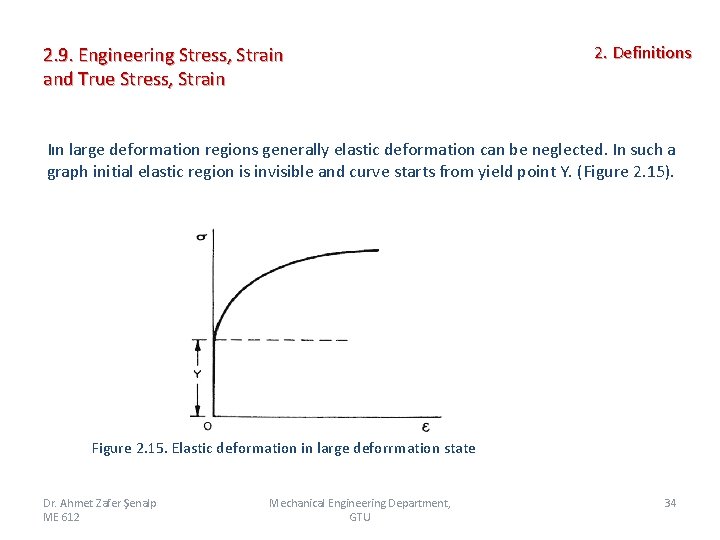
2. 9. Engineering Stress, Strain and True Stress, Strain 2. Definitions Iın large deformation regions generally elastic deformation can be neglected. In such a graph initial elastic region is invisible and curve starts from yield point Y. (Figure 2. 15). Figure 2. 15. Elastic deformation in large deforrmation state Dr. Ahmet Zafer Şenalp ME 612 Mechanical Engineering Department, GTU 34

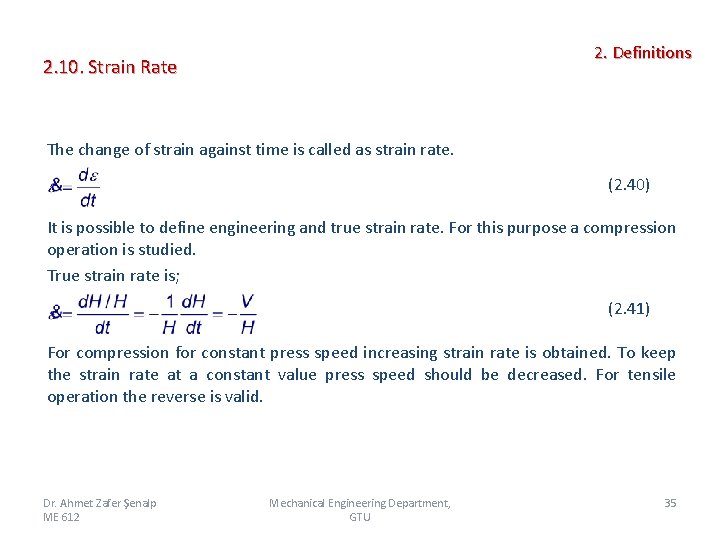
2. Definitions 2. 10. Strain Rate The change of strain against time is called as strain rate. (2. 40) It is possible to define engineering and true strain rate. For this purpose a compression operation is studied. True strain rate is; (2. 41) For compression for constant press speed increasing strain rate is obtained. To keep the strain rate at a constant value press speed should be decreased. For tensile operation the reverse is valid. Dr. Ahmet Zafer Şenalp ME 612 Mechanical Engineering Department, GTU 35

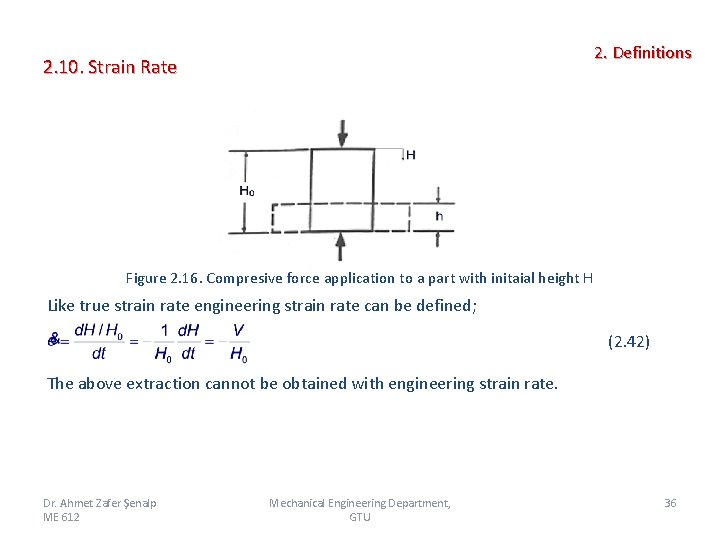
2. Definitions 2. 10. Strain Rate Figure 2. 16. Compresive force application to a part with initaial height H Like true strain rate engineering strain rate can be defined; (2. 42) The above extraction cannot be obtained with engineering strain rate. Dr. Ahmet Zafer Şenalp ME 612 Mechanical Engineering Department, GTU 36

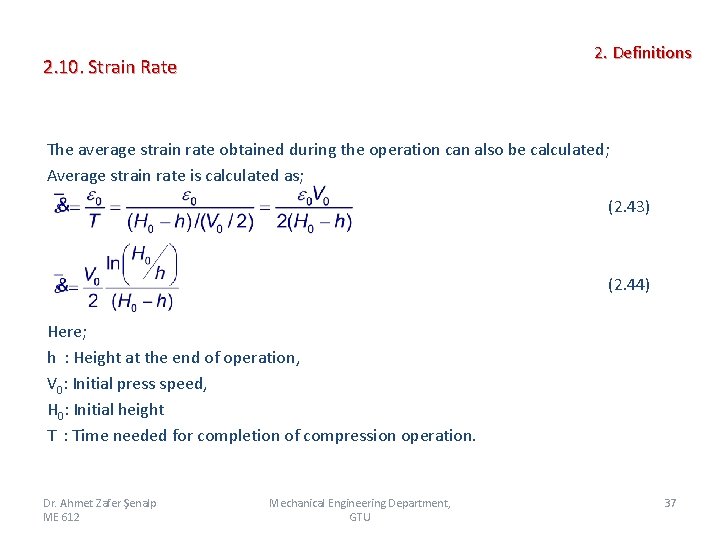
2. Definitions 2. 10. Strain Rate The average strain rate obtained during the operation can also be calculated; Average strain rate is calculated as; (2. 43) (2. 44) Here; h : Height at the end of operation, V 0: Initial press speed, H 0: Initial height T : Time needed for completion of compression operation. Dr. Ahmet Zafer Şenalp ME 612 Mechanical Engineering Department, GTU 37

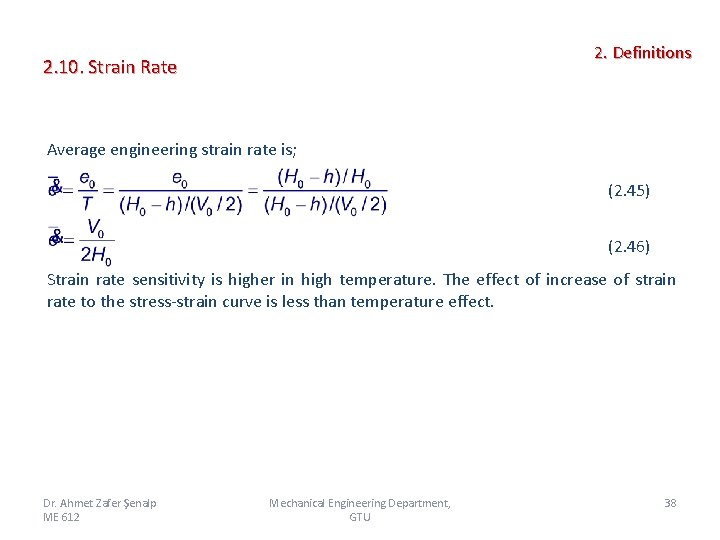
2. Definitions 2. 10. Strain Rate Average engineering strain rate is; (2. 45) (2. 46) Strain rate sensitivity is higher in high temperature. The effect of increase of strain rate to the stress-strain curve is less than temperature effect. Dr. Ahmet Zafer Şenalp ME 612 Mechanical Engineering Department, GTU 38

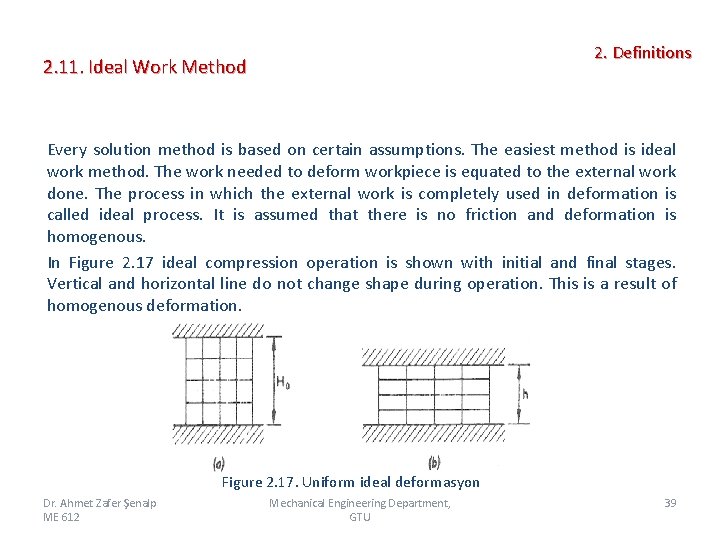
2. Definitions 2. 11. Ideal Work Method Every solution method is based on certain assumptions. The easiest method is ideal work method. The work needed to deform workpiece is equated to the external work done. The process in which the external work is completely used in deformation is called ideal process. It is assumed that there is no friction and deformation is homogenous. In Figure 2. 17 ideal compression operation is shown with initial and final stages. Vertical and horizontal line do not change shape during operation. This is a result of homogenous deformation. Figure 2. 17. Uniform ideal deformasyon Dr. Ahmet Zafer Şenalp ME 612 Mechanical Engineering Department, GTU 39

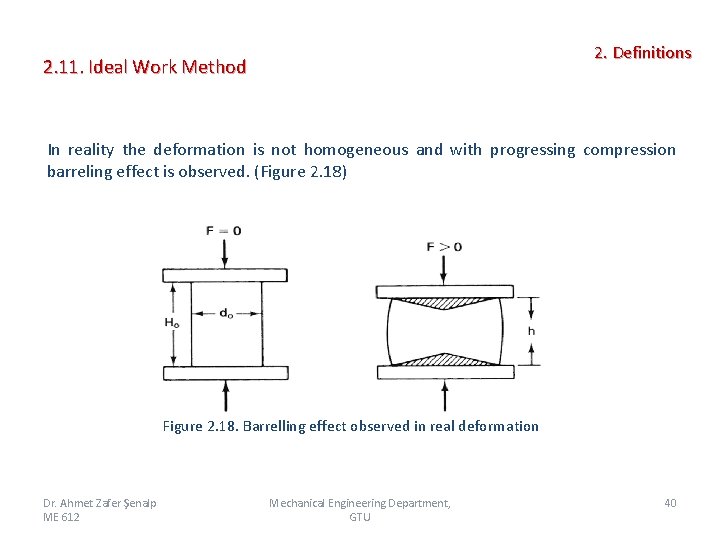
2. Definitions 2. 11. Ideal Work Method In reality the deformation is not homogeneous and with progressing compression barreling effect is observed. (Figure 2. 18) Figure 2. 18. Barrelling effect observed in real deformation Dr. Ahmet Zafer Şenalp ME 612 Mechanical Engineering Department, GTU 40

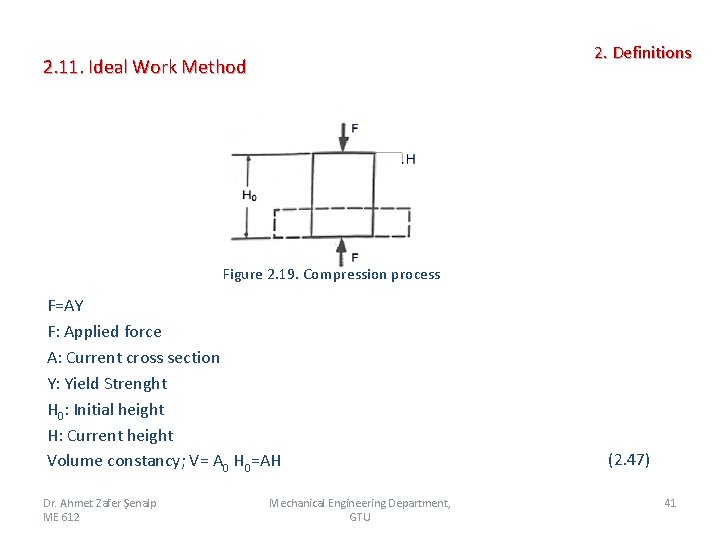
2. Definitions 2. 11. Ideal Work Method Figure 2. 19. Compression process F=AY F: Applied force A: Current cross section Y: Yield Strenght H 0: Initial height H: Current height Volume constancy; V= A 0 H 0=AH Dr. Ahmet Zafer Şenalp ME 612 Mechanical Engineering Department, GTU (2. 47) 41

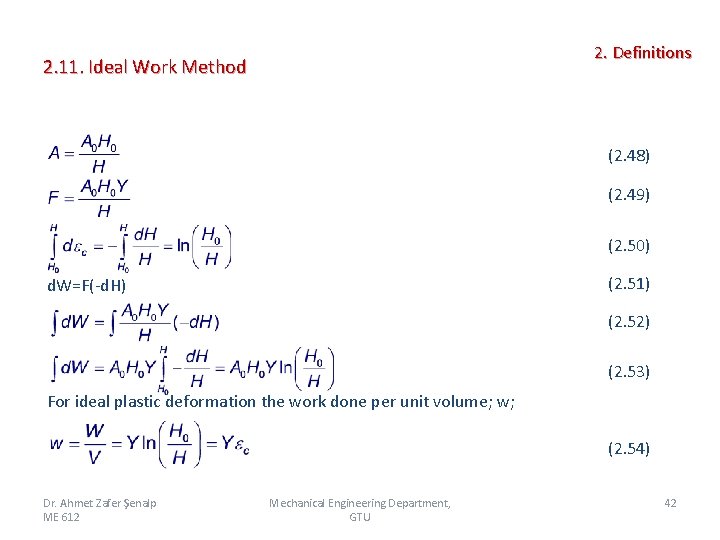
2. Definitions 2. 11. Ideal Work Method (2. 48) (2. 49) (2. 50) (2. 51) d. W=F(-d. H) (2. 52) (2. 53) For ideal plastic deformation the work done per unit volume; w; (2. 54) Dr. Ahmet Zafer Şenalp ME 612 Mechanical Engineering Department, GTU 42

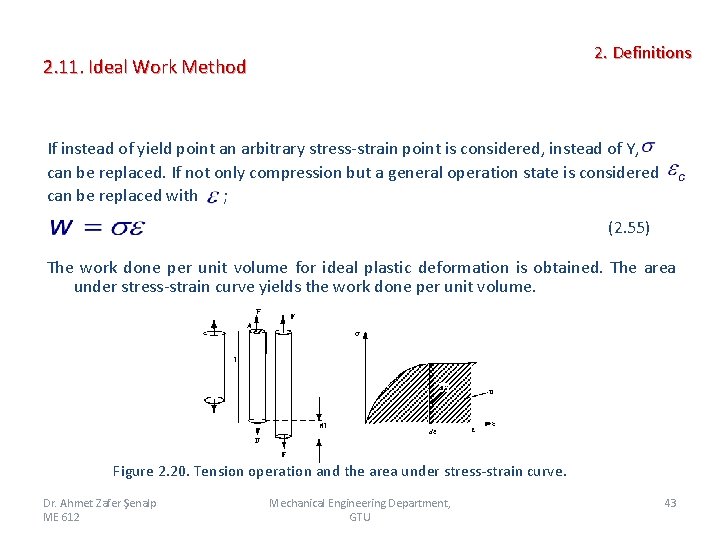
2. Definitions 2. 11. Ideal Work Method If instead of yield point an arbitrary stress-strain point is considered, instead of Y, can be replaced. If not only compression but a general operation state is considered can be replaced with ; (2. 55) The work done per unit volume for ideal plastic deformation is obtained. The area under stress-strain curve yields the work done per unit volume. Figure 2. 20. Tension operation and the area under stress-strain curve. Dr. Ahmet Zafer Şenalp ME 612 Mechanical Engineering Department, GTU 43

2. Definitions 2. 11. Ideal Work Method Specific forming energy is called as u; (2. 56) This calculated ideal work does not include friction and redundant shear effects. These effects and efficiency criteria will be covered in the chapter related with ideal work. Dr. Ahmet Zafer Şenalp ME 612 Mechanical Engineering Department, GTU 44