MATHEMATICAL LITERACY GRADE 10 CAPS TOPIC 5 Maps


 In Section 5. 3, learners will be able to: § Use")


")


- Slides: 15
MATHEMATICAL LITERACY GRADE 10 CAPS TOPIC 5: Maps, plans and other representations of the physical world Section 5. 3. : Plans (instruction/assembly diagrams)
Topic 5: Maps, plans and other representations of the physical world The following sections will be covered: 5. 1. Scale 5. 2. Maps 5. 3. Plans (instruction/assembly diagrams) 5. 4. Plans (floor, elevation and design plans) 5. 5. Models
Plans (instruction/assembly diagrams) In Section 5. 3, learners will be able to: § Use instruction/assembly diagrams containing words and pictures for plugs and cell-phones. § Complete the task presented in the instructions using everyday language. § Explain what the instructions mean or represent using everyday language.
Plans (instruction/assembly diagrams �Instructions diagrams use drawings and words to explain step-by-step how to complete a task, e. g. how to change a plug. �Assembly diagrams use drawings or words (or both) to explain step-by-step how to assemble parts of an object, e. g. how to insert a battery and SIM card into a cellphone.
Assembly diagrams: how to wire a plug
Assembly diagrams: how to wire a plug 1. Open the plug by either unscrewing the screw on the base (generally a star/phillips head) or unclipping the plug if it is a clip plug. 2. Once the plug is open you will see 3 smaller screws, you can undo these screws enough for the cable to be placed inside. 3. Strip the protective shielding on the cable to show the inside smaller cables. (You should now see a brown, blue and a yellow & green (combined) 4. Remove a section off the top of the 3 cables to expose the copper wire, enough copper wire needs to be exposed to place through the small holes where the screws we loosened earlier. 5. You will now place the cables in the necessary holes and tighten the screws to hold them in place.
Activity 1 1. Name the colours inside the plug. 2. What is the colour of the wire that is inserted in the hole in the top pin of the plug? 3. How can the words below help you to remember which colour comes where? B R B O W L N U E
Solutions Activity 1 1. Brown, blue, green and yellow 2. Green and yellow 3. The R in the BROWN shows that the brown wire goes on the right. The L in the BLUE shows that the blue wire goes on the left.
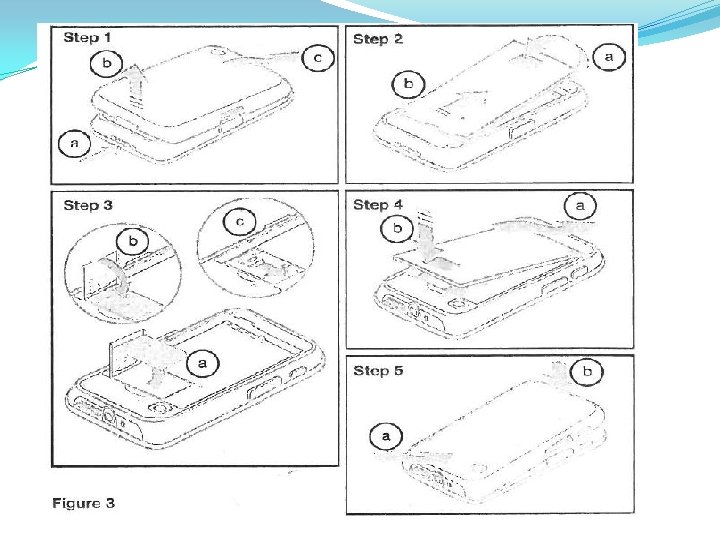
Final Assessment Questions Use figure 3 in the next slide to answer the following questions:
Question 1 What is shown by the series of pictures in figure 3?
Question 2 Write down what you think is shown by the picture in: a) Step 1 b) Step 3 c) Step 5
Question 3 Write down instructions for step 2 a and 2 b:
Question 4 Write down step 3 a, 3 b and 3 c.
Solutions Assessment Questions 1. The series of pictures show to insert the SIM card and battery of a cell phone. 2. a) Step 1: How to remove the back cover. b) Step 3: How to insert a SIM card c) Step 5: How to replace the back cover 3. Step 2 a: Lift the bottom of the battery upwards. Step 2 b: Slide the battery downwards to release it from the battery connections. 4. Step 3 a: Slide the SIM card holder backwards and lift it up. Step 3 b: Insert the SIM card with its contact area downwards. Step 3 c: Close the SIM card holder and slide it forward to lock it.