Mate Cam 1080 P WIFI Live Streaming Cam


- Slides: 19
Mate. Cam _1080 P WIFI Live Streaming Cam Video Recorder Instruction Manual
• • • First person point of view recording allows filming and sharing of everything you see. Live streaming, real-time video sharing, delay is only 0. 2 s, no time lag. No geographic limit, our APP can stream video on the Internet all around the world.
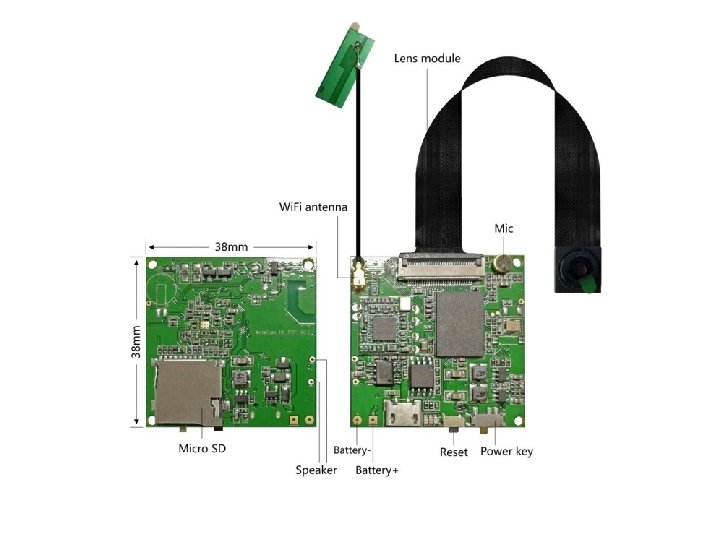
Unpacking introductions: 1. The board 2. The lens module 3. The instruction 4. Five meters power supply/USB charging cable 5. 5 V 1 A Charger 6. 4000 m. A battery(Optional) Preparation before use: : 1. Insert the Micro SD Card with a maximum RAM of 256 GB. Class 10 or above is recommended. (Does not support hot swap) 2. Install the battery before charging the product. After 4 hours or so, the battery will be full, and the red light charging indicator will turn off. 3. Download the APP via scanning QR Code. MATECam Android & Io. S & PC
Basic Operation: Power on: insert the battery or access 5 V 1 A power supply. Turn the power switch to ”ON”, blue red light flashed alternately after the boot. *attention: automatic filming starts after full power on. If you want to pause filming, please enter APP and set video mode. 2. Power off: Turn the power switch to “OFF”, the machine shuts down. 3. Reset to defaults: press the reset button for 4 seconds. The blue and green lights are off at the same time, then they come on again and the reset is complete. 4. Reading data: Remove the Micro SD card from the Micro SD card slot and connect to a computer, or through APP to download files.
Scene 1: connecting live Mate. Cam via phone. Operation for initial use: connecting live Mate. Cam wifi via phone 1. Power on: 20 seconds for whole initial process, blue red light will blink. 2. Turn phone WLAN on, next choose “Mate. Cam-xxxxxx”, click connect, no code needed. There is a tip on successful connection.
3. Open the APP, automatically add online Cam device Operation interface
4. Icon function
Scene 2: Outdoors, no wifi, only 3/4 G data internet for initial use Operation 1: Set Mate. Cam to connect to WLAN hotspot 1. Power on: turn on the machine about 20 seconds for initial use, and the blue light will blink. 2. Turn on WLAN hotspot of phone, choose “Mate. Cam-xxxxxx” , to connect, no code needed. 3. Turn on WLAN Hotspot of phone (the name and code should be easy to input) to enable phone to connect and please make sure the correct input of the WLAN name and code. 4. Click “SETTING” icon and choose advance config.
Choose ”WIFI config, next click the name of WLAN hotspot, input the code. After clicking ”ok”, machine restarts automatically, that is, it has completed the operation. 5. Turn on 3 G/4 G net on phone to view the live video via APP. *Note: : 1: If the WLAN hotspot configuration is not successful, the blue red LED will always flash, please check the code, The blue light will be on after the configuration is successful. 2: Mate. Cam and WLAN hotspot must be within 20 meters. If it becomes out of hotspot range, it will disconnect.
Scene 3: Matecam WIFI router for initial using Operation 2: Connect the wireless router WIFI through the phone APP setting. Power on: turn on the machine about 20 seconds for initial use, and the blue light will blink. Turn on WLAN hotspot of phone, choose “Mate. Cam-xxxxxx”, to connect, without password. Click “SETTING” icon and choose advance configuration.
Choose ”WIFI config, next click the name of WLAN hotspot, input the code. After clicking ”ok”, machine restarts automatically, that is, it has completed the operation. 5. Turn on 3 G/4 G net on phone for viewing the video wherever there is a signal. *Note: 1: If connection to the WLAN hotspot configuration is not successful, the blue red LED will always flash, please check the code, blue light is on after the configuration. 2: Mate. Cam and WLAN hotspot must be within 20 meters. If it becomes out of hotspot range, it will disconnect.
Operation 4:More Functions 1. Data resetting Pressing the reset defaults button for 4 -5 seconds in power-on condition, the green and blue light would be off for automatic reboot. The data reset is finished as a result. This function can be used in the following conditions: a. Forgetting the P 2 P password b. Need to restore the default video format. c. Need to modify the internet connection setting, Clear the Wi. Fi hotspot name and password of the original memory of the product, Revert to WAN mode to LAN to reset the new WAN mode connection. 2. Forced shutdown: When the product crashes and cannot be shut down properly.
Operation 4:More Functions 3. Modify access password. a. Revising P 2 P password can be found and changed in advanced settings b. Only the correct P 2 P password has access to live video , service and downloading video data. c. Pres the reset button about 4 seconds to reset the WIFI password to“ 8888”in normal power-on mode.
Operation 4:More Functions 4. Multi-screen sharing function 1. Click on "split screen" in the top right corner 2. Click "+" and select Add online device to display thelive screen. Support up to 4 screens at the same time
Operation 4:More Functions 1. Screenshot and video data management In the video management interface, you can view the local videos on the mobile phone, and you can remotely view the video on the online memory card, or download the video from the memory card to the mobile phone Via wireless or remote. Use Tips: Other features not mentioned in this manual are not yet open, They could be updated without notice。
Operation 4:More Functions. Advance setting Click” ” to enter into the advanced configuration interface to make more parameter settings for the product. If you need to restore the default configuration, please press the product factory reset button to reset. Use Tips: Other features not mentioned in this manual are not yet open, They could be updated without notice
Product Parameter 1 Product name Mate. Cam_1080 P 2 P 2 Size 38*38 mm 3 4 Image processing SONY IMX 323 machine Video resolution HD 1920*1080 P@25 fps H. 265 ration 5 USB port Micro USB 6 Power External optional 4000 m. Ah 7 Charging specification Input DC 5. 0 V/1 A 8 Camera lens 80° optics lens with wide angle 9 Extended function Wi. Fi wireless communicaon 10 RAM extender Micro SD maximum for 400 GB 11 Weight around 30 g 12 Battery life 4000 m. Ah approx. : 12 hours (max)
Notes: 1. Please comply with relevant national laws. Do not use the product in illegal activities. 2. Please inset SD card in correct direction to avoid damaging it or the camera before filming. Using tweezers is recommended. 3. File clean-up on SD card is suggested once a week. Backup important files to a computer or other storage devices. 4. Please revise the default password for privacy. Our company does not have access to private information. The company would not take any responsibility of inappropriate use. 5. The battery life would be reduced with the increased service time. Please fully charge battery (using a power adapter of 5 V 1 A) when the machine is not in service for a long time. 6. Do not lay the product in a humid environment as the glasses are not water-proof. 7. Do not expose the camera lens to direct sun for shooting as optical parts damage might occur. 8. We do not recommend using the product in very dusty environment so as to avoid making the lens and other parts dirty, thus negatively affecting filming. A glass wiping cloth could be used for clean up. 9. This product is a delicate electronic instrument. Strong impact, shock and heavy magnetic and electric fields are forbidden.