
Manage Triage Customize Integrate Life Stream Manager Basic
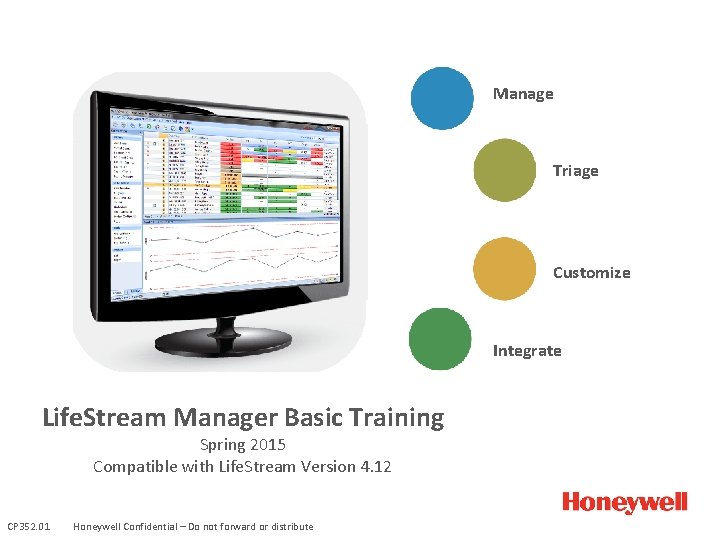
Manage Triage Customize Integrate Life. Stream Manager Basic Training Spring 2015 Compatible with Life. Stream Version 4. 12 CP 352. 01 Honeywell Confidential – Do not forward or distribute
Life. Stream Manager Basic Training Goal Objectives • Develop an in-depth understanding of the Life. Stream Manager interface to optimize its use and manage telemonitored patients more effectively • Review features and user interface navigation • Increase application of Life. Stream functionality to improve workflows and efficiencies • Integrate telehealth data into patient management activities Module Length: Approximately 60 minutes Best Practice: Access to the Life. Stream Manager application is recommended if completing training as a self-study, or in conjunction with Hom. Med Clinical Consultant training Evaluation: Life. Stream Application Competency – C 3002. 04 Honeywell Confidential – Do not forward or distribute
Training Agenda • What is Life. Stream Manager? • User Interface Overview – Login – Tool bars and navigation pane – Icons, filters, and hover feature • Data Management – Creating lists to customize your application • Admitting Patients into Life. Stream • Clinical Management – Familiarizing yourself with Current Status – Responding to patient data or ‘Charting’ – Utilizing reports to share information across the care continuum 3 Honeywell Confidential – Do not forward or distribute
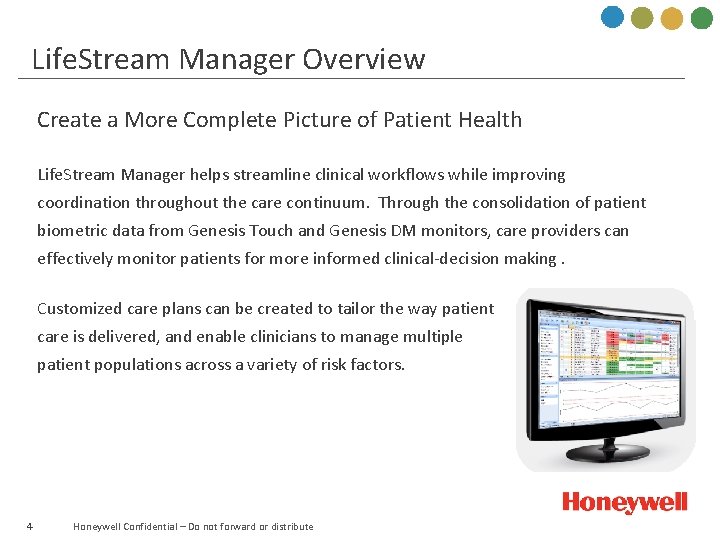
Life. Stream Manager Overview Create a More Complete Picture of Patient Health Life. Stream Manager helps streamline clinical workflows while improving coordination throughout the care continuum. Through the consolidation of patient biometric data from Genesis Touch and Genesis DM monitors, care providers can effectively monitor patients for more informed clinical-decision making. Customized care plans can be created to tailor the way patient care is delivered, and enable clinicians to manage multiple patient populations across a variety of risk factors. 4 Honeywell Confidential – Do not forward or distribute
Indications for Use • Life. Stream receives, displays, and stores monitored biometric data for review and interpretation by qualified healthcare professionals after patients complete their scheduled biometric collection • Life. Stream is not intended for emergency use and does not provide real-time, critical-care monitoring of patient vital signs • Reference the Life. Stream Product Manual for a complete list of warnings and cautions for use. • To access, select Help from the Life. Stream menu. 5 Honeywell Confidential – Do not forward or distribute
Life. Stream Manager Benefits Improve quality of care • Create a more complete picture of patient health by expanding the type of information being monitored, and analyze trends over time • Help patients stay healthy at home by providing reliable and continuous clinical oversight Easy to use • Manage a large number of patients at any time • Generate a wide range of reports to help demonstrate the value of your telehealth program • User interface offers care providers the ability to modify how patient data/workflows are viewed on their desktop Flexible, customized solutions • 6 Customized user interface increases care provider efficiencies by providing a holistic picture of the patient’s condition Honeywell Confidential – Do not forward or distribute
User Interface Overview 7 Honeywell Confidential – Do not forward or distribute
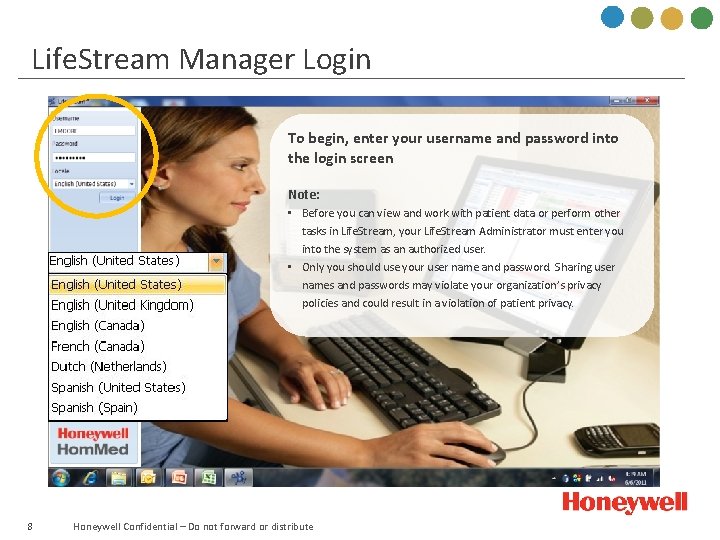
Life. Stream Manager Login To begin, enter your username and password into the login screen Note: • Before you can view and work with patient data or perform other tasks in Life. Stream, your Life. Stream Administrator must enter you into the system as an authorized user. • Only you should use your user name and password. Sharing user names and passwords may violate your organization’s privacy policies and could result in a violation of patient privacy. 8 Honeywell Confidential – Do not forward or distribute
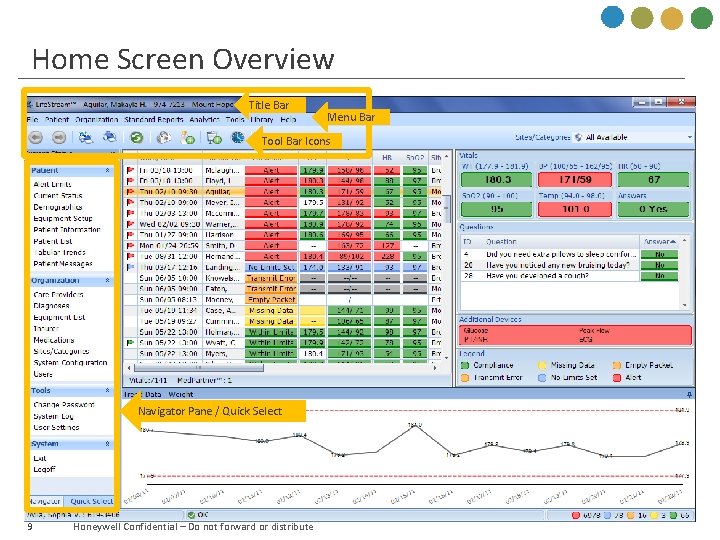
Home Screen Overview Title Bar Menu Bar Tool Bar Icons Navigator Pane / Quick Select 9 Honeywell Confidential – Do not forward or distribute
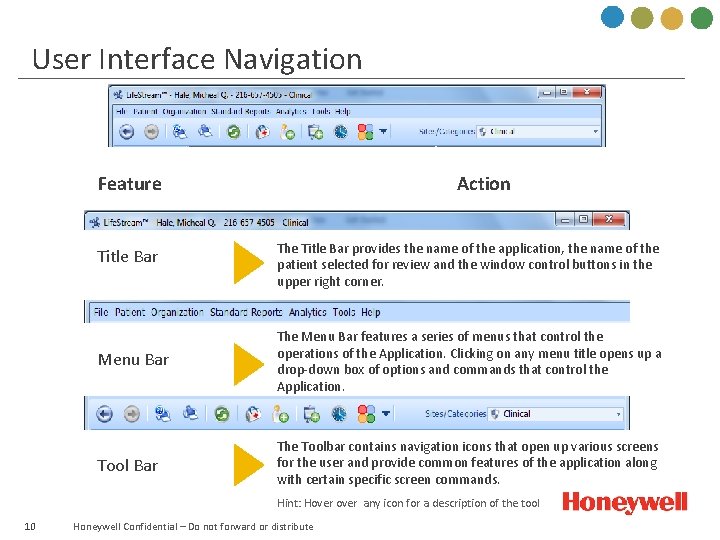
User Interface Navigation Feature Title Bar Action The Title Bar provides the name of the application, the name of the patient selected for review and the window control buttons in the upper right corner. Menu Bar The Menu Bar features a series of menus that control the operations of the Application. Clicking on any menu title opens up a drop-down box of options and commands that control the Application. Tool Bar The Toolbar contains navigation icons that open up various screens for the user and provide common features of the application along with certain specific screen commands. Hint: Hover any icon for a description of the tool 10 Honeywell Confidential – Do not forward or distribute
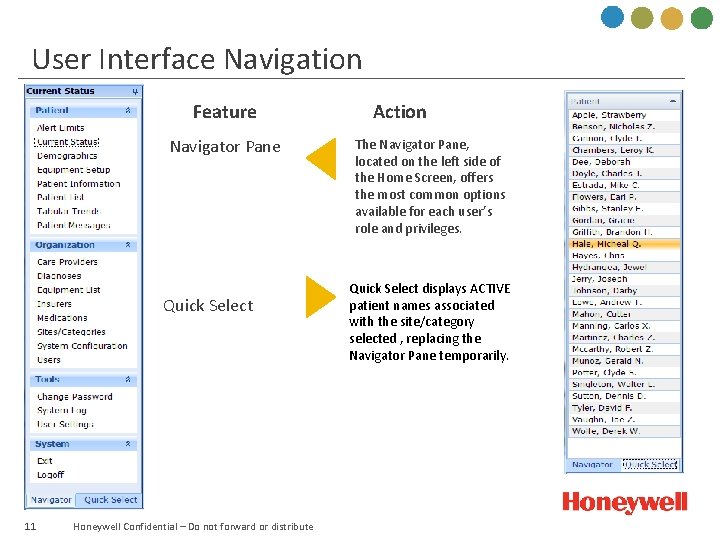
User Interface Navigation Feature Navigator Pane Quick Select 11 Honeywell Confidential – Do not forward or distribute Action The Navigator Pane, located on the left side of the Home Screen, offers the most common options available for each user’s role and privileges. Quick Select displays ACTIVE patient names associated with the site/category selected , replacing the Navigator Pane temporarily.
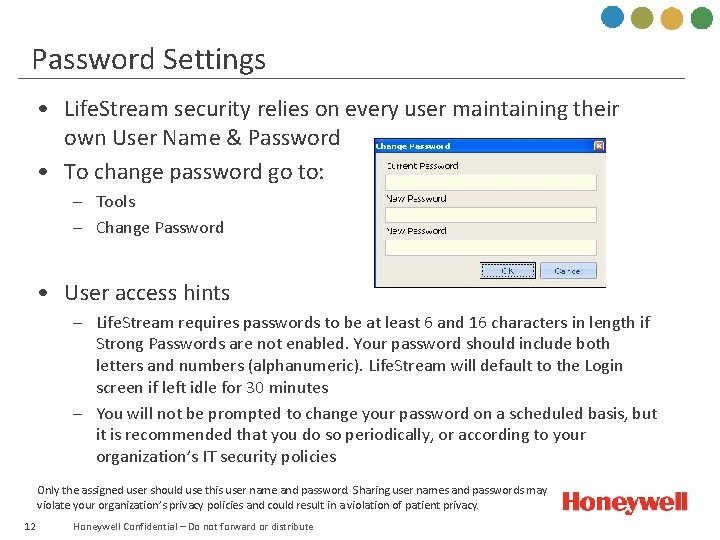
Password Settings • Life. Stream security relies on every user maintaining their own User Name & Password • To change password go to: – Tools – Change Password • User access hints – Life. Stream requires passwords to be at least 6 and 16 characters in length if Strong Passwords are not enabled. Your password should include both letters and numbers (alphanumeric). Life. Stream will default to the Login screen if left idle for 30 minutes – You will not be prompted to change your password on a scheduled basis, but it is recommended that you do so periodically, or according to your organization’s IT security policies Only the assigned user should use this user name and password. Sharing user names and passwords may violate your organization’s privacy policies and could result in a violation of patient privacy. 12 Honeywell Confidential – Do not forward or distribute
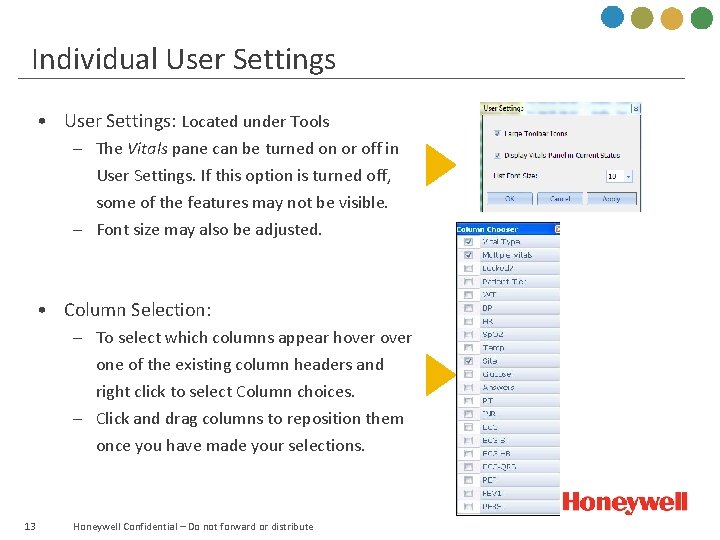
Individual User Settings • User Settings: Located under Tools – The Vitals pane can be turned on or off in User Settings. If this option is turned off, some of the features may not be visible. – Font size may also be adjusted. • Column Selection: – To select which columns appear hover one of the existing column headers and right click to select Column choices. – Click and drag columns to reposition them once you have made your selections. 13 Honeywell Confidential – Do not forward or distribute
Data Management 14 Honeywell Confidential – Do not forward or distribute
Data Management Functions Organizational Navigator: Creating Lists • Care Provider • Diagnoses • Equipment and Manual Entry Monitor • Insurers and Medication • Sites and Categories 15 Honeywell Confidential – Do not forward or distribute
Organizational Navigator Field Best Practice: • To avoid duplication and/or multiple sites and categories, assign one owner of data management functions • Define ownership responsibilities in your telehealth policies and procedures 16 Honeywell Confidential – Do not forward or distribute
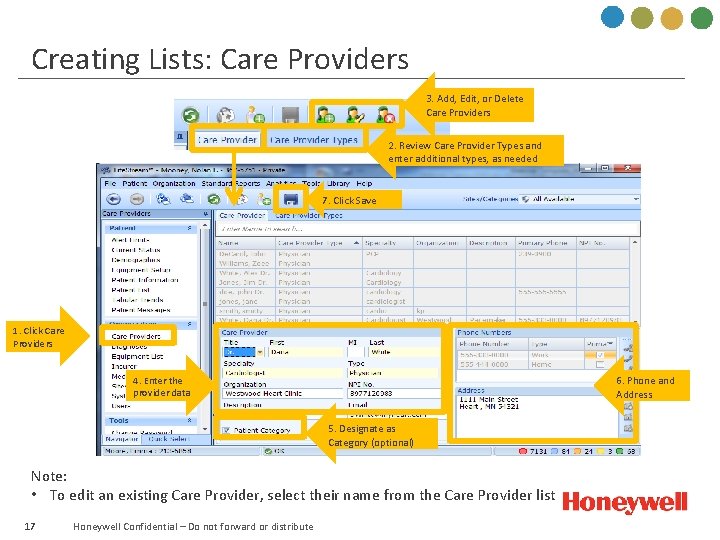
Creating Lists: Care Providers 3. Add, Edit, or Delete Care Providers 2. Review Care Provider Types and enter additional types, as needed 7. Click Save 1. Click Care Providers 6. Phone and Address 4. Enter the provider data 5. Designate as Category (optional) Note: • To edit an existing Care Provider, select their name from the Care Provider list 17 Honeywell Confidential – Do not forward or distribute
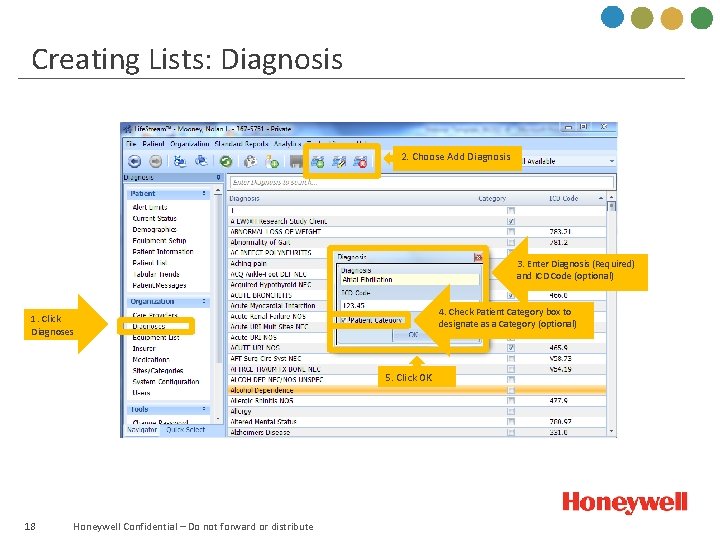
Creating Lists: Diagnosis 2. Choose Add Diagnosis 3. Enter Diagnosis (Required) and ICD Code (optional) 4. Check Patient Category box to designate as a Category (optional) 1. Click Diagnoses 5. Click OK 18 Honeywell Confidential – Do not forward or distribute
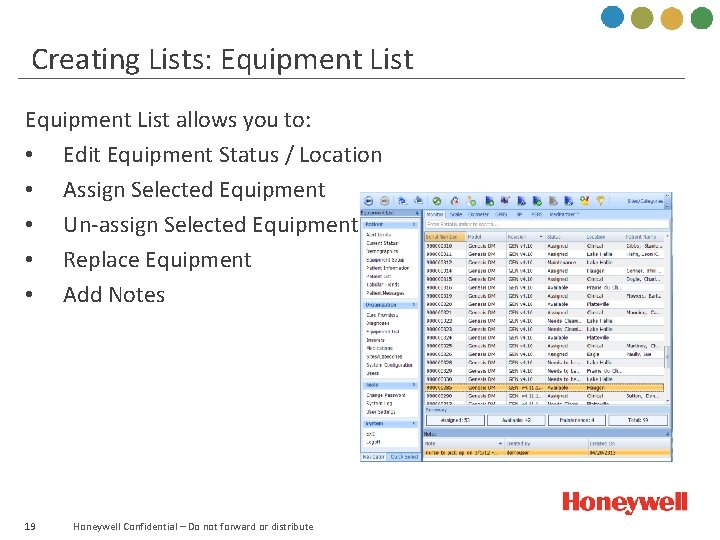
Creating Lists: Equipment List allows you to: • Edit Equipment Status / Location • Assign Selected Equipment • Un-assign Selected Equipment • Replace Equipment • Add Notes 19 Honeywell Confidential – Do not forward or distribute
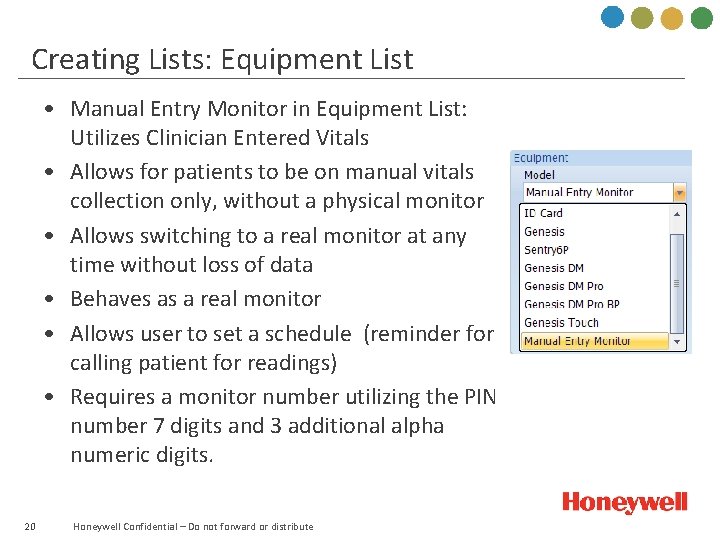
Creating Lists: Equipment List • Manual Entry Monitor in Equipment List: Utilizes Clinician Entered Vitals • Allows for patients to be on manual vitals collection only, without a physical monitor • Allows switching to a real monitor at any time without loss of data • Behaves as a real monitor • Allows user to set a schedule (reminder for calling patient for readings) • Requires a monitor number utilizing the PIN number 7 digits and 3 additional alpha numeric digits. 20 Honeywell Confidential – Do not forward or distribute
Admitting Patients into Life. Stream 21 Honeywell Confidential – Do not forward or distribute
Admitting Patients: Overview The process of adding patients into Life. Stream involves the following series of steps: • Identify the patient and provide their demographic information • Identify the patient’s emergency contacts, who may include family members, friends, neighbors, and/or care providers • Assign care providers who are responsible for the patient’s care • Assign insurer(s) who are responsible for reimbursements • Assign patient diagnosis(es) • Set alert limits, which identify a range of vital sign parameters for each patient Best Practice: • While you are not required to enter data into all patient fields, the more details you can provide, the better record you will have for each patient 22 Honeywell Confidential – Do not forward or distribute
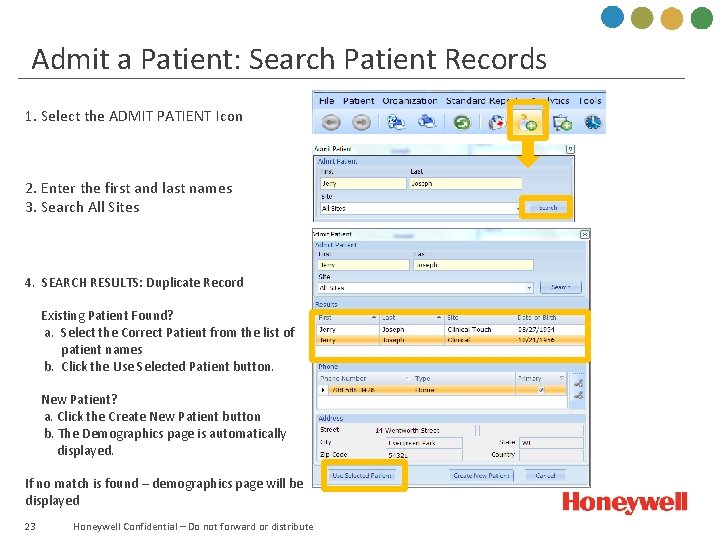
Admit a Patient: Search Patient Records 1. Select the ADMIT PATIENT Icon 2. Enter the first and last names 3. Search All Sites 4. SEARCH RESULTS: Duplicate Record Existing Patient Found? a. Select the Correct Patient from the list of patient names b. Click the Use Selected Patient button. New Patient? a. Click the Create New Patient button b. The Demographics page is automatically displayed. If no match is found – demographics page will be displayed 23 Honeywell Confidential – Do not forward or distribute
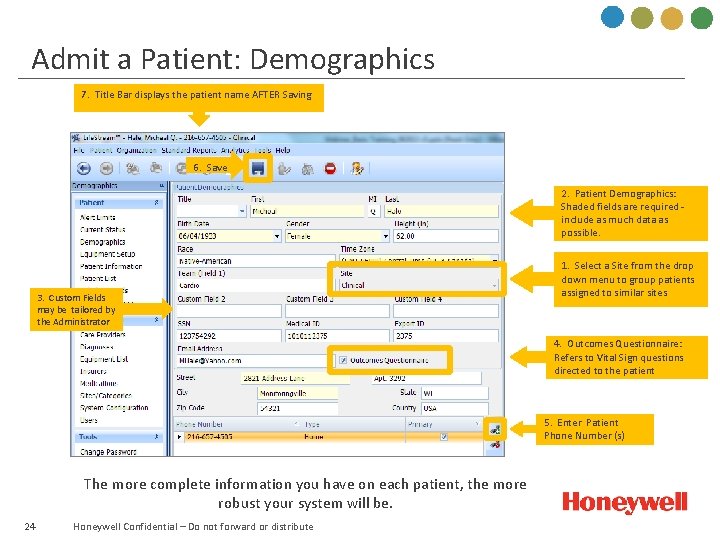
Admit a Patient: Demographics 7. Title Bar displays the patient name AFTER Saving 6. Save 2. Patient Demographics: Shaded fields are required include as much data as possible. 3. Custom Fields may be tailored by the Administrator 1. Select a Site from the drop down menu to group patients assigned to similar sites 4. Outcomes Questionnaire: Refers to Vital Sign questions directed to the patient 5. Enter Patient Phone Number (s) The more complete information you have on each patient, the more robust your system will be. 24 Honeywell Confidential – Do not forward or distribute
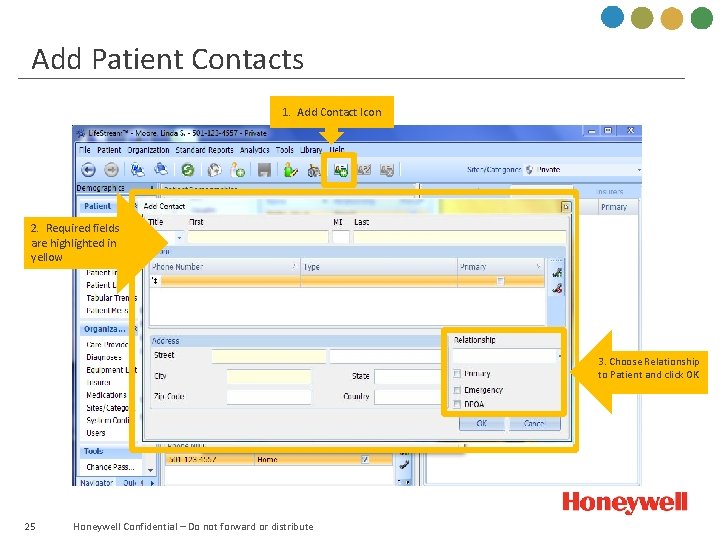
Add Patient Contacts 1. Add Contact Icon 2. Required fields are highlighted in yellow 3. Choose Relationship to Patient and click OK 25 Honeywell Confidential – Do not forward or distribute
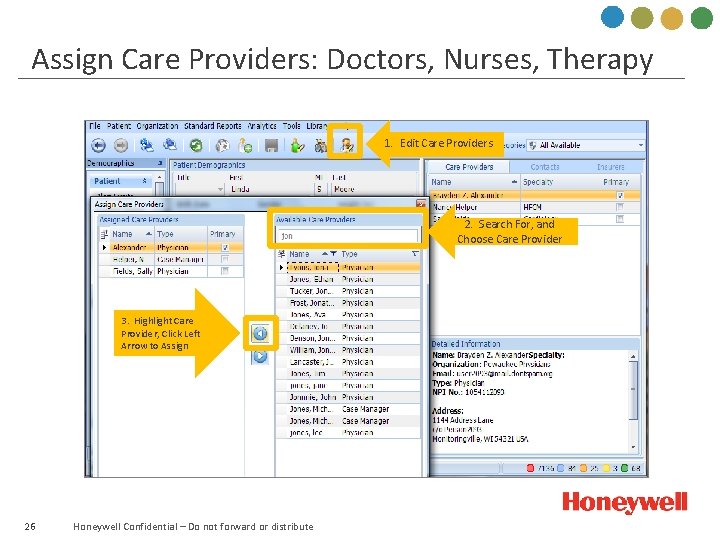
Assign Care Providers: Doctors, Nurses, Therapy 1. Edit Care Providers 2. Search For, and Choose Care Provider 3. Highlight Care Provider, Click Left Arrow to Assign 26 Honeywell Confidential – Do not forward or distribute
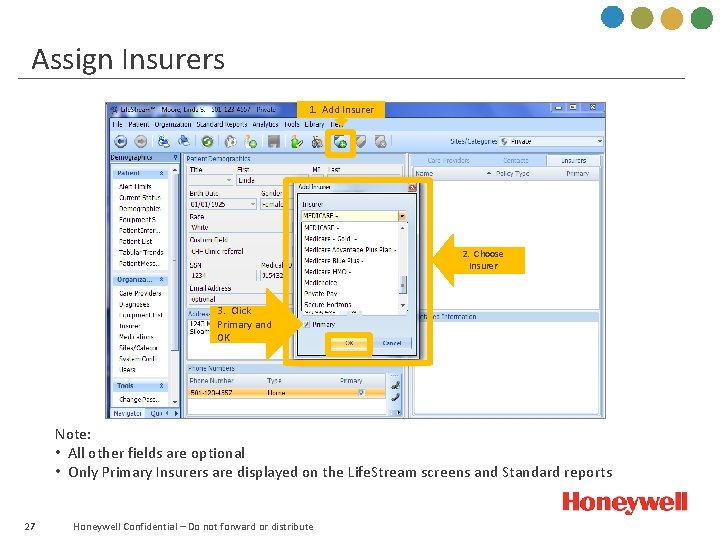
Assign Insurers 1. Add Insurer 2. Choose Insurer 3. Click Primary and OK Note: • All other fields are optional • Only Primary Insurers are displayed on the Life. Stream screens and Standard reports 27 Honeywell Confidential – Do not forward or distribute
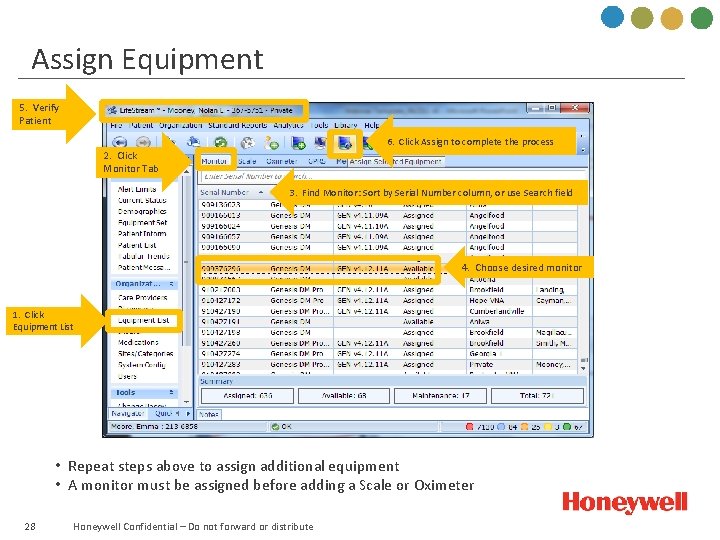
Assign Equipment 5. Verify Patient 6. Click Assign to complete the process 2. Click Monitor Tab 3. Find Monitor: Sort by Serial Number column, or use Search field 4. Choose desired monitor 1. Click Equipment List • Repeat steps above to assign additional equipment • A monitor must be assigned before adding a Scale or Oximeter 28 Honeywell Confidential – Do not forward or distribute
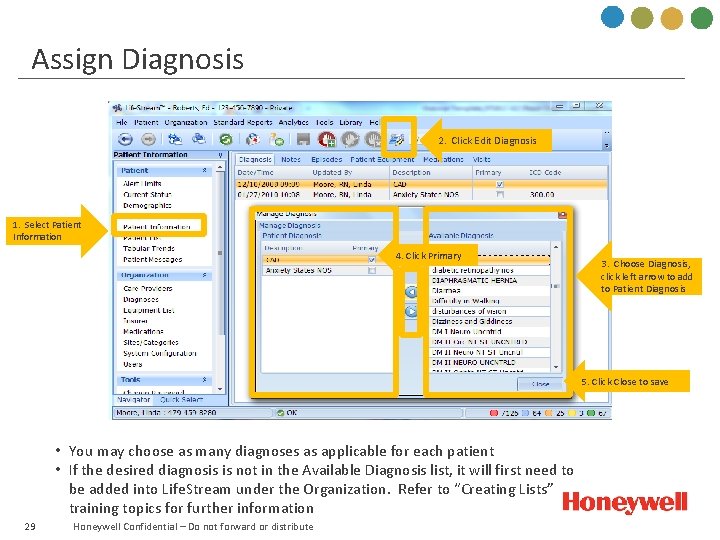
Assign Diagnosis 2. Click Edit Diagnosis 1. Select Patient Information 4. Click Primary 3. Choose Diagnosis, click left arrow to add to Patient Diagnosis 5. Click Close to save • You may choose as many diagnoses as applicable for each patient • If the desired diagnosis is not in the Available Diagnosis list, it will first need to be added into Life. Stream under the Organization. Refer to “Creating Lists” training topics for further information 29 Honeywell Confidential – Do not forward or distribute
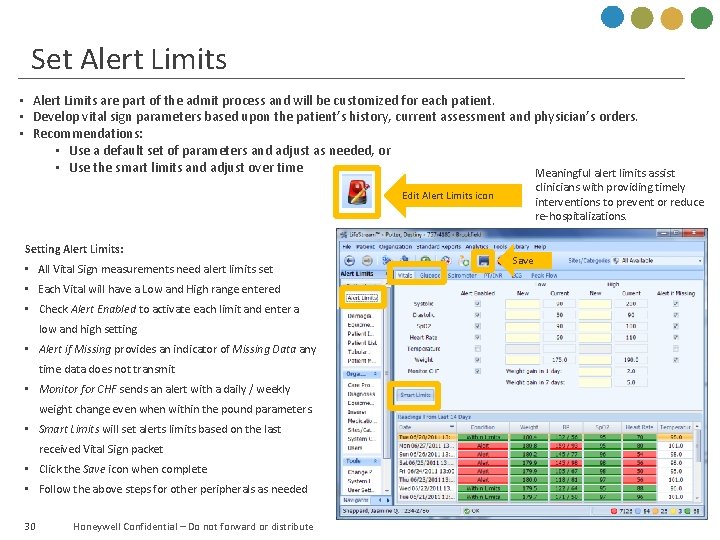
Set Alert Limits • Alert Limits are part of the admit process and will be customized for each patient. • Develop vital sign parameters based upon the patient’s history, current assessment and physician’s orders. • Recommendations: • Use a default set of parameters and adjust as needed, or • Use the smart limits and adjust over time Meaningful alert limits assist clinicians with providing timely interventions to prevent or reduce re-hospitalizations. Edit Alert Limits icon Setting Alert Limits: • All Vital Sign measurements need alert limits set • Each Vital will have a Low and High range entered • Check Alert Enabled to activate each limit and enter a low and high setting • Alert if Missing provides an indicator of Missing Data any time data does not transmit • Monitor for CHF sends an alert with a daily / weekly weight change even when within the pound parameters. • Smart Limits will set alerts limits based on the last received Vital Sign packet • Click the Save icon when complete • Follow the above steps for other peripherals as needed 30 Honeywell Confidential – Do not forward or distribute Save
Equipment Setup 31 Honeywell Confidential – Do not forward or distribute
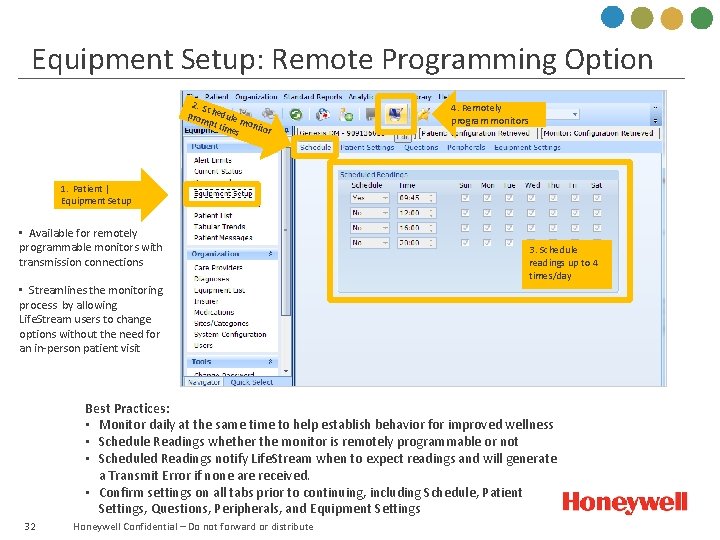
Equipment Setup: Remote Programming Option 2. S c prom hedule m pt ti mes onitor 4. Remotely program monitors 1. Patient | Equipment Setup • Available for remotely programmable monitors with transmission connections 3. Schedule readings up to 4 times/day • Streamlines the monitoring process by allowing Life. Stream users to change options without the need for an in-person patient visit Best Practices: • Monitor daily at the same time to help establish behavior for improved wellness • Schedule Readings whether the monitor is remotely programmable or not • Scheduled Readings notify Life. Stream when to expect readings and will generate a Transmit Error if none are received. • Confirm settings on all tabs prior to continuing, including Schedule, Patient Settings, Questions, Peripherals, and Equipment Settings 32 Honeywell Confidential – Do not forward or distribute
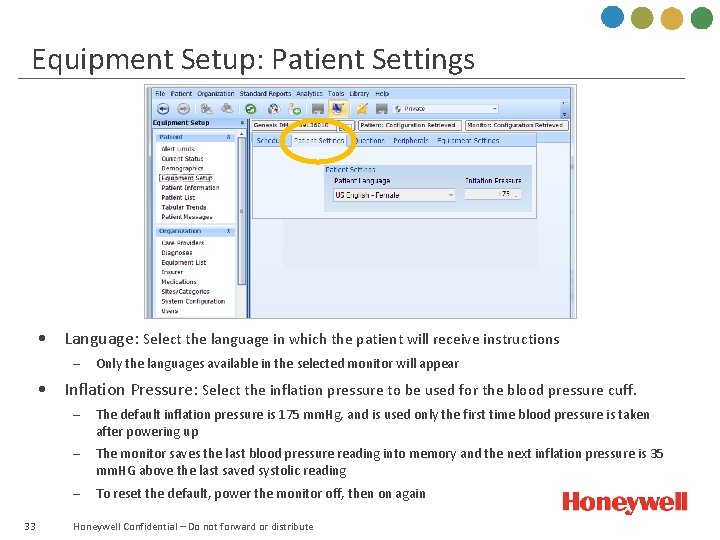
Equipment Setup: Patient Settings • Language: Select the language in which the patient will receive instructions – Only the languages available in the selected monitor will appear • Inflation Pressure: Select the inflation pressure to be used for the blood pressure cuff. 33 – The default inflation pressure is 175 mm. Hg, and is used only the first time blood pressure is taken after powering up – The monitor saves the last blood pressure reading into memory and the next inflation pressure is 35 mm. HG above the last saved systolic reading – To reset the default, power the monitor off, then on again Honeywell Confidential – Do not forward or distribute
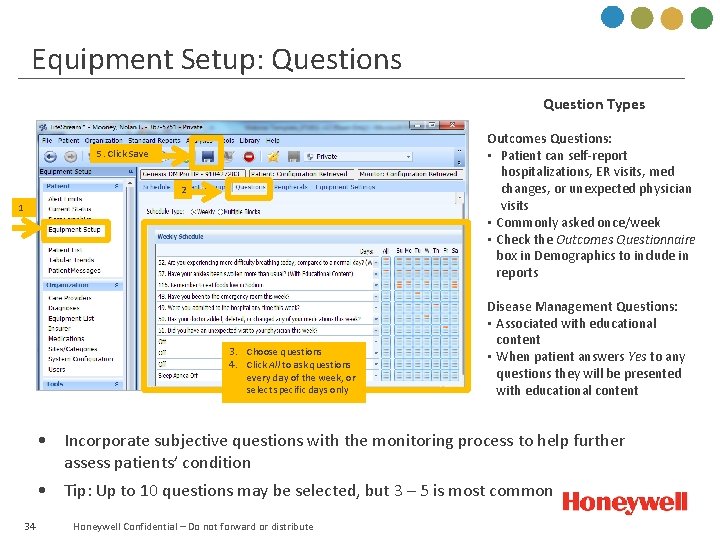
Equipment Setup: Questions Question Types Outcomes Questions: • Patient can self-report hospitalizations, ER visits, med changes, or unexpected physician visits • Commonly asked once/week • Check the Outcomes Questionnaire box in Demographics to include in reports 5. Click Save 2 1 3. Choose questions 4. Click All to ask questions every day of the week, or select specific days only Disease Management Questions: • Associated with educational content • When patient answers Yes to any questions they will be presented with educational content • Incorporate subjective questions with the monitoring process to help further assess patients’ condition • Tip: Up to 10 questions may be selected, but 3 – 5 is most common 34 Honeywell Confidential – Do not forward or distribute
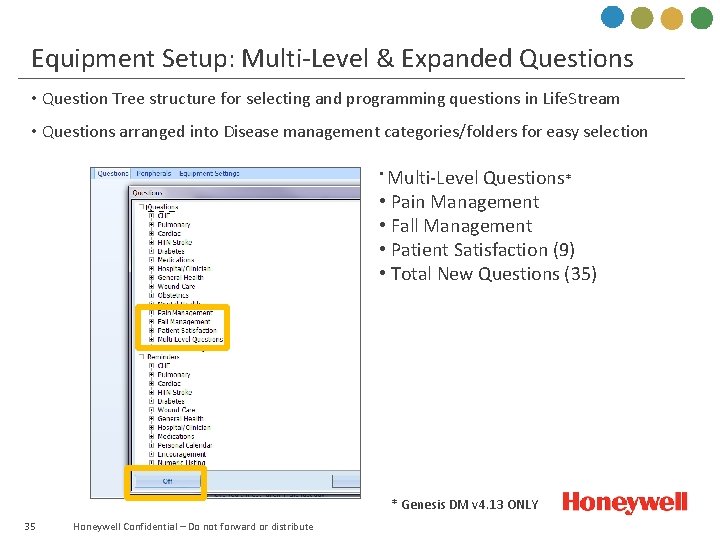
Equipment Setup: Multi-Level & Expanded Questions • Question Tree structure for selecting and programming questions in Life. Stream • Questions arranged into Disease management categories/folders for easy selection • Multi-Level Questions* • Pain Management • Fall Management • Patient Satisfaction (9) • Total New Questions (35) * Genesis DM v 4. 13 ONLY 35 Honeywell Confidential – Do not forward or distribute
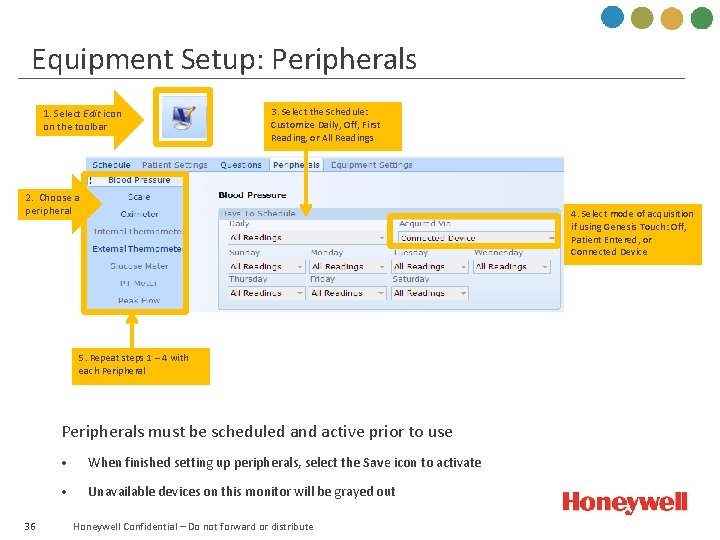
Equipment Setup: Peripherals 1. Select Edit icon on the toolbar 3. Select the Schedule: Customize Daily, Off, First Reading, or All Readings 2. Choose a peripheral 4. Select mode of acquisition if using Genesis Touch: Off, Patient Entered, or Connected Device 5. Repeat steps 1 – 4 with each Peripherals must be scheduled and active prior to use 36 • When finished setting up peripherals, select the Save icon to activate • Unavailable devices on this monitor will be grayed out Honeywell Confidential – Do not forward or distribute
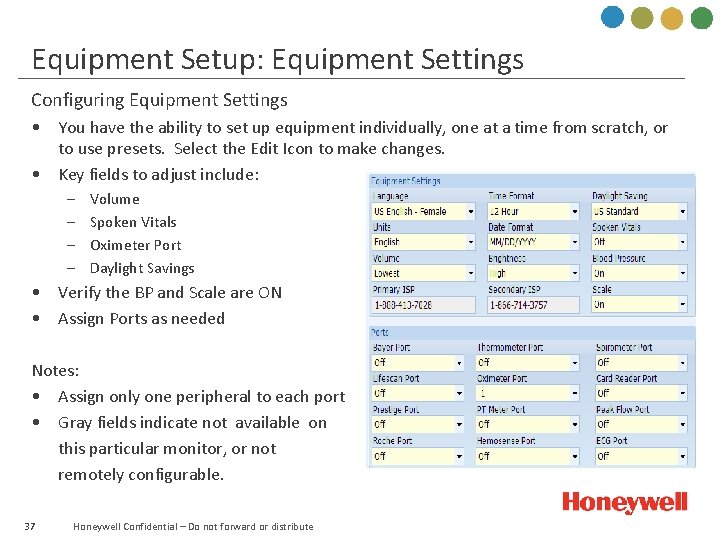
Equipment Setup: Equipment Settings Configuring Equipment Settings • You have the ability to set up equipment individually, one at a time from scratch, or to use presets. Select the Edit Icon to make changes. • Key fields to adjust include: – – Volume Spoken Vitals Oximeter Port Daylight Savings • Verify the BP and Scale are ON • Assign Ports as needed Notes: • Assign only one peripheral to each port • Gray fields indicate not available on this particular monitor, or not remotely configurable. 37 Honeywell Confidential – Do not forward or distribute
Clinical Management 38 Honeywell Confidential – Do not forward or distribute
Clinical Management Agenda • Familiarizing with Current Status • Charting: Responding to patient data • Reporting: Share patient data with other care providers across the continuum 39 Honeywell Confidential – Do not forward or distribute
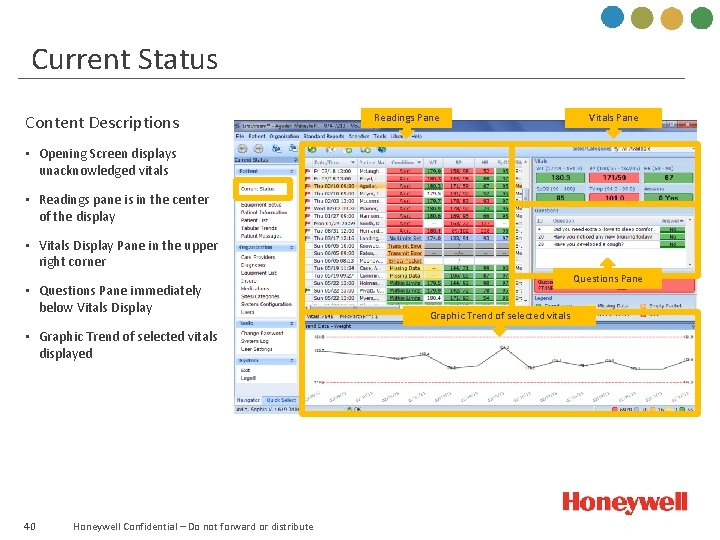
Current Status Content Descriptions Readings Pane Vitals Pane • Opening Screen displays unacknowledged vitals • Readings pane is in the center of the display • Vitals Display Pane in the upper right corner • Questions Pane immediately below Vitals Display • Graphic Trend of selected vitals displayed 40 Honeywell Confidential – Do not forward or distribute Questions Pane Graphic Trend of selected vitals
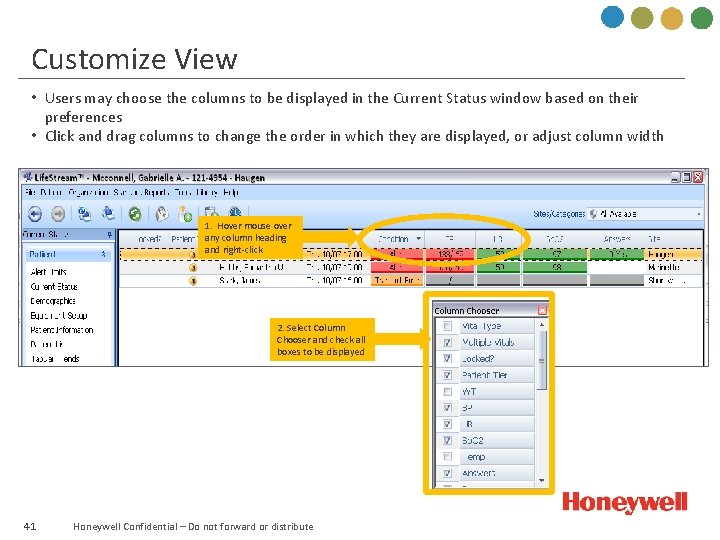
Customize View • Users may choose the columns to be displayed in the Current Status window based on their preferences • Click and drag columns to change the order in which they are displayed, or adjust column width 1. Hover mouse over any column heading and right-click 2. Select Column Chooser and check all boxes to be displayed 41 Honeywell Confidential – Do not forward or distribute
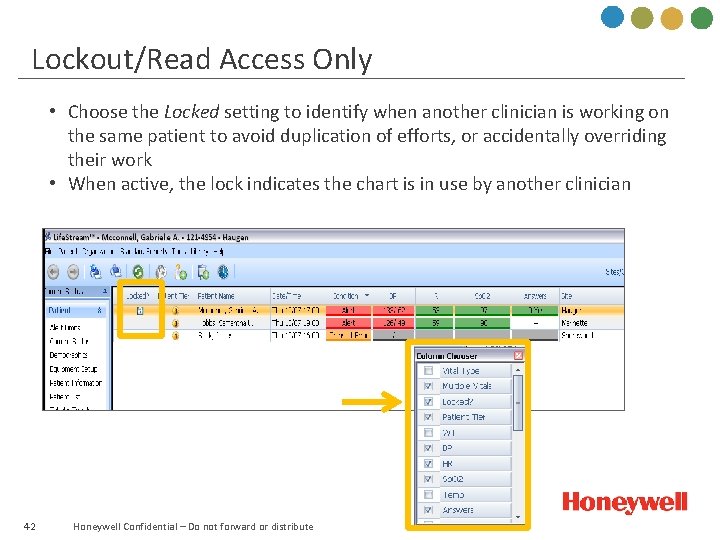
Lockout/Read Access Only • Choose the Locked setting to identify when another clinician is working on the same patient to avoid duplication of efforts, or accidentally overriding their work • When active, the lock indicates the chart is in use by another clinician 42 Honeywell Confidential – Do not forward or distribute
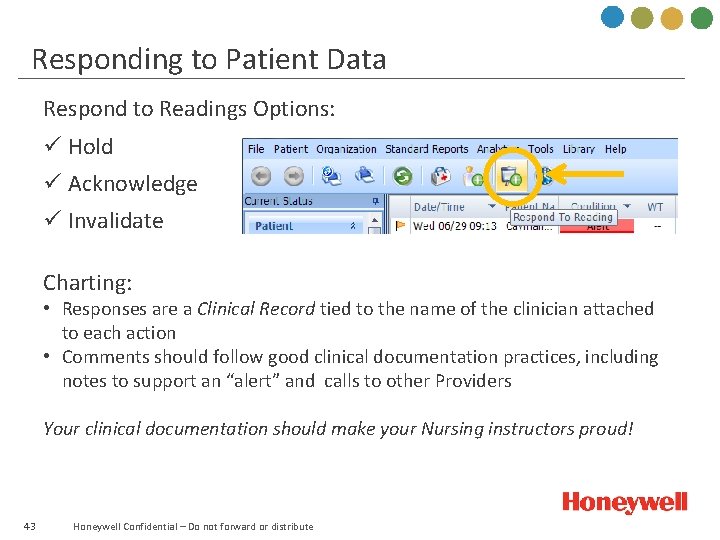
Responding to Patient Data Respond to Readings Options: ü Hold ü Acknowledge ü Invalidate Charting: • Responses are a Clinical Record tied to the name of the clinician attached to each action • Comments should follow good clinical documentation practices, including notes to support an “alert” and calls to other Providers Your clinical documentation should make your Nursing instructors proud! 43 Honeywell Confidential – Do not forward or distribute
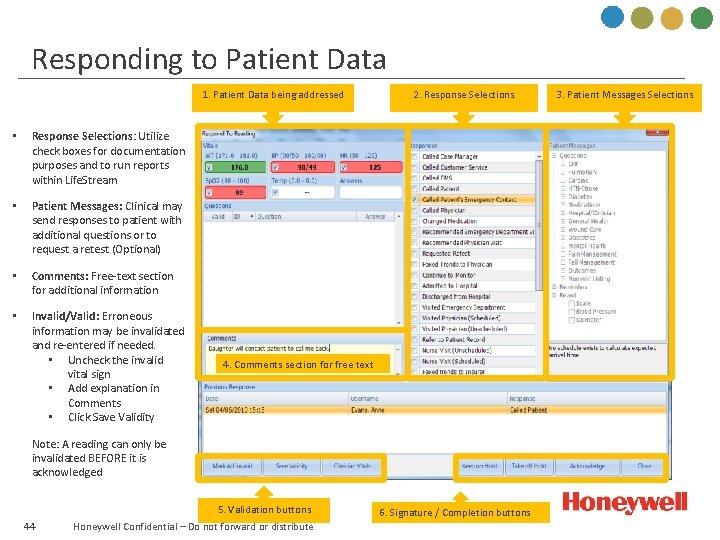
Responding to Patient Data 1. Patient Data being addressed • Response Selections: Utilize check boxes for documentation purposes and to run reports within Life. Stream • Patient Messages: Clinical may send responses to patient with additional questions or to request a retest (Optional) • Comments: Free-text section for additional information • Invalid/Valid: Erroneous information may be invalidated and re-entered if needed. • Uncheck the invalid vital sign • Add explanation in Comments • Click Save Validity 2. Response Selections 4. Comments section for free text Note: A reading can only be invalidated BEFORE it is acknowledged 5. Validation buttons 44 Honeywell Confidential – Do not forward or distribute 6. Signature / Completion buttons 3. Patient Messages Selections
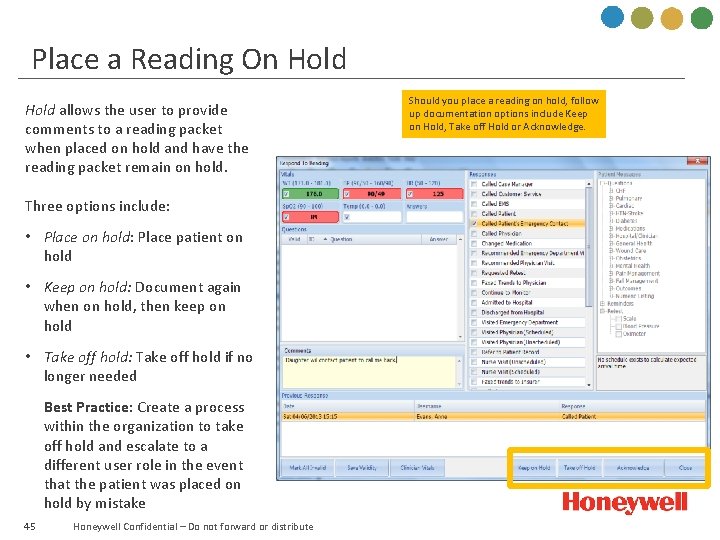
Place a Reading On Hold allows the user to provide comments to a reading packet when placed on hold and have the reading packet remain on hold. Three options include: • Place on hold: Place patient on hold • Keep on hold: Document again when on hold, then keep on hold • Take off hold: Take off hold if no longer needed Best Practice: Create a process within the organization to take off hold and escalate to a different user role in the event that the patient was placed on hold by mistake 45 Honeywell Confidential – Do not forward or distribute Should you place a reading on hold, follow up documentation options include Keep on Hold, Take off Hold or Acknowledge.
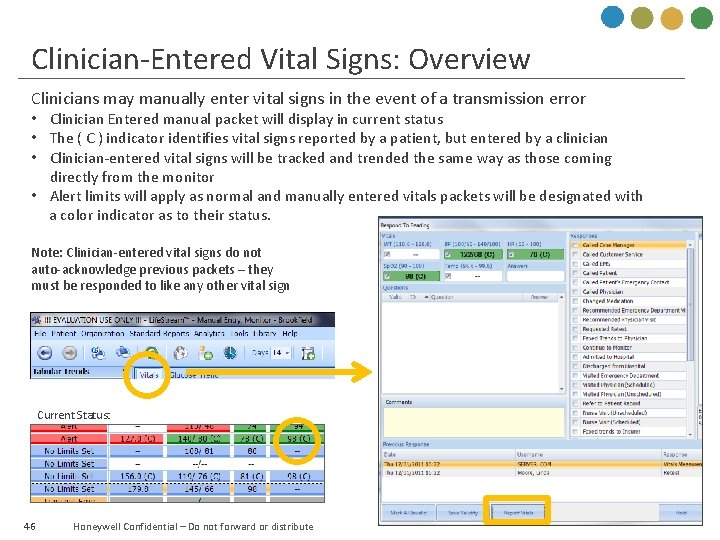
Clinician-Entered Vital Signs: Overview Clinicians may manually enter vital signs in the event of a transmission error • Clinician Entered manual packet will display in current status • The ( C ) indicator identifies vital signs reported by a patient, but entered by a clinician • Clinician-entered vital signs will be tracked and trended the same way as those coming directly from the monitor • Alert limits will apply as normal and manually entered vitals packets will be designated with a color indicator as to their status. Note: Clinician-entered vital signs do not auto-acknowledge previous packets – they must be responded to like any other vital sign Current Status: 46 Honeywell Confidential – Do not forward or distribute
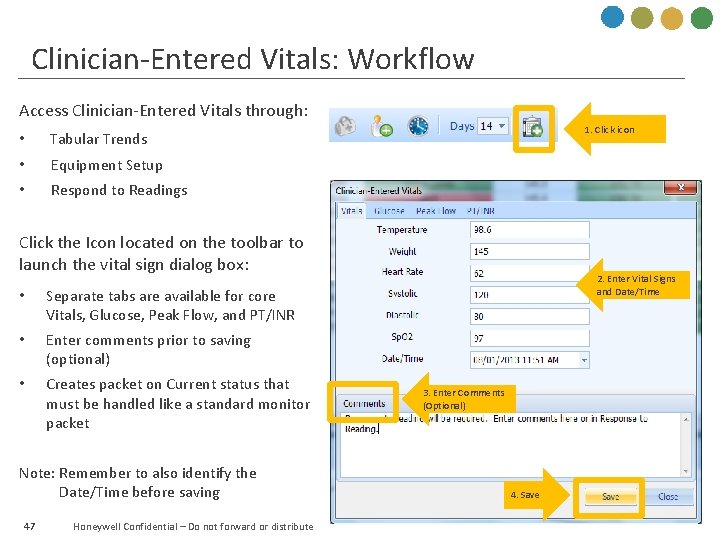
Clinician-Entered Vitals: Workflow Access Clinician-Entered Vitals through: • Tabular Trends • Equipment Setup • Respond to Readings 1. Click icon Click the Icon located on the toolbar to launch the vital sign dialog box: • Separate tabs are available for core Vitals, Glucose, Peak Flow, and PT/INR • Enter comments prior to saving (optional) • Creates packet on Current status that must be handled like a standard monitor packet Note: Remember to also identify the Date/Time before saving 47 Honeywell Confidential – Do not forward or distribute 2. Enter Vital Signs and Date/Time 3. Enter Comments (Optional) 4. Save
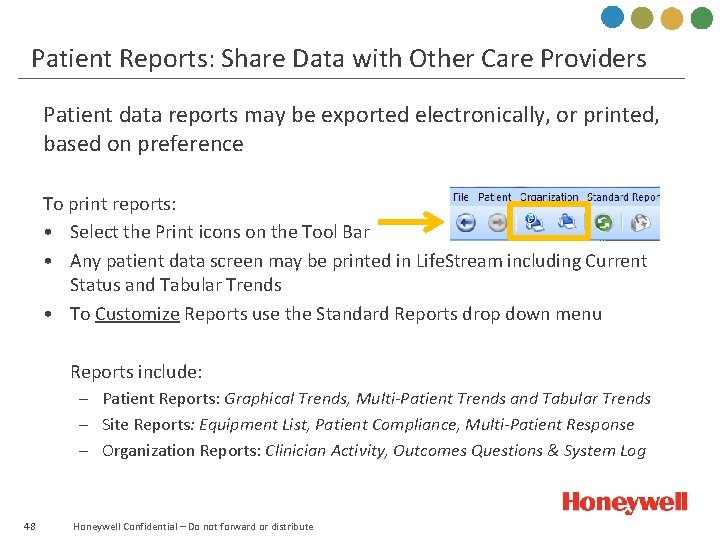
Patient Reports: Share Data with Other Care Providers Patient data reports may be exported electronically, or printed, based on preference To print reports: • Select the Print icons on the Tool Bar • Any patient data screen may be printed in Life. Stream including Current Status and Tabular Trends • To Customize Reports use the Standard Reports drop down menu Reports include: – Patient Reports: Graphical Trends, Multi-Patient Trends and Tabular Trends – Site Reports: Equipment List, Patient Compliance, Multi-Patient Response – Organization Reports: Clinician Activity, Outcomes Questions & System Log 48 Honeywell Confidential – Do not forward or distribute
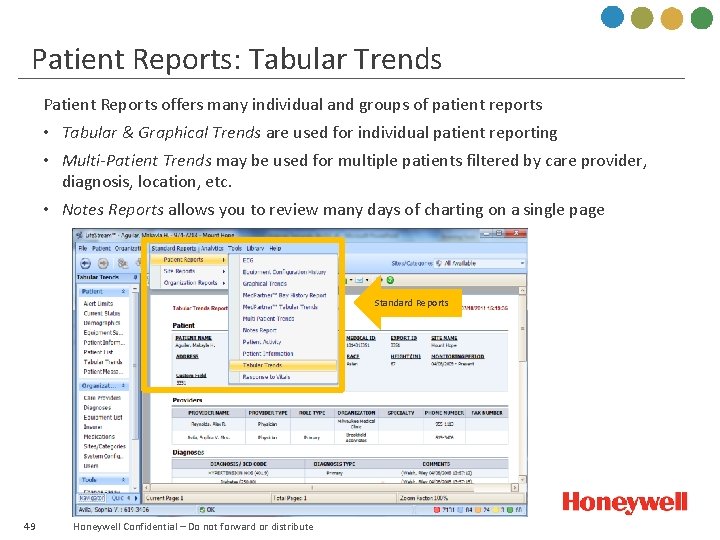
Patient Reports: Tabular Trends Patient Reports offers many individual and groups of patient reports • Tabular & Graphical Trends are used for individual patient reporting • Multi-Patient Trends may be used for multiple patients filtered by care provider, diagnosis, location, etc. • Notes Reports allows you to review many days of charting on a single page Standard Reports 49 Honeywell Confidential – Do not forward or distribute
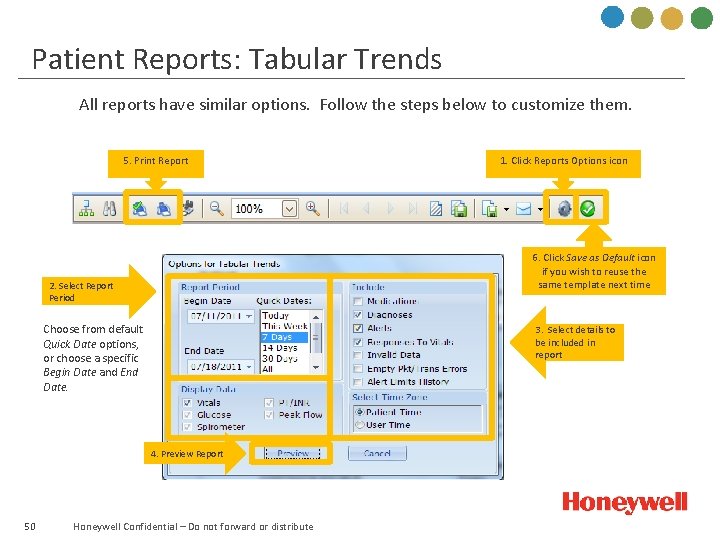
Patient Reports: Tabular Trends All reports have similar options. Follow the steps below to customize them. 5. Print Report 6. Click Save as Default icon if you wish to reuse the same template next time 2. Select Report Period Choose from default Quick Date options, or choose a specific Begin Date and End Date. 3. Select details to be included in report 4. Preview Report 50 1. Click Reports Options icon Honeywell Confidential – Do not forward or distribute
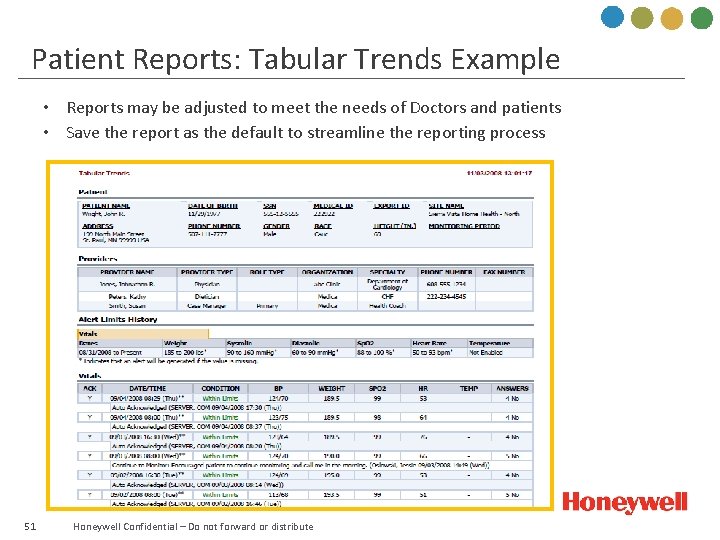
Patient Reports: Tabular Trends Example • Reports may be adjusted to meet the needs of Doctors and patients • Save the report as the default to streamline the reporting process 51 Honeywell Confidential – Do not forward or distribute
Life. Stream Training Modules • Check your email for a 10 question survey invite! • Let us know what classes you would like to see • Archives are available online. – Go to Help in Life. Stream and see the Life. Stream University section of the help page. 52 Honeywell Confidential – Do not forward or distribute
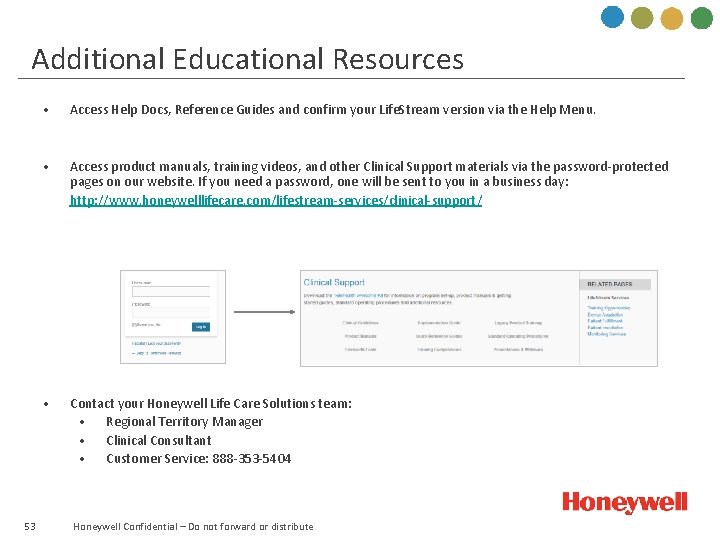
Additional Educational Resources 53 • Access Help Docs, Reference Guides and confirm your Life. Stream version via the Help Menu. • Access product manuals, training videos, and other Clinical Support materials via the password-protected pages on our website. If you need a password, one will be sent to you in a business day: http: //www. honeywelllifecare. com/lifestream-services/clinical-support/ • Contact your Honeywell Life Care Solutions team: • Regional Territory Manager • Clinical Consultant • Customer Service: 888 -353 -5404 Honeywell Confidential – Do not forward or distribute
- Slides: 53