Making it move Using photoshop to create keyframe


- Slides: 22
Making it move Using photoshop to create keyframe animation
During these sessions you will be able to: ▪ Finish making your flipbook ▪ Identify the section of your narrative you are going to turn into keyframe ▪ Create a storyboard for your keyframe action ▪ Create your assets needed for your keyframe ▪ Experiment in keyframe ▪ Create your own keyframe
Catch up ▪ You are now going to have time to finish your flip book ▪ When you have finished your flip book you need to: ▪ Film your flipbook and post this on wordpress ▪ Answer these questions ▪ What materials did you use? ▪ What problems did you encounter? ▪ How did you solve them? ▪ Are you happy with the finished product ▪ What would you do differently next time? ▪ THIS NEEDS TO BE PUT ONTO YOUR WORDPRESS - WEEK FOUR
What now? Now you have identified your action, you need to create a storyboard for it ▪ First bullet point here ▪ Second bullet point here ▪ Third bullet point here
Shopping list, shopping list What do you need? ▪ You need to list what you need • Be precise • Find visual references to help you ▪ Where are you going to source your assets Where? ▪ How are you going to make them. • Are you going to make them? • If not where are your images coming from How? • How are you going to make each of your assets? ▪ Then you need to make your assets
Experiment 1 How to use keyframe
Add a Slide Title - 2 Before Start new project ▪ Go to: ▪ Open photoshop ▪ Daveturnermedia. wordpress. com ▪ File ▪ Trimester 2 ▪ New ▪ Week 5 ▪ 1080 pixels width ▪ Save Brian as a picture ▪ 720 pixels height ▪ Select ok
Setting up the work space. ▪ Bring Brian into photoshop. ▪ Using the lasso tool. ▪ Select around his arm. ▪ Then right click and select, LAYER VIA COPY. ▪ Then repeat for the tail. ▪ Watch Dave and follow he is doing it. ▪ When you have three layers, rename them: ▪ Body ▪ Arm ▪ Tail
Almost there ▪ Now you have layers for the arm and tail. ▪ Deselect view for these two layers. ▪ Using the eraser tool remove the arm and tail from the original layer. ▪ Follow Dave ▪ When you have done this, right click on each layer and select convert to smart object
Work space ▪ Select ▪ Window ▪ Timeline ▪ When you select timeline, this will be shown. ▪ Make sure it says “Create video timeline” ▪ Select this
Changes to make • Your layers will now be placed into the timeline. • You need to select options • Then select set timeline frame rate • Then select 25 fps
Timeline 1 second = 25 frames This is a five second sequence and is set at 25 fps.
To make the sequence longer If you need to make your sequence longer, you can move to the end of the timeline and extend the layers to fit the time you need.
Let’s begin Bring the playhead to the beginning, select the arrow for the first layer to show the keyframe options
Still there Before we start the movement, make sure the playhead is at the beginning. Next to the word transform you will see a stop watch. Select this and it will place the first key frame.
▪ Move the play head to the first frame and select the diamond ▪ On the arm layer, move the arm down slightly.
Next frame Move the playhead to the next frame. Select the diamond Move the arm Move the tail
REPEAT FOR THE NEXT 122 FRAMES
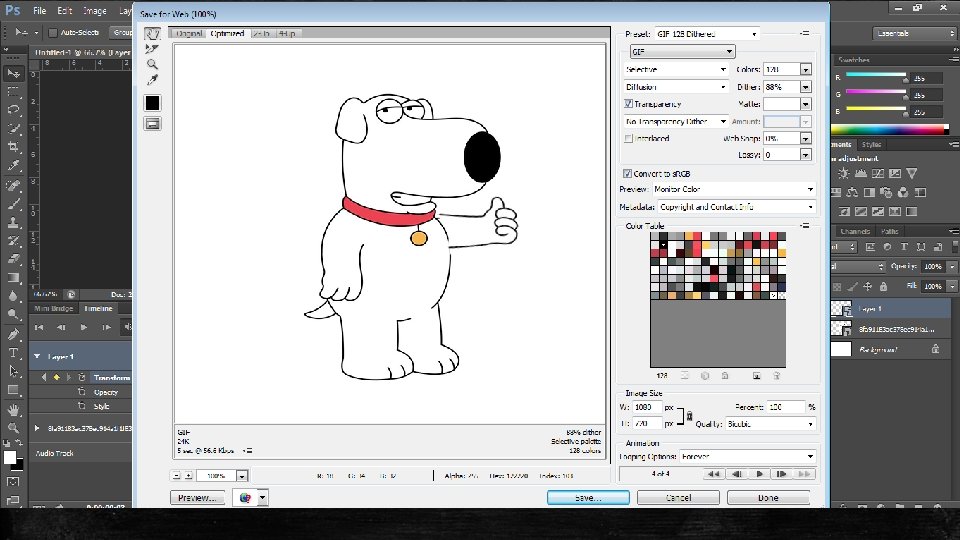
▪ Export the animation as a GIF ▪ Go to File > Export > Save for Web (Legacy). . . ▪ Select GIF 128 Dithered from the Preset menu. . ▪ Select Forever from the Looping Options menu. ▪ Then click save. ▪ A window will appear asking where to save it. Send it to the desktop.
BRIAN! ▪ Now you have exported your Brian. ▪ Right click on the icon, select open with, select google chrome or firefox. The gif will not work in explorer. ▪ Post the gif onto your wordpress ▪ Answer the following questions: ▪ How did you find the process? ▪ What worked? ▪ What did not work? ▪ What would you do differently for your own project?
Over to you ▪ That is the basic skills for using photoshop for keyframe animation. ▪ Using this skill, you are to apply this to your own keyframe animation. ▪ I hope you now see the importance of asset list?