Lung Trauma By Dr Ben Siggers and Jason

Lung Trauma By Dr Ben Siggers and Jason Butler, HEMS Paramedic Task • Gas Exchange Systems • Anatomy of the Chest • Mechanics of Breathing • Medical Innovation HAMPSHIRE AND ISLE OF WIGHT AIR AMBULANCE

Case Study A call has come in to the airbase at Thruxton. A pedestrian has been hit by a car in Bishops Waltham. “When we arrive on scene, we find a 22 -year-old male on the ground. The patient is conscious, but short of breath, drowsy, sweating and confused. We cut away his shirt and notice a chest wound that is bubbling with each exhalation. When speaking to the witness, we discover that the pedestrian was thrown against a metal railing, which was sticking into his chest until he was lowered onto the ground”.

To give the patient the correct pre-hospital care he requires, our medical team on the scene (doctors and paramedics), must apply their knowledge of: The Anatomy of the chest. Mechanics of Breathing. Gas Exchange Systems.
 that leads to lungs. Branches from the trachea")
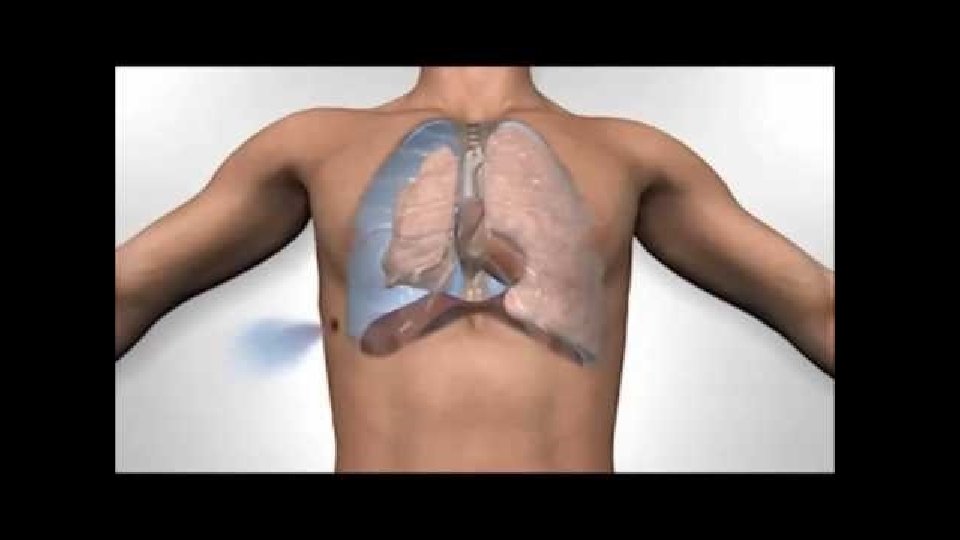
Anatomy of the Chest Pipe (windpipe) that leads to lungs. Branches from the trachea into smaller bronchioles, like branches of a tree. The chest cavity. Muscles in-between the ribs. Muscle that expands and contracts to assist with breathing. Lower part of torso.

TASK 1: Fake Lung Experiment Part 1 Make your own model lung using the instructions below: 1. Carefully remove the bottom of your bottle using your scissors. EQUIPMENT: • • • Plastic Bottle A Straw An elastic Band Scissors 2 Balloons Modelling Clay Chest Cavity 2. Tie a knot in one end of a balloon and snip off the wide end using the scissors. 3. Stretch this end around the bottom of your plastic bottle. Lung 4. Put a straw in the neck of the other balloon and secure tightly with the elastic band but not so that you crush the straw. The air must flow through, so test it by blowing through the straw to see if the balloon inflates. 5. Put the straw and the balloon into the neck of the bottle and secure with the modelling clay to make a seal around the bottle – make sure that you don’t crush the straw. Trachea Diaphragm

Here is a video to help you make your fake lung.

TASK 1: Fake Lung Experiment Part 1, continued… Hold the bottle and pull the knot of the balloon at the bottom. What happens? You should find that the balloon inside the bottle inflates, and as you let go it deflates. Why does this happen?

Mechanics of Breathing As the knotted balloon is pulled down, it increases the volume inside the bottle, which lowers the pressure. Air is then sucked down the straw to equalize the pressure, and the balloon fills. When you let go of the knot, the volume decreases, and the pressure rises. The air from the balloon is expelled, making it deflate. THE ACTION OF BREATHING WORKS THE SAME WAY. Changes of pressure in the thorax, compared with the outside atmospheric pressure, cause air to move in and out along the trachea.

WHEN WE INHALE…… • The intercostal muscles move the rib cage upwards and out. • The diaphragm flattens and moves downwards to expand the chest. This increase in volume decreases the pressure in the thorax, so air from the outside flows down the trachea into the lungs to equalise the pressures, and the lungs inflate. WHEN WE EXHALE…… • The intercostal muscles and diaphragm relax. • The pressure and flow reverse. • The lungs deflate.

Exchange of Gases THE JOB OF THE LUNGS IS TO ALLOW GAS EXCHANGE. OXYGEN (O 2) enters the blood and CARBON DIOXIDE (CO 2) leaves. The lungs are specialised for this job. The ALVEOLI are tiny air sacs in the lungs, where gas is exchanged during breathing. ALVEOLI have a large surface area, so there is lots of space for gases to move.

When something goes wrong with a patient’s lungs and they are not functioning properly, no air gets to the ALVEOLI so oxygen levels in the blood will fall and CO 2 LEVELS WILL RISE. This could cause serious problems for our patient. To assess our patient at a scene we use an OXYGEN SATURATION MONITOR and an EXHALED CO 2 MONITOR (Capnograph), which will show us changes in GAS EXCHANGE. Breathing Rate Expired CO 2 Levels CO 2 Trace Percentage Oxygen Saturation Capnograph & Saturation Monitor Heart Rate Pulse

TASK 2: Inhaled and Exhaled Air Look at the table below showing the composition of INHALED and EXHALED air. GAS INHALED AIR EXHALED AIR Nitrogen (N 2) 58% 48% Water Vapour (H 20) 20% 30% Oxygen (O 2) 21% 16% Carbon Dioxide (CO 2) 0. 04% 4% Inert Gases 0. 96% 2% On your worksheet or graph paper, draw two graphs; REMEMBER one for INHALED AIR and one for EXHALED AIR. TO ADD You can use a bar or line graph to show the data. SCALE, LABELS AND A TITLE TO YOUR GRAPHS.

Open Pneumothorax Our diagnosis shows that our 22 -year-old patient has suffered an OPEN PNEUMOTHORAX or ‘Sucking Chest Wound’. An open pneumothorax is a hole in the chest wall. Task 3 A: Cause and Symptoms Give some examples of the type of injuries that could CAUSE an open pneumothorax. Because an open pneumothorax affects the chest, the main SIGNS and SYMPTOMS are observed in the chest cavity and are related to breathing. Give some examples of the SIGNS and SYMPTOMS we might observe in cases of open pneumothorax.

TASK 3 B: Fake Lung Experiment Part 2 Carefully pierce a small hole in the side of your model lung using scissors. The size of the hole needs to be larger than the width of the straw. What happens to the balloon inside the bottle when you pull the bottom balloon up and down? a) It gets bigger? b) It gets smaller? c) Nothing? Why does this happen? TAKE CARE!

Why does this happen? . . . The puncture wound on the chest is sucking air into the PLEURAL SPACE (the space between the chest wall and the lung) through the chest wall during inhalation, instead of into the lungs through the airways. THIS HAPPENS BECAUSE THE AIR FOLLOWS THE PATH OF LEAST RESISTANCE. Because air is no longer moving into the lung during inhalation, the lung will collapse. We need to treat the wound quickly and effectively, as a temporary measure, before getting the patient to the hospital. We need to ensure that air is coming out of the chest cavity, but no more air is going into the chest cavity. Open Pneumothorax

Task 4: Medical Innovation Medical Product Designers are continually developing new ways to make Pre-Hospital Emergency Medicine (PHEM) more efficient. As a team, invent an effective way to treat the patient’s open pneumothorax using the available materials. 1. 2. Use your model lung and the drawing paper to work out your ideas as a team. Once you have found a suitable solution, sketch your final ideas on the drawing paper demonstrating: (a) The anatomy of the chest, labelling all the parts. (b) How your medical invention will work. 3. Present your ideas to the rest of the class or group. Give yourself a TEAM NAME and a name for your MEDICAL PRODUCT. MATERIALS: • • Sticky Tape Paper/Card Elastic bands Scissors Balloons Modelling Clay Drawing Paper REMEMBER: We need to ensure that air is coming out of the chest cavity, but no more air going into the chest cavity.

To find out how we treat an open pneumothorax in real life PHEM go to: https: //www. youtube. com/watch? v=5 fa. Pm. S LHy 14 or watch the video on the next slide.

Task 5: Tension Pneumothorax Another call has come in. This time a patient has fallen from a height. Part of their ribcage has been crushed. There is no hole in the chest wall, but a sharp bone fragment has punctured a hole in the right lung. Air is coming into the chest cavity through the hole in the lung, but can’t get out again. When this happens for real, it can produce a very dangerous effect called a tension pneumothorax. As a team, discuss the following questions and share your answers with the rest of the group 1. 2. What effect would a tension pneumothorax have on the chest cavity (thorax)? How would our team of doctors and paramedics resolve this? Remember: We need to think about pressure.

Well done! Thanks to a combination of science, teamwork and medical innovation, our patient was transferred to University Hospital Southampton where he eventually made a full recovery. • Visit our website www. hiowaa. org/lifelines to find out more about our jobs and emergency vehicles. • Why not take the Life. Lines Challenge and get involved with the charity? See how at www. hiowaa. org/lifelines

Medic Test your medical knowledge and see if you can explain the following terminology. Wording What Does it Mean? Thorax Capnograph PHEM ED Open Pneumothorax Tension Pneumothorax Alveoli HEMS CO 2 Zero Fuel Mass Well done team!
- Slides: 21