LOGO Serial LCD UART Serial LCD IC ICIsquaredC
 LCD 디스플레이-UART ØSerial(직렬) LCD 디스플레이-I²C 버스 § I²C(I-squared-C) 란? § I²C")
 § Serial(직렬) LCD 디스플레이-UART Dongyang Mirae University 센서활용프로그래밍 3 prepared")
 Serial LCD & I 2 C LCD LOGO v (참고 동영상) Serial")
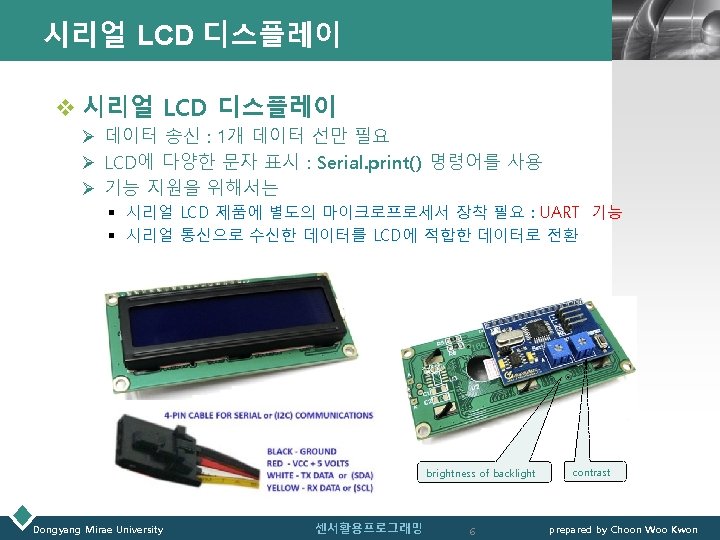
 Serial LCD & I 2 C LCD LOGO v Serial LCD의 onboard")

")
 - 스케치 // 스케치 예시(1) – Serial LCD Display LCD 1602/1604/2004")
 - 스케치 // 스케치 예시(2) – Serial LCD Display LCD 1602/1604/2004")
 – 변수값 표시 // 스케치 예시(3) – Serial LCD Display :")

 § Serial(직렬) LCD 디스플레이-I²C 버스 Dongyang Mirae University 센서활용프로그래밍 14")
 - I²C(I-squared-C) 란? Dongyang Mirae University 센서활용프로그래밍 15 prepared by")
 LOGO v I²C(Inter-Integrated Circuit, Inter IC) • ‘I-squared-C’로 읽음 : I 2")
 § 설계 ü 7 비트의")
 § I²C 버스 직렬 LCD 디스플레이 실습 Dongyang Mirae University")


")
 - i 2 c_scanner // -------------------// i 2 c_scanner")
 - i 2 c_scanner // i 2 c_scanner #include")
 #include <Wire. h> #include <Liquid. Crystal_I 2 C.")

- Slides: 27
목차 LOGO ØSerial(직렬) LCD 디스플레이-UART ØSerial(직렬) LCD 디스플레이-I²C 버스 § I²C(I-squared-C) 란? § I²C 직렬 LCD 디스플레이 실습 Dongyang Mirae University 센서활용프로그래밍 2 prepared by Choon Woo Kwon
LOGO LCD(Liquid Crystal Display) § Serial(직렬) LCD 디스플레이-UART Dongyang Mirae University 센서활용프로그래밍 3 prepared by Choon Woo Kwon
(참조 자료) Serial LCD & I 2 C LCD LOGO v (참고 동영상) Serial LCD의 onboard microcontroller chip ü How to Connect an I 2 C LCD Display to an Arduino Uno Tutorial (Arduino Uno - LCD Display 연결) (Arduino Uno - I 2 C LCD Display 연결) https: //youtu. be/s. CMTJzmp. ILU https: //youtu. be/x. VC 0 X_PE_XE Newliquid. Crystal library: https: //bitbucket. org/fmalpartida/new-liquidcrystal/wiki/Home i 2 c Scanner: http: //playground. arduino. cc/Main/I 2 c. Scanner Dongyang Mirae University 센서활용프로그래밍 4 prepared by Choon Woo Kwon
(참조 자료) Serial LCD & I 2 C LCD LOGO v Serial LCD의 onboard microcontroller chip ü How to Connect an I 2 C Lcd Display to an Arduino Uno Tutorial https: //youtu. be/x. VC 0 X_PE_XE Arduino RFID Kit: http: //goo. gl/BRvfi. H Newliquid. Crystal library: https: //bitbucket. org/fmalpartida/new-liquidcrystal/wiki/Home i 2 c Scanner: http: //playground. arduino. cc/Main/I 2 c. Scanner Arduino IDE software: https: //www. arduino. cc/ SUBSCRIBE TECHYDIY CHANNEL: http: //bit. ly/2 des 2 sq SUBSCRIBE TECHYDIY REVIEWS CHANNEL: http: //bit. ly/2 d. Gw. UCl techydiy ► http: //www. techydiy. org Facebook ► http: //facebook. com/techydiy Twitter ► http: //twitter. com/techydiy Pinterest ► http: //www. pinterest. com/techydiy Dongyang Mirae University 센서활용프로그래밍 5 prepared by Choon Woo Kwon
시리얼 LCD 디스플레이 - 배선도 LOGO D 1 Serial LCD Module (LCD 1602/LCD 1604/LCD 2004) Dongyang Mirae University 센서활용프로그래밍 7 Serial LCD Arduino 5 V 5 V GND Tx. D Rx(Pin 0) Rx. D Tx(Pin 1) prepared by Choon Woo Kwon
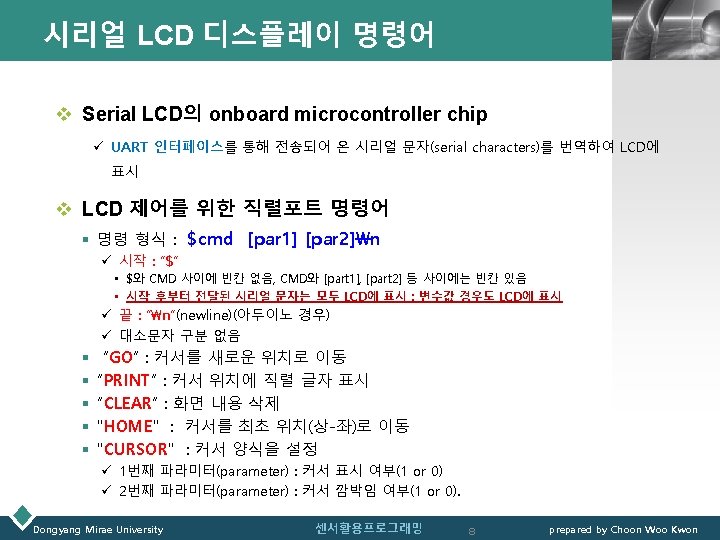
시리얼 LCD 디스플레이 명령어 - LCD 1602/1604/2004 LOGO 명령어 LCD 1602 형식 설명 예제(Arduino) $lcd 1602n LCD 선택 : LCD 1602 LCD 1604 LCD 2004 - 명령어 1회 실행 필요 Serial. print("$LCD 1602 n"); Serial. print("$LCD 1604 n"); Serial. print("$LCD 2004 n"); LCD 1604 $lcd 1604n LCD 2004 $lcd 2004n HOME $homen 커서를 LCD의 시작위치(0, 0)로 이동 Serial. print("$HOMEn"); GO $GO x yn 커서를 LCD 좌표 (x, y)로 이동. - x : 행, y : 열 (1부터 시작) Serial. print("$GO 2 10n"); CLEAR $clearn LCD 상의 모든 글자를 지우고 커서를 시작위 치 (0, 0)로 이동 Serial. print("$CLEARn"); PRINT $print [para]n 글자 [para]를 현재 커서 위치에 표시 Serial. print("$PRINT Hello World!n"); CURSOR $cursor [status]n 커서 상태를 설정 : ON/OFF, 또는 깜박임 - 1번째 Parameter : 커서 ON(1), OFF(0) - 2번째 Parameter : 커서 BLINKING(1) 여부 Serial. print("$CURSORONn"); Serial. print("$CURSOROFFn"); Serial. print("$CURSORBLINKINGn"); CLOSE $closen LCD 표시 끔 Serial. print("$CLOSE n"); OPEN $openn LCD 표시 켬 Serial. print("$OPEN n"); Dongyang Mirae University 센서활용프로그래밍 9 prepared by Choon Woo Kwon
시리얼 LCD 디스플레이(1) - 스케치 // 스케치 예시(1) – Serial LCD Display LCD 1602/1604/2004 void setup() { Serial. begin(9600); } Serial. print("$Go 2 5n"); delay(3000); Serial. print("$CURSOR 1 0n"); // 커서 켜기 깜박이지 않음 delay(3000); Serial. print("$CURSOR 1 1n"); // 커서 켜기 깜박임 delay(3000); void loop() { Serial. print("$CLEARn"); // rn도 가능 r(0 x 0 D, CR), n(0 x 0 A, LF) // 커서 상태 : 켜기/끄기, 깜박이기/깜박이지 않기 Serial. print("$CURSOR 1 1n"); // 커서 켜기 깜박이기 LOGO Serial. print("$CURSOR 0 0n"); // 커서 끄기 깜박이지 않음 delay(3000); } Serial. print("$GO 1 4n"); Serial. print("$PRINT DONGYANGn"); delay(3000); Serial. print("$GO 2 1n"); Serial. print("$PRINT Mirae Univ !!n"); delay(3000); Dongyang Mirae University 센서활용프로그래밍 10 prepared by Choon Woo Kwon
시리얼 LCD 디스플레이(2) - 스케치 // 스케치 예시(2) – Serial LCD Display LCD 1602/1604/2004 void setup(void) { Serial. begin(9600); // baud 9600 /** set LCD type LCD 1602, LCD 1604 and LCD 2004 are supported**/ Serial. print("$LCD 1602n"); delay(2000); Serial. print("$clearn"); // clear screen Serial. print("$Homen"); // go home (top left corner) delay(2000); Serial. print("$CURSOR BLINKINGn"); // cursor on and blinking delay(2000); Serial. print("$go 0 0n"); // move cursor delay(500); Serial. print("$go 1 0n"); delay(500); Serial. print("$go 0 1n"); delay(500); Serial. print("$go 1 1n"); delay(500); Dongyang Mirae University LOGO Serial. print("$c. URSor OFfn"); // cursor off delay(100); Serial. print("$go 0 0n"); } void loop(void) { Serial. print("$go 1 3n"); Serial. print("$prin. T DONGYANG n"); // write to LCD */ Serial. print("$go 2 1n"); Serial. print("$prin. T MIRAE n"); Serial. print("$prin. T Univ. !!n"); delay(2000); Serial. print("$clearn"); delay(1000); } 센서활용프로그래밍 11 prepared by Choon Woo Kwon
시리얼 LCD 디스플레이(3) – 변수값 표시 // 스케치 예시(3) – Serial LCD Display : 변수를 LCD 표시 int age 1=55; int age 2=33; LOGO // String 개체 활용 LCD에 표시 Serial. print(String(bom 1 + bom 2 + String(age 2, DEC))); // 다음 명령으로 동일 결과 가능 // Serial. print(bom 1); // Serial. print(bom 2); // Serial. print(String(age 2, DEC)); 혹은 Serial. print(ages 2); char prt[] = "$PRINT MY AGE = "; String bom 1 = "$PRINT "; //만약 $가 빠지면 LCD에 표시 안됨 String bom 2 = "your age = "; void setup() { Serial. begin(9600); } Serial. print(" n"); // 직렬 데이터 LCD 표시하는 현 상태 종료 Serial. print("$CURSOR 1 1n"); // 커서 켜기 깜박임 delay(2000); } void loop() { Serial. print("$Cursor. Offn"); // 커서 깜박거리기 Serial. print("$CLEARn"); // r(0 x 0 D, CR), n(0 x 0 A, LF) Serial. print("$GO 1 2n"); // 1번째 행에 표시 명령 // 직렬 데이터를 LCD에 표시하기 위해서는 $[cmd] 로 시작 Serial. print(prt); // $[cmd] 를 prt 문자열로 출력해도 됨 Serial. print(age 1); // 변수값 age 1을 표시 Serial. print(" n"); // n가 전달되면 LCD 표시 종료 Serial. print("$GO 2 1n"); // 2번째 행에 표시 명령 Dongyang Mirae University 센서활용프로그래밍 12 prepared by Choon Woo Kwon
시리얼 LCD 디스플레이 - 배선도 LOGO D 1 Serial LCD Module (LCD 1602/LCD 1604/LCD 2004) Dongyang Mirae University 센서활용프로그래밍 13 Serial LCD Arduino 5 V 5 V GND Tx. D Rx(Pin 0) Rx. D Tx(Pin 1) prepared by Choon Woo Kwon
LOGO LCD(Liquid Crystal Display) § Serial(직렬) LCD 디스플레이-I²C 버스 Dongyang Mirae University 센서활용프로그래밍 14 prepared by Choon Woo Kwon
LOGO LCD(Liquid Crystal Display) - I²C(I-squared-C) 란? Dongyang Mirae University 센서활용프로그래밍 15 prepared by Choon Woo Kwon
I²C 버스(1) LOGO v I²C(Inter-Integrated Circuit, Inter IC) • ‘I-squared-C’로 읽음 : I 2 C(I-two-C) 또는 IIC(I-I-C)라고도 함 § 직렬 컴퓨터 버스(serial computer bus) • • • multi-master, multi-slave, packet switched serial data line (SDA) + serial clock line (SCL) Bitrate : 1 / 0. 4 / 1. 0 / 3. 4 / 5. 0 Mbit/s (depending on mode) Protocol : Serial, half-duplex 동작 전압 : +3. 3 V(일반적), +5 V(최대), 다른 전압도 가능 ü Philips Semiconductor(현 NXP Semiconductors)가 개발(1982년) § I²C 통신 ü Two Wire serial Interface(TWI)로 여러 개의 디바이스(device)를 제어 • SDA : 전송하는 데이터 신호 • SCL : Master와 Slave를 동기화하는 클럭(clock) ü 장점 : 단 두 개 신호로 여러 개 디바이스 제어 • I/O핀을 적게 쓰면서, 많은 디바이스와 통신 • 디바이스 : 고유 주소(7 비트)를 보유 • 주소를 결정한 후 해당 주소에 데이터 전송 Dongyang Mirae University (I²C - 1 - 3 - 2 센서활용프로그래밍 BUS 회로 예시) master (microcontroller) slave nodes(ADC, DAC, microcontroller) pull-up resistors R p 16 prepared by Choon Woo Kwon
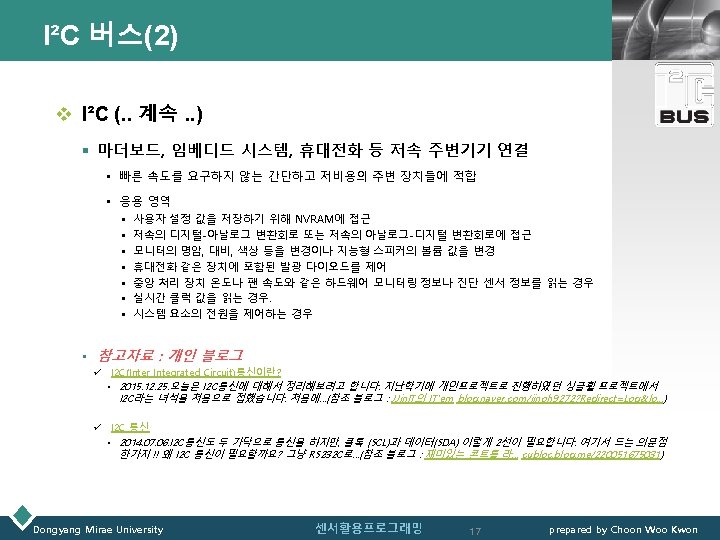
I²C 버스 LOGO v I²C(. . 계속. . ) § 설계 ü 7 비트의 주소 공간(16개는 예약)이 있어, 동일한 버스에 최대 112개 노드 연결 ü I²C 버스의 모드 : 표준 모드 100 kbit/s, 저속 모드 10 kbit/s를 주로 사용 ü 패스트(fast) 모드인 400 kbit/s, 고속(high-speed) 모드 3. 4 Mbit/s를 지원 ü 확장 기능 지원 : 최대 1008 노드까지 연결 가능한 10 비트 주소 지정 v Specification History : Revision • 1982(the original 100 k. Hz I²C system) : a simple internal bus system for building control electronics with various Philips chips • 1992(Version 1) : added 400 k. Hz Fast-mode (Fm), and a 10 -bit addressing mode to increase capacity to 1008 nodes. (the first standardized version) • 1998(Version 2) : added 3. 4 MHz High-speed mode (Hs) with power-saving requirements • 2007(Version 3) : added 1 MHz Fast-mode plus (Fm+), and a device ID mechanism • 2012(Version 4) : added 5 MHz Ultra Fast-mode (UFm) for new USDA (data) and USCL (clock) lines, and added an assigned manufacturer ID table. It is only a unidirectional bus. • 2012(Version 5) : corrected mistakes. 2014(Version 6) : corrected two graphs. This is the most recent standard. Dongyang Mirae University 센서활용프로그래밍 18 prepared by Choon Woo Kwon
LOGO LCD(Liquid Crystal Display) § I²C 버스 직렬 LCD 디스플레이 실습 Dongyang Mirae University 센서활용프로그래밍 19 prepared by Choon Woo Kwon
I²C LCD 디스플레이 – 실습 LOGO v Arduino Uno에서 I²C LCD Display 동작 § 순서 1. I²C LCD Display와 Arduino Uno 연결 2. I²C LCD Display를 위한 라이브러리 설치 : Liquid. Crystal_I 2 C (download) Liquid. Crystal_I 2 C : Liquid. Crystal_I 2 C. zip (click!) 3. I²C 버스에 연결된 LCD Display 주소(slave 주소) 찾기 : i 2 c Scanner (download) i 2 c Scanner : http: //playground. arduino. cc/Main/I 2 c. Scanner • I²C 버스에 접속된 장치를 스캔하여 아두이노 시리얼 모니터를 통해 7 -bit주소를 알려주는 간단한 스케 치 - I²C 통신을 위한 첫 단계 • (예시) 0 x 27 또는 0 x 3 F 4. I²C LCD 디스플레이 스케치 작성 • 스케치에 Wire. h 및 Liquid. Crystal_I 2 C. h 라이브러리 include #include <Wire. h> #include <Liquid. Crystal_I 2 C. h> Dongyang Mirae University 센서활용프로그래밍 20 prepared by Choon Woo Kwon
I²C LCD 디스플레이 - 배선도 LOGO v I²C LCD Display와 Arduino Uno 연결 LCD Contrast 조절 I²C LCD Arduino Uno GND VCC 5 V SDA A 4 SCL A 5 Arduino Uno R 3와 I²C LCD Module (LCD 1602) 연결 Dongyang Mirae University 센서활용프로그래밍 21 prepared by Choon Woo Kwon
I²C LCD 디스플레이 - 라이브러리 LOGO v I²C LCD Display를 위한 라이브러리 : Liquid. Crystal_I 2 C § 라이브러리 파일 다운로드 : Liquid. Crystal_I 2 C. zip (click!) § 설치 방법 ü Arduino IDE 메뉴 사용 • 스케치 > 라이브러리 포함하기 >. ZIP 라이브러리 추가 • 다운로드 파일을 선택 ü 강의자료 참조 • 강의자료 게시판 “ 2. 9 (참고) Arduino Libraries” § TWI/ I²C로 디바이스(device, sensor 등)와 통신하기 위한 라이브러리 : Wire • TWI(Two Wire Interface), I²C(Inter-Integrated Circuit, Inter IC) Arduino Board ü 함수(Function) • begin() request. From() begin. Transmission() • end. Transmission() write() available() • read() Uno, Ethernet A 4 (SDA), A 5 (SCL) Mega 2560 20 (SDA), 21 (SCL) Leonardo 2 (SDA), 3 (SCL) Due 20 (SDA), 21 (SCL), SDA 1, SCL 1 Set. Clock() on. Receive() on. Request() Dongyang Mirae University I 2 C/TWI 핀 센서활용프로그래밍 22 prepared by Choon Woo Kwon
I²C LCD 디스플레이 – 라이브러리 함수 LOGO v Liquid. Crystal_I 2 C 라이브러리 함수(Function) 함수 Function 동작 동작 lcd. init(); LCD 초기화 lcd. blink(); lcd. no. Blink(); 커서 깜빡이기 끄기 lcd. backlight(); lcd. no. Backlight(); LCD 백라이트 ON LCD 백라이트 OFF lcd. write(ASCII 값); (예) lcd. write(36); LCD 화면에 ASCII 코드 문자 출력 (예) LCD에 '$' 출력 lcd. no. Display(); lcd. display(); LCD 표시 숨기기 LCD 표시 보이기 lcd. print(“character"); LCD 화면에 문자 출력 lcd. cursor(); lcd. no. Cursor(); 커서 표시 커서 끄기 lcd. clear(); LCD 모든 내용 지움 lcd. set. Cursor(x, y); 커서를 LCD 해당 좌표로 이 동 lcd. scroll. Display. Right(); lcd 내용을 우측으로 1칸 스크롤 커서를 홈 좌표 (0, 0)로 이동 lcd. scroll. Display. Left(); lcd 내용을 좌측으로 1칸 스크롤 lcd. autoscroll(); 출력내용을 자동으로 우에서 좌로 스크롤 lcd. home(); 1602 LCD 좌표(col, row) (16 Columns x 2 Rows) Dongyang Mirae University 센서활용프로그래밍 23 prepared by Choon Woo Kwon
I²C BUS 주소 스캔용 스케치(1) - i 2 c_scanner // -------------------// i 2 c_scanner // // 원본 위치 <http: //playground. arduino. cc/Main/I 2 c. Scanner> // // Version 1 // This program (or code that looks like it) // can be found in many places. // For example on the Arduino. cc forum. // The original author is not know. // Version 2, Juni 2012, Using Arduino 1. 0. 1 // Adapted to be as simple as possible by Arduino. cc user Krodal // Version 3, Feb 26 2013 // V 3 by louarnold // Version 4, March 3, 2013, Using Arduino 1. 0. 3 // by Arduino. cc user Krodal. // Changes by louarnold removed. // Scanning addresses changed from 0. . . 127 to 1. . . 119, // according to the i 2 c scanner by Nick Gammon // http: //www. gammon. com. au/forum/? id=10896 // Version 5, March 28, 2013 // As version 4, but address scans now to 127. // A sensor seems to use address 120. // Version 6, November 27, 2015. // Added waiting for the Leonardo serial communication. // Dongyang Mirae University LOGO // This sketch tests the standard 7 -bit addresses // Devices with higher bit address might not be seen properly. // // (Skech Source는 다음 슬라이드에 …) // 센서활용프로그래밍 24 prepared by Choon Woo Kwon
I²C BUS 주소 스캔용 스케치(2) - i 2 c_scanner // i 2 c_scanner #include <Wire. h> void setup() { Wire. begin(); if (error == 0) { Serial. print("I 2 C device found at address 0 x"); if (address<16) Serial. print("0"); Serial. print(address, HEX); Serial. println(" !"); if(Serial) > returns true if the specified serial port is available Serial. begin(9600); while (!Serial); // Leonardo: wait for serial monitor Serial. println("n. I 2 C Scanner"); n. Devices++; } else if (error==4) { Serial. print("Unknown error at address 0 x"); if (address<16) Serial. print("0"); Serial. println(address, HEX); } } void loop() { byte error, address; int n. Devices; Serial. println("Scanning. . . "); n. Devices = 0; for(address = 1; address < 127; address++ ) { // The i 2 c_scanner uses the return value of // the Write. end. Transmisstion to see if // a device did acknowledge to the address. Wire. begin. Transmission(address); error = Wire. end. Transmission(); Dongyang Mirae University LOGO } if (n. Devices == 0) Serial. println("No I 2 C devices foundn"); else Serial. println("donen"); delay(5000); // wait 5 seconds for next scan } 센서활용프로그래밍 25 prepared by Choon Woo Kwon
I²C LCD 디스플레이 – 예제 스케치(1) #include <Wire. h> #include <Liquid. Crystal_I 2 C. h> // Set the LCD address to 0 x 27 for a 16 chars and 2 line display Liquid. Crystal_I 2 C lcd(0 x 27, 16, 2); void setup() { // initialize the LCD lcd. init(); // initialize the lcd // ------- Quick 3 blinks of backlight ------for(int i = 0; i< 3; i++) { lcd. backlight(); delay(250); lcd. no. Backlight(); delay(250); } lcd. backlight(); } Dongyang Mirae University // finish with backlight on LOGO void loop() { bool blinking = true; lcd. cursor(); while (1) { if (blinking) { lcd. clear(); lcd. set. Cursor(0, 0); lcd. print("No cursor blink"); lcd. set. Cursor(0, 1); lcd. print("(3 seconds)"); lcd. no. Blink(); blinking = false; } else { lcd. clear(); lcd. set. Cursor(0, 0); lcd. print("Cursor blink"); lcd. set. Cursor(0, 1); lcd. print("(3 seconds)"); lcd. blink(); blinking = true; } delay(3000); } } 센서활용프로그래밍 26 prepared by Choon Woo Kwon
LOGO Dongyang Mirae University 센서활용프로그래밍 27 prepared by Choon Woo Kwon