Living Geography Young geographers explore their local area


: My 5 favourite things about my village")


- Slides: 21
Living Geography Young geographers explore their local area Young Geographers Project Shelley First School Lisa Conlon ~ March 2008
Living Geography The young geographers project has focused on four key aspects: § Engaging in ‘curriculum making’ practical § Capturing the sense motivating ‘living geography’ of § learning outside the classroom § Education for sustainable development How does it fit in with Shelley First School? As the Geography co-ordinator in school, who has taught both KS 1 and KS 2 I felt that this was a great opportunity to move the school forward in the fieldwork aspect of Geography. This was an area that, as a school, we feel could be developed further and this project gave us the opportunity to do it. Geography is valued greatly in school and we wanted to use the time given to take part in good quality teaching and learning.
Starting Points… What do I want to get out of this? • Support and advice with ideas • Sharing of good practise and enthusiasm • Working together • Time allowed to plan, teach and evaluate • Creating good plans and resources to share with colleagues at school • Opportunity to develop and teach fieldwork ideas and skills Starting Points… What do I want the children to get out of this? • Opportunity to take part in high quality fieldwork experiences • ENJOY!!! remember Something to • Develop geography skills and in time raise standards • Use links within the school and village to look at the wider world in regards to localities and sustainable development
Planning Using the current geography topic ‘Kenya’ I decided it would be a good idea to link it together with this project. As I am also taking part in the ‘Primary Geography and ICT’ curriculum making course it made sense to bring it all together. Below are the 2 planners I created: ‘What is it like to live in Shelley? ’ ‘Using ICT in Geography’
‘Living Geography’ Project Session 1: Walking around the village Aims: To find out where we live in the village and how we are all connected Class discussion: Discuss and recap with the children their journeys to school, using the maps they have produced. Talk about who lives near to…, what things have been included on the maps, anyone else have the same? Explain that we are all linked together, firstly through school; talk about how we get to school, how do we travel, who do we come with, who do we see? Introduce the fieldwork session with the children, telling them we are going to be going out into the village to see where we live and what we can find in the village. Talk about amenities, areas of interest, places to visit or play. Tell the children we are going to try and answer the question: How well do you know the village? Activity: Divide the class into four groups (making sure they are with other children who live relatively near to each other – timing) Each group to leave school gates and follow the journey home… can they lead the other children back to their house? Photos to be taken on the journey which will be used back in class. What do they see on their way? Do they visit the park, post office…? Is this the same direction other children follow? Where is the best place to cross the road? Why? What do they know about the cricket club, top shop…? Children to draw a sketch of each house – discussing the similarities and differences in the buildings, materials used, garage/s, gardens…? Back in the classroom time to discuss our findings, who lives on…, where do you go for some milk…, where can you post a letter…, where can you play…? Explain to the class that we will be using all this information to create a 3 D map of Shelley. Resources: Children’s maps of their journey to school Clipboards Drawing pencils Paper Camera
‘This house is near to school, you have a very short journey and you don’t even have to cross a road! I have to cross two. ’ ‘My house has a garage at the side of the house not at the bottom. ’ ‘My house is tall, you have to go up two lots of stairs. ’
‘Some houses were built before others, Shelley keeps getting bigger and bigger!’ ‘A lot of houses in Shelley look the same because they are made out of the same stone. ’ ‘I wonder why? ’ ‘So they all look the same, silly. ’
‘I like walking up the Wyns, sometimes if you listen carefully you can hear crickets and birds. ’ ‘What number house do you live at? ’ ‘Mark’s grandma lives in a bungalow like my Auntie’
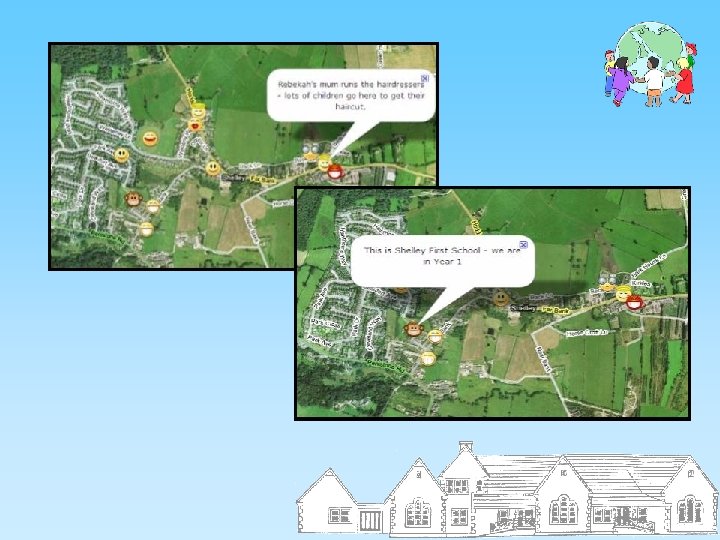
‘Living Geography’ Project Session 2: How do I feel about Shelley? Aims: To talk about my feelings about my village of Shelley and beyond Class discussion: Introduce the children to a map of Shelley, using Quikmaps. Explain to the children the layout of the map. Do they know the name of their road? Can they find it? What other things in Shelley can they find? How do they know where they are? Give the children time to talk about different aspects of Shelley – what about further? Some children live in Cumberworth, Shepley… Activity: Children to think of a sentence that we could include on the map of Shelley which tells others something about the village. It could be something they like doing or where a friend lives, anything they feel is important about their village. Children spend time on the computer in the ICT suite looking at the map closely; exploring, identifying… Resources: Class computer and IWB Internet – Quikmaps Camera
Using the website ‘Quikmaps’ to talk about what we think about Shelley. www. quikmaps. com
‘Living Geography’ Project Session 3 (Homework Task): My 5 favourite things about my village Aims: To show an understanding of the village we live in To be able to present information in maps, photos, sketches and text Class discussion: Talk to the children about our fieldwork activities, what did we find out? Explain to the children that we can use our knowledge of our village to tell others about it – in particularly our link to a school in Kenya Activity: Tell the children about their homework task; Think about your local area (Shelley, Shepley, Cumberworth…) and choose 5 things that make your area great! During the holiday can you spend time taking photos, sketching these areas? Can you write a few sentences about them? Can you draw a map showing how these areas are linked together? After collecting all your information – can you present your findings? What about as a poster or a booklet or using ICT? I would like to display these mini projects in school when we return after the holiday if that’s okay? Good luck! Spend time discussing projects and what the children have included, how they have presented information Display the projects in class, discuss how we can use them to inform our link in Kenya Resources: Homework sheet/information Children’s knowledge and equipment at home Display board in school
Year 1 Homework Projects My 5 favourite things about my village
Year 1 Homework Projects My 5 favourite things about my village
‘Living Geography’ Project Session 4: Creating a 3 D map of Shelley Aims: To use maps, sketches and photos to create a 3 D map of Shelley Class discussion: Talk to the children about the information we have collected on the village of Shelley Explain to them we are going to create a 3 D map of our findings using the information collected Activity: In small groups children to use a projector to project a simple map of Shelley to sketch as large as possible Work together to label roads Children to use the photos collected to put into the correct positions on the maps; their homes, shops, areas of interest Time spent with the children exploring, discussing and informing each other about the map Children have the opportunity to use Bee. Bots on our map – seeing whether they can direct them from school to their homes Resources: Photos Sketches Projector Simple map of Shelley Bee. Bots
‘I live down the road from Amy. ’ ‘I live across from the hairdressers. ’ ‘This is my old house, I don’t live in Shelley now. Park Avenue is a very long road. ’
‘Shelley First School is on Far Bank, near the post office. ’ ‘Penistone road is the main road, we go on it to town and Morrisons. ’
‘Living Geography’ Project Session 5: What is it like to live in Shelley? Aims: To inform children from Kenya what our village is like Class discussion: • Recap with the children the main aim of this project – to tell others, in particular children in Kenya what it is like to live in Shelley • Recap with the children all the activities we have taken part in • Discuss how we can tell others about our findings Activity: • Children to produce a short video about our village; sharing our projects, what you can do, where we live / our journeys to school, our 3 D map • Children to produce a poster or letter for the link school in Kenya Resources: • Photos • Sketches • Camcorder • 3 D map • Projects
We sketched maps of our journey to school. Then we went in the ICT suite to use the software local studies to copy it.
After our visit from an action-aid teacher, we had a coffee afternoon as part of the ’ 24 hour tea and coffee’ event. We raised £ 200!