Linux Bootcamp An introduction to the Linux environment

Linux Bootcamp An introduction to the Linux environment v 2018 -11

Programme • Linux Basics • What is Linux • Using the BASH shell to run and automate programs • Installing and managing software • • Understanding the file system Installing operating system packages Installing external software Installing packages for other languages (R, Python, Perl) • Other Useful Stuff • • Using containers Remote connections through SSH Installing operating systems on hardware or virtual machines Using Linux in a cloud environment

Learning Outcomes • By the end of the course you should be able to: 1. Install a Linux operating system on your machine, either directly or through a virtual machine 2. Be able to run and customise installed applications using the BASH shell 3. Be able to perform simple automation, linking programs together and iterating the processing of large numbers of files. 4. Be able to install and configure new software packages 5. Understand how to use Linux in a variety of environments from personal computers to cloud infrastructure.


Linux Basics Understanding Linux and the BASH shell v 2018 -11
 is Linux?")
What (exactly) is Linux?

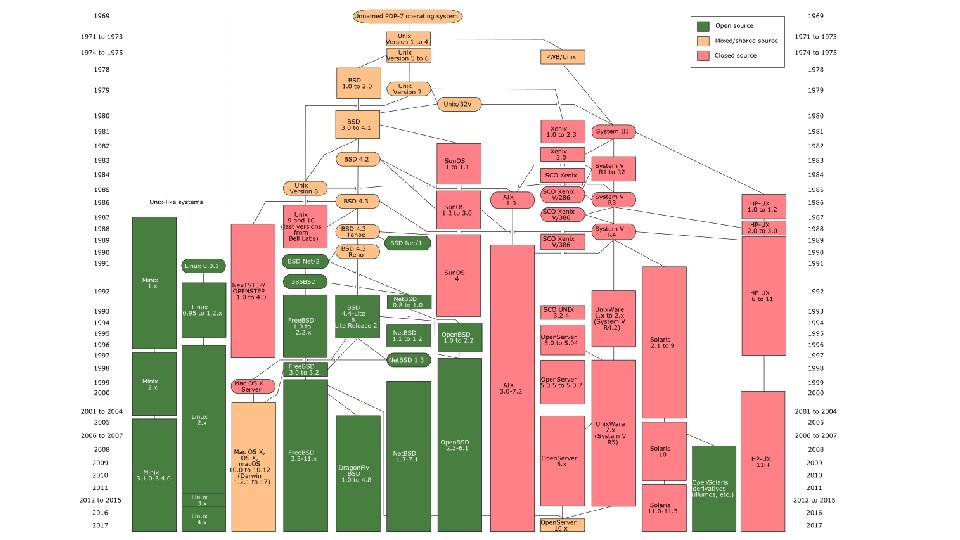
Unix, Posix and Linux • Unix was a set of concepts which defined a number of early operating systems developed in the 1970 s. • These concepts allowed for interoperability of software written based on them. • The original Unix concepts developed into POSIX, a more formal standard defining • The way that devices, configuration, memory and libraries are handled • A standardised development environment based on C and make • A core set of commands and a command interpreter (shell) in which to run them • A standard set of documentation
 • Linux is more")
Linux - what most people now use (apart from OSX!) • Linux is more correctly called GNU/Linux • Linux is the kernel • GNU is a collection of applications and libraries • POSIX • The way that devices, configuration, memory and libraries are handled • A standardised development environment based on C and make • A core set of commands and a shell in which to run them • A standard set of documentation

Linux comes in different distributions • They vary in • • Their choice of (non-core) software Their support packages (the way software is installed for example) How much non-core software they provide Their frequency of update and length of support

Most Popular Distributions • Ubuntu • • • Mostly aimed at desktop users Friendly and well supported Regular updates (some with long term support) Based on Debian Other offshoots such as Mint • Cent. OS • • Free version of the Red. Hat commercial distro Mostly aimed at servers Stable software and long term support Used in many large environments

Specialised Distributions • Bio Linux • Many pre-built scientific programs • Based on Ubuntu • ROCKS • Linux distribution to run on clusters • Includes automated building and management • Based on Cent. OS


Running programs in the BASH shell v 2018 -11

Running programs in Linux • Two major methods • Graphical • Command line • Graphical launches only work for graphical programs accessed through a graphical environment • Most data processing will be command line based, as will most remote access • Graphical programs can still be launched from the command line

Shells • A shell is a command line interpreter, used to launch software in Linux • There are many different shells available: • BASH • CSH • ZSH etc. • Most software will work the same in all shells • Some functions and automation are different between shells • We will use the most popular shell, BASH

What does a shell provide • Command line editing and construction tools (eg auto complete) • History • Job control • Configuration management (startup scripts) • Aliases • Automation • Scripting language • Variables, functions etc

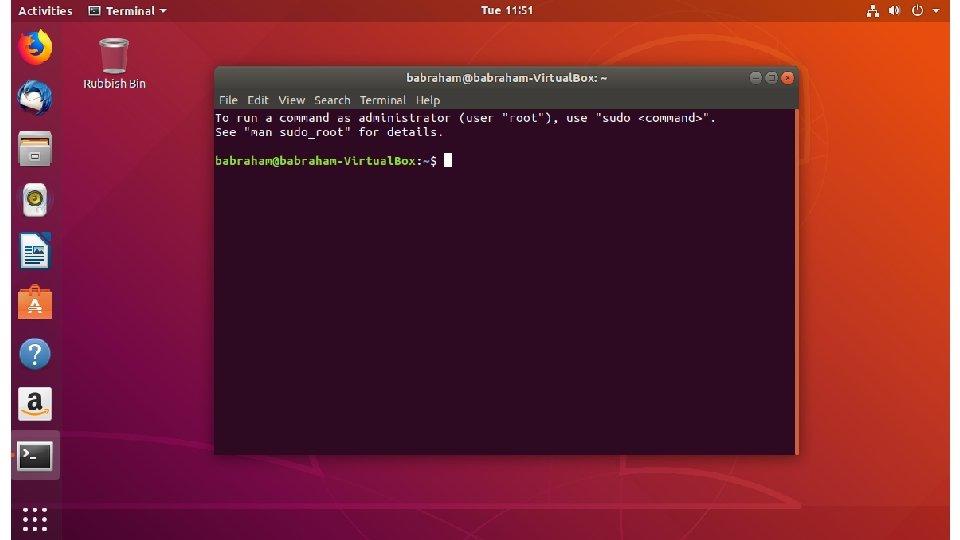
Running programs in BASH • We will be using a graphical terminal running BASH • Right click and select "Open terminal" • . . or, from Applications menu find Terminal • Once running, right click on icon and select "Add to favourites"

Running programs • Type the name of the program you want to run • Add on any options the program needs • Press return - the program will run • When the program ends control will return to the shell • Run the next program!

Running programs babraham@babraham-Virtual. Box: ~$ ls Desktop Documents Downloads examples. desktop Pictures Public Templates Videos Music babraham@babraham-Virtual. Box: ~$ Command prompt - you can't enter a command unless you can see this The command we're going to run (ls in this case, to list files) The output of the command - just text in this case

Running graphical programs babraham@babraham-Virtual. Box: ~$ xeyes babraham@babraham-Virtual. Box: ~$ Note that you can't enter another command until you close the program you launched

The structure of a unix command ls Program name -ltd --reverse Downloads/ Switches Desktop/ Documents/ Data (normally files) Each option or section is separated by spaces. Options or files with spaces in must be put in quotes.

Command line switches • Change the behaviour of the program • Come in two flavours (each option usually has both types available) • Minus plus single letter (eg -x -c -z) • Can be combined (eg -xcz) • Two minuses plus a word (eg --extract --gzip) • Can't be combined • Some take an additional value, this can be an additional option, or use an = to separate (it's up to the program) • -f somfile. txt (specify a filename) • --width=30 (specify a value)

Manual pages • All core programs will have a manual page to document the options for the command • Manual pages are accessible using the man program followed by the program name you want to look up. • All manual pages have a common structure
 CAT(1) User Commands NAME cat - concatenate files and print")
Manual Pages (man cat) CAT(1) User Commands NAME cat - concatenate files and print on the standard output SYNOPSIS cat [OPTION]. . . [FILE]. . . DESCRIPTION Concatenate FILE(s) to standard output. With no FILE, or when FILE is -, read standard input. -A, --show-all equivalent to - v. ET -n, --number all output lines -T, --show-tabs display TAB characters as ^I --help display this help and exit EXAMPLES cat f - g Output f's contents, then standard input, then g's contents. cat Copy standard input to standard output. CAT(1)

Exercise 1

Understanding Unix File Systems
 • Each")
Unix File Systems • Consists of a hierarchical set of directories (folders) • Each directory can contain files • No drive letters (drives can appear at arbitrary points in the file system) • No file extensions (you can add them, but they're not required)
 home/ (Directory")
A simple unix filesystem / (Always the top of the file system) home/ (Directory containing all home directories) anne/ simon/ Documents/ (All names are case sensitive) test. txt (A file we want to work with) /home/simon/Documents/test. txt media/ myusb/ (A USB stick added to the system)

Drives in a Linux file system $ mount /dev/sda 1 on / type ext 4 (rw) /dev/sda 5 on /state/partition 1 type ext 4 (rw) /dev/sda 2 on /var type ext 4 (rw) Private-Cluster. local: /ifs/homes on /bi/home type nfs (rw, addr=10. 99. 101. 5) Private-Cluster. local: /ifs/Scratch on /bi/scratch type nfs (rw, addr=10. 99. 101. 5) Private-Cluster. local: /ifs/Group on /bi/group type nfs (rw, addr=10. 99. 101. 4) Private-Cluster. local: /ifs/apps-nfs on /bi/apps type nfs (rw, addr=10. 99. 101. 5) central-cluster. local: /ifs/bioinformatics/pubcache on /bi/pubcache type nfs (rw, addr=10. 99. 102. 7) central-cluster. local: /ifs/bioinformatics/seqfac on /bi/seqfac type nfs (ro, addr=10. 99. 102. 6) /dev/fuse on /bi/sequencing type fuse (ro, nosuid, nodev, allow_other)

Specifying file paths • Some shortcuts • ~ (tilde, just left of the return key) - the current user's home directory • . (single dot) - the current directory • . . (double dot) - the directory immediately above the current directory

Specifying file paths • Absolute paths from the top of the file system • /home/simon/Documents/Course/some_file. txt • Relative paths from whichever directory you are currently in • If I'm in /home/simon/Documents/Course/ • . . /Data/big_data. csv • is the same as /home/simon/Data/big_data. csv • Paths using the home shortcut • ~/Documents/Course/some_file. txt will work for user simon anywhere on the system

Command line completion • Most errors in commands are typing errors in either program names or file paths • Shells (ie BASH) can help with this by offering to complete path names for you • Command line completion is achieved by typing a partial path and then pressing the TAB key (to the left of Q)

Command line completion Actual files in a folder: Desktop Documents Downloads examples. desktop Music Pictures Public Templates Videos If I type the following and press tab: De [TAB] will complete to Desktop as it is the only option T [TAB] will complete to Templates as it is the only option Do [TAB] will no nothing (just beep) as it is ambiguous Do [TAB] will show Documents and Downloads since those are the only options Do [TAB] c [TAB] will complete to Documents You should ALWAYS use TAB completion to fill in paths for locations which exist so you can't make typing mistakes (it obviously won't work for output files though)
 • A quick")
Wildcards • Another function provided by your shell (not your application) • A quick way to be able to specify multiple related file paths in a single operation • There are two main wildcards • * = Any number of any characters • ? = One of any character • You can include them at any point in a file path and the shell will expand them before passing them on to the program • Multiple wildcards can be in the same path. • Command line completion won't work after the first wildcard

Wildcard examples $ ls Monday/*txt Monday/mon_1. txt Monday/mon_2. txt Monday/mon_3. txt $ ls Monday/mon_? . txt Monday/mon_1. txt Monday/mon_2. txt Monday/mon_3. txt $ ls */*txt Friday/fri_1. txt Friday/fri_2. txt Monday/mon_1. txt Monday/mon_2. txt Monday/mon_3. txt Monday/mon_500. txt $ ls */*1. txt Friday/fri_1. txt Monday/mon_1. txt Tuesday/tue_1. txt Monday/mon_500. txt Tuesday/tue_1. txt Tuesday/tue_2. txt

The structure of a Unix command ls Program name -ltd --reverse D* Downloads/ Switches Desktop/ Documents/ Data (normally files) Each option or section is separated by spaces. Options or files with spaces in must be put in quotes.

Programs for manipulating files

Manipulating files • You will spend a lot of time managing files on a Linux system. • • • Viewing files (normally text files) Editing text files Moving or renaming files Copying files Deleting files Finding files

Viewing Files • Simplest solution • cat Sends the entire contents of a file (or multiple files) to the screen. • Quick look • head or tail will look at the start/end of a file • head -10 [file] • tail -20 [file] • More scalable solution • less is a 'pager' program, sends output to the screen one page at a time • • • Return / j k Space b /[term] q = = = move down one line move up one line move down one page go back one page search for [term] in the file quit back to the command prompt less -S (no wrapping)

Editing files • Lots of text editors exist, both graphical and command line • Many have special functionality for specific content (C, HTML etc) • Technically, only the vi editor is required to be present in POSIX • nano is a simple command line editor which is nearly always present • You can try several until you find one you like
![Using nano to edit text files • nano [filename] (edits if file exists, creates](http://slidetodoc.com/presentation_image/2a8e55a45cf14ef49d97cc8bdf19c499/image-43.jpg "Using nano to edit text files • nano [filename] (edits if file exists, creates")
Using nano to edit text files • nano [filename] (edits if file exists, creates if it doesn't)

Moving / Renaming files • Uses the mv command for both (renaming is just moving from one name to another) • mv [file or directory] [new name/location] • If new name is a directory then the file is moved there with its existing name • Moving a directory moves all of its contents as well • Examples • • mv mv old. txt new. txt old. txt. . /Saved/new. txt. . /Saved/old. txt.
![Copying files • • Uses the cp command cp [file] [new file] Operates on](http://slidetodoc.com/presentation_image/2a8e55a45cf14ef49d97cc8bdf19c499/image-45.jpg "Copying files • • Uses the cp command cp [file] [new file] Operates on")
Copying files • • Uses the cp command cp [file] [new file] Operates on a single file Can copy directories using recursive copy (cp -r) • Examples • • • cp cp cp old. txt new. txt old. txt. . /Saved/new. txt. . /Saved/old. txt. -R. . /Saved. /New. Dir -R. . /Saved. /Existing. Dir/ (only if Existing. Dir exists)

Linking rather than copying • Copy duplicates the data in a file • Can be a problem with big data files • Can be a problem if you want edits to propagate • Links are a way to do 'virtual' copies. You can make the same file appear in more than one place. • Two types of link • Hard link - completely indistinguishable from a copied file • Only works on the same disk (can't span file systems) • Only works for files (not directories) • Symbolic (or soft) link • • Is visible as a link, but can still be used as if it is a file Can work across file systems Can be used for directories as well as files Normally the safe option to use

Creating symbolic links • Use the ln command with the -s modifier • Usage ln -s [from] [to] • Exactly the same structure as mv • When you list a link you can see where it points, but you can use it like a file $ cat test. txt This is a test file $ ln -s test. txt test 2. txt $ ls -l test 2. txt lrwxrwxrwx 1 babraham 8 Sep 11 16: 27 test 2. txt -> test. txt $ cat test 2. txt This is a test file

Deleting files • Linux has no undo. • Deleting files has no recycle bin. • Linux will not ask you "are you sure" • Files can be deleted with the rm command • Directories (and all of their contents) can be deleted with rm -r • Examples • rm test_file. txt test_file 2. txt • rm *. txt (be VERY careful using wildcards. Always run ls first to see what will go) • rm -r Old_directory/

Finding files • From the command line there are two main mechanisms • Using locate • Uses a pre-built index, so is *VERY* quick • Needs to be installed and configured (isn't on all distributions) • Only works on local drives - not network shares • Using find • Searches fresh each time • Can be slow if you're searching large numbers of files • Requires no pre-processing
![Using find • find [options/filters] [place to start] [action] • Options / Filters •](http://slidetodoc.com/presentation_image/2a8e55a45cf14ef49d97cc8bdf19c499/image-50.jpg "Using find • find [options/filters] [place to start] [action] • Options / Filters •")
Using find • find [options/filters] [place to start] [action] • Options / Filters • -name thisfile. txt • -name *txt • -type f -empty • Action • -print • -exec (any command - include {} for filename - need to finish with ; )

Find examples • find ~ -name *fastq. gz -print • find /etc/ -name *conf -exec wc -l '{}' ; • find ~ -type l -print

Exercise 2

Finding programs to run ls Program name -ltd --reverse Downloads/ Switches Desktop/ Documents/ Data (normally files) • How does the system know which executable file to run when you just supply a name (like ls in this example) rather than a file path? • What happens when you have two different programs with the same name?

The PATH environment variable • Two new concepts which will be reused a lot: 1. A search path is a list of directories which the shell will iterate over to try to find something (a program in this case). It is an ordered list and the first hit will be returned. 2. Shells use "environment variables" as a small scale storage and configuration system. They are a set of key/value pairs which provide named pieces of data which influence the behaviour of the shell or programs which it runs. Some environment variables are created by default, but you can modify these, or add your own.

The PATH environment variable • You can see the current PATH contents by running: • echo $PATH • /usr/local/sbin: /usr/local/bin: /usr/sbin: /usr/bin: /sbin: /usr/games: /usr/local/games: /snap/bin • These are the directories which are trusted to contain good programs which you can launch just using their name • Other programs can be launched using their location (rather than name) • You can find the location of a named program using which • which ls (produces /bin/ls which is where the ls program is)

Setting the PATH • PATH is an environment variable, you can set it the same as any other variable, using the export function • export PATH=/one/folder: /another/folder • Normally you want to just add to the existing PATH, so you can include the current $PATH in the definition • export PATH=/new/folder/: $PATH • You can write this into ~/. bashrc to make the change permanent.

Exercise 3


More advanced BASH usage v 2018 -11

What we know already • How to run existing programs • Those which are in the PATH • Those which are somewhere else • How to modify the options for a program using switches • How to supply data to programs using file paths and wildcards

What else can we do • Record the output of programs • Check for errors in programs which are running • Link programs together into small pipelines • Automate the running of programs over batches of files • All of these are possible with some simple BASH scripting

Recording the output of programs • One of the aspects of POSIX is a standard system for sending data to and from programs. • Three data streams exist for all Linux programs (though they don't have to use them all) • STDIN (Standard Input - a way to send data into the program) • STDOUT (Standard Output - a way to send expected data out of the program) • STDERR (Standard Error - a way to send errors or warnings out of the program) • By default STDOUT and STDERR are connected to your shell, so when you see text coming from a program, it's coming from these streams.

Recording the output of programs STDIN program STDOUT STDERR • Rather than leaving these streams connected to the screen, you can link them to either files, or other programs to either create logs, or to build small pipelines

Redirecting standard streams • You can redirect using arrows at the end of your command • • > [file] Redirects STDOUT < [file] Redirects STDIN 2> [file] Redirects STDERR 2>&1 Sends STDERR to STDOUT so you only have one output stream $ find. -print > file_list. txt 2> errors. txt $ ls Data Desktop Documents Downloads errors. txt examples. desktop $ head file_list. txt. . /Downloads. /Pictures. /Public. /Music. /. bash_logout. /. local/share/icc/edid-33 d 524 c 378824 a 7 b 78 c 6 c 679234 da 6 b 1. icc file_list. txt Music Pictures Public Templates Videos

Throwing stuff away • Sometimes you want to be able to hide output • STDOUT - I just want to test whether something worked • STDERR - I want to hide progress / error messages • Linux defines a special file /dev/null which you can write to but just discards all data sent to it • might_fail > /dev/null • chatty_app 2> /dev/null

Linking programs together • Part of the original UNIX design was to have lots of small programs doing specific jobs, and then to link them together to perform more advanced tasks. • There a couple of mechanisms to do this • Pipes • Backticks

Linking programs together using pipes • Pipes are a mechanism to connect the STDOUT of one program to the STDIN of another. You can use them to build small pipelines • To create a pipe just use a pipe character | between programs • pr 1 | pr 2 is the equivalent to pr 1 > temp; pr 2 < temp $ ls | head -2 Data Desktop

Useful programs for pipes • Whilst you can theoretically use pipes to link any programs, there are some which are particularly useful, these are things like: • • • wc - to do word and line counting grep - to do pattern searching sort - to sort things uniq - to deduplicate things less - to read large amounts of output zcat/gunzip/gzip - to do decompression or compression

Small example pipeline • Take a compressed fastq sequence file, extract from it all of the entries containing the telomere repeat sequence (TTAGGG) and count them • zcat file. fq. gz | grep TTAGGG | wc -l $ zcat file. fq. gz | wc -l 179536960 $ zcat file. fq. gz | grep TTAGGG | wc -l 3925

Using backticks to capture output • Pipes are great to link streams of data together, but they need to be supported by both programs • In some cases you want to use the output of one program as an argument to another one. • You can do this using backticks - these are like quotes, but their contents are executed, and the contents are replaced with the STDOUT of the executed code
 is installed,")
Backticks example • I want to find out where a program (fastqc) is installed, and I want to find out whether that location is a real file, or a symlink to somewhere else. • I can do this in 2 separate steps, but this involves copy/paste • which fastqc • ls -l [whatever came out of step 1] • Backticks let you do this in a single step. $ ls -l `which fastqc` -rwxr-xr-x 1 andrewss bioinf 14400 Dec 21 2017 /bi/apps/fastqc/0. 11. 7/fastqc

Iterating over files • When processing data it is common to need to re-run the same command multiple times for different input/output files. • Some programs will support being provided with multiple input files, but many will not. • You can use the automation features of the BASH shell to automate the running of these types of programs

The BASH for loop • Simple looping construct • Loop over a set of files • Loop over a set of values • Creates a temporary environment variable which you can use when creating commands

Examples of for loops for value in {5, 10, 20, 50} do run_simulation --iterations=$value > ${value}_iterations. log 2>&1 done for value in {10. . 100} do run_simulation --iterations=$value > ${value}_iterations. log 2>&1 done for file in *txt do echo $file grep. sam $file | wc -l done

Job Control • By default you run one job at at time in a shell • Shells support multiple running jobs • States of job • • Running - foreground (shell has the attention of the job) Running - background (output goes to the shell but other jobs can run) Suspended - background (job exists but is paused, consumes no CPU) Running - disconnected (output is no longer attached to the shell)
 (starts in background) • Control of")
Job Control • prog_to_run & (starts in foreground) (starts in background) • Control of running jobs • • jobs (lists the jobs in this shell) Control + Z (suspends the current job) bg (puts the current suspended job into the background fg [number] (puts the selected job back in the foreground)

Job Control - nohup • nohup prog_to_run • • • Merges STDOUT and STDERR Disconnects from the terminal Can't be killed when the terminal exits Output appended to nohup. out Can redirect with > logfile. txt
![Job Control - listing and killing processes • ps -fu [username] • ps -ef](http://slidetodoc.com/presentation_image/2a8e55a45cf14ef49d97cc8bdf19c499/image-78.jpg "Job Control - listing and killing processes • ps -fu [username] • ps -ef")
Job Control - listing and killing processes • ps -fu [username] • ps -ef $ ps -fu UID andrewss server andrewss (list my processes associated with this shell) (list all processes for user [username]) (list all processes on the system) andrewss PID PPID 14510 1 15496 15494 15497 15496 17195 1 C 0 0 17955 1 20618 15497 0 Sep 26 ? 0 11: 03 pts/36 STIME Sep 26 10: 21 Sep 26 TTY ? ? pts/36 ? TIME 00: 02 00: 00: 00 00: 11 CMD ls --color=auto sshd: andrewss@pts/36 -bash /usr/libexec/openssh/sftp- 00: 11 ls --color=auto 00: 00 ps -fu andrewss

Job Control - listing and killing processes • You can only kill your own processes • kill [PID] • kill -9 [PID] (Nicely ask this process to stop) (Force this process to abruptly stop)

Exercise 4


Installing and Managing Software v 2018 -11

Different types of software • Software comes in different types • Interpreted scripts • Pre-compiled binary software • Source code requiring compilation • Software comes from different sources • Distributed with your operating system • Distributed by some other software management system • Downloaded from a specific site on the internet

Users, roles and permissions • Software can be installed just for an individual user • Most software is installed in a way which allows all users to run it • You need to understand users, roles and permissions to install software

Users and Roles • For security and privacy most users run with restricted privileges most of the time • They can only read some parts of the file system (eg: not other users data for) • They can only write to some parts of the file system (eg: can’t overwrite important programs) • The ‘root’ user is an account which has full privileges on the system and is used for administrative purposes

Using the root account • Log in as root – requires knowledge of the root account password. Quite dangerous as everything runs with full privileges. • Use su to move from a user account to the root account. Can be done within a session, but still requires the root account password. • Use sudo to selectively run some commands as root. Can restrict which commands can be run and log them. Can use the users own password to authenticate • Running programs with the suid or sgid permissions set on them

File / Directory Permissions • Every file and directory has a number of permissions. There are 3 types 1. Read permission 2. Write permission 3. Execute permission (list permission on directory) • The permissions apply to 3 classes of user 1. The owner of the file/directory 2. The members of the file/directories group 3. Everyone else

File / Directory Permissions $ ls -l total 128 -rw-r--r-drwxr-xr-x -rwxr-xr-x Permissions 1 3 1 1 2 1 root root 10266 Nov 13 root 4096 Nov 13 root 35141 Nov 13 root 1720 Nov 13 root 4096 Nov 13 root 68054 Nov 13 Owner Group 2017 2017 Changelog. md Docs LICENSE README. md test_files trim_galore

File / Directory Permissions Directory or not drwxr-xr-x Permissions for owner Permissions for group r = read w = write x = execute/list Permissions for everyone else
 / g (group) /")
Changing permissions / ownership • chmod • • u (user) / g (group) / a (all) + / - (add or remove permission) r (read) / w (write) / x (execute/list) File/directory list chmod g+wx my. file chmod ga-x my. file chmod -R u-w my. dir • Can add -R to change permissions for a directory and all of its contents
 • Applies to executable files")
Special permission bits • User level special bit (SUID) • Applies to executable files • Will execute as root, even for a normal user • Group level special bit (SGID) • Can apply to executables or directories • On executables executes as the group of the file • On directories it forces any newly created files to inherit the group of the parent • chmod u+s [file] • chmod g+s [file]

Where to install software • In theory you can install software anywhere on the system, but there are places where software is expected to be installed. • If you don't have admin access, or you are installing just for yourself you can install into your home directory. • For site-wide packages you should follow the rules set out by the File Hierarchy Standard (FHS), which defines the expected locations of software on a POSIX system

FHS Locations • There are two types of application • Those which follow a standard structure for dividing the files they use between a set of related directories. These will be all system software and some add in packages • bin - executable files - things you'd actually run • lib - library files - code which is shared between programs and doesn't run directly • share - other data files used by applications • Those which bundle all of their code and data under a single directory and don't split it up • These will be the majority of scientific applications and other non-core software

FHS Installation Locations • If software follows the FHS division of sub-folders then it can go in a few places • /bin and /sbin are only for vital software packaged by the operating system, software in /sbin is to be used only by admins • /usr/bin and /usr/sbin are similar, but are for non-vital software • /usr/local (with executables in /usr/local/bin) is for software installed outside the operating systems package manager, but for software which follows the FHS standard • Non-FHS packages are generally recommended to be installed under /opt

Installing operating system packages • Nearly all Linux distributions come with a set of optional software packages for a wide range of applications • They use a package manager program to allow you to add and remove packages • Package managers handle installation of the required software as well as any dependencies. They also handle updates. • There are two main package managers • Apt (advanced packaging tool) - Ubuntu, Debian, Mint • Yum (Yum updater modified) - Red. Hat, Cent. OS, Fedora
 All operations (except searches) need to run under")
Using a package manager (command line) All operations (except searches) need to run under sudo APT • apt install [package name] search [search term] upgrade purge [package name] YUM • yum install [package name] search [search term] update remove [package name]

The good and bad of OS packages Good Bad • Very easy to install • Limited software availability • Will resolve dependencies and install them • Only one version of any package • Sometimes not up to date • Guaranteed compatible with the rest of your system • More difficult to get support from authors
 # apt install default-jre Reading package lists. .")
OS Package Example - JRE (Java) # apt install default-jre Reading package lists. . . Done The following additional packages will be installed: ca-certificates-java default-jre-headless fonts-dejavu-extra java-common libatk-wrapper-java-jni libgif 7 openjdk-11 -jre-headless Suggested packages: default-java-plugin fonts-ipafont-gothic fonts-ipafont-mincho fonts-wqy-microhei | fonts-wqy-zenhei The following NEW packages will be installed ca-certificates-java default-jre-headless fonts-dejavu-extra java-common libatk-wrapper-java libatkwrapper-java-jni libgif 7 openjdk-11 -jre-headless 0 to upgrade, 10 to newly install, 0 to remove and 0 not to upgrade. Need to get 41. 6 MB of archives. After this operation, 191 MB of additional disk space will be used. Do you want to continue? [Y/n] y Get: 1 http: //gb. archive. ubuntu. com/ubuntu bionic/main amd 64 java-common all 0. 63 ubuntu 1~02 [7, 032 B] Unpacking java-common (0. 63 ubuntu 1~02). . . Setting up default-jre (2: 1. 10 -63 ubuntu 1~02). . . Processing triggers for libc-bin (2. 27 -3 ubuntu 1). . . Processing triggers for ca-certificates (20180409). . . 0 added, 0 removed; done. Running hooks in /etc/ca-certificates/update. d. . . done.

Exercise 5

Installing pre-compiled binaries • These are the easiest type of installation to perform • You need to make sure that you have the correct download for your operating system and architecture (32 bit vs 64 bit) • Installation is normally just extracting the files from the archive • You can add the new directory to the PATH, or link the executables to a location already in $PATH to make them easier to work with • You might need to check for library compatibility

Some useful related functions • Downloading files from the internet via command line • Compression systems and archive files

Downloading via command line • The first stage in most installations is to download the packaged software from the project web site. • To do this from the command line you can use the wget program which simply takes the URL you want to download as an argument $ wget https: //www. bioinformatics. babraham. ac. uk/projects/fastqc_v 0. 11. 7. zip --2018 -09 -12 13: 15: 32 -- https: //www. bioinformatics. babraham. ac. uk/projects/fastqc_v 0. 11. 7. zip Resolving www. bioinformatics. babraham. ac. uk (www. bioinformatics. babraham. ac. uk). . . 149. 155. 144. 82 Connecting to www. bioinformatics. babraham. ac. uk (www. bioinformatics. babraham. ac. uk)|149. 155. 144. 82|: 443. . . connected. HTTP request sent, awaiting response. . . 200 OK Length: 10254666 (9. 8 M) [application/zip] Saving to: ‘fastqc_v 0. 11. 7. zip’ fastqc_v 0. 11. 7. zip 21. 3 MB/s in 0. 5 s 100 %[==============================>] 2018 -09 -12 13: 15: 33 (21. 3 MB/s) - ‘fastqc_v 0. 11. 7. zip’ saved [10254666/10254666] 9. 78 M

Extracting from archive files • Most software is distributed as a single archive file to make it simpler, and to allow it to be compressed • The two major formats used are: • Zip - a container which is compressed by default • Tar - a container which can optionally be compressed • tar. gz = gzip compression • tar. bz 2 = bzip compression • The first step in most software installations is to extract from the archive

Extracting from zip files • Use the unzip program. Very simple. Don't normally supply options. $ unzip fastqc_v 0. 11. 7. zip Archive: fastqc_v 0. 11. 7. zip creating: Fast. QC/ inflating: Fast. QC/cisd-jhdf 5. jar creating: Fast. QC/Configuration/ inflating: Fast. QC/Configuration/adapter_list. txt inflating: Fast. QC/Configuration/contaminant_list. txt inflating: Fast. QC/Configuration/limits. txt inflating: Fast. QC/fastqc_icon. ico creating: Fast. QC/Help/ etc…

Extracting from tar files • Uses the tar program with the following options • • • -x (extract data) -v (be verbose - show what you're extracting - optional) -z (decompress gzipped archive - for tar. gz files) -j (decompress bzipped argive - for tar. bz files) -f [file] (the tar file to extract from) $ tar -xzvf bismark_v 0. 20. 0. tar. gz Bismark_v 0. 20. 0/bismark Bismark_v 0. 20. 0/coverage 2 cytosine Bismark_v 0. 20. 0/bismark 2 report Bismark_v 0. 20. 0/bismark_genome_preparation Bismark_v 0. 20. 0/deduplicate_bismark Bismark_v 0. 20. 0/bismark 2 summary Bismark_v 0. 20. 0/bismark 2 bed. Graph Bismark_v 0. 20. 0/Docs/Bismark_User_Guide. html Bismark_v 0. 20. 0/plotly/plot. ly Bismark_v 0. 20. 0/bismark_methylation_extractor

Binary install example - bowtie 2 • This is a short read aligner, distributed as a binary zip file ! Be careful which download link you select The main (green) link here is for the source code, not the Linux binaries

Binary install example - bowtie 2 We need to be root as we're installing outside our home $ sudo su It's a self-contained app, so goes in /opt # cd /opt/ # wget https: //kent. dl. sourceforge. net/project/bowtie-bio/bowtie 2/2. 3. 4. 2/bowtie 2 -2. 3. 4. 2 -linux-x 86_64. zip 2018 -09 -12 14: 22: 14 (3. 00 MB/s) - ‘bowtie 2 -2. 3. 4. 2 -linux-x 86_64. zip’ saved [54761153/54761153] # unzip bowtie 2 -2. 3. 4. 2 -linux-x 86_64. zip Archive: bowtie 2 -2. 3. 4. 2 -linux-x 86_64. zip creating: bowtie 2 -2. 3. 4. 2 -linux-x 86_64/ inflating: bowtie 2 -2. 3. 4. 2 -linux-x 86_64/bowtie 2 -align-l-debug # cd bowtie 2 -2. 3. 4. 2 -linux-x 86_64 # ls AUTHORS bowtie 2 -align-l-debug #. /bowtie 2 --help bowtie 2 -align-s-debug bowtie 2 -build-l-debug bowtie 2 -build-s-debug bowtie 2 -inspect-l-debug bowtie 2 -inspect-s-debug doc example LICENSE MANUAL. markdown NEWS scripts TUTORIAL VERSION It's not in PATH, so we need to use. /bowtie 2 to launch it Bowtie 2 version 2. 3. 4. 2 by Ben Langmead (langmea@cs. jhu. edu, www. cs. jhu. edu/~langmea) Usage: bowtie 2 [options]* -x <bt 2 -idx> {-1 <m 1> -2 <m 2> | -U <r> | --interleaved <i>} [-S <sam >] # ln -s /opt/bowtie 2 -2. 3. 4. 2 -linux-x 86_64/bowtie 2 /usr/local/bin/ We can link the executable into a directory in PATH

Libraries • Most binary applications make use of dynamic linking • Some functionality is not in the application but is taken from 'library' files • Come with the operating system • Distributed with the application • Libraries allow for • Updating without rebuilding the application • Removal of duplicate code

Checking library compatibility • Most binaries are dynamically linked • Additional functionality pulled from system libraries at runtime • If the libraries are missing / wrong versions then the application won’t work • Installing the missing libraries will usually fix things. • You can see the requirements with ldd

Example of ldd usage $ ldd `which ssh` linux-vdso. 1 (0 x 00007 ffef 7598000) libselinux. so. 1 => /lib/x 86_64 -linux-gnu/libselinux. so. 1 (0 x 00007 f 68 e 7899000) libcrypto. so. 1. 0. 0 => /usr/lib/x 86_64 -linux-gnu/libcrypto. so. 1. 0. 0 (0 x 00007 f 68 e 7456000) libdl. so. 2 => /lib/x 86_64 -linux-gnu/libdl. so. 2 (0 x 00007 f 68 e 7252000) libz. so. 1 => /lib/x 86_64 -linux-gnu/libz. so. 1 (0 x 00007 f 68 e 7035000) libresolv. so. 2 => /lib/x 86_64 -linux-gnu/libresolv. so. 2 (0 x 00007 f 68 e 6 e 1 a 000) libgssapi_krb 5. so. 2 => /usr/lib/x 86_64 -linux-gnu/libgssapi_krb 5. so. 2 (0 x 00007 f 68 e 6 bcf 000) libc. so. 6 => /lib/x 86_64 -linux-gnu/libc. so. 6 (0 x 00007 f 68 e 67 de 000) libpcre. so. 3 => /lib/x 86_64 -linux-gnu/libpcre. so. 3 (0 x 00007 f 68 e 656 c 000) /lib 64/ld-linux-x 86 -64. so. 2 (0 x 00007 f 68 e 7 d 77000) libkrb 5. so. 3 => /usr/lib/x 86_64 -linux-gnu/libkrb 5. so. 3 (0 x 00007 f 68 e 6296000) libk 5 crypto. so. 3 => /usr/lib/x 86_64 -linux-gnu/libk 5 crypto. so. 3 (0 x 00007 f 68 e 6064000) libcom_err. so. 2 => /lib/x 86_64 -linux-gnu/libcom_err. so. 2 (0 x 00007 f 68 e 5 e 60000) libkrb 5 support. so. 0 => /usr/lib/x 86_64 -linux-gnu/libkrb 5 support. so. 0 (0 x 00007 f 68 e 5 c 55000) libpthread. so. 0 => /lib/x 86_64 -linux-gnu/libpthread. so. 0 (0 x 00007 f 68 e 5 a 36000) libkeyutils. so. 1 => /lib/x 86_64 -linux-gnu/libkeyutils. so. 1 (0 x 00007 f 68 e 5832000)

Library search path • Libraries are identified by using a search path • Some hard-coded components • Some components added by the application • Some components can be configured by the user • System library directories (/lib /usr/lib) • Application library directories (usually relative to the application itself) • User components (via the LD_LIBRARY_PATH environment variable)

Library search path $ ldd jellyfish Linux-vdso. 1 => (0 x 00007 ffd 4 a 352000) libpthread. so. 0 => /lib 64/libpthread. so. 0 (0 x 000000376 b 400000) libjellyfish-2. 0. so. 2 => not found libstdc++. so. 6 => /usr/lib 64/libstdc++. so. 6 (0 x 0000003770400000) libm. so. 6 => /lib 64/libm. so. 6 (0 x 000000376 ac 00000) libgcc_s. so. 1 => /lib 64/libgcc_s. so. 1 (0 x 000000376 f 000000) libc. so. 6 => /lib 64/libc. so. 6 (0 x 000000376 a 800000) /lib 64/ld-Linux-x 86 -64. so. 2 (0 x 000000376 a 400000)

Installing script files • Some software is written as cross-platform scripts. • These are distributed as source code, but do not need to be compiled to run. They are written in interpreted languages such as perl, python, ruby etc. • Installation is similar to that for binary executables

Script install example - bismark $ sudo su # cd /opt # wget http: //www. bioinformatics. babraham. ac. uk/projects/bismark_v 0. 20. 0. tar. gz 2018 -09 -12 14: 49: 19 (60. 6 MB/s) - ‘bismark_v 0. 20. 0. tar. gz’ saved [1411124/1411124] # tar -xzvf bismark_v 0. 20. 0. tar. gz Bismark_v 0. 20. 0/bismark Bismark_v 0. 20. 0/coverage 2 cytosine Bismark_v 0. 20. 0/bismark 2 report # cd Bismark_v 0. 20. 0/ #. /bismark --help DESCRIPTION The following is a brief description of command line options and arguments to control the Bismark bisulfite mapper and methylation caller. Bismark takes in Fast. A or Fast. Q files and aligns the reads to a specified bisulfite genome. Sequence reads are transformed into a bisulfite converted # export PATH=/opt/Bismark_v 0. 20. 0/: $PATH

Running script based programs • Two methods: • Call the interpreter and pass the script • Execute the script directly - interpreter taken from the first line # perl bismark --version Bismark - Bisulfite Mapper and Methylation Caller. Bismark Version: v 0. 20. 0 # bismark --version Bismark - Bisulfite Mapper and Methylation Caller. Bismark Version: v 0. 20. 0
![Script 'shebang' lines • The first line of a script file starts with #![interpreter]](http://slidetodoc.com/presentation_image/2a8e55a45cf14ef49d97cc8bdf19c499/image-116.jpg "Script 'shebang' lines • The first line of a script file starts with #![interpreter]")
Script 'shebang' lines • The first line of a script file starts with #![interpreter] • If your interpreter is in a different location you can edit the first line • You can also use the env program to take the first instance from your PATH #!/usr/bin/perl #!/opt/perl_5. 28. 0/bin/perl #!/usr/bin/env perl

Exercise 6

Installing from source code • Most software distributed as source code is written in C or C++ • Should come with a BUILD. txt or INSTALL. txt file • Most programs will use a build system to manage compilation • make • cmake • Many will use the autotools system to manage differences in configuration • Compilation will require various accessory packages to work

Anatomy of C/C++ compilation Compilation Source code files Library Header Files Make system Compiler Running Final Binary Libraries

Libraries and headers • We mentioned libraries earlier, as a way to include common code in several applications without duplicating it • At runtime a "dynamically linked" application needs the binary libraries to be available • During compilation, code which uses libraries will also need the library "header" file - a text file describing the capabilities of the library. These will not normally be installed, but will be available from the OS • For each library package there will be a corresponding 'dev' package containing the headers. These will be needed for compilation.

Setting up a build environment • Get all of the basic tools in one go • Ubuntu/Debian etc • sudo apt install build-essential • Cent. OS/Redhat etc. • sudo yum groupinstall "Development tools"

Standard autotools / make compilation • Four steps • configure Checks library dependencies and the capabilities of your system. Writes out a custom 'makefile' which should work for you. Allows for some customisation • make test Does the actual compilation Runs a test suite to make sure the binaries work (not always present) Moves the compiled binaries to their final location • make install • All of the steps involving make (but particularly the compilation) can be parallelised over multiple CPUs

Options for autotools • Configure • Some programs will offer custom options. Try. /configure --help • Main option here is to set the location for the installed files. By default these will go into the directories under /usr/local/. If you want to put them somewhere else you specify the --prefix option. Other options might be described in BUILD. txt. /configure --prefix=/opt/custom/ • Make • You can set the number of CPU cores to split the compilation over using the -j parameter make -j 10

$ wget -q ftp: //emboss. open-bio. org/pub/EMBOSS-6. 6. 0. tar. gz $ tar -xzf EMBOSS-6. 6. 0. tar. gz $ cd EMBOSS-6. 6. 0/ $ . /configure --prefix=/opt/EMBOSS/ > configure. log 2>&1 Installing EMBOSS 1. Configure checking for X 11/Xlib. h. . . no X 11 graphics have been selected but no X 11 header files have been found. $ sudo apt install libx 11 -dev $. /configure --prefix=/opt/EMBOSS/ > configure. log 2>&1 checking for X 11/Xlib. h. . . yes $ make -j 4 > make. log 2>&1 & $ tail -f make. log $ make test make: Nothing to be done for 'test'. $ sudo make install $ ls /opt/EMBOSS/ bin include lib share $ /opt/EMBOSS/bin/embossversion Report the current EMBOSS version number 6. 6. 0. 0 2. Make 3. Make test 4. Make install

Standard cmake installation • Slightly simpler than autotools • Create a build directory inside the source directory • Move into the build directory • Run cmake with the target being the directory above (cmake. . ) • Add -DCMAKE_INSTALL_PREFIX=/my/custom/dir if wanted • Run make, the same as for autotools

$ wget https: //github. com/pezmaster 31/bamtools/archive/v 2. 5. 1. tar. gz $ tar -xzf v 2. 5. 1. tar. gz $ cd bamtools-2. 5. 1/ $ mkdir build $ cd build $ sudo apt install cmake $ Installing Bam. Tools cmake -DCMAKE_INSTALL_PREFIX=/opt/bamtools/. . > cmake. log 2>&1 Could NOT find ZLIB (missing: ZLIB_LIBRARY ZLIB_INCLUDE_DIR) $ sudo apt install zlib 1 g-dev $ cmake -DCMAKE_INSTALL_PREFIX=/opt/bamtools/. . > cmake. log 2>&1 Found ZLIB: /usr/lib/x 86_64 -linux-gnu/libz. so (found version "1. 2. 11") $ make -j 4 > make. log 2>&1 & $ make test make: *** No rule to make target 'test'. Stop. $ sudo make install $ /opt/bamtools/bin/bamtools --version bamtools 2. 5. 1 Part of Bam. Tools API and toolkit Primary authors: Derek Barnett, Erik Garrison, Michael Stromberg (c) 2009 -2012 Marth Lab, Biology Dept. , Boston College

Exercise 7


Extending Languages v 2018 -11

Extending Languages • Most commonly used languages will have extensions which can be installed to provide new functionality • The extensions may not be written in the same language • C or C++ extensions to scripted languages are very common • We will look at how to extend different languages • R • Perl • Python

R packages

Installing R packages • Standard locations are either in site-wide R package folder, eg /usr/lib/R or in ~/R/ • Installation through a package repository • CRAN • Bio. Conductor • Manual installation from any source • Project site • Github etc.
 (R function to show the current search")
R Library Paths • . lib. Paths() (R function to show the current search path) • Controlled by environment variables • R_LIBS_USER • Set the root of a R library tree • Default personal directory is • ~/R/R. [version]$[platform]-library/

Installing R packages through CRAN • Installer and dependency resolution built into the language • Can install both binary and source packages • Source packages my have OS dependencies which will need to be fixed • From within R • install. packages(“packagename”) • Use sudo to launch R if you want to install for all users

Installing R packages from Bio. Conductor • Independent, bioinformatics oriented package repository • Has its own installer which you need to load • Different processes for different R versions • Older R (<3. 5. 0) • source("https: //bioconductor. org/bioc. Lite. R") • bioc. Lite() • Newer R (>=3. 5. 0) • install. packages("Bioc. Manager") • Bioc. Manager: : install()

Installing R packages from Bio. Conductor • Additional packages can be installed with • Old system • bioc. Lite("packagename") • New system • Bioc. Manager: : install("packagename") • Will handle dependency resolution both within Bioconductor and to CRAN repositories.

Installing R packages from other sources • Download the tar. gz file for the package • Run: • R CMD INSTALL package. tar. gz • Direct installation from github • Install the devtools package • library(devtools) • install_github(“user/repository”)

Exercise 8

Perl Modules

Installing Perl modules • Install from your OS repository • Structured naming format, Example: : Module would be perl-example-module • Won't be pulled from here any other way • May end up with duplicates • Automated install using CPAN. pm • Use a module to install modules. • Ships alongside Perl • Manual installation • Follows a standard recipe

Perl module search path • Searches through directories in @INC • Can see these with perl -V • Can add locations using PERL 5 LIB environment variable @INC: /bi/apps/perl_modules/lib/perl 5/x 86_64 -linux-thread-multi /bi/apps/perl_modules/lib/perl 5 /bi/apps/perl_modules/share/perl 5/ /bi/apps/perl_modules/lib/perl 5/x 86_64 -linux-thread-multi /bi/apps/perl_modules/lib 64/perl 5 /usr/local/share/perl 5 /usr/lib 64/perl 5/vendor_perl /usr/share/perl 5/vendor_perl /usr/lib 64/perl 5 /usr/share/perl 5.

Installing Perl modules - Using cpan • Run cpan install Example: : Module • Automated download, configuration and installation • Does the same steps as a manual install • Can resolve dependencies • Configuration on first use To install modules, you need to configure a local Perl library directory or escalate your privileges. CPAN can help you by bootstrapping the local: : lib module or by configuring itself to use 'sudo' (if available). You may also resolve this problem manually if you need to customize your setup. What approach do you want? [local: : lib] (Choose 'local: : lib', 'sudo' or 'manual')
 Maker Build • perl Makefile. PL")
Manual Perl Module installation (after download and un-tarring) Maker Build • perl Makefile. PL • make test • make install (with sudo? ) • perl Build. PL • . /Build test • . /Build install (with sudo? )
 • @INC: • /usr/local/share/perl/5.")
Installing in non-standard locations • perl -V (look at @INC) • @INC: • /usr/local/share/perl/5. 26. 1 • /usr/share/perl/5. 26 • /usr/local/lib/site_perl Makefile. PL INSTALL_BASE=/my/dir perl Build. PL --install_base=/my/dir • Add folders to PERL 5 LIB environment variable

Exercise 9

Python packages

Installing python packages • Several options 1. 2. 3. 4. OS system packages Automated install with pip Manual install Install from source code repository

Python package locations • Searches in directories in sys. path • Can add directories by modifying PYTHONPATH $ python Python 2. 7. 3 (default, Feb 15 2013, 11: 09: 45) [GCC 4. 4. 6 20110731 (Red Hat 4. 4. 6 -3)] on linux 2 Type "help", "copyright", "credits" or "license" for more information. >>> import sys >>> print ("n". join(sys. path)) /bi/apps/python/2. 7. 3/lib/python 27. zip /bi/apps/python/2. 7. 3/lib/python 2. 7/plat-linux 2 /bi/apps/python/2. 7. 3/lib/python 2. 7/lib-tk /bi/apps/python/2. 7. 3/lib/python 2. 7/lib-old /bi/apps/python/2. 7. 3/lib/python 2. 7/lib-dynload /bi/apps/python/2. 7. 3/lib/python 2. 7/site-packages/ipython-0. 13. 1 -py 2. 7. egg /bi/apps/python/2. 7. 3/lib/python 2. 7/site-packages/ply-3. 4 -py 2. 7. egg /bi/apps/cellprofiler/Cell. Profiler-2. 2. 0 /bi/apps/python/2. 7. 3/lib/python 2. 7/site-packages/gtk-2. 0 /bi/apps/python/2. 7. 3/lib/python 2. 7/site-packages

Installing python packages with pip • apt/yum install python-pip • pip install numpy • pip install --user numpy • pip install --upgrade numpy • Check pip vs pip 3
 • python setup. py install •")
Manual python package installation (after download and un-tarring) • python setup. py install • python 3 setup. py install --prefix=/my/folder • Will fail initially as final destination isn't in PYTHONPATH • Will tell you what folder to add • Rerun install after fixing PYTHONPATH • If the custom location is outside your home directory then you'll need to modify the global PYTHONPATH by editing /etc/bashrc (or one of the other global shell config files)

Exercise 10


Automated installers and Containers v 2018 -11

Automated Installers • Like a package manager, but independent of Operating System • Some will operate from source, distributing recipes • Some will distribute pre-compiled binaries • Most common examples • Conda • Easy Build (https: //conda. io) (https: //easybuild. readthedocs. io)

Conda • Package management system • Originally for python packages, but now covers all types of software • Several Implementations • Anaconda (original distribution, with a full python environment) • Miniconda (small distribution, just for running conda) • Add-in repositories for more packages • Bio. Conda (https: //bioconda. github. io/)
 • Set up some")
Using conda • Install a conda providing environment (probably miniconda) • Set up some channels (bioconda) • Install some packages • Use the packages

Installing miniconda • Go to https: //conda. io/miniconda. html • Download the shell script for your platform • Run it • Will install into your home directory - each user gets a separate install • Will offer to modify your PATH to include the miniconda bin directory* *Be careful about this!!

Adding bioconda channels • conda config --add channels bioconda • conda config --add channels conda-forge • Bioconda will now be searched for new installs
![Installing packages with conda • Simple installs [but don't do this] • conda install](http://slidetodoc.com/presentation_image/2a8e55a45cf14ef49d97cc8bdf19c499/image-159.jpg "Installing packages with conda • Simple installs [but don't do this] • conda install")
Installing packages with conda • Simple installs [but don't do this] • conda install bwa=0. 7. 4 • Custom environments • • conda create -n aligners source activate aligners conda install bwa bowtie 2 hisat 2 source deactivate

Problems with conda? • Only software available in the repositories • Pretty comprehensive these days • Closed environment • Can't mix and match with things from the base OS (well you can, but stuff will break!) • Duplication • Every user (and every environment) gets their own copy of everything • Duplication (again) • Will install its own R / perl / python etc and will put it first in the path • Can break non-conda applications in odd ways • Always use a named environment

Exercise 11

Containers

Containers • A method for bundling software and data together into a single item which can be ported easily between users/computers • Can provide an isolated environment - similar to a VM or a conda environment, or make a suite of programs/data look like an application • Main systems • Docker* • Singularity* *They play nicely together (https: //www. docker. com/) (https: //www. sylabs. io/singularity/)
 • Singularity. Hub (https:")
Finding a container • Docker. Hub (https: //hub. docker. com) • Singularity. Hub (https: //singularity-hub. org) • Search for the application / user / container you want • Find the address (user/name) eg vsoch/hello-world

Installing singularity • Available from apt in Debian/Ubuntu • sudo apt install singularity-container • Note that just "singularity" is a game! • Compile from source (https: //github. com/sylabs/singularity/releases) • v 2. 6. 0 is autotools based - similar install to previous apps • v 3. 0. 0 is re-written in GOLang so has a custom install procedure

Installing a container • Download from a repository and install onto your machine • singularity pull shub: //dleehr/qiime 2 -singularity • singularity pull docker: //qiime 2/core • File names can get a bit long, so: • singularity pull --name qiime. simg docker: //qiime 2/core • Produces a. simg file on your machine

Using a container • Different options. You can start a shell in the environment of the container • singularity shell qiime. simg • You can run a script which the image provides • singularity run qiime. simg • . /qiime. simg

Exercise 12


Different types of Linux installation v 2018 -11

Types of Linux installation • Bare metal • Physical hardware • CD / DVD / USB / Network installation • Virtual Machine • Runs within another operating system • Portable / disposable • Install from ISO / Network • Cloud • Virtual machine on someone else's hardware • Amazon / Google are the main providers • Range of available hardware and OS images available

Installing bare metal or in a VM • Essentially the same process • Uses an installer provided by the Linux distribution • Two main types • Live image • Boot into a working OS from a CD/DVD/USB • Copy the image to a hard drive and boot from there • Little to no configuration options - need to modify post install • Real installer • Guided installation process in a custom installer • Many options (software, networking, disk partitioning etc. ) • More flexibility, but more hassle

Installing into a Virtual. Box VM

Exercise 14

Creating an Amazon EC 2 server • Create an AWS account (will require a credit card, but test servers can be run for free) • https: //aws. amazon. com • Create a key pair • Create an EC 2 instance • Connect to the image using the key • Do what you want • Shut it down (so you stop being charged!)

Create a key pair • Key Pairs > Create Key Pair • Give it a name • Download the. pem file which it creates

Create an EC 2 instance • Instances > Launch Instance • Select hardware and base OS

Launch instance and set keys

Find instance details • Under instances • Find username • • For Amazon Linux 2 or the Amazon Linux AMI, the user name is ec 2 -user. For a Centos AMI, the user name is centos. For a Debian AMI, the user name is admin or root. For a Fedora AMI, the user name is ec 2 -user or fedora. For a RHEL AMI, the user name is ec 2 -user or root. For a SUSE AMI, the user name is ec 2 -user or root. For an Ubuntu AMI, the user name is ubuntu.
![Connect to the instance via SSH using your key • ssh -i [key_file. pem]](http://slidetodoc.com/presentation_image/2a8e55a45cf14ef49d97cc8bdf19c499/image-180.jpg "Connect to the instance via SSH using your key • ssh -i [key_file. pem]")
Connect to the instance via SSH using your key • ssh -i [key_file. pem] username@address. from. ec 2

Terminate your instance • Instances > Right click > Terminate • Will be warned about deleting the underlying storage

Storage • Simple instances come with limited, temporary storage • For serious work you want additional storage • Configure storage bins • Add them to one (or more) images • Add data to them • Storage bins exist independently of the compute instances • Simple stores for applications or databases • File system storage for concurrent access Elastic Block Store (EBS) Elastic File System (EFS) $$$$$$ • Large data storage and processing/archiving Simple Storage Service (S 3) $$ • Long term archiving Glacier $

Exercise 15

- Slides: 184