Light Microscopy Dr R Babu Rajendran Professor Dept

Light Microscopy Dr. R. Babu Rajendran Professor Dept. of Environmental Biotechnology Bharathidasan University

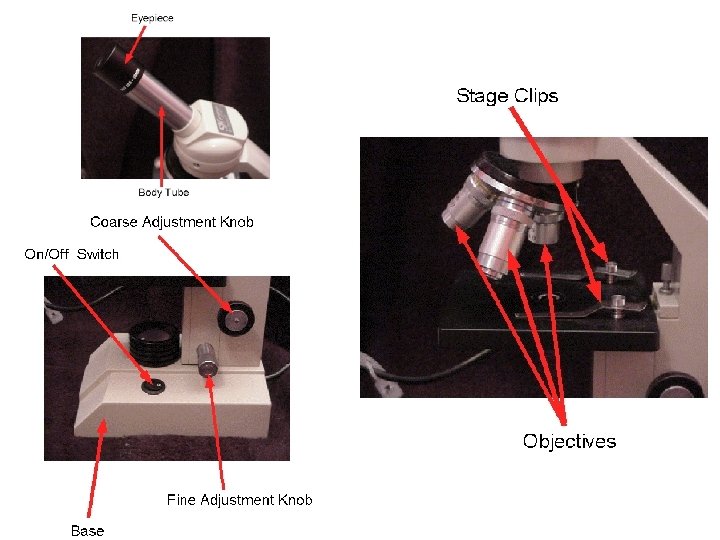
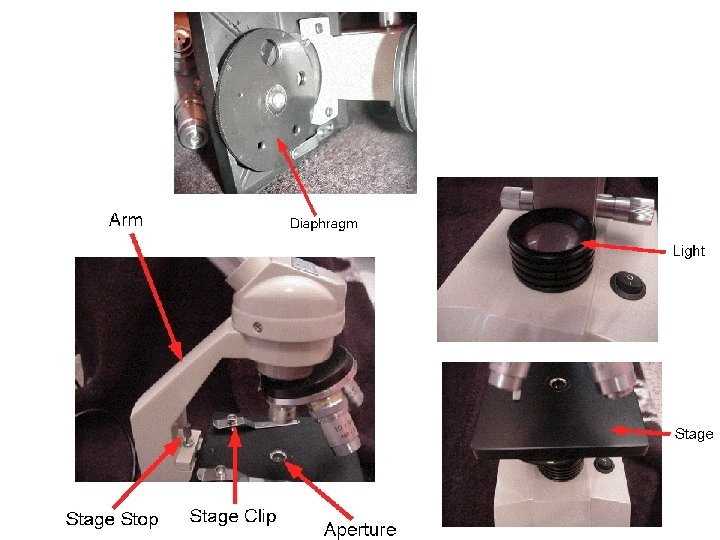
Compound Microscope Parts 1. Eyepiece 2. Objectives 3. Fine Adjustment Knob 4. Power Switch 5. Stage 6. Diaphragm 7. Base 8. Body Tube 9. Nosepiece 10. Stage Clips 11. Stage Stop 12. Coarse Adjustment Knob 13. Aperture 14. Arm 15. Light Source

A Microscope’s Light Path : The light path in an advanced bright field microscope and the location of the virtual image

Slide Preparations Types Wet Mount Slide Dry Mount Slide Heat Fix Slide Simple Stain Slide

Total Magnification • To figure the total magnification of an image that you are viewing through the microscope is really quite simple. • To get the total magnification take the power of the objective (4 X, 10 X, 40 X) and multiply by the power of the eyepiece, usually 10 X.

Comparison of Magnification Elodea is a genus of aquatic plants often called the waterweeds.

How it works? • Light from an incandescent source is aimed toward a lens beneath the stage called the condenser, through the specimen, through an objective lens, and to the eye through a second magnifying lens, the ocular or eyepiece. • We see objects in the light path because natural pigmentation or stains absorb light differentially, or because they are thick enough to absorb a significant amount of light despite being colorless. Diagram Showing Light Traveling Through The Microscope

Numerical Aperture in Microscopy • The angular aperture θ is 1/2 the angle of the cone of light that enters a lens from a specimen, and the numerical aperture is n sin θ. • In the right-hand illustration the lens has larger angular (θ) and numerical apertures n sin θ; its resolution is greater and its working distance smaller.

Microscope Resolution • The most important part of the microscope is the objective, which must produce a clear image, not just a magnified one. Thus resolution is extremely important. • Resolution is the ability of a lens to separate or distinguish between small objects that are close together. • The minimum distance (d) between two objects that reveals them as separate entities is given by the Abbé equation, in which lambda (λ) is the wavelength of light used to illuminate the specimen and n sin θ is the numerical aperture (NA).

• Abbé equation indicates that a major factor in resolution is the wavelength of light used. • The wavelength must be shorter than the distance between two objects or they will not be seen clearly. • Thus the greatest resolution is obtained with light of the shortest wavelength, light at the blue end of the visible spectrum (in the range of 450 to 500 nm).

Need of Oil Immersion Lens • The angle of the cone of light that can enter a lens depends on the refractive index (n) of the medium in which the lens works, as well as upon the objective itself. • The refractive index for air is 1. 00. Since sin θ cannot be greater than 1 (the maximum θ is 90° and sin 90° is 1. 00), no lens working in air can have a numerical aperture greater than 1. 00. • The only practical way to raise the numerical aperture above 1. 00, and therefore achieve higher resolution, is to increase the refractive index with immersion oil, a colorless liquid with the same refractive index as glass.

• If air is replaced with immersion oil, many light rays that did not enter the objective due to reflection and refraction at the surfaces of the objective lens and slide will now do so. • An increase in numerical aperture and resolution results. The Oil Immersion Objective: An oil immersion objective operating in air and with immersion oil.

The Properties of Microscope Objectives

Images taken Using Light Microscopy

The Dark-Field Microscope • Living, unstained cells and organisms can be observed by simply changing the way in which they are illuminated. • A hollow cone of light is focused on the specimen in such a way that unreflected and unrefracted rays do not enter the objective. • Only light that has been reflected or refracted by the specimen forms an image. • The field surrounding a specimen appears black, while the object itself is brightly illuminated because the background is dark, this type of microscopy is called dark-field microscopy.

Dark-Field Microscopy The simplest way to convert a microscope to dark-field microscopy is to place (a) a dark-field stop underneath (b) the condenser lens system. The condenser then produces a hollow cone of light so that the only light entering the objective comes from the specimen.

Images taken Using Dark-Field Microscopy

Thank You…
- Slides: 20