Lecture Slides Chapter 8 Screws Fasteners and the

- Slides: 26

Lecture Slides Chapter 8 Screws, Fasteners, and the Design of Nonpermanent Joints © 2015 by Mc. Graw-Hill Education. This is proprietary material solely for authorized instructor use. Not authorized for sale or distribution in any manner. This document may not be copied, scanned, duplicated, forwarded, distributed, or posted on a website, in whole or part.

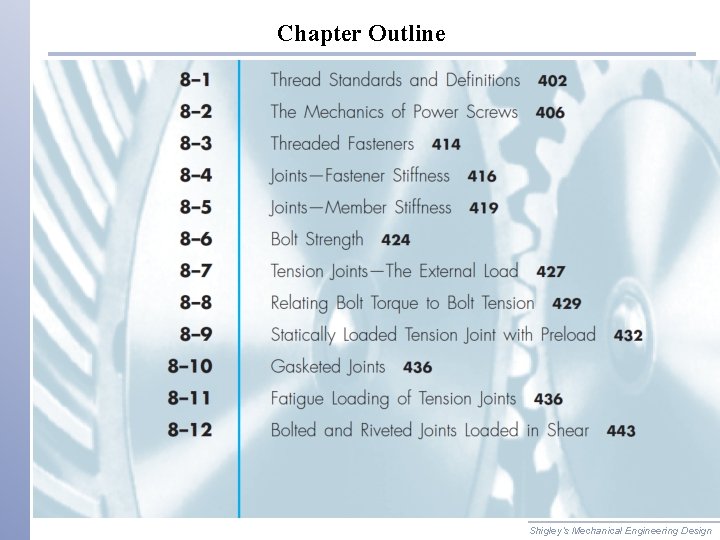
Chapter Outline Shigley’s Mechanical Engineering Design

Reasons for Non-permanent Fasteners � Field assembly � Disassembly � Maintenance � Adjustment Shigley’s Mechanical Engineering Design

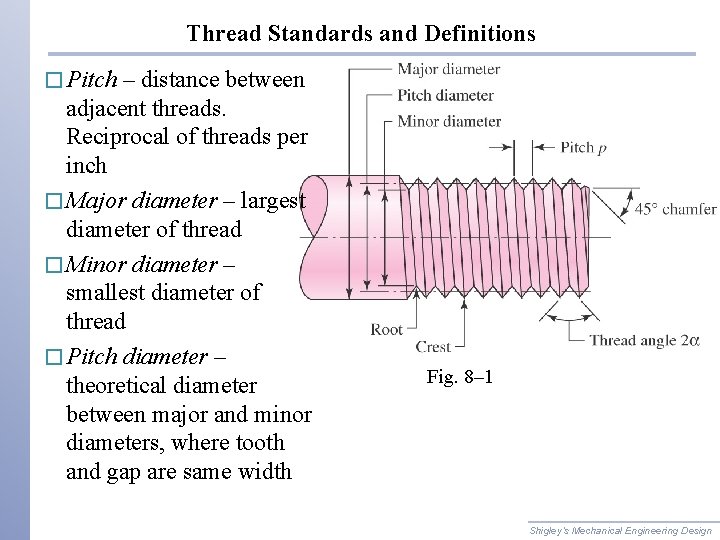
Thread Standards and Definitions � Pitch – distance between adjacent threads. Reciprocal of threads per inch � Major diameter – largest diameter of thread � Minor diameter – smallest diameter of thread � Pitch diameter – theoretical diameter between major and minor diameters, where tooth and gap are same width Fig. 8– 1 Shigley’s Mechanical Engineering Design

Standardization • The American National (Unified) thread standard defines basic thread geometry for uniformity and interchangeability • American National (Unified) thread • UN normal thread • UNR greater root radius for fatigue applications • Metric thread • M series (normal thread) • MJ series (greater root radius) Shigley’s Mechanical Engineering Design

Standardization • Coarse series UNC • General assembly • Frequent disassembly • Not good for vibrations • The “normal” thread to specify • Fine series UNF • Good for vibrations • Good for adjustments • Automotive and aircraft • Extra Fine series UNEF • Good for shock and large vibrations • High grade alloy • Instrumentation • Aircraft Shigley’s Mechanical Engineering Design

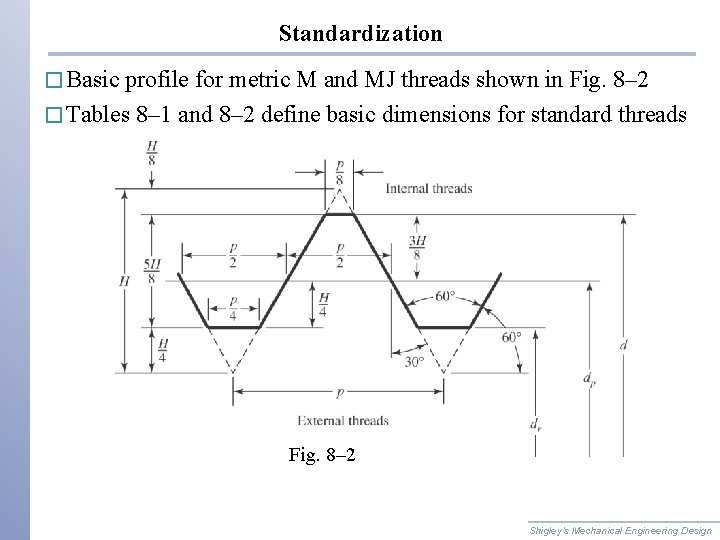
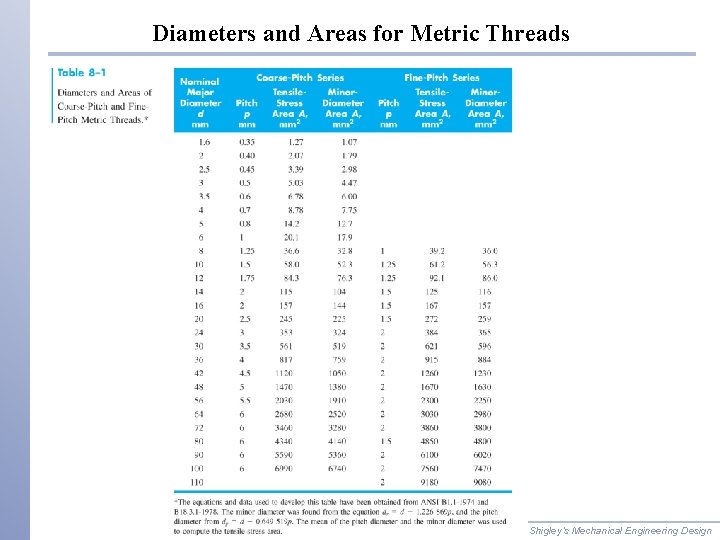
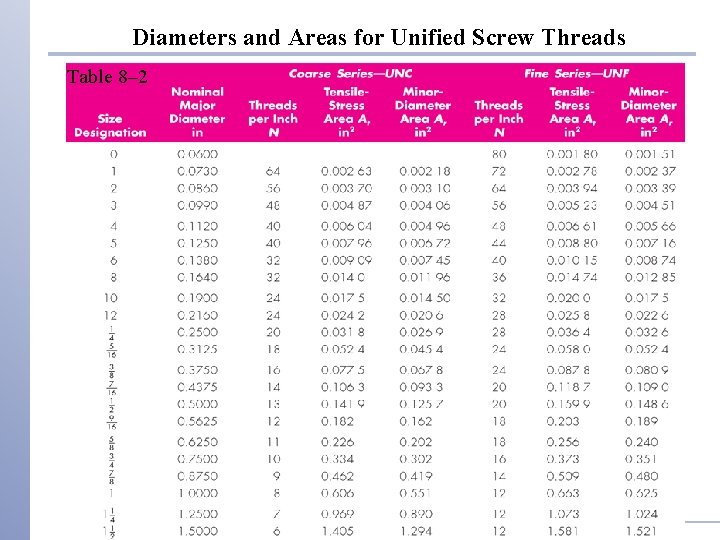
Standardization � Basic profile for metric M and MJ threads shown in Fig. 8– 2 � Tables 8– 1 and 8– 2 define basic dimensions for standard threads Fig. 8– 2 Shigley’s Mechanical Engineering Design

Diameters and Areas for Metric Threads Shigley’s Mechanical Engineering Design

Diameters and Areas for Unified Screw Threads Table 8– 2

Tensile Stress Area • The tensile stress area, At , is the area of an unthreaded rod with the same tensile strength as a threaded rod. • It is the effective area of a threaded rod to be used for stress calculations. • The diameter of this unthreaded rod is the average of the pitch diameter and the minor diameter of the threaded rod. Shigley’s Mechanical Engineering Design

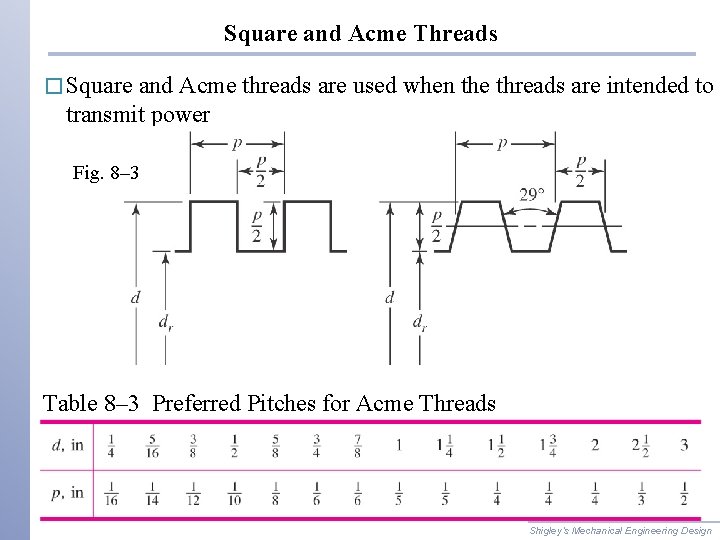
Square and Acme Threads � Square and Acme threads are used when the threads are intended to transmit power Fig. 8– 3 Table 8– 3 Preferred Pitches for Acme Threads Shigley’s Mechanical Engineering Design

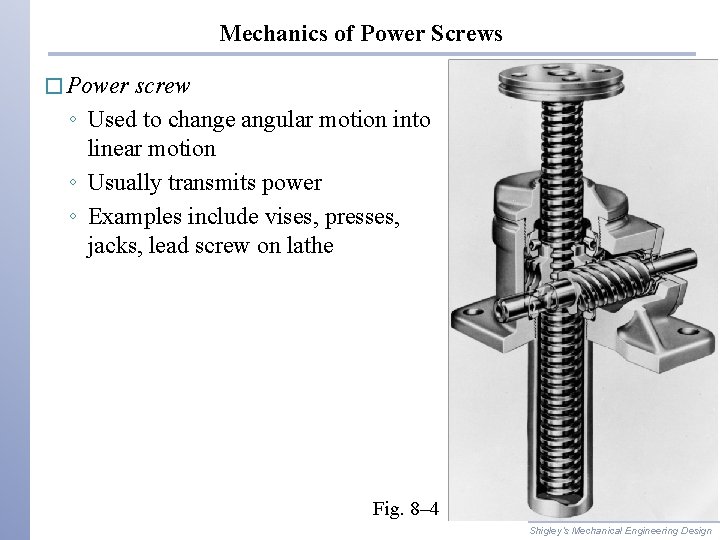
Mechanics of Power Screws � Power screw ◦ Used to change angular motion into linear motion ◦ Usually transmits power ◦ Examples include vises, presses, jacks, lead screw on lathe Fig. 8– 4 Shigley’s Mechanical Engineering Design

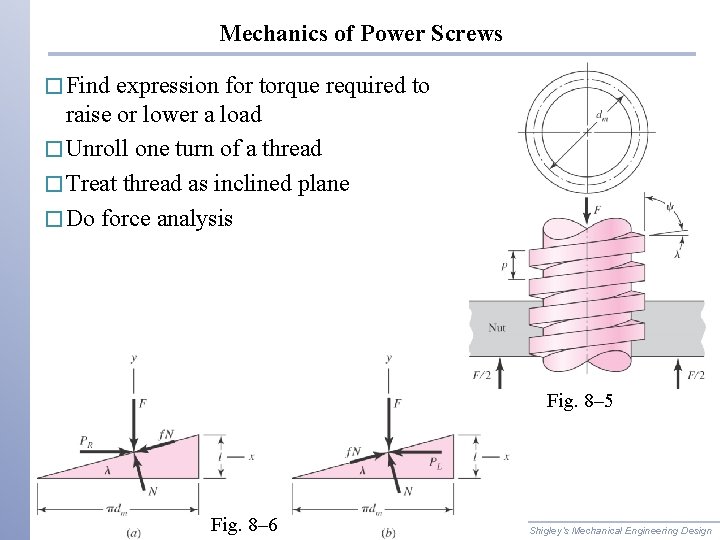
Mechanics of Power Screws � Find expression for torque required to raise or lower a load � Unroll one turn of a thread � Treat thread as inclined plane � Do force analysis Fig. 8– 5 Fig. 8– 6 Shigley’s Mechanical Engineering Design

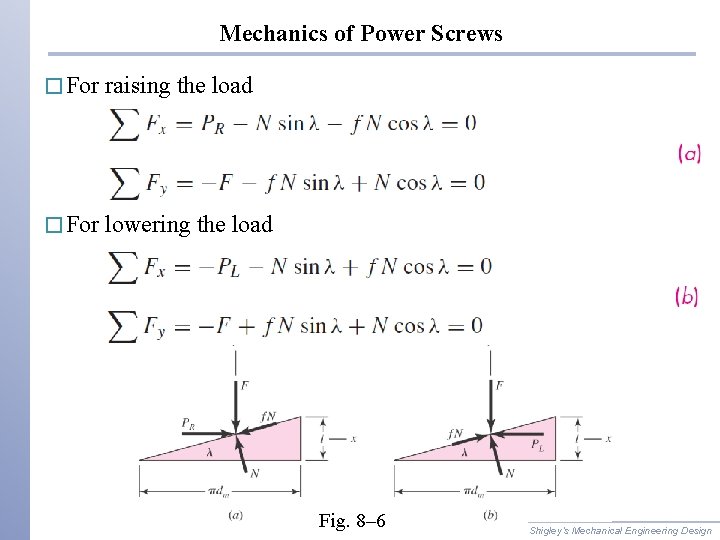
Mechanics of Power Screws � For raising the load � For lowering the load Fig. 8– 6 Shigley’s Mechanical Engineering Design

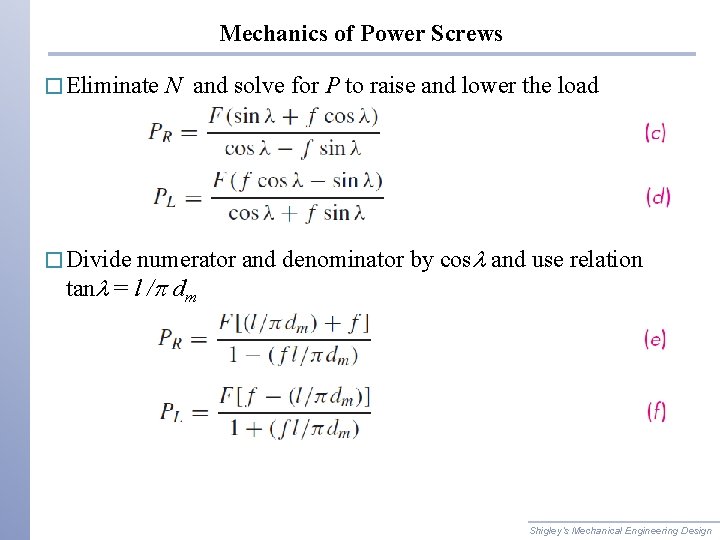
Mechanics of Power Screws � Eliminate N and solve for P to raise and lower the load numerator and denominator by cosl and use relation tanl = l /p dm � Divide Shigley’s Mechanical Engineering Design

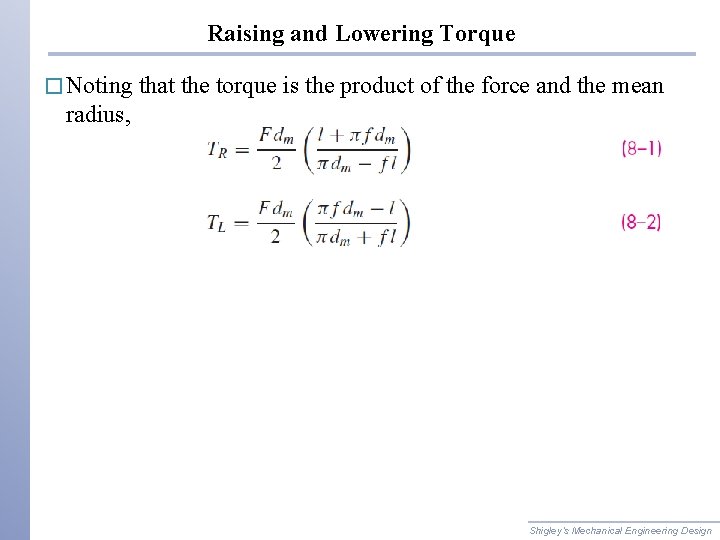
Raising and Lowering Torque � Noting that the torque is the product of the force and the mean radius, Shigley’s Mechanical Engineering Design

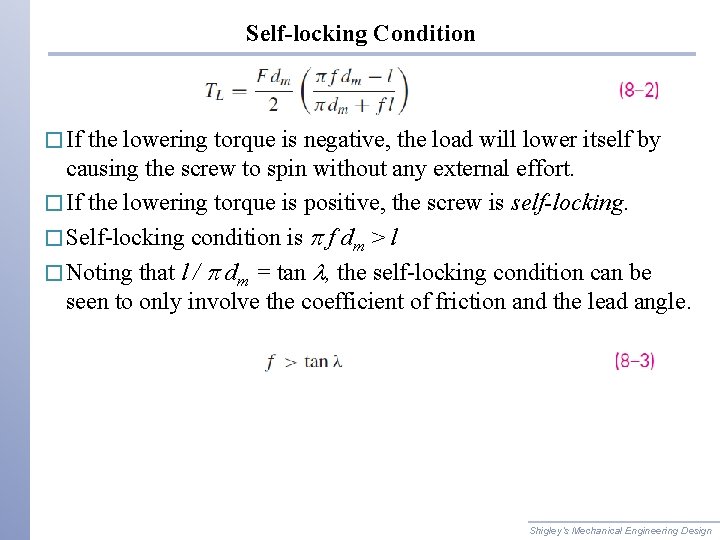
Self-locking Condition � If the lowering torque is negative, the load will lower itself by causing the screw to spin without any external effort. � If the lowering torque is positive, the screw is self-locking. � Self-locking condition is p f dm > l � Noting that l / p dm = tan l, the self-locking condition can be seen to only involve the coefficient of friction and the lead angle. Shigley’s Mechanical Engineering Design

Power Screw Efficiency � The torque needed to raise the load with no friction losses can be found from Eq. (8– 1) with f = 0. � The efficiency of the power screw is therefore Shigley’s Mechanical Engineering Design

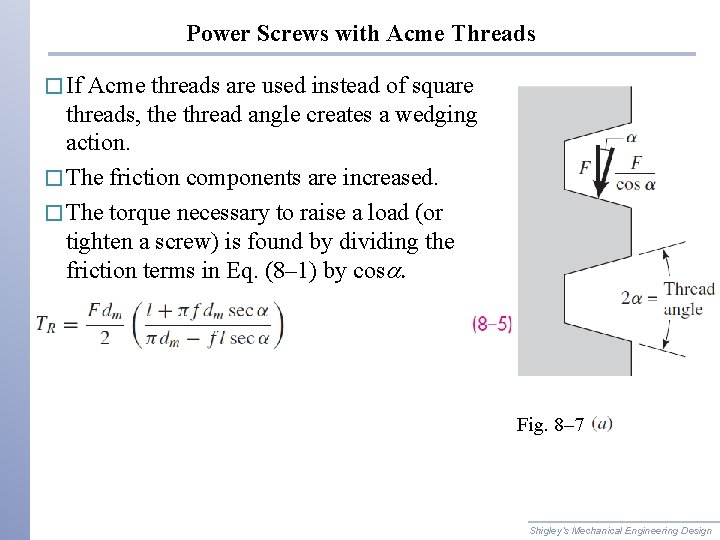
Power Screws with Acme Threads � If Acme threads are used instead of square threads, the thread angle creates a wedging action. � The friction components are increased. � The torque necessary to raise a load (or tighten a screw) is found by dividing the friction terms in Eq. (8– 1) by cosa. Fig. 8– 7 Shigley’s Mechanical Engineering Design

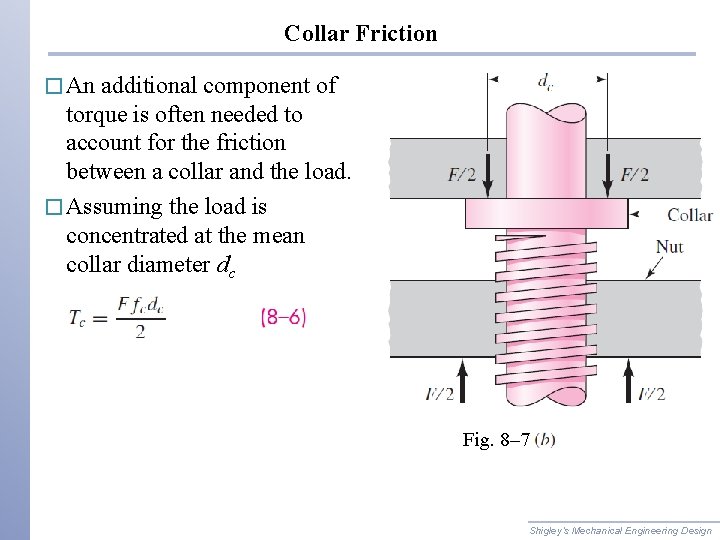
Collar Friction � An additional component of torque is often needed to account for the friction between a collar and the load. � Assuming the load is concentrated at the mean collar diameter dc Fig. 8– 7 Shigley’s Mechanical Engineering Design

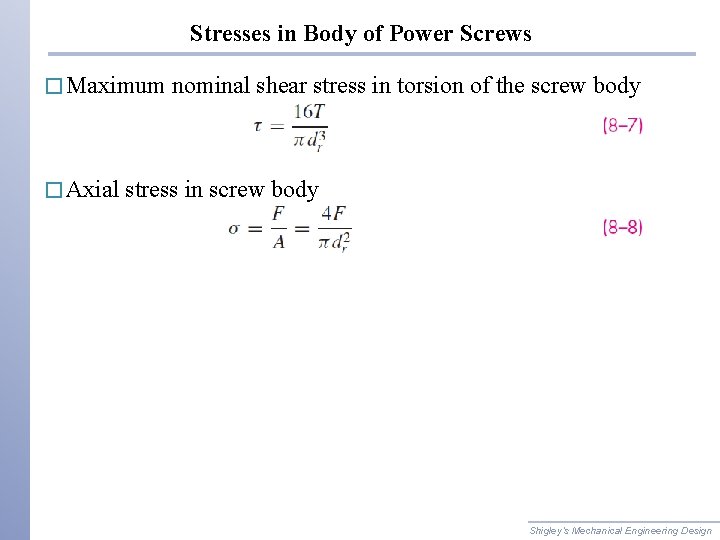
Stresses in Body of Power Screws � Maximum � Axial nominal shear stress in torsion of the screw body stress in screw body Shigley’s Mechanical Engineering Design

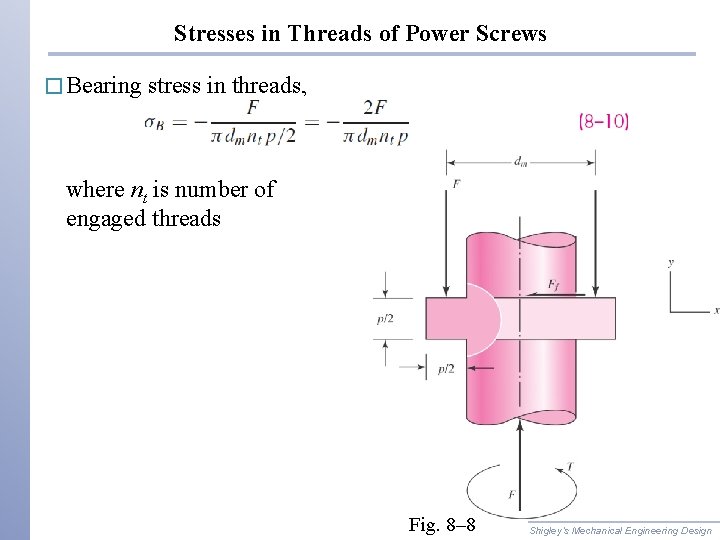
Stresses in Threads of Power Screws � Bearing stress in threads, where nt is number of engaged threads Fig. 8– 8 Shigley’s Mechanical Engineering Design

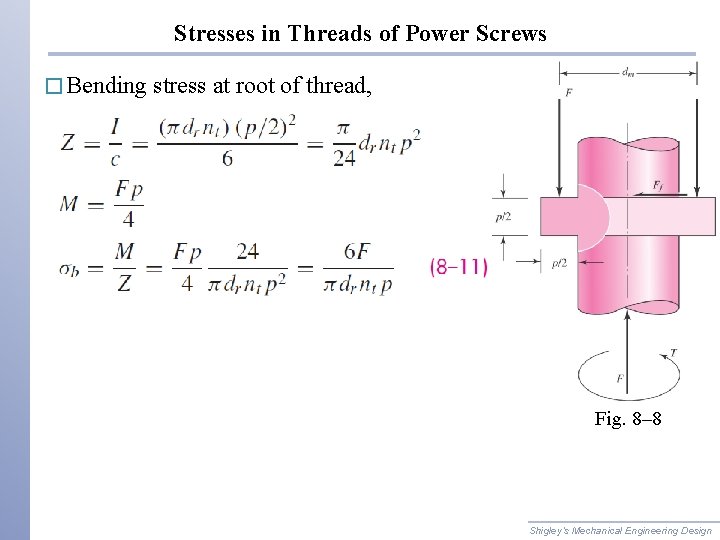
Stresses in Threads of Power Screws � Bending stress at root of thread, Fig. 8– 8 Shigley’s Mechanical Engineering Design

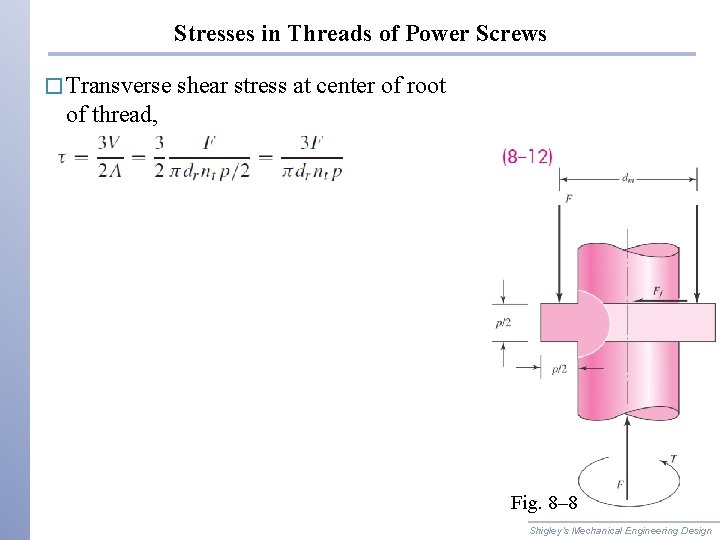
Stresses in Threads of Power Screws � Transverse shear stress at center of root of thread, Fig. 8– 8 Shigley’s Mechanical Engineering Design

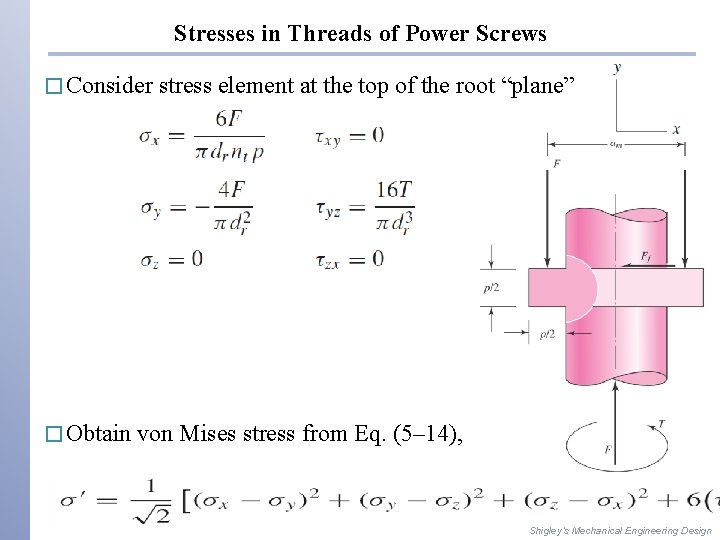
Stresses in Threads of Power Screws � Consider � Obtain stress element at the top of the root “plane” von Mises stress from Eq. (5– 14), Shigley’s Mechanical Engineering Design

Thread Deformation in Screw-Nut Combination � Power screw thread is in compression, causing elastic shortening of screw thread pitch. � Engaging nut is in tension, causing elastic lengthening of the nut thread pitch. � Consequently, the engaged threads cannot share the load equally. � Experiments indicate the first thread carries 38% of the load, the second thread 25%, and the third thread 18%. The seventh thread is free of load. � To find the largest stress in the first thread of a screw-nut combination, use 0. 38 F in place of F, and set nt = 1. Shigley’s Mechanical Engineering Design