LECTURE ON LIS ver 2 for SCHOOL HEADS


, then click")


 CLICK SCHOOL FORMS TO OPEN")


- Slides: 111
LECTURE ON LIS ver. 2 for SCHOOL HEADS BY FEDERICO M. CALDERON JR. Planning Officer II DIVISION OF MALABON CITY NCR
REMINDER: Before you will go on, please consider these reminder 1. Do not use arrow keys to go to the next slide 2. Click these symbol: NEXT SLIDE PREVIOUS SLIDE HOME (RETURN TO TOPIC (CONTENTS)
TABLE OF CONTENTS “Click the Topic you want to display” ACCESSING THE LIS VER 2 – GETTING STARTED – FIRST LOG IN REMOVING UN-NECESSARY SECTION/CLASS HOW TO SIGN OUT HOW TO LOGIN (SECOND TIME AND SO FORTH………. . ) HOW TO MANAGE/ADD CLASS ADVISER ACCOUNT ASSIGNING AN ADVISER TO A CERTAIN CLASS/SECTION CREATING NEW CLASS/SECTION EDIT PROFILE OF PUPIL/STUDENT ENROLLED CREATING AN LRN OF PUPILS/STUDENTS DOWNLOADING/PRINTING OF SCHOOL FORMS ENROLLING PUPILS/STUDENTS WHO ARE ENROLLED IN THE PREVIOUS SCHOOL YEAR HOW TO CHANGE PASSWORD Enrolling Individual Pupil/Student with UN-ENROL PUPIL/STUDENT IN A GRADE AND SECTION HOW TO SEARCH LEARNER WITH LRN HOW TO SEARCH LEARNER WITHOUT LRN HOW TO RESET PASSWORD OF CLASS ADVISER
GETTING STARTED To access the LIS, type lis. deped. gov. ph at the address or location bar of a web browser, then press Enter.
This will connect you to the LIS login page as shown in (Figure 1. 1 -1: Login Page). Enter your username and password, then click the “Sign In” button. A successful login will direct the user to the LIS Dashboard At the onset, a school may use the same account details as in the EBEIS. In this case, the user is first directed to an account validation facility or the “Account Check” page. USE THE EBEIS USERNAME AND PASSWORD, IF YOU FORGOT, PLEASE CALL YOUR PLANNING OFFICER TO RESET, RESETTING MEANS USERNAME AND PASSWORD ARE THE SAME Figure 1. 1 -1: Login Page
Figure 1. 2 -1: Account Check If it is your first time to login using the default school user account, the system will prompt you to change your default password in the “Figure 1. 2 -1: Account Check (Update Password) page”. Enter your new password twice then click “Update” button to save your changes. Upon completing the password change, the system displays the message “password changed”.
After typing the New Password, it displayed Password changed (pls. don’t forget to record your password) Type the First Name, Middlename and Lastname of the School Head, then click Search
No existing personnel record found, Click new record to create new one, Click New Record
Click Complete Personnel Record
Fill up the required field, then click SAVE
Click Continue
This is the School DASHBOARD, click View Masterlist
Since you are viewing the Current School Year, so you can see No enrolment found, Click Import previous SY classes to create classes based on previous SY
Click List of Classes to display the Imported Classes from previous School Year END OF THE TOPIC – CLICK HOME TO GOTO TOPIC CLICK HERE
Click this ICON to return to TABLE OF CONTENTS
SIGNOUT LIS Click Sign out Dep. Ed Connect END OF THE TOPIC – CLICK HOME TO GOTO TOPIC CLICK HERE
Click this ICON to return to TABLE OF CONTENTS
LOG IN FOR THE SECOND TIME AND SO FORTH…. Type lis. deped. gov. ph in the address bar Type USERNAME AND NEW PASSWORD, THEN CLICK SIGN IN
CLICK Learner Information System
MENU Click List of Classes or any of the Menu MAIN MENU
In here, you can now do what you want, like Enroll, Create LRN, etc END OF THE TOPIC – CLICK HOME TO GOTO TOPIC CLICK HERE
Click this ICON to return to TABLE OF CONTENTS
REMOVING UN-NECESSARY EMPTY SECTION OR CLASS/S Click List of Classes, From imported Previous SY Classes, if you want to remove a class in a certain Grade/Year, select a Section/Class to remove, say Grade 4, Section GO, click pulldown menu, select Class settings
In the class settings, Click Remove, to remove the Class, it will return to the List of Classes NOTE: You cannot remove a class with enrolment
Section GO in Grade 4 is already removed END OF THE TOPIC – CLICK HOME TO GOTO TOPIC CLICK HERE
Click this ICON to return to TABLE OF CONTENTS
CREATING CLASS/SECTION In the List of Classes Menu, Click Create Class
Class Create, Click List of Classes Menu
Section Mango is added in Kinder END OF THE TOPIC – CLICK HOME TO GOTO TOPIC CLICK HERE
HOW TO MANAGE/ADD CLASS ADVISER ACCOUNT? In the Dashboard (Click Dashboard Menu, Click the Pulldown Menu, Click Settings
Click Personnel Record to manage personnel
Click Manage Personnel to open the list of Personnel in the School
Click Add Personnel
Type First Name and Last Name then click Search
CLICK NEW RECORD
CLICK COMPLETE PERSONNEL RECORD
Fill up the required field for the Class Adviser
In the Username of the Class Adviser, please use this format: School ID_intial, ex. 100001 acmedrano This will be the username and default password if an adviser will log in to LIS System, then click SAVE
To Edit the Personnel Data, just click Update After Saving, Personnel Added is displayed at top of the screen, if you want to Add another Personnel, please follow slide 30 to 35 End of Topic – Click Home CLICK HERE TO GOTO SLIDE 30
Click this ICON to return to TABLE OF CONTENTS
ASSIGNING AN ADVISER TO A CLASS/SECTION Click the List of Classes Menu, select the Grade and Section you want to set Class Adviser, click pulldown menu, select Class settings
Click Set Adviser
Select the Name of Adviser in the list, Click Select
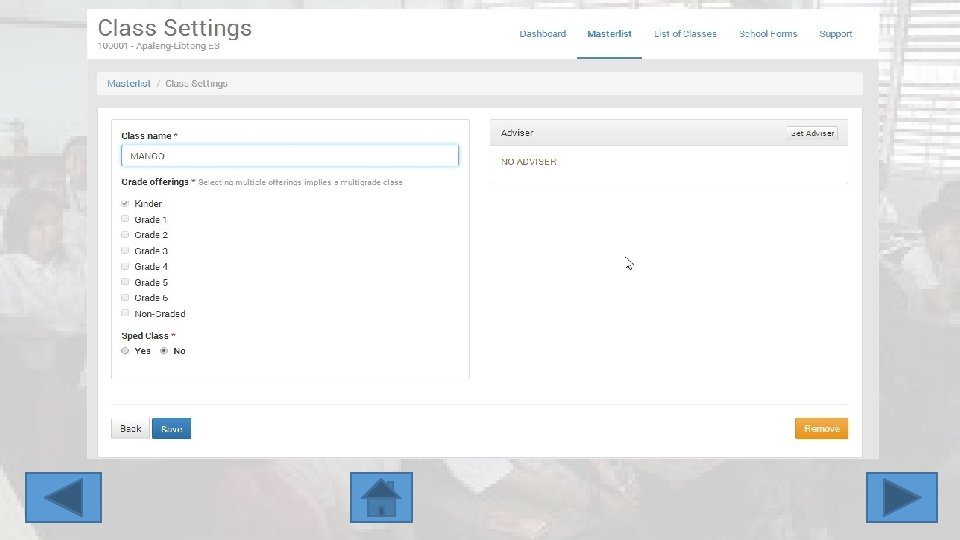
You can also edit the Class Name Click Save after editing/setting an Adviser to save changes
After saving, Class updated is displayed in the screen With Adviser With/out Adviser In the List of Classes Menu, when you see like in the figure above, you can now determine if a class or section has no Adviser End of Topic – Click Home
Click this ICON to return to TABLE OF CONTENTS
HOW TO SEARCH LEARNER WITH LRN Click List of Classes
Pulldown Menu Select any Grade and Section, use the pulldown menu, then click Enrol Learner
Click Search LRN
TYPE THE LRN OF PUPIL/STUDENT, THEN CLICK SEARCH BUTTON
Click Enrol if you want to enroll End of Topic – Click Home
Click this ICON to return to TABLE OF CONTENTS
HOW TO SEARCH LEARNER WITHOUT LRN Click List of Classes
pulldown menu Select any Grade and Section, use the pulldown menu, then click Enrol Learner
Type the First name and Last name, then click Search
Type again the Middle Name, then Click Search Note: As of March 2, if no middle name, type NA to continue
Type again the Birth date, then click Preview Matched to display the LRN and Enrolment History
CLICK ENROL IF YOU WANT TO ENROLL End of Topic – Click Home
Click this ICON to return to TABLE OF CONTENTS
CREATING LRN NUMBER OF PUPILS/STUDENTS AND ENROLLING THEM IN THE CURRENT SCHOOL YEAR This facility is applied to all Kinder Pupils, pupils transferred from Private Schools, Balik Aral, students from Private Schools Click the pulldown menu, then select Enrol Learner In the list of Classes, select the Grade and Section you want to enrol the pupils without LRN
Type the First Name, Middle name and Last Name (with correct spelling), then click Search
CLICK NEW RECORD TO CREATE AN LRN
Click Complete Enrolment Record to Enter other details of pupils/students
Fill up the required information of the Pupils/ Students, then click Enrol to enroll and Create LRN
Click the List of Classes Menu, Click View Enrollment of the Grade and Section to display the LRN of pupils/Students enrolled in the current school year
End of Topic – Click Home
Click this ICON to return to TABLE OF CONTENTS
ENROLLING EXISTING PUPILS/STUDENTS IN THE PREVIOUS SCHOOL YEAR (NAKA-ENROLL PO LAST SCHOOL YEAR – ENCODED IN THE LIS SYSTEM VERSION 1 – Using Batch Enrolment) Pulldown menu Click List of Classes Menu, Select a Grade and Section you want to enroll pupils/students, then click the pulldown menu, then select Batch Enrol
Click the Box beside the number of the pupils, click Batch Enrol Selected Note: You cannot include pupil/student with Click here
Read this After reviewing, click Batch Enrol Selected to enroll pupils/students in the current school year
Click List of Classes to view the list of classes
In the List of Classes, select a Grade and Section, then Click View Enrolment to display the current enrollment
End of Topic – Click Home
Click this ICON to return to TABLE OF CONTENTS
EDITING PROFILE OF PUPIL/STUDENT ENROLLED IN THE CURRENT SCHOOL YEAR CLICK LIST OF CLASSES MENU, SELECT A GRADE OR SECTION YOU WANT TO EDIT, CLICK VIEW ENROLMENT
Select a pupil to edit, Click Profile
Click UPDATE
Edit the Profile like Religion, Dialect, Residence and others…, then Click Update. Click Here to Enter Residence
Read this Click List of Classes
End of Topic – Click Home
Click this ICON to return to TABLE OF CONTENTS
UN-ENROLL PUPILS/STUDENTS IN A CERTAIN GRADE AND SECTION In the List of Classes Menu, select a Grade and Section, Click View Enrolment
Select Pupil to remove in the list of enrolled, Click Un-enrol
Click OK to confirm Un-enrol
End of Topic – Click Home
Click this ICON to return to TABLE OF CONTENTS
ENROLMENT OF INDIVIDUAL PUPIL/STUDENT WITH Learner Basic Information is Incomplete Click List of Classes Menu, Select a Grade and Section you want to enroll pupils/students, then click the pulldown menu, then select Batch Enrol
Select a pupil/ student with incomplete learner information or with triangle symbol, then Click Enrol at the right side beside Profile
Click Enrol
Fill up the required data *, then click Enrol
End of Topic – Click Home
Click this ICON to return to TABLE OF CONTENTS
PRINTING OF SCHOOL FORMS (SF 1 AND SF 5) CLICK SCHOOL FORMS TO OPEN THE SCHOOL FORMS SCREEN
Select the Grade Level and Section using the pulldown menu to Print
Click HERE to download the School Form End of Topic – Click Home
Click this ICON to return to TABLE OF CONTENTS
NOTE: IF YOU ARE USING GOOGLE CHROME, IT WILL AUTOMATICALLY DOWNLOAD THE FILE BELOW, IF YOU ARE USING MOZILLA FIRE FOX, IT WILL ASK YOU OPEN OR SAVE……. Click Here to open
HOW TO CHANGE PASSWORD Click HERE then select Settings
Type the Old Password, then type the New Password, then Repeat Password, Click Change Password
Read this End of Topic – Click Home
Click this ICON to return to TABLE OF CONTENTS
RESET PASSWORD OF CLASS ADVISER Click HERE, then Click Settings
CLICK PERSONNEL RECORD
CLICK MANAGE PERSONNEL
SELECT A PERSONNEL TO RESET PW, CLICK UPDATE
CLICK RESET PASSWORD
CLICK OK to confirm
Read this End of Topic – Click Home
Click this ICON to return to TABLE OF CONTENTS
THANK YOU FOR LISTENING