Learning Plan 10 Mobility THE MUSCULOSKELETAL SYSTEM Provides

Learning Plan 10 Mobility

THE MUSCULOSKELETAL SYSTEM � Provides the framework for the body and lets the body move � Bones ◦ The human body has 206 bones. ◦ There are four types �Long bones bear the body’s weight. (leg bones) �Short bones allow skill and ease in movement. (fingers, ankles, toes) �Flat bones protect the organs. (skull, pelvic bones, shoulder blades) �Irregular bones allow various degrees of movement and flexibility. (vertebrae in spine)

Types of Joints � Ball & Socket—allows movement in all directions. Ex: hip, shoulder joints � Hinge—allows movement in one direction. Ex: elbow � Pivot—allows turning from side to side. Ex: Pivot joint connects the skull to the spine
 ◦ Involuntary muscles work")
� Muscles ◦ Voluntary muscles can be consciously controlled. (straited) ◦ Involuntary muscles work automatically. (smooth— ex. Blood vessels, intestines, stomach) ◦ Cardiac muscle is in the heart. ◦ Muscles have three functions. �Movement of body parts �Maintenance of posture �Production of body heat ◦ Tendons connect muscles to bones.

Body Mechanics Chapter 11

MOVING PERSONS IN BED � Protect person. the skin when moving the ◦ Friction is the rubbing of one surface against another. ◦ Shearing is when the skin sticks to a surface while muscles slide in the direction the body is moving. � To reduce friction and shearing: ◦ Roll the person or use assist devices. ◦ Use a lift sheet (turning sheet), turning pad, large incontinence product, slide board, or slide sheet.

� Moving the person up in bed with an assist device A person is moved up in bed by two nursing assistants. Each has one arm under the person's shoulders and the other under the thighs. They have locked arms under the person. The person's knees are flexed. The nursing assistants shift their weight from the rear leg to the front leg as the person is moved up in bed. Moving the person to the side of the bed Moving the person in segments Using an assist device

TURNING PERSONS � The person is turned toward or away from you � Turning and positioning the person
 � Patients and residents dangle for")
SITTING ON THE SIDE OF THE BED (DANGLING) � Patients and residents dangle for many reasons. � Helping the person sit on the side of the bed (dangle)

TRANSFERRING PERSONS � To transfer a person means moving the person from one place to another. � Applying a transfer belt* � Transferring the person to a chair or wheelchair � Transferring the person from the chair or wheelchair to bed*

Transfer from bed to Wheelchair 1. 2. 3. 4. 5. 6. 7. 8. 9. Explain Procedure, speaking clearly, maintaining face-to-face contact Privacy is provided with a curtain, screen or door Before assisting to stand, wheelchair is positioned along side of bed, at head of bed, and facing the foot of the bed Before assisting to stand, footrests are folded up or removed Before assisting to stand, bed is at a safe level Before assisting to stand, locks wheels on wheelchair Before assisting to stand, checks and/or locks bed wheels Before assisting to stand, client is assisted to a sitting position with feet flat on the floor Before assisting to stand, ensures client is wearing shoes 10. 11. 12. 13. 14. 15. 16. 17. 18. 19. Before assisting to stand, applies transfer belt securely over clothing/gown Before assisting to stand provides instructions to enable client to assist in standing including prearranged signal to alert client to begin standing Stands facing client positioning self to ensure safety of self and client during transfer. Counts to three before standing On signal, gradually assists client to stand by grasping transfer belt on both sides with an upward position, maintaining stability of clients legs Assists client to turn to stand in front of wheelchair with back of client’s legs against wheelchair Lowers client into wheelchair Positions client with hips touching back of wheelchair and transfer belt is removed Positions feet on footrests Signaling device is within reach and bed in low position Wash hands

� Transferring the person using a mechanical lift* ◦ Before using a lift: �You must be trained in its use. �It must work. �The sling, straps, hooks, and chains must be in good repair. �The person’s weight must not exceed the lift’s capacity. �At least two staff members are needed.

POSITIONING � Regular position changes and good alignment: ◦ ◦ Promote comfort and well‑being Make breathing easier Promote circulation Prevent pressure ulcers and contractures

� Guidelines to safely position a person Use good body mechanics. Ask a co‑worker to help you if needed. Explain the procedure to the person. Be gentle when moving the person. Provide for privacy. Use pillows as directed for support and alignment. ◦ Place the signal light within reach after positioning. ◦ ◦ ◦

� Fowler’s position is a semi‑sitting position. ◦ The spine is kept straight. ◦ The head is supported with a small pillow. ◦ The arms are supported with pillows. � The supine (dorsal recumbent) position is the back‑lying position. ◦ The bed is flat. ◦ The head and shoulders are supported on a pillow. ◦ Arms and hands are at the sides.

� Prone position ◦ The person lies on the abdomen with the head turned to one side. ◦ The bed is flat. ◦ Small pillows are placed under the head, abdomen, and lower legs. ◦ Arms are flexed at the elbows with the hands near the head. � Lateral position (side-lying)** ◦ A pillow is under the head and neck. ◦ The upper leg, ankle, and thigh are supported with pillows. ◦ A pillow is positioned against the person’s back. ◦ A small pillow is under the upper arm and hand.

Positioning on side 1. 2. 3. 4. 5. 6. 7. 8. 9. 10. 11. 12. Explain Procedure, speaking clearly, maintaining face-to-face contact Privacy is provided with a curtain, screen or door Before turning, lowers head of bed Raises side rail on side to which body will be turned Slowly rolls onto side as one unit toward raised side rail Places or adjust pillow under head for support Client is positioned so that client is not lying on arm Supports top arm with supportive device Places supportive device behind client’s back Places supportive device between legs with top knee flexed; knee and ankle supported Signaling device is within reach and bed is in low position Washes hands

� Sims’ position is a left side-lying position � Chair position ◦ Place a pillow under the person’s head and shoulder. ◦ Support the upper leg with a pillow. ◦ Place a pillow under the upper arm and hand. ◦ The person’s back and buttocks are against the back of the chair. ◦ Feet are flat on the floor. ◦ Backs of the knees and calves are slightly away from the edge of the seat. ◦ Paralyzed arms are supported on pillows. ◦ Wrists are positioned at a slight upward angle.

Exercise and Activity Chapter 20

� Inactivity, whether mild or severe, affects: ◦ Every body system ◦ Mental well-being � The care plan and your assignment sheet include: ◦ The person's activity level ◦ Needed exercises

BEDREST � Bedrest ◦ ◦ ◦ is ordered to: Reduce physical activity Reduce pain Encourage rest Regain strength Promote healing � These types of bedrest are common: ◦ Bedrest ◦ Strict bedrest ◦ Bedrest with commode privileges ◦ Bedrest with bathroom privileges � Complications of bedrest ◦ Pressure ulcers ◦ Constipation and fecal impaction ◦ Urinary tract infections and renal calculi ◦ Blood clots (thrombi) ◦ Pneumonia ◦ Musculoskeletal system complications �Contractures—shortening of a muscle, person is permanently deformed �Muscle atrophy—wasting of muscle tissue �Orthostatic hypotension (postural hypotension) –low blood pressure when a person sits up

� The care plan includes: ◦ Good alignment ◦ Range-of-motion exercises ◦ Frequent position changes � Positioning ◦ These supportive devices are often used: �Bed boards �Foot boards �Trochanter rolls �Hip abduction wedges �Hand rolls or hand grips �Splints �Bed cradles

RANGE-OF-MOTION EXERCISES � The doctor or nurse may order: ◦ Active range-of-motion exercises ◦ Passive range-of-motion exercises ◦ Active-assistive range-of-motion exercises

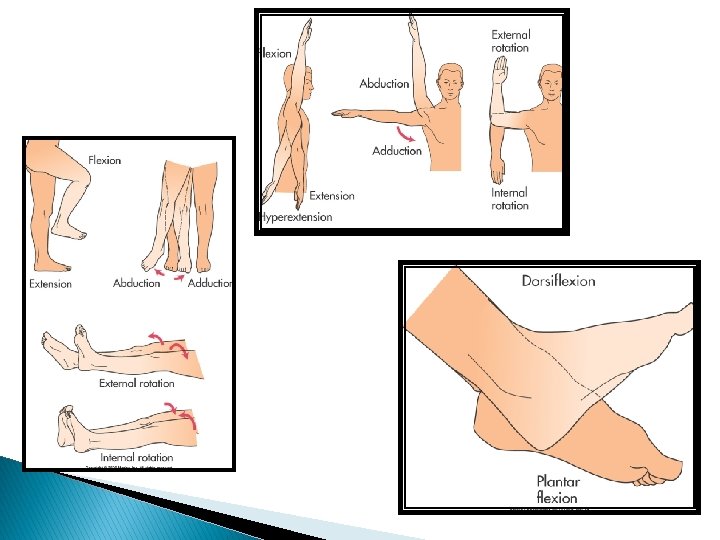
ROM Exercise � Performing exercises ◦ ◦ ◦ ROM Abduction Adduction Extension Flexion Hyperextension Dorsiflexion Rotation Internal rotation External rotation Pronation Supination � Exercises to: can be done ◦ The neck ◦ ◦ ◦ �Only if allowed by your agency and the nurse instructs you to do so The The The shoulders elbows forearms wrists thumbs fingers hips knees ankles feet toes

Passive ROM to Shoulder 1. 2. 3. 4. 5. 6. 7. 8. 9. Explain Procedure, speaking clearly, maintaining face-to-face contact Privacy is provided with a curtain, screen or door Instructs client to inform nurse aide if pain is experienced during exercise Supports client’s arm at elbow and wrist while performing range of motion for shoulder Raises client’s straightened arm from side position upward toward head to ear level and returns arm down to side of body (extension/flexion) (at least 3 times unless pain is verbalized) Moves client’s straightened arm away from the side of body to shoulder level and returns to side of body (abduction/adduction) (at least 3 times unless pain is verbalized) While supporting the limb, moves joints gently, slowly, and smoothly through the range of motion, discontinuing exercise if client verbalizes pain Signaling device is within reach and bed is in low position Washes hands

Passive ROM to Knee & Ankle 1. 2. 3. 4. 5. 6. 7. 8. 9. 10. Explain Procedure, speaking clearly, maintaining face-to-face contact Privacy is provided with a curtain, screen or door Instructs client to inform nurse aide if pain is experienced during exercise Supports leg at knee and ankle while performing range of motion for knee Bends the knee and then returns leg to client’s normal position (extension/flexion) (at least 3 times unless pain is verbalized) Supports foot and ankle close to bed while performing range of motion for ankle Pushes/pulls foot toward head (dorsiflexion), and pushes/pulls foot down, toes pointed down (plantar flexion) (at least 3 times unless pain is verbalized) While supporting the limb, moves joints gently, slowly, and smoothly through the range of motion, discontinuing exercise if client verbalizes pain Signaling device is within reach and bed is in low position Washes hands

AMBULATION � After bedrest, activity increases slowly and in steps. ◦ First the person dangles. ◦ Sitting in a bedside chair follows. ◦ Next the person walks. � Helping the person to walk ◦ Follow the care plan. ◦ Use a gait (transfer) belt if the person is weak or unsteady. ◦ The person uses hand rails along the wall. ◦ Check the person for orthostatic hypotension.

Assist to Ambulate with transfer belt 1. 2. 3. 4. 5. 6. 7. 8. 9. 10. 11. 12. 13. Explain Procedure, speaking clearly, maintaining face-to-face contact Before assisting to stand, ensures client is wearing shoes Before assisting to stand, bed is at a safe level Before assisting to stand, checks and/or locks bed wheels Before assisting to stand, client is assisted to sitting position with feet flat on the floor Before assisting to stand, applies transfer belt securely over clothing/gown Before assisting to stand provides instructions to enable client to assist in standing including prearranged signal to alert client to begin standing Stands facing client positioning self to ensure safety of self and client during transfer. Counts to three before standing On signal, gradually assists client to stand by grasping transfer belt on both sides with an upward position, maintaining stability of clients legs Walks slightly behind and to one side of client for a distance of 10 feet while holding belt After ambulation, assists client to bed and removes transfer belt Signaling device is within reach and bed in low position Wash hands

� The falling person ◦ Causes of falling include: �The person may be weak, lightheaded, or dizzy. �Slipping or sliding on spills, waxed floors, throw rugs, or improper shoes ◦ Do not try to prevent the fall. �If a person starts to fall, ease him or her to the floor. ◦ Helping the falling person*

� Walking aids ◦ Crutches �Check the crutch tips. �Check wooden crutches for cracks and metal crutches for bends. �Tighten all bolts. �Street shoes are worn. �Clothes must fit well. �Practice safety rules to prevent falls. �Keep crutches within the person’s reach.

� Canes ◦ A cane is held on the strong side of the body. � Walkers � Braces ◦ Are used to: �Support weak body parts �Prevent or correct deformities �Prevent joint movement ◦ Skin and bony points under braces are kept clean and dry. Report any breakdown to RN
- Slides: 32