Lean Manufacturing Cellular Manufacturing One Piece Flow for


 for the elimination of")


- Slides: 28
Lean Manufacturing Cellular Manufacturing One Piece Flow for Workteams Chapter 3 Basic Elements of Cell Design
Chapter 3 Overview l Phase 1 – Understanding the Current Conditions • • • l Phase 2 – Converting to a Process-Based Layout • • • l Evaluate the Options Plan Possible New Layouts Move the Machines Document the New Operating Procedures Test to Confirm Improvement Phase 3 – Continuously Improving the Process • • l Collect Product and Production Data Document Current Layout and Flow Time the Process Calculate Process Capacity and Takt Time Create Standard Work Combination Sheets Shorten Cycle Times Shorten Changeover Times Eliminate Product Defects Reduce Equipment Failures Summary
Converting Work Area into A Manufacturing Cell l Understanding the current conditions l Converting to a process-based layout l Continuously improving the process
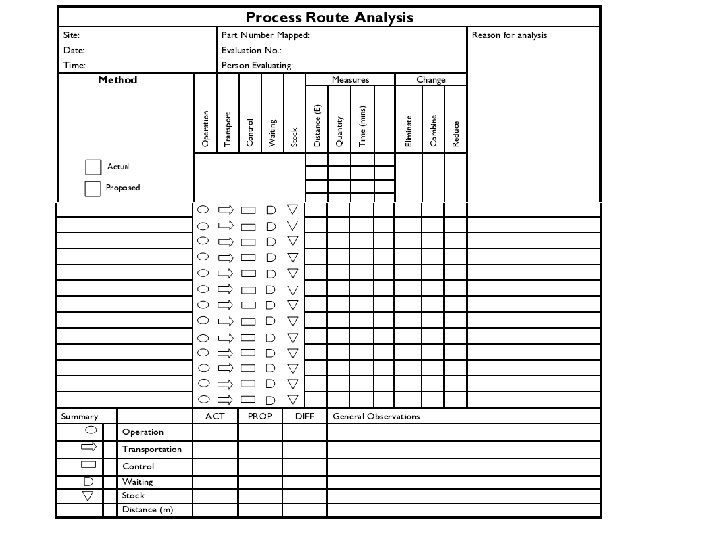
Phase 1: Understanding the Current Conditions Helps the conversion team determine what process to convert, and a base line to measure improvement. l Collect Product Data and Production Data • Product mix • Production resources (shifts, hours, employees, volume) l Document Current Layout and Flow • Process Route Analysis: helps to identify processing similarities between different products and groups of products that could be made in a cell. • Process Mapping • Time The Process: Determine the value-added ratio. The valueadded ratio is the time spent actually machining or working on the product divided by the total process lead time. Calculate Process Capacity and Takt Time l Create Standard Work Combination Sheet l
Document the Current Process Create Standard Work Combination Chart: Graphical display for each operation in the process. l Depict the relationship between manual work time, machine work time, and walking time for each step in an operation as well as the non-cyclical time. l Draw a solid line to indicate the Takt time. l
Standard Work Combination Table Definition The Standard Work Combination Table combines human movement and machine movement based on takt time and is used as a tool to determine the range of work and work sequence for which a team member is responsible.
Human work and Machine work l. The key notion (idea) for the elimination of waste and the effective combination of work on the shop floor is the separation of machine work and human work. l When we observe the work in which operators handle machinery, then that work can be classified into machine or human work. l. Understanding the separation of human and machine work is the basis for understanding the interface between these two elements. l. If operators are merely observing the machine working then this is the waste of “Waiting” and should be eliminated.
Human work This refers to work that cannot be completed without human effort. For example, lpicking up materials lputting materials onto a machine loperating the controls of a machine
Machine work This refers to work or incidental work that equipment, which has been started by human hand, automatically performs operations. l. Milling l. Auto riveting / bolting l. Auto inspection
Standard Symbols The four basic symbols used in Standard work combination tables are: Manual Automatic Walking Waiting
HOW TO DISPLAY WORK ON THE STANDARDISED WORK COMBINATION TABLE Manual Work Takt Time Walk Automatic Cycle Wait
HOW TO DISPLAY WORK ON THE STANDARDISED WORK COMBINATION TABLE Returning to the same process. TT 1 2, 4 3, 5
Issue date 30/09/99 Part Number / Name STANDARDISED WORK COMBINATION TABLE Group Leader 123 ABC / Widget LH Qty / shift: 169 Takt Time: 162 Process Machine and sub Available time: 480’ Supervisor Cycle time assembly Department: Machine Prod/Engineer WORK SEQ’ OPERATION TIME MAN AUTO WALK 1 2 Select part A 2 Set into M/C 1 10 3 Start machine 1 84 4 5 Select part B 2 Set into jig 9 6 Select part C 2 7 Fit C to B 15 8 Set C/B to m/c 2 11 9 Start m/c 1 41 10 Remove A from m/c 1 5 11 Set A to jig 12 Remove C/B from m/c 7 5 13 Screw C/B to A 14 Check torque 15 15 Put in finished bin 2 TOTALS 8 5 10 15 20 25 30 3 2 2 3 3 3 2 5 Operator 129 95 125 34 Wait time 33 35 40 45 OPERATING TIME IN MINUTES 50 55 60 65 70 75 80 85 90 95 100 105 110 115 Manual Automatic Walking Waiting 120 125 130 135 140 145 CT TT 150 155 160
Phase 2: Converting to a Process-Based Layout l Evaluate the Options: how to improve the four basic element of production: • • l Methods Machines Materials People Plan Possible New Layouts • • Layout in the process steps is the basic principle Machines placed close together U or C shape Often Counterclockwise (R/H next to machine) Move the Machines l Document the New Operating Procedures l Test to Confirm Improvement l
Phase 3: Continuously Improving the Process l Rearranging the layout into a manufacturing cell is not really an end point - it is the beginning of continuous improvement l Look for problems that keeps the process from flowing: • • l Long cycle times Product defects Long changeover times Equipment failures Shorten Cycle Times
Phase 3: Continuously Improving the Process… l Shorten Changeover Times Single minute exchange of die (SMED) approach gives a three stage system for shortening setup: 1. Separate Internal and External Setup (can reduce setup time by 30 -50 %) • Internal setup refers to setup operations that can be done only with the equipment stopped • External setup can be done while the machine is working Typical activities include: • Transporting all necessary tools and parts to the machine while it is still running the previous job • Confirming the function of exchangeable parts before stopping the machine for changeover 2. Convert Internal Setup to External Setup • Standardized functions such as die height to eliminate the need for adjustments. • Using devises that automatically position the parts without measurement
Phase 3: Continuously Improving the Process… 3. Streamline All Aspects of Setup • Using parallel operations, with two or more people working simultaneously • Using functional clamps instead of nuts and bolts • Using numerical setting to eliminate trial and error adjustments • • l Eliminate Product Defects Mistake proofing/Zero Quality Control (ZQC)- zero defects Reduce Equipment Failure • Total Productive Maintenance (TPM): is a comprehensive, company-wide approach for reducing equipment related losses such as downtime, speed reduction, and defects by stabilizing and improving equipment conditions.
Summary l Phase 1 – Understanding the Current Conditions • • • l Phase 2 – Converting to a Process-Based Layout • • • l Collect Product and Production Data Document Current Layout and Flow Time the Process Calculate Process Capacity and Takt Time Create Standard Work Combination Sheets Evaluate the Options Plan Possible New Layouts Move the Machines Document the New Operating Procedures Test to Confirm Improvement Phase 3 – Continuously Improving the Process • • Shorten Cycle Times Shorten Changeover Times Eliminate Product Defects Reduce Equipment Failures
Lean Manufacturing Cellular Manufacturing One Piece Flow for Workteams Chapter 4 Teamwork Tools for Cellular Manufacturing
Chapter 4 Overview l Working in Teams l Standardizing Workplace Conditions through 5 S l Using Visual Management for Production Control and Safety l Performing Autonomous Maintenance Activities l Using Activity Boards and One-Point Lessons l Summary
Working in Teams l Success depends on teamwork l In a cell, people work together in new ways l Several operations are combined in a sequence, and the main job of the people working in the cell is to maintain a smooth flow through the operations l Work must be coordinated l A group of employees has more creative potential and energy than any person working on a problem alone
Standardizing Workplace Conditions through 5 S l Cellular manufacturing cannot succeed in a workplace that is cluttered, disorganized or dirty l Establishing basic workplace conditions is essential in creating a manufacturing cell l The 5 S system is a set of five basic principles that have names beginning with S: • • • Sort Set in Order Shine Standardize Sustain
Using Visual Management for Production Control and Safety l Visual management is an important support for cellular manufacturing l Visual management techniques express information in a way that can be understood quickly by everyone l Sharing information through visual tools helps keep production running smoothly and safely l One form of visual management in manufacturing cells is the andon system: • Individual machines or assembly stations are equipped with call lamps • If the machine breaks down or run out of parts, the operator or the machine turns on a light to call attention
Using Visual Management for Production Control and Safety l Visual location indicators help keep order in the workplace • Lines, labels, and signboards l Visual information can also prevent to make mistakes • Color coding • Matching color marks
Performing Autonomous Maintenance Activities l Activities carried out by shopfloor teams in cooperation with maintenance staff l Element of Total Productive Maintenance (TPM) l Changes old view that operators just run machines and maintenance people just fix them l Operators learn how to clean the equipment daily and how to inspect it for trouble signs as they clean l Learn the equipment and assist with repairs l Team-based activity: work with maintenance technicians and engineer
Using Activity Boards and One-point Lessons Two useful approaches for making information public l A bulletin board or wall chart l • Displays information about team activities and the results achieved • Chart improvement measures such as quality rate, On Time Delivery, Overtime, Takt Rate, etc. • Helps keeping track of issues to follow up in the future l A one-point lesson • • • An easy to read poster to teach others about a particular problem An improvement example, or Basic knowledge that everyone should have Kept short and focused on one point Often illustrated with photos or drawings
Summary l Working in Teams l Standardizing Workplace Conditions through 5 S l Using Visual Management for Production Control and Safety l Performing Autonomous Maintenance Activities l Using Activity Boards and One-Point Lessons