LAB 1 INTRODUCTION TO COMPUTER AIDED DRAFTING DET
LAB 1: INTRODUCTION TO COMPUTER AIDED DRAFTING DET 111 – ENGINEERING DRAWING Dr. Suzanna HR & En. Mohammad Isa AA
CONTENTS 1. 2. 3. 4. 5. X-Y COORDINATE SYSTEM ANGULAR MEASUREMENT AUTOCAD USER INTERFACE SET DRAWING UNITS ZOOMING & PANNING DET 111 – ENGINEERING DRAWING Dr. Suzanna HR & En. Mohammad Isa AA
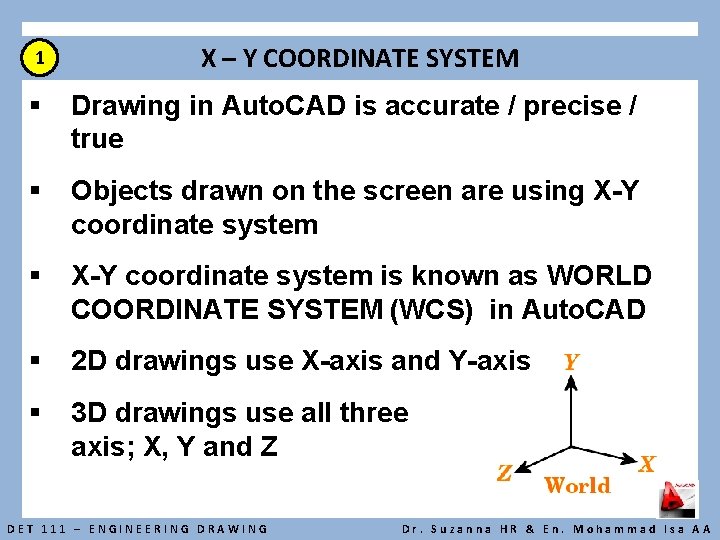
1 X – Y COORDINATE SYSTEM § Drawing in Auto. CAD is accurate / precise / true § Objects drawn on the screen are using X-Y coordinate system § X-Y coordinate system is known as WORLD COORDINATE SYSTEM (WCS) in Auto. CAD § 2 D drawings use X-axis and Y-axis § 3 D drawings use all three axis; X, Y and Z DET 111 – ENGINEERING DRAWING Dr. Suzanna HR & En. Mohammad Isa AA
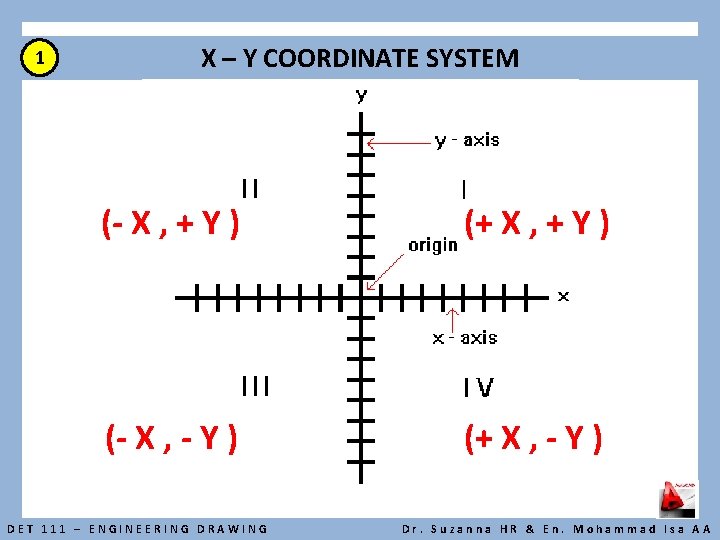
1 X – Y COORDINATE SYSTEM (- X , + Y ) (+ X , + Y ) (- X , - Y ) (+ X , - Y ) DET 111 – ENGINEERING DRAWING Dr. Suzanna HR & En. Mohammad Isa AA
1 X – Y COORDINATE SYSTEM § Auto. CAD uses point (X , Y) to determine location of the objects § Objects are located in relation to the origin (0 , 0) § When using points, X always come first before Y. DET 111 – ENGINEERING DRAWING Dr. Suzanna HR & En. Mohammad Isa AA
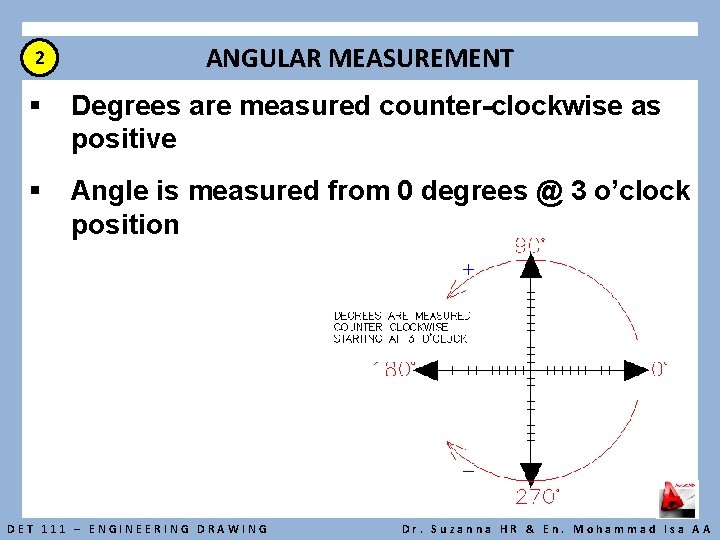
2 ANGULAR MEASUREMENT § Degrees are measured counter-clockwise as positive § Angle is measured from 0 degrees @ 3 o’clock position DET 111 – ENGINEERING DRAWING Dr. Suzanna HR & En. Mohammad Isa AA
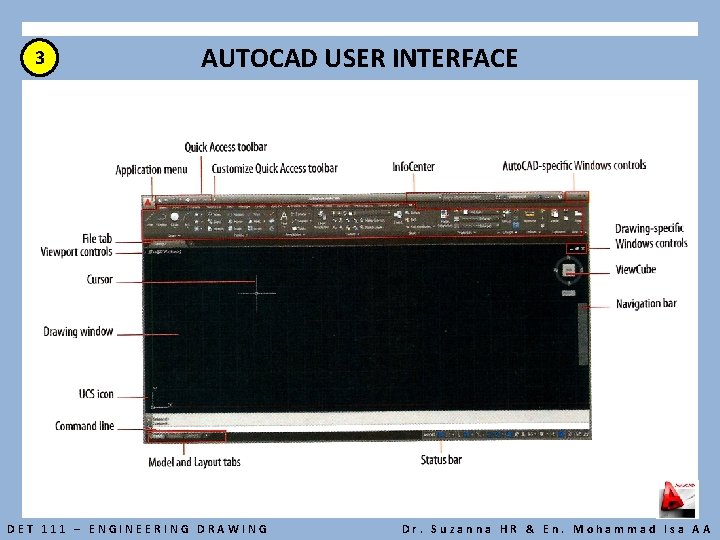
3 AUTOCAD USER INTERFACE DET 111 – ENGINEERING DRAWING Dr. Suzanna HR & En. Mohammad Isa AA
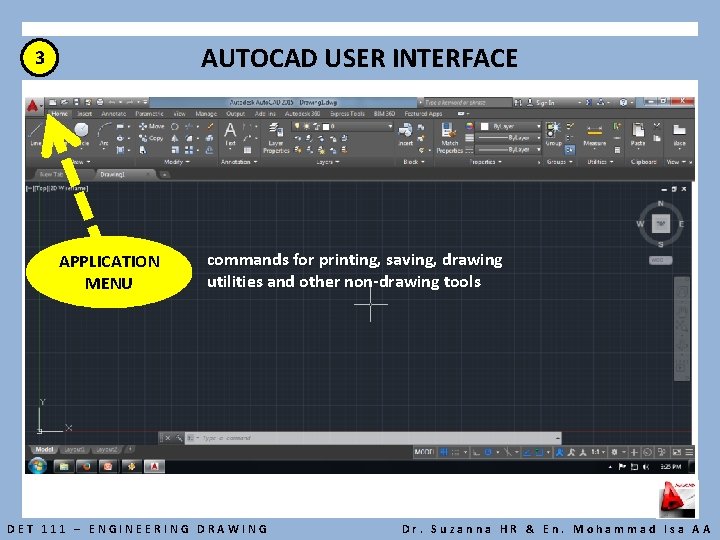
AUTOCAD USER INTERFACE 3 APPLICATION MENU commands for printing, saving, drawing utilities and other non-drawing tools DET 111 – ENGINEERING DRAWING Dr. Suzanna HR & En. Mohammad Isa AA
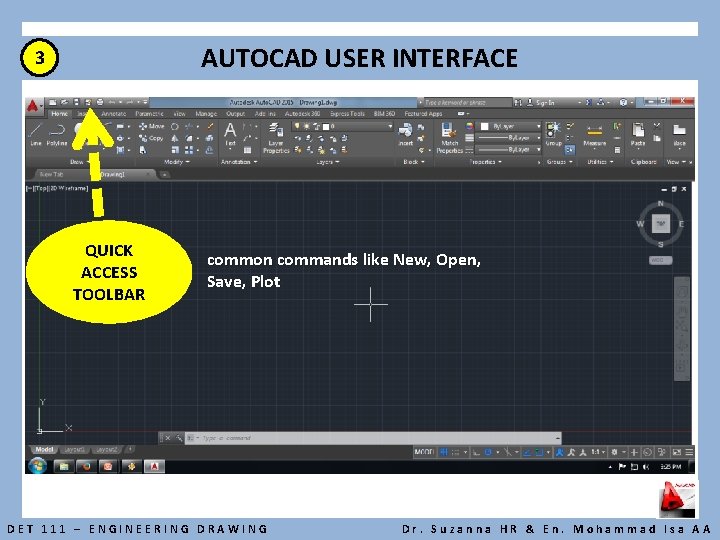
AUTOCAD USER INTERFACE 3 QUICK ACCESS TOOLBAR common commands like New, Open, Save, Plot DET 111 – ENGINEERING DRAWING Dr. Suzanna HR & En. Mohammad Isa AA
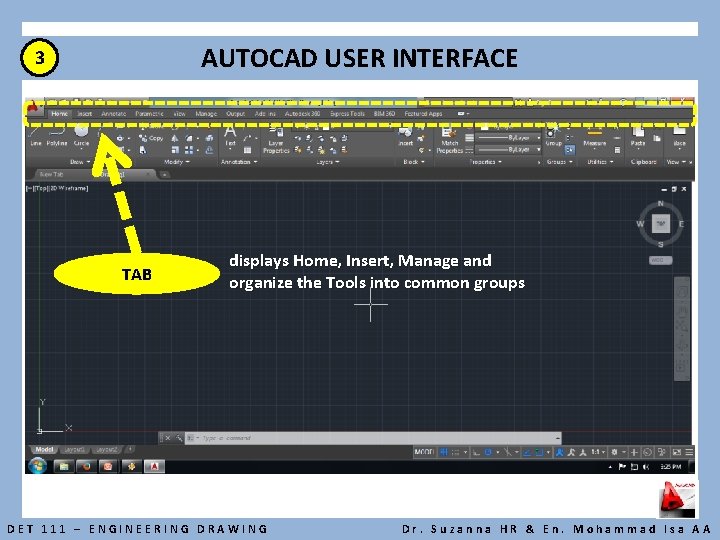
AUTOCAD USER INTERFACE 3 TAB displays Home, Insert, Manage and organize the Tools into common groups DET 111 – ENGINEERING DRAWING Dr. Suzanna HR & En. Mohammad Isa AA
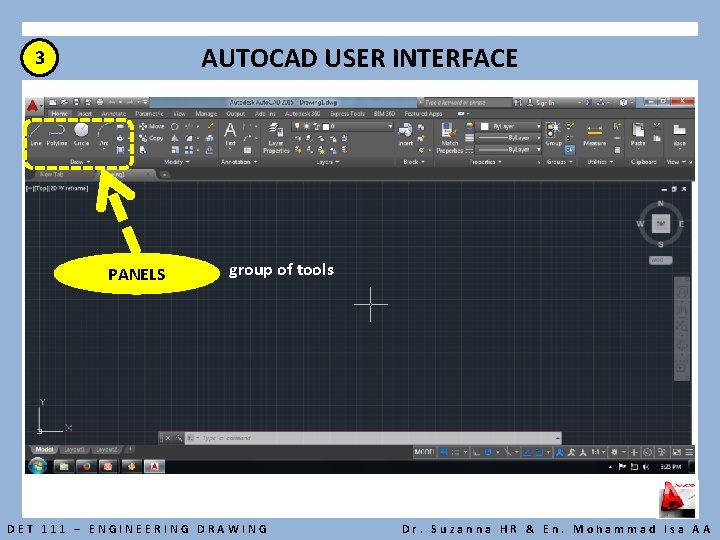
AUTOCAD USER INTERFACE 3 PANELS group of tools DET 111 – ENGINEERING DRAWING Dr. Suzanna HR & En. Mohammad Isa AA
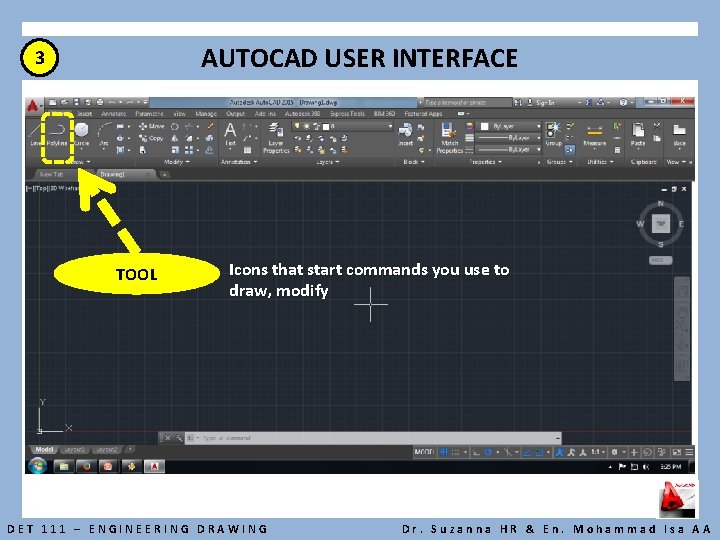
AUTOCAD USER INTERFACE 3 TOOL Icons that start commands you use to draw, modify DET 111 – ENGINEERING DRAWING Dr. Suzanna HR & En. Mohammad Isa AA
3 AUTOCAD USER INTERFACE Application Button - This button displays commands for printing, saving, drawing utilities and other non-drawing tools Quick Access Toolbar - This is for quick access to common commands like New, Open, Save, Plot Filename - The name of the current file you are working on Search Bar - Search for text in your drawing or search the help files Ribbon - The Ribbon has most of the commands/tools that you will use while you are working Tabs - A series of Tabs make up the Ribbon (Home, Insert, Manage, etc) and organize the Tools into common groups Panels - Contain a group of tools DET 111 – ENGINEERING DRAWING Dr. Suzanna HR & En. Mohammad Isa AA
3 AUTOCAD USER INTERFACE Tools - These are the icons that start the commands you use to draw, modify, etc Tool Tip - If you hover your mouse over a tool, a tool tip will appear to give you more information. Hold it longer for more info Drawing Space - These is where you draw your designs Command line - When you type a command, you will see it here. Auto. CAD uses this space to 'prompt' you for information. It will give you a lot of information and tell you where you are in the command Status bar - This allows to see and change different modes of drawing such as Ortho, Osnaps, Grid, Otrack, etc. You can right click this area to toggle between icons and text for this area DET 111 – ENGINEERING DRAWING Dr. Suzanna HR & En. Mohammad Isa AA
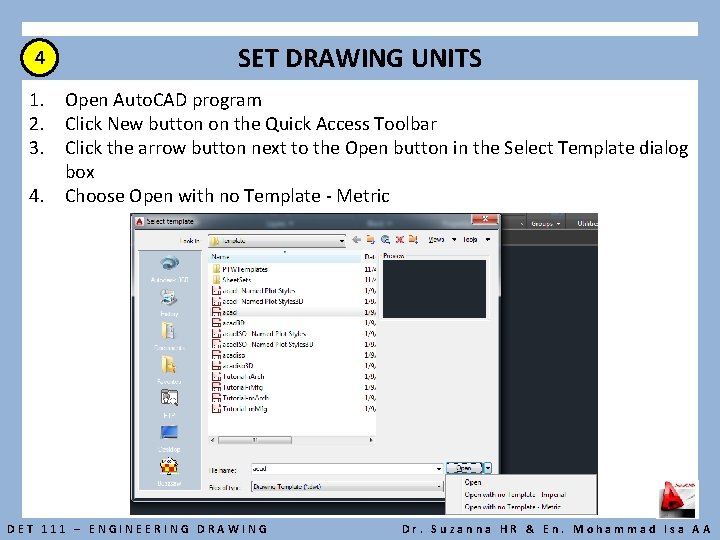
4 SET DRAWING UNITS 1. Open Auto. CAD program 2. Click New button on the Quick Access Toolbar 3. Click the arrow button next to the Open button in the Select Template dialog box 4. Choose Open with no Template - Metric DET 111 – ENGINEERING DRAWING Dr. Suzanna HR & En. Mohammad Isa AA
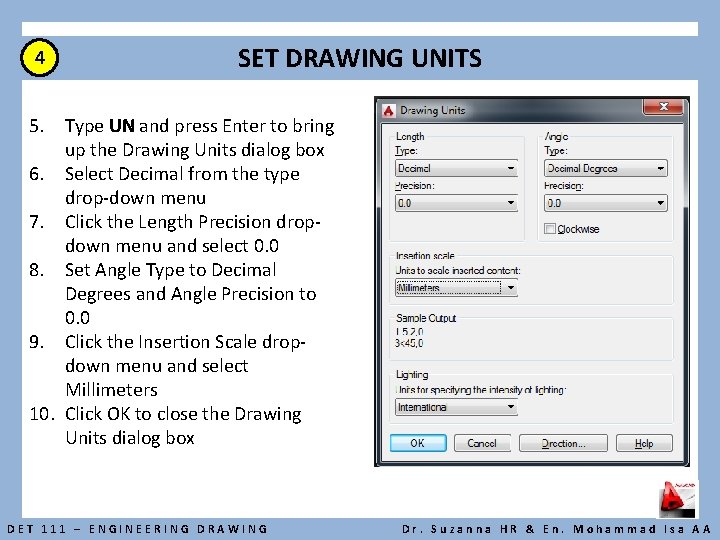
4 SET DRAWING UNITS 5. Type UN and press Enter to bring up the Drawing Units dialog box 6. Select Decimal from the type drop-down menu 7. Click the Length Precision dropdown menu and select 0. 0 8. Set Angle Type to Decimal Degrees and Angle Precision to 0. 0 9. Click the Insertion Scale dropdown menu and select Millimeters 10. Click OK to close the Drawing Units dialog box DET 111 – ENGINEERING DRAWING Dr. Suzanna HR & En. Mohammad Isa AA
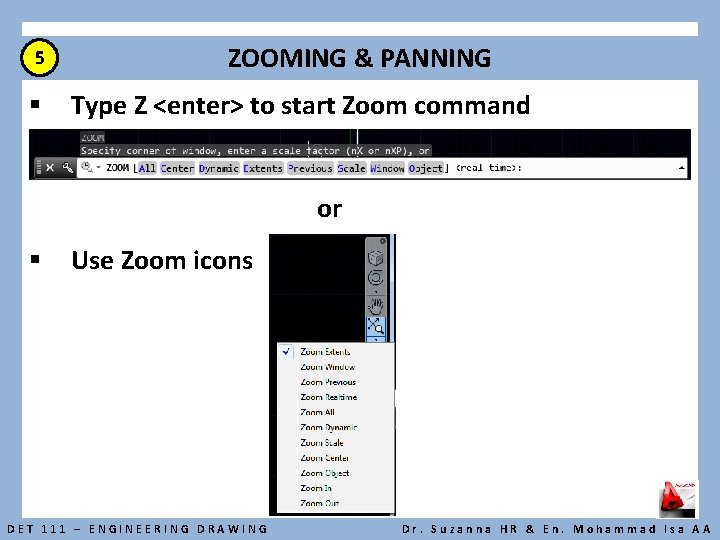
5 § ZOOMING & PANNING Type Z <enter> to start Zoom command or § Use Zoom icons DET 111 – ENGINEERING DRAWING Dr. Suzanna HR & En. Mohammad Isa AA
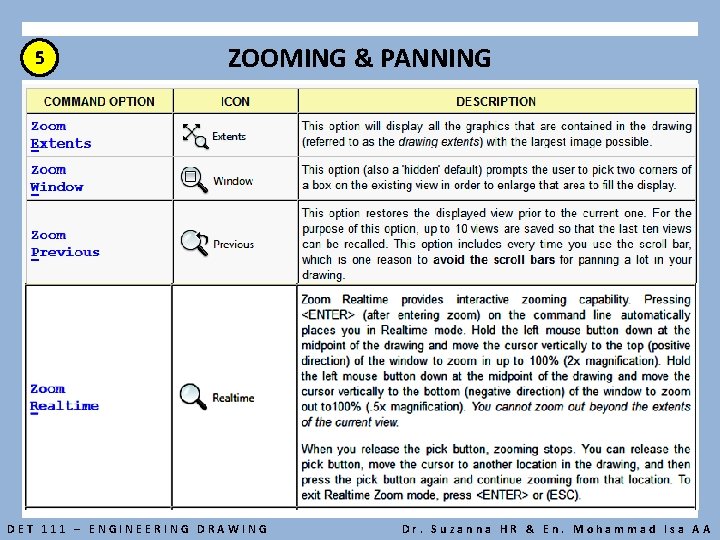
5 ZOOMING & PANNING DET 111 – ENGINEERING DRAWING Dr. Suzanna HR & En. Mohammad Isa AA
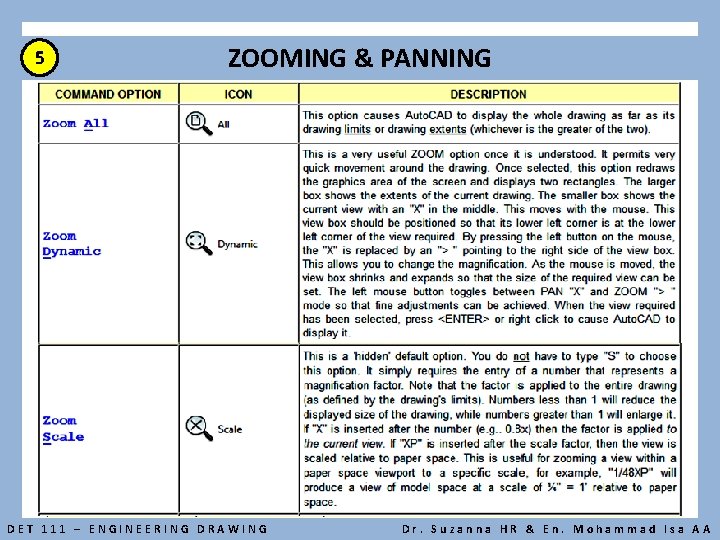
5 ZOOMING & PANNING DET 111 – ENGINEERING DRAWING Dr. Suzanna HR & En. Mohammad Isa AA
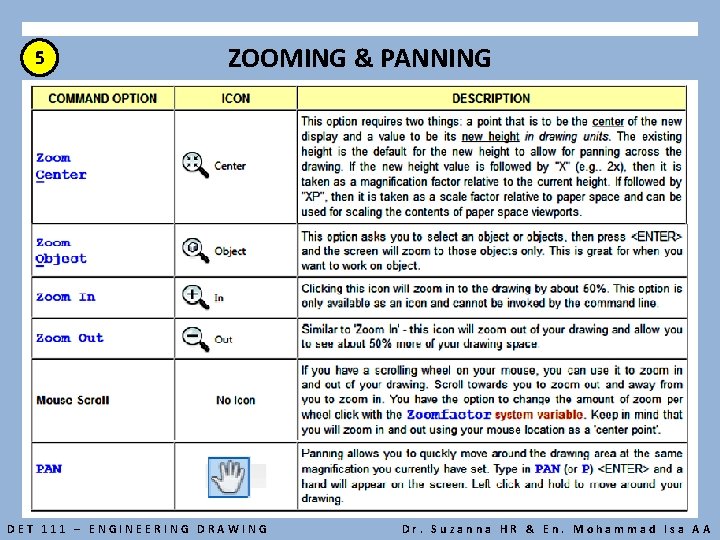
5 ZOOMING & PANNING DET 111 – ENGINEERING DRAWING Dr. Suzanna HR & En. Mohammad Isa AA
- Slides: 20