Java UI Manejo de eventos En Java los


 Event Listeners Event Sources Button Event")
. Basadas en Observer Cada")

; void")
 fuente(s) que")


, uso")


 { class.")


); //")

![Código public static void main(String args[]) { Simple. Events frame = new Simple. Events("Simple](https://slidetodoc.com/presentation_image_h/ea8327239a0c331382a5f20a9079ccc4/image-26.jpg "Código public static void main(String args[]) { Simple. Events frame = new Simple. Events(\"Simple")


 del receptor (Receiver, el que")


 { Color c = (Color)get. Value(\"Color\"); target.")
{ set. Title(\"Separate. GUITest\"); set. Size(300,")
, Color. yellow,")
,")
; m. add(red. Action); JMenu. Bar mbar = new JMenu. Bar();")


; timer. set. Coalesce(true); add. Window. Listener(new Window. Adapter() {")
 { public void mouse. Pressed(Mouse. Event e)")
 { if (frozen) { //Do nothing. The user has")
 { //Advance the animation frame. repaint(); }")
; moving. set. Size(600, 200); moving. set. Visible(true); //It's OK to start")


 { //parámetros del applet. . . //Anima de derecha a")
; //\"Loading Images. . . \" label status. Label =")

; } protected Image. Icon create. Frame(int image. Num) { String path")

 { loopslot = 0; off += offset; if (off")

- Slides: 68
Java UI – Manejo de eventos En Java los eventos son representados por objetos Ejemplos: clic en un botón arrastrar el mouse pulsar Enter Los componentes AWT y Swing generan (fire) eventos java. awt. AWTEvent
Los XXXEvent nos informan. . . Quién lo dispara? De qué tipo es? Cuándo ocurrió? Información propia del evento Los detalles del evento pueden ser obtenidos usando métodos de acceso: Ej. : get. Action. Command() get. Modifiers()
Eventos AWT De bajo nivel Componentes – Component. Event, Focus. Event, Key. Event, Mouse. Event Paint. Event Contenedores – Container. Event Ventanas – Window. Event Semánticos – mayor nivel de abstracción Action. Event, Item. Event, Text. Event, Adjustment. Event
Eventos AWT
Eventos semánticos No son disparados por todos los componentes Ejemplo 1: Item. Event indica que un ítem fue seleccionado o deseleccionado Disparado por JCombo. Box No disparado por JButton Ejemplo 2: Action. Event Disparado por JCombo. Box Disparado por JButton
Eventos Swing tiene además su propio paquete de manejo de eventos: javax. swing. event Casi todos estos nuevos eventos están relacionados con la arquitectura MVC Ejemplo: Tree. Model. Event List. Data. Event
Manejo de eventos Modelo de Delegación de Eventos Interfaces “listeners” Registro para recibir eventos de una fuente Patrón Observer
Manejo de eventos add. Action. Listener(Action. Listener l) Event Listeners Event Sources Button Event
Listeners Interfaces que manejan los eventos (java. util. Event. Listener). Basadas en Observer Cada clase Event tiene su correspondiente interface Listener Varios Listeners para el mismo tipo de eventos Action. Event Action. Listener Mouse. Event Mouse. Listener Mouse. Motion. Listener
Listeners Ejemplos de Listeners:
public interface Window. Listener extends Event. Listerner { void window. Activated(Window. Event e); void window. Closing(Window. Event e); void window. Deactivated(Window. Event e); void window. Deiconified(Window. Event e); void window. Iconified(Window. Event e); void window. Opened(Window. Event e); } public interface Mouse. Listener extends Event. Listener { public void mouse. Clicked(Mouse. Event e); public void mouse. Pressed(Mouse. Event e); public void mouse. Released(Mouse. Event e); public void mouse. Entered(Mouse. Event e); public void mouse. Exited(Mouse. Event e); }
Registro de Listeners Un Listener debe en primer lugar registrarse con la(s) fuente(s) que pueda(n) generar los eventos de su interés: public void add. XXXListener(XXXListener e) add. Action. Listener, add. Item. Listener, etc. Para el mismo evento en un componente, puede haber registrado varios Listeners Un evento puede provocar numerosas respuestas Los eventos son “difundidos” a todos sus Listeners
Múltiples Listeners Component add. Event. Listener Ocurre evento add. Event. Listener Event
Conectar un Listener con una fuente de eventos Defina una clase que implemente la interface Listener(o que extienda una clase que la implemente) Añada la implementación de la interface Registre el Listener con la fuente
Tips Debe implementar todos los métodos de la interface Si el código usado para implementar el manejo de eventos tiene unas pocas líneas se suele usar una clase interna anónima. No hay garantía de cuál Listener es notificado primero. No escribir código contando con un orden específico. Trate eventos semánticos antes que de bajo nivel cambios en look and feel componentes compuestos Utilice métodos descriptivos de los eventos Action. Event – get. Action. Command() Threads
Clases Adapter Son clases que implementan una interface Listener con métodos vacíos (“dummy”), uso herencia. Desventaja: Java no permite herencia múltiple Solución: usar clases internas anónimas Utiles sólo para interfaces Listeners con más de un método Principalmente por razones de conveniencia Ejemplos: Mouse. Adapter Window. Adapter
Clases internas En Java una clase puede ser definida en cualquier lugar Anidada dentro de otras clases En la invocación de un método Tienen acceso a los miembros y métodos de todas las clases externas a ellas Pueden tener nombres o ser anónimas Pueden extender de otra clase o implementar interfaces Muy útiles para el manejo de eventos
Clases internas con nombre Se definen como las clases normales No pueden ser public
Clases internas con nombre public class My. Class extends JPanel { … an. Object. add. Mouse. Listener(new My. Adapter()); … class my. Adapter extends Mouse. Adapter { public void mouse. Clicked(Mouse. Event e) { // blah } // end mouse. Clicked } // end inner class } // end My. Class
Clases internas anónimas Definida dentro de add. XXXListener (new class. Name( ) { class. Body }); (new interface. Name() { class. Body }); Dentro del cuerpo no puedo definir constructores.
Ejemplo
Código // importa los símbolos de AWT and Swing import java. awt. *; import java. awt. event. *; import javax. swing. *; public class Simple. Events extends JFrame { static final int WIDTH=350; //ancho y alto del frame static final int HEIGHT=180; // Declara JText. Field para entrar texto JText. Field text. Field; // Declara JText. Area p/recibir líneas de text. Field JText. Area text. List; // Declara JScroll. Pane para JText. Area JScroll. Pane pane; // Constructor: aquí se hace casi todo el trabajo public Simple. Events(String lab) { // llama el constructor de Jframe: pone etiqueta super(lab);
Código /******* Crea un contedor para text. Field ****/ // Instancia un JPanel text. Panel = new JPanel(); // le pone un borde (por defecto no tiene) text. Panel. set. Border(Border. Factory. create. Etched. Border()); // Set el layout del text. Panel a Border. Layout text. Panel. set. Layout(new Border. Layout()); // Crea una etiqueta y la añade al panel JLabel text. Title =new JLabel("Type and hit <ENTER>"); text. Panel. add(text. Title, Border. Layout. NORTH); // Instancia un JText. Field y añade a text. Panel text. Field = new JText. Field(); text. Panel. add(text. Field, Border. Layout. SOUTH); // Añade un strut al text. Panel como margen inferior text. Panel. add(Box. create. Vertical. Strut(6)); // Crea un contenedor p/ text. Area // Instancia un JPanel list. Panel = new JPanel();
Código // añade borde list. Panel. set. Border (Border. Factory. create. Etched. Border()); // Set el layout del text. Panel list. Panel. set. Layout(new Box. Layout(list. Panel, Box. Layout. Y_AXIS)); // Crea una etiqueta y añade al panel JLabel title = new JLabel("Text List"); list. Panel. add(title); // Añade un strut al Box. Layout list. Panel. add(Box. create. Vertical. Strut(10)); // Instancia una JText. Area sin texto inicial // 6 filas, 10 columnas, y vertical scrollbars text. List=new JText. Area("", 6, 10); // la hace read-only text. List. set. Editable(false); // Añade text. List a list. Panel pane = new JScroll. Pane (text. List); list. Panel. add(pane);
Código // Añade un strut a list. Panel como margen inferior list. Panel. add(Box. create. Vertical. Strut(6)); /* Añade un listener a text. Field cuando se pulse ENTER copia el texto de text. Field al area de texto. Los componentes están interrelacionados*/ text. Field. add. Action. Listener(new Action. Listener() { public void action. Performed(Action. Event e) { // Añade el texto de text. Field a text. List. append(text. Field. get. Text()); text. List. append("n"); // Reset el text. Field. set. Text(""); }}); // Añade los 2 paneles al frame, separados por strut Container c = get. Content. Pane(); c. set. Layout (new Flow. Layout()); c. add(text. Panel); c. add(Box. create. Horizontal. Strut(30)); c. add(list. Panel); }
Código public static void main(String args[]) { Simple. Events frame = new Simple. Events("Simple Events Example"); // standard adapter usado en casi todas las // aplicaciones para cerrar la ventana frame. add. Window. Listener(new Window. Adapter() { public void window. Closing(Window. Event e) { System. exit(0); } }); // set el tamaño de frame y lo muestra frame. set. Size(WIDTH, HEIGHT); frame. set. Visible(true); } }
Command Pattern Command encapsula un requerimiento en un objeto, permitiendo parametrizar clientes con diferentes requerimientos, hacer una cola o registro de ellos y permitir por lo tanto hacer undo/redo.
Command Pattern
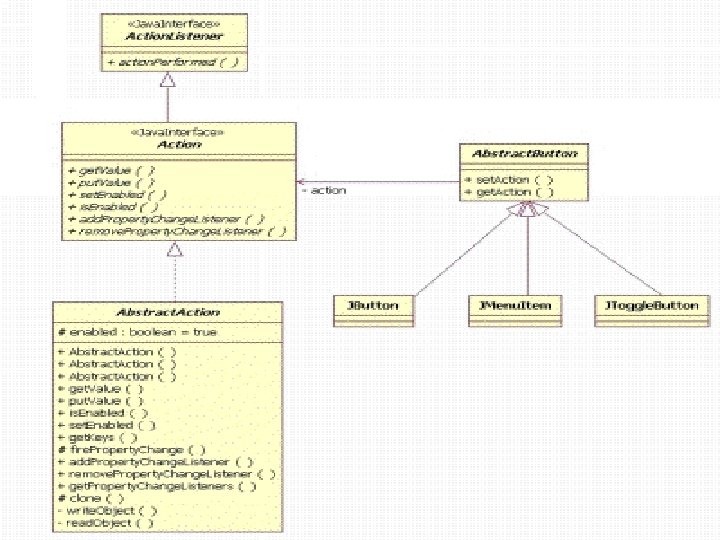
Swing Action Command permite desacoplar el objeto invocante (Invoker) del receptor (Receiver, el que conoce cómo atender el requerimiento). Swing implementa el patrón Command con objectos de clases que implementen Action, por ej. , subclases de Abstract. Action. Siempre que selecciona un ítem de un menú o pulsa un botón, estos objetos action emiten un requerimiento de una acción específica de la aplicación.
Swing Action Puede configurar un objeto JBbutton mediante una implementación concreta de Action que delega el requerimiento al Receiver. JButton actúa como Invoker llamando al método action. Performed de un objeto concreto Action y no le importa qué objeto ejecuta realmente el comando requerido. El objeto Action delega el llamado al objeto Receiver que sabe cómo procesar el requerimiento, pero no quién lo hizo. El Receiver puede ser modificado o ser otro objeto y no afectar el código en JButton y del mismo modo se puede añadir el pedido de nuevos objetos, sin afectar al Receiver.
Ejemplo Swing Action
Código import java. awt. *; import java. awt. event. *; import javax. swing. *; class Color. Action extends Abstract. Action{ private Component target; public Color. Action(String name, Icon icon, Color c, Component comp) {put. Value(Action. NAME, name); put. Value(Action. SMALL_ICON, icon); put. Value("Color", c); target = comp; }
Código public void action. Performed(Action. Event evt) { Color c = (Color)get. Value("Color"); target. set. Background(c); target. repaint(); }} class Action. Button extends JButton{ public Action. Button(Action a){ set. Text((String)a. get. Value(Action. NAME)); Icon icon = (Icon)a. get. Value(Action. SMALL_ICON); if (icon != null) set. Icon(icon); add. Action. Listener(a); }}
Código class Separate. GUIFrame extends JFrame{ public Separate. GUIFrame(){ set. Title("Separate. GUITest"); set. Size(300, 200); add. Window. Listener(new Window. Adapter() { public void window. Closing(Window. Event e) { System. exit(0); }}); JPanel panel = new JPanel(); Action blue. Action = new Color. Action("Blue", new Image. Icon( "blue-ball. gif"), Color. blue, panel);
Código Action yellow. Action = new Color. Action("Yellow", new Image. Icon("yellow-ball. gif"), Color. yellow, panel); Action red. Action = new Color. Action("Red", new Image. Icon("red-ball. gif"), Color. red, panel); panel. add(new Action. Button(yellow. Action)); panel. add(new Action. Button(blue. Action)); panel. add(new Action. Button(red. Action)); panel. register. Keyboard. Action(yellow. Action, Key. Stroke. get. Key. Stroke(Key. Event. VK_Y, 0), JComponent. WHEN_IN_FOCUSED_WINDOW);
Código panel. register. Keyboard. Action(blue. Action, Key. Stroke. get. Key. Stroke(Key. Event. VK_B, 0), JComponent. WHEN_IN_FOCUSED_WINDOW); panel. register. Keyboard. Action(red. Action, Key. Stroke. get. Key. Stroke(Key. Event. VK_R, 0), JComponent. WHEN_IN_FOCUSED_WINDOW); Container content. Pane = get. Content. Pane(); content. Pane. add(panel); JMenu m = new JMenu("Color"); m. add(yellow. Action);
Código m. add(blue. Action); m. add(red. Action); JMenu. Bar mbar = new JMenu. Bar(); mbar. add(m); set. JMenu. Bar(mbar); }} public class Separate. GUITest{ public static void main(String[] args){ JFrame frame = new Separate. GUIFrame(); frame. show(); }}
Threads y Swing Si su programa crea y se refiere a la GUI en forma correcta, probablemente no tenga que preocuparse de este tema. Si su programa crea threads para realizar tareas que afecten la GUI, o si manipula la GUI ya visible en respuesta a algo que no sea un evento standard, sea cuidadoso!
Regla del thread único: “Una vez que un componente se “realizó”, todo código que pueda afectarlo o dependa del estado del mismo, debería ejecutarse en el “event-dispatching thread ”. ” Hay unas pocas excepciones: http: //java. sun. com/docs/books/tutorial/uiswing/overview/threads. html
La historia real import java. awt. *; public class Hello. GUI { public static void main (String[ ] arg) { System. out. println (“About to make GUI”); Frame f = new Frame (“Hello GUIs”); f. set. Size( 200, 200 ); f. show(); System. out. println (“Finished making GUI”); }// main }// class Hello. GUI Usualmente se piensa en un programa como un único conjunto lineal de pasos a ejecutar, aunque ocurre algo especial cuando se crean objetos gráficos.
Event-dispatching thread import java. awt. *; public class Hello. GUI { public static void main (String[ ] arg) { System. out. println (“About to make GUI”); Frame f = new Frame (“Hello GUIs”); f. set. Size( 200, 200 ); f. show(); System. out. println (“Finished making GUI”); }// main }// class Hello. GUI
Las dos áreas de un programa con GUI import java. awt. *; public class Hello. GUI { public static void main (String[ ] arg) { System. out. println (“About to make GUI”); Frame f = new Frame (“Hello GUIs”); f. set. Size( 200, 200 ); f. show(); System. out. println (“Finished making GUI”); }// main }// class Hello. GUI Su código Graphics 1 El código que escribe en main() Y otros métodos 2 El código que Java provee para manejar la parte gráfica de la aplicación.
Event-dispatching thread import java. awt. *; public class Hello. GUI { public static void main (String[ ] arg) { System. out. println (“About to make GUI”); Frame f = new Frame (“Hello GUIs”); f. set. Size( 200, 200 ); f. show(); System. out. println (“Finished making GUI”); }// main }// class Hello. GUI Mouse Click callback El código para manejar este evento
Event-dispatching thread Registro de eventos antes que ocurren
Event-dispatching thread Action. Listener import java. awt. *; public class Hello. GUI { public static void main (String[ ] arg) { System. out. println (“About to make GUI”); Frame f = new Frame (“Hello GUIs”); f. set. Size( 200, 200 ); f. show(); System. out. println (“Finished making GUI”); }// main }// class Hello. GUI public void action. Performed (Action. Event e) { // code doing something } Este método DEBE estar aquí, tal que Java lo sabe y puede “callback” al mismo. callback
Cuando conviene usar threads? Para mover, fuera del thread principal, una tarea de inicialización que requiera mucho tiempo y para que la GUI sea más rápida (ej. : cálculos intensivos, I/O en disco tal como carga de imágenes). Para mover fuera del event-dispatching thread, tareas que requieran mucho tiempo, de forma tal que la GUI permanezca sensible. ( Ejecutar el código de manejo de eventos en un único thread garantiza que el manejo de cada uno de ellos terminará de ejecutarse antes del manejo del siguiente) Para ejecutar una operación repetidamente, usualmente a iguales intervalos de tiempo. Para esperar mensajes de otros programas.
Programas Multi-threads Debería analizar el código de su programa y documentar desde cuál thread se invoca cada método. Si no está seguro si su código se está ejecutando en el thread de eventos use Swing. Utilities. is. Event. Dispatch. Thread() que retorna true si se está ejecutando en el EDT. Invoque Swing. Utilities. invoke. Later (preferido, retorna inmediatamente sin esperar que el EDT ejecute el código) o Swing. Utilities. invoke. And. Wait desde cualquier thread para requerir que el EDT ejecute cierto código que involucre un acceso a la GUI.
Programas Multi-threads Ejemplo: un thread que necesita acceder a un par de text fields: void print. Text. Field() throws Exception { final String[] my. Strings = new String[2]; Runnable get. Text. Field. Text = new Runnable() { public void run() { my. Strings[0] = text. Field 0. get. Text(); my. Strings[1] = text. Field 1. get. Text(); } }; Swing. Utilities. invoke. And. Wait(get. Text. Field. Text); System. out. println(my. Strings[0] + " " + my. Strings[1]); }
Programas Multi-threads Swing. Worker Crea un thread para ejecutar operaciones que requieran mucho tiempo. Después que las mismas finalizan, da la opción de ejecutar código adicional en el EDT. no está en Swing release. métodos construct() and finish() javax. swing. Timer Se suele usar si se necesita actualizar un componente después de un delay o a intervalos regulares.
Ejemplo animación
Código import javax. swing. *; import java. awt. event. *; public class Components extends JPanel { int position = 10; public void paint. Component(Graphics g) { super. paint. Component(g); g. draw. Line(position, 10, position + 20, 90); position ++; if(position > 300) position = 10; }}
Código import java. awt. *; import java. awt. event. *; import javax. swing. *; public class Moving. Line extends JFrame implements Action. Listener {Timer timer; boolean frozen = false; Component moving; Moving. Line(int fps, String window. Title) { super(window. Title); int delay = (fps > 0) ? (1000 / fps) : 100; timer = new Timer(delay, this);
Código timer. set. Initial. Delay(0); timer. set. Coalesce(true); add. Window. Listener(new Window. Adapter() { public void window. Iconified(Window. Event e) { stop. Animation(); } public void window. Deiconified(Window. Event e) { start. Animation(); } public void window. Closing(Window. Event e) { System. exit(0); } }); Component contents = new Components();
Código contents. add. Mouse. Listener(new Mouse. Adapter() { public void mouse. Pressed(Mouse. Event e) { if (frozen) { frozen = false; start. Animation(); } else { frozen = true; stop. Animation(); }} }); get. Content. Pane(). add(contents, Border. Layout. CENTER); } //Can be invoked by any thread (since timer is thread-safe).
Código public void start. Animation() { if (frozen) { //Do nothing. The user has requested that we //stop changing the image. } else {//Start animating! if (!timer. is. Running()) { timer. start(); } } } //Can be invoked by any thread (since timer is thread-safe). public void stop. Animation() { //Stop the animating thread. if (timer. is. Running()) { timer. stop(); } }
Código public void action. Performed(Action. Event e) { //Advance the animation frame. repaint(); } public static void main(String args[]) { int fps = 10; //Get frames per second from the command line argument. if (args. length > 0) {try { fps = Integer. parse. Int(args[0]); } catch (Exception e) {} } Moving. Line moving = new Moving. Line(fps, "Moving line with Timer --" + "Click to pause or continue");
Código moving. pack(); moving. set. Size(600, 200); moving. set. Visible(true); //It's OK to start the animation here because //start. Animation can be invoked by any thread. moving. start. Animation(); }}
Applet, Timer y Swing. Worker
Código import javax. swing. *; import java. awt. event. *; import java. net. *; public class Tumble. Item extends JApplet implements Action. Listener { int loopslot = -1; //nro. de frame actual String dir; //direct. relativo desde el cual cargo las 17 imágenes Timer timer; int pause; //long. de pausas int offset; //offset entre loops int off; //offset actual
Código int speed; //veloc. de animación int nimgs; //nro. de imágenes a animar int width; //ancho del content pane del applet JComponent content. Pane; Image. Icon imgs[]; //imágenes int max. Width; //ancho máx. de las imágenes boolean finished. Loading = false; JLabel status. Label; static Color[] label. Color = { Color. black, Color. white, Color. white };
Código public void init() { //parámetros del applet. . . //Anima de derecha a izquierda si offset es negativo. width = get. Size(). width; if (offset < 0) {off = width - max. Width; } //dibuja la imagen actual a un particular offset. content. Pane = new JPanel() { public void paint. Component(Graphics g) {super. paint. Component(g); if (finished. Loading &&(loopslot > -1) && (loopslot < nimgs)) { imgs[loopslot]. paint. Icon(this, g, off, 0); }}}; content. Pane. set. Background(Color. white);
Código set. Content. Pane(content. Pane); //"Loading Images. . . " label status. Label = new JLabel("Loading Images. . . ", JLabel. CENTER); status. Label. set. Foreground(label. Color[0]); content. Pane. set. Layout(new Border. Layout()); content. Pane. add(status. Label, Border. Layout. CENTER); //Set up timer, no comience h/cargar todas las imágenes timer = new Timer(speed, this); timer. set. Initial. Delay(pause); imgs = new Image. Icon[nimgs]; timer. start(); //comienza la animación
Código //Carga de imágenes puede tomar mucho tiempo, las carga en un Swing. Worker thread final Swing. Worker worker = new Swing. Worker() { public Object construct() { //Imágenes numeradas de 1 a nimgs, for (int i = 0; i < nimgs; i++) {imgs[i] = create. Frame(i+1); } finished. Loading = true; return imgs; } public void finished() {//saca la etiqueta "Loading images" content. Pane. remove. All(); content. Pane. repaint(); loopslot = -1; }};
Código worker. start(); } protected Image. Icon create. Frame(int image. Num) { String path = dir + "/T" + image. Num + ". gif"; URL img. URL = this. get. Class(). get. Resource(path); if (img. URL != null) { return new Image. Icon(img. URL); } else {System. err. println("Couldn't find file: " + path); return null; }} public void start() { if (finished. Loading && (nimgs > 1)) { timer. restart(); }} public void stop() {timer. stop(); }
Código //actualiza nro. de frame y offset. //si es el último frame, hacer una pausa larga entre loops public void action. Performed(Action. Event e) { loopslot++; if (!finished. Loading) { int color. Index = loopslot % label. Color. length; status. Label. set. Foreground(label. Color[color. Index]); return; }
Código if (loopslot >= nimgs) { loopslot = 0; off += offset; if (off < 0) { off = width - max. Width; } else if (off + max. Width > width) { off = 0; }} content. Pane. repaint(); if (loopslot == nimgs - 1) { timer. restart(); }}
Código