IV insertion Chapter 8 Objectives Identify the antecubital

IV insertion Chapter 8

Objectives: • Identify the antecubital vein used for intravenous injections • Know the 13 steps used for venipuncture • List the symptoms of extravasation • Know which universal precautions should be taken by a person performing venipuncture.

Info: • http: //faculty. mercer. edu/summervill_j/iv. ht m • http: //www. iv-therapy. net

Step 1: • Wash hands • Gather equipment: Needle, contrast, band aid … ü Order ü Lab work done? 60 and older?

Step 2: • Introduce yourself to the patient, and check the patient’s name band

Step 3: • Explain the procedure and why we are doing it. Do they understand you? Get feedback from the patient. Allergies to meds, tape, or skin cleaner • Sign the consent • Make them feel at ease • Would you like me to tell everything as I do it? Or just warn you before the stick?

Step 4: Prepare the drug and all required supplies for administration- draw up contrast and open up supplies

Step 5: • Put on gloves

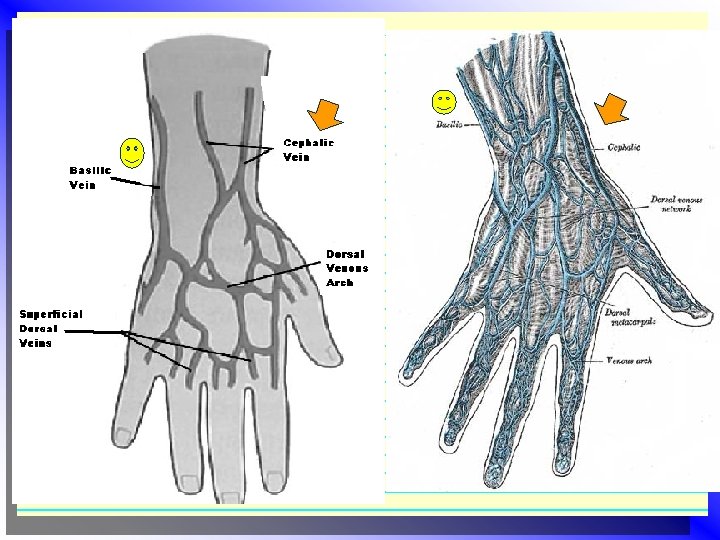
Site Selections: • The most common used upper extremity access sites are: * Median Cubital (Antecubital) • Cephalic or Accessory Cephalic • Basilic • These sites provide the most benefits with the lowest risks.
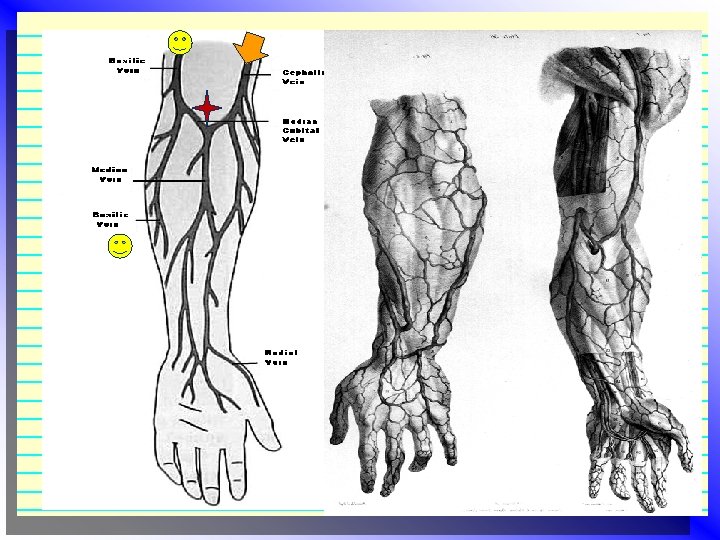

Step 6 • Determine the best site for the venipuncture: What arm is better? Have they had surgery (Breast or arm), PIC line in, Blood thinners? • Antecubital space: Anterior elbow, you usually see two veins, they are large enough and near enough to the surface to be seen. Not used for long term(pt. should not bent this arm). This area can be overused (scarred ) • Vein needs to be twice the diameter of the needle, with no bens or curves for the length of the needle • Press down: Do you feel a hard bump (value/scar)? Do you feel a heart beat?

The Efficacy of Antiseptics • “Prior to any antiseptic application, the skin must be physically clean because organic matter can inactivate the efficacy of antiseptics. ” • Is the area visible dirty? • Clean first with soap and water! Then alcohol and or iodine.
 • • • Inhibits bacteria growth")
IV Site Prep • 70% Isopropyl Alcohol (ETOH) • • • Inhibits bacteria growth Least reactive Dries fast Safe Cost effective • Apply to the area in a circular motion from center out in a two inch area and allow to air dry. Do not fan or blow on the area! • Isopropyl takes 2 full minutes to kill bacteria

IV site prep • If the patient is not allergic to Iodine it may be applied in tandem with the alcohol for long term use. • If both are used the alcohol should be applied first, allowed to dry, and then the Iodine can be applied. • You can reverse this order, *IF allowed by your site. This is sometimes done to increase vein visibility. However it is not recommended because alcohol does not provide a long antiseptic effect.

Step 7: • Secure the tourniquet around the arm above the elbow (3 -4 cm above the site) • Open and close the hand a few times • Locate vein v. Release tourniquet (if it is going to take some time before your ready!) • Clean the area

Are you ready? • Verify that you have the proper medication. • Set up area: Cotton ball or 2 x 2 and tape torn and ready, right size Butterfly flushed, extra saline for flush and contrast ready to go • Emergency drugs in room and 02 ready with nasal canula

Step 8: • To stabilize the vein and to keep it from rolling, place your(left if your are right handed) thumb directly below the injection site and gently pull the skin toward the wrist • This helps prevent movement and makes the skin taut. • This makes for easier insertion.

Step 9: • Hold the needle with the bevel facing upward • If using a butterfly set, pinching the wings together assists in stability

Step 10: • Puncture the skin at angle of 20 -45 degrees (depends on pt size large pts go deep) usually 20 degrees • Use a quick motion • Insert the needle farther into the vein until you feel it “pop” as the needle enters the vein, look for backflow of blood in chamber “the flash” • Decrease the angle of the needle • You want the needle to be ¼ to ½ way into the vein

Step 11: • Release the tourniquet • Tape the needle in place: This will keep it from dislodging during injection • Inject saline to check site • Change to contrast • Recheck vein (pull back on plunger to check for blood flow) • You are ready to inject • After injection flush with saline and put cap back on end of butterfly
, band aid, sharps container ready")
Step 12: • Have cotton ball (2 x 2), band aid, sharps container ready to go • Put gloves on • Remove tape • In your left hand have a cotton ball over needle, with your right hand quickly pull the needle out and put it in the sharps container • Apply light pressure with cotton ball (2 x 2) until bleeding stops, and apply bandage (are they sensitive to tape? )

Step 13 • Chart all pertinent info

Dressing and IV Site Maintenance • The dressing most recommended is paper tape if the patient is not allergic to it “sterile gauze, pressure dressing (ace bandage type tape) or “sterile transparent semipermeable membrane dressings” (tegaderm) to cover the catheter site if left in for long term use. Label site with date put in

Intravascular Catheters • Needles are generally used for short term IV access of less than three hours, while angiocaths are used for longer periods of time. • Angiocaths made with teflon or polyurethane have been associated with fewer infectious complications • There also catheters that have been coated with antimicrobial agents but these are not cost effective and many hospitals can not afford to use them.

Infiltration vs Extravasation • An infiltration is an inadvertent administration of a nonvesicant into the surrounding tissue. [Infiltration most often occurs as a result of dislodging of the IV cannula. ] Extravasation is defined as an inadvertent delivery of a vesicant (producing blisters) into the tissues. It also generally causes more extensive long term damage/problems. Vesicants cause blistering, severe tissue damage, even necrosis if extravagated, and requires more intervention than standard infiltration.

Extravasation/Infiltration • Occasionally, IV fluid or medication may accidentally be injected into the tissues surrounding the vein. • Painful and dangerous • Patient will complain of discomfort and you might see swelling at the site

Extravasation/Infiltration • This is the most frequently occurring problems with IV injection. • Causes: • Dislodgment of the catheter or needle cannula • Puncture of the distal vein wall during venipuncture • Cannula is too large for vein diameter (causes leaking into the insertion site). • Weakened vein (poor vein choice) • IV device is over manipulated • Tape is applied improperly (restricts flow)

Prevention: ü for back flow • Immobilize the needle at the injection site. • Stop the injection immediately if the patient complains of discomfort at the injection site • Is there resistance to the injection? • Tight or rigid skin? • Sensation of coolness • Swelling • Damp or liquid leaking from site

Oops! Now what? • Stop the injection! • Remove the needle(if it is a nonvesicant) and attend to this problem before proceeding with an injection at another site. • Let the patient know what happen and let them know what you are going to do next. • Policy for this? • Pressure on the vein until bleeding has stopped completely. No hematoma please! • Hot packs or moist heat to the affected area will help with pain • Incident report!

SHMC Policy • • • Treatment: Hot Packing EQUIPMENT: 1. Terry towel 2. Blue pad METHOD: 1. 2. 3. Warm water 4. Paper tape Discontinue the IV and remove needle / catheter. Apply warm moist packs to site. a. Warm, moist terry towel to site. b. Cover damp towel with blue pad. c. Secure with paper tape. d. Monitor and document site q shift for 24 hours

Complications • Complications from needle stick may include infiltration, hematoma, an air embolism, phlebitis, extravascular drug administration, and intraarterial injection. Intraarterial injection is more rare.

• Infiltration is the infusion of fluid and/or medication outside the intravascular space, into the surrounding soft tissue. Generally caused by poor placement of a needle or angiocath outside of the vessel lumen. Clinically, you will notice swelling of the soft tissue surrounding the IV, and the skin will feel cool, firm, and pale. Small amounts of IV fluid will have little consequence. • A hematoma occurs when there is leakage of blood from the vessel into the surrounding soft tissue. This can occur when an IV angiocatheter passes through more than one wall of a vessel or if pressure is not applied to the IV site when the catheter is removed. A hematoma can be controlled with direct pressure and will resolve over the course of 2 weeks.

• Air embolism occurs as a result of a large volume of air entering the patient's vein via the I. V. administration set. A patient can generally tolerate up to 1 CC per kilogram of weight of air (100 lbs. = 45. 5 kg); so small children are at greater risk. Air embolisms are easily prevented by making sure that all the air bubbles are out of the I. V. tubing; fortunately, it is an extremely rare complication. • Phlebitis and thrombophlebitis occur more frequently. Phlebitis is inflammation of the vein which occurs due to the p. H of the agent being administered during the administration of the I. V, while thrombophlebitis refers to inflammation associated with a thrombus. Both are more common on the dorsum of the hand than on the antecubital space and may occur especially in hospitalized patients where an I. V. may be in for several days, where use of an angiocatheter, as opposed to a needle, can increase the risk of phlebitis, as the metal needle is less irritating to the endothelium. The infusate itself may cause phlebitis and may be irritating to the skin. Older patients are also more susceptible to phlebitis.

• Extravascular injection of a drug may result in pain, delayed absorption and/or tissue damage (if the p. H of the agent being administering is too high or too low). If large volumes have been injected and the skin is raised and looks ischemic, then a nurse or Dr should put 1% procaine into the infiltrate. Procaine is a vasodilator, which will improve the blood supply both to the area and improve venous drainage away. • An intraarterial injection occurs rarely, but is much more critical. The most important measure is prevention, by making sure that the needle is inserted in a vein. Remember that veins are more superficial than arteries. If you cannulate an artery, there should be a pumping of bright red blood back into your angiocath, which would not be seen when you cannulate a vein. Intraarterial injection frequently causes arterial spasm and eventual loss of limb, usually from gangrene.

For your information: • In the case of intraarterial injection, recognition is paramount; observe the color of the skin, observe capillary refill, and feel the radial pulse. Capillary refill, which is observed by squeezing a fingertip and then watching the red color return, is a reflection of perfusion. If capillary refill is decreased, then perfusion to that extremity is decreased. Treatment: ( by a nurse or Dr )in the case of intraarterial injection, it is the intravenous drugs which pose severe problems, rather than the I. V. solution. Leave the needle in the artery, and slowly inject approximately 10 CCs of one percent procaine. Procaine is a vasodilator. It is slightly acidic, with a p. H of 5, and will counter the alkaline drugs that were just administered. Following treatment, the patient must be hospitalized, and may often require a sympathetic nerve block. An endarterectomy and heparinization may also be necessary to prevent further complications

Improper response or treatment may to lead to: • • • Tissue sloughing Tissue destruction Nerve damage Blood vessel damage Limb damage Loss of limb function

Conclusion: • Administration of medications is a very important responsibility! Check 3 times! • This requires that you have high degree of knowledge, skill and awareness. Read up on all drugs you give! • Remember the potential harm and legal complications that could result from medication administration errors! • We always strive for error-free performance!

Objectives: • Identify the antecubital vein used for intravenous injections • Know the 13 steps used for venipuncture • List the symptoms of extravasation • Know which universal precautions should be taken by a person performing venipuncture.
- Slides: 39