Isometric Projections ME 111 Engineering Drawing Recap In
- Slides: 33

Isometric Projections ME 111 Engineering Drawing

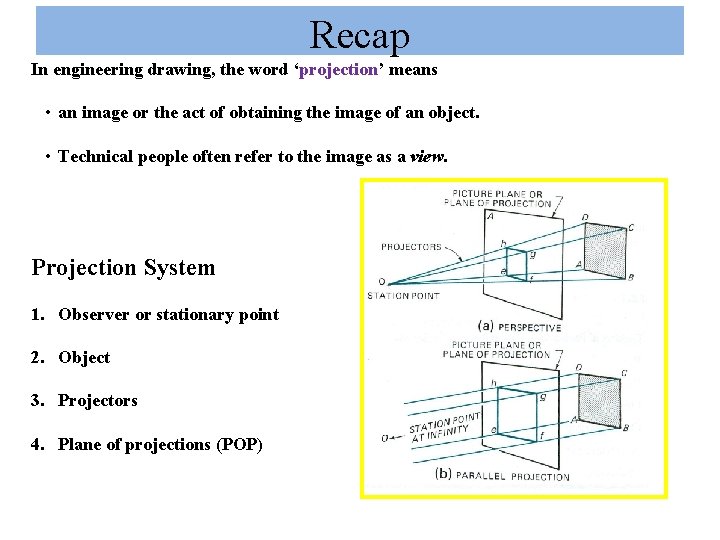
Recap In engineering drawing, the word ‘projection’ means • an image or the act of obtaining the image of an object. • Technical people often refer to the image as a view. Projection System 1. Observer or stationary point 2. Object 3. Projectors 4. Plane of projections (POP)

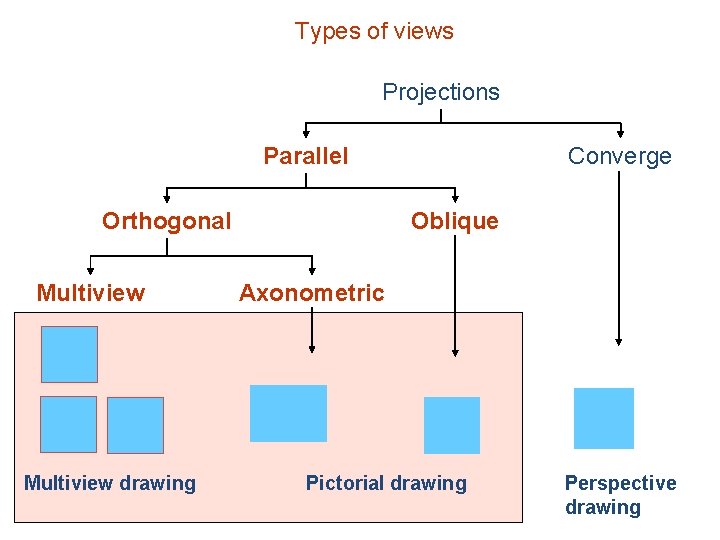
Types of views Projections Parallel Orthogonal Multiview drawing Converge Oblique Axonometric Pictorial drawing Perspective drawing

Introduction • Isometric projection is a type of an axonometric projection (or pictorial projection). • Isometric means ‘equal measure’. • In isometric projection, – all the mutually perpendicular plane surfaces of an object and the edges formed by these surfaces are equally inclined to a POP. • In isometric projection, only one view on a plane is drawn to represent the three dimensions of an object. • This provides a pictorial view with a real appearance.

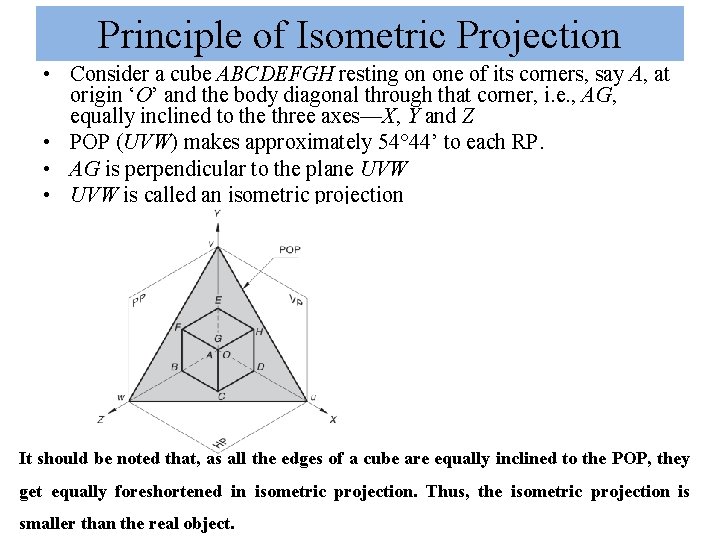
Principle of Isometric Projection • Consider a cube ABCDEFGH resting on one of its corners, say A, at origin ‘O’ and the body diagonal through that corner, i. e. , AG, equally inclined to the three axes—X, Y and Z • POP (UVW) makes approximately 54° 44’ to each RP. • AG is perpendicular to the plane UVW • UVW is called an isometric projection It should be noted that, as all the edges of a cube are equally inclined to the POP, they get equally foreshortened in isometric projection. Thus, the isometric projection is smaller than the real object.

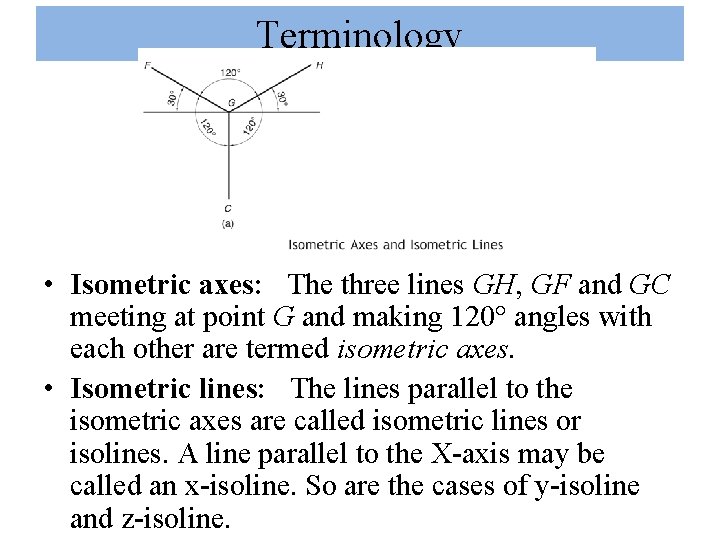
Terminology • Isometric axes: The three lines GH, GF and GC meeting at point G and making 120° angles with each other are termed isometric axes. • Isometric lines: The lines parallel to the isometric axes are called isometric lines or isolines. A line parallel to the X-axis may be called an x-isoline. So are the cases of y-isoline and z-isoline.

Terminology • Non-Isometric lines: The lines which are not parallel to isometric axes are called non-isometric lines or non-isolines. • Isometric planes: The planes representing the faces of the cube as well as other faces parallel to these faces are called isometric planes or isoplanes. Note that isometric planes are always parallel to any of the planes formed by two isometric axes. • Non-Isometric planes: The planes which are not parallel to isometric planes are called nonisometric planes or non-isoplanes (or non-isometric faces). • Origin or Pole Point: The point on which a given object is supposed to be resting on the HP or ground such that the three isometric axes originating from that point make equal angles to POP is called an origin or pole point.

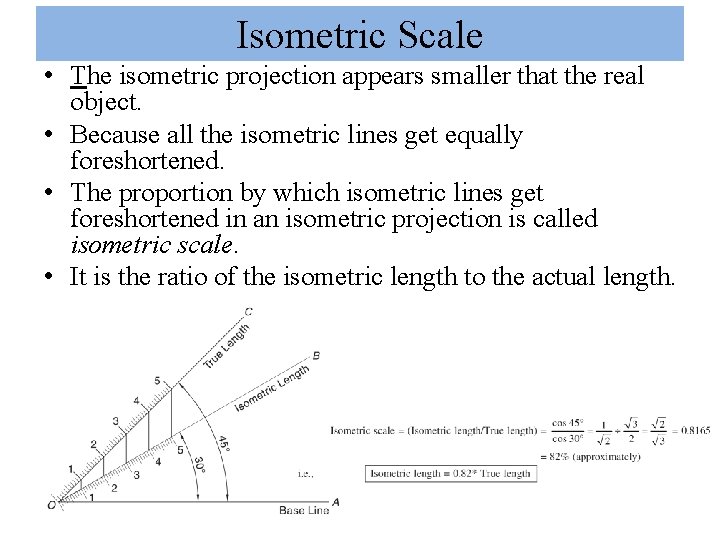
Isometric Scale • The isometric projection appears smaller that the real object. • Because all the isometric lines get equally foreshortened. • The proportion by which isometric lines get foreshortened in an isometric projection is called isometric scale. • It is the ratio of the isometric length to the actual length.

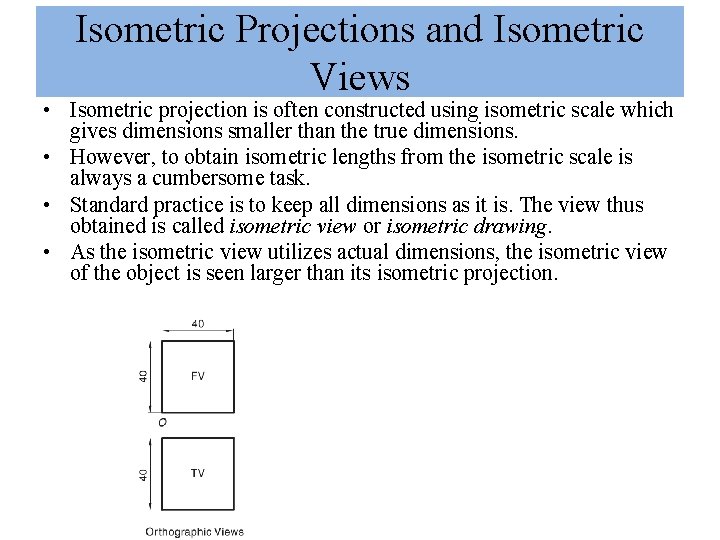
Isometric Projections and Isometric Views • Isometric projection is often constructed using isometric scale which gives dimensions smaller than the true dimensions. • However, to obtain isometric lengths from the isometric scale is always a cumbersome task. • Standard practice is to keep all dimensions as it is. The view thus obtained is called isometric view or isometric drawing. • As the isometric view utilizes actual dimensions, the isometric view of the object is seen larger than its isometric projection.

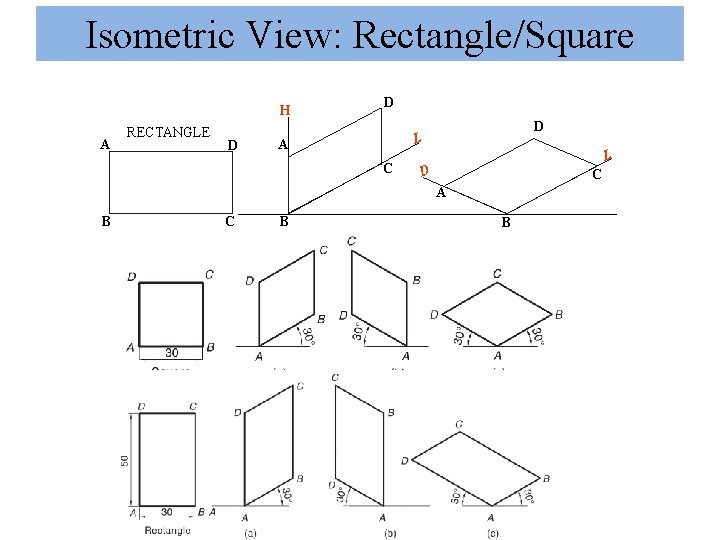
Isometric View: Rectangle/Square H A RECTANGLE D D D L A C L D C A B C B B

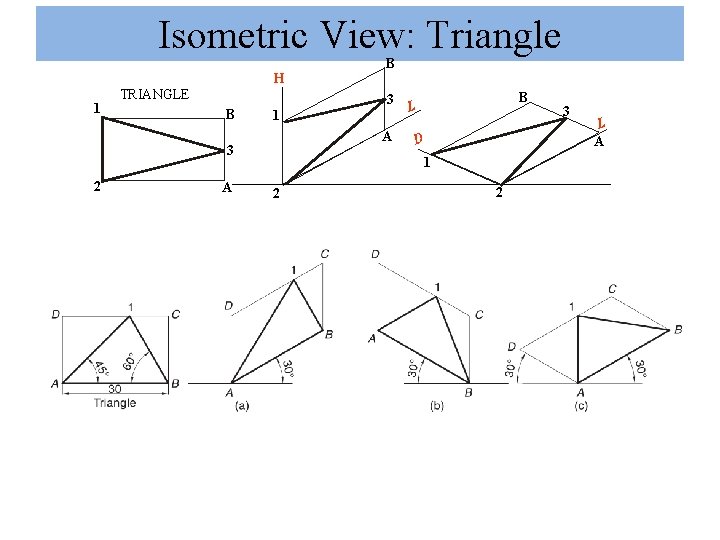
Isometric View: Triangle H 1 TRIANGLE B 3 1 A 3 2 A B B L D 1 2 2 3 L A

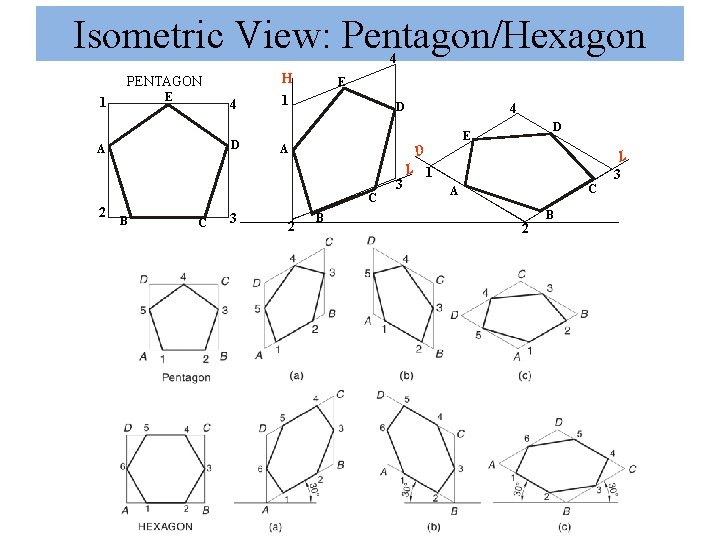
Isometric View: Pentagon/Hexagon 4 H PENTAGON E 1 4 D A E 1 D B C 3 D E A D C 2 4 2 B 3 L 1 C A 2 B

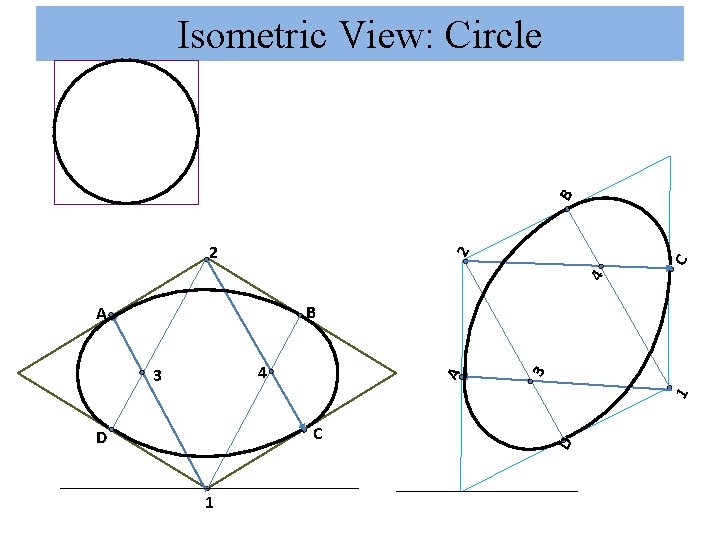
B Isometric View: Circle 4 C 2 2 C D 1 A 4 3 3 B A

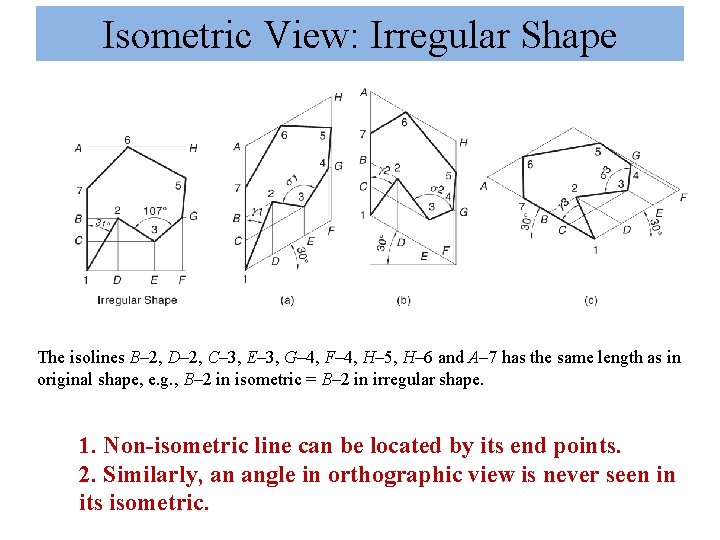
Isometric View: Irregular Shape The isolines B– 2, D– 2, C– 3, E– 3, G– 4, F– 4, H– 5, H– 6 and A– 7 has the same length as in original shape, e. g. , B– 2 in isometric = B– 2 in irregular shape. 1. Non-isometric line can be located by its end points. 2. Similarly, an angle in orthographic view is never seen in its isometric.

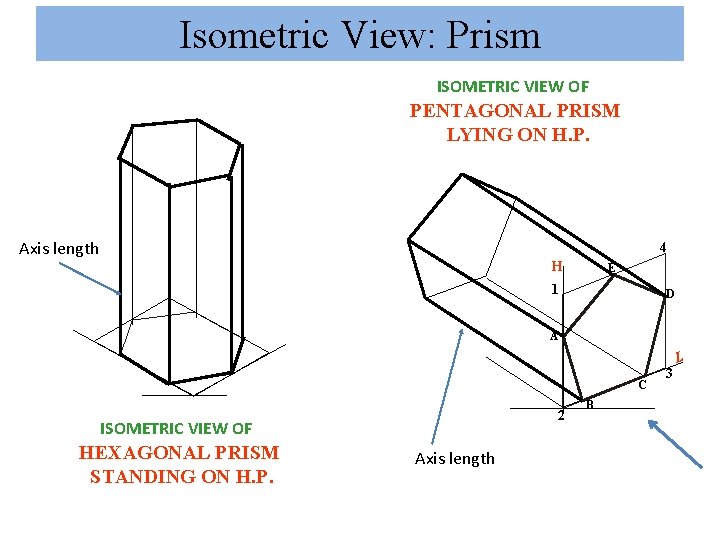
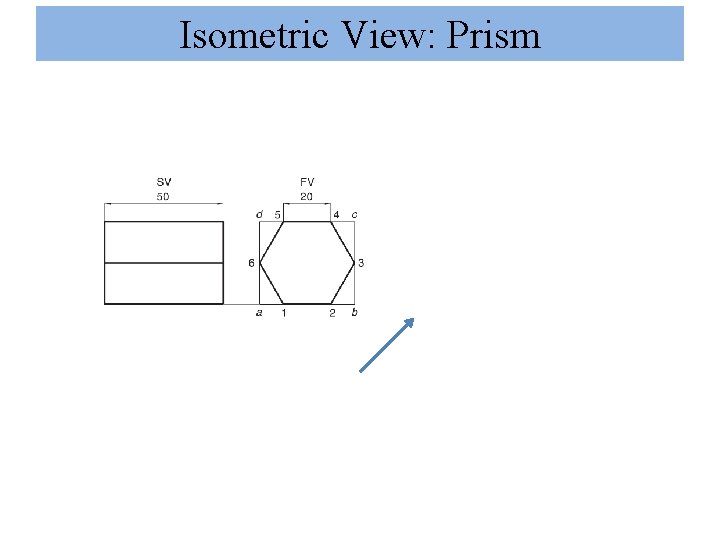
Isometric View: Prism ISOMETRIC VIEW OF PENTAGONAL PRISM LYING ON H. P. Axis length 4 H E 1 D A C 2 ISOMETRIC VIEW OF HEXAGONAL PRISM STANDING ON H. P. Axis length B 3 L

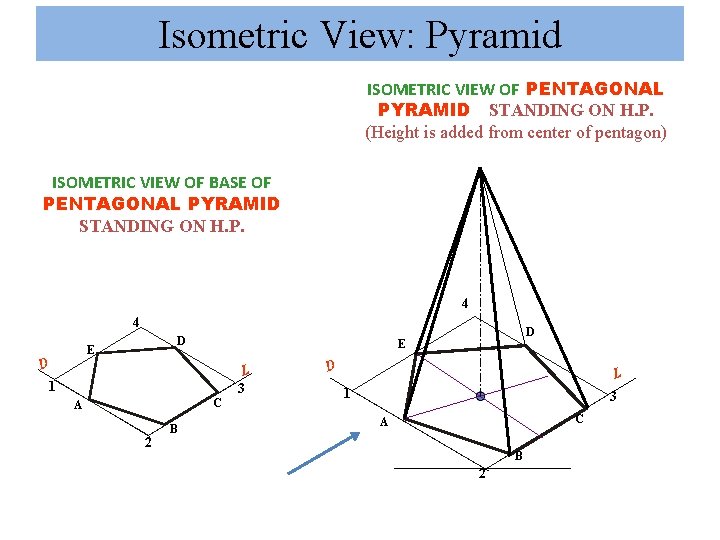
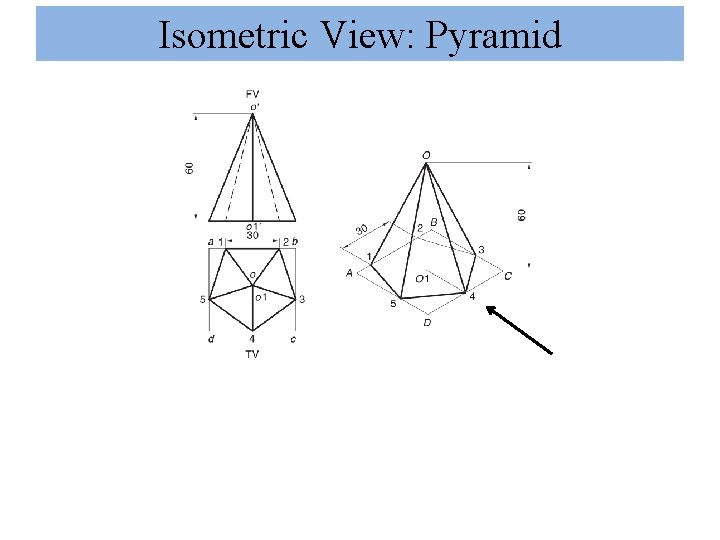
Isometric View: Pyramid ISOMETRIC VIEW OF PENTAGONAL PYRAMID STANDING ON H. P. (Height is added from center of pentagon) ISOMETRIC VIEW OF BASE OF PENTAGONAL PYRAMID STANDING ON H. P. 4 4 D E D L 3 1 C A 2 B D E D L 1 3 C A B 2

Isometric View: Pyramid

Isometric View: Prism

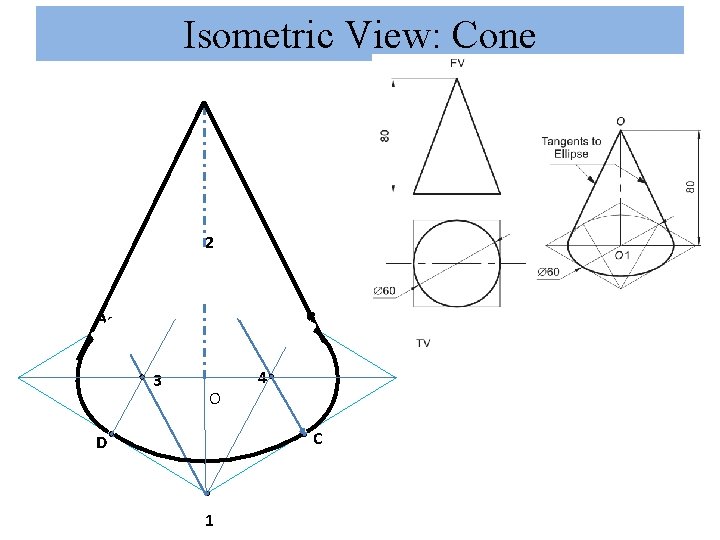
Isometric View: Cone 2 B A 3 O 4 C D 1

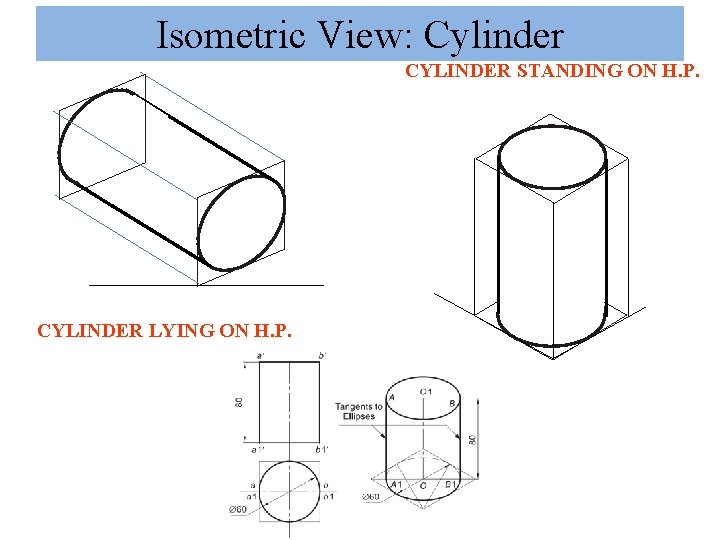
Isometric View: Cylinder CYLINDER STANDING ON H. P. CYLINDER LYING ON H. P.

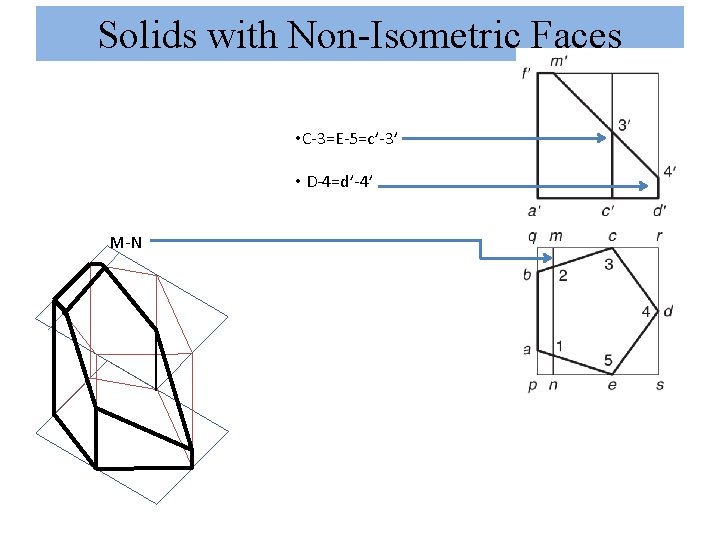
Solids with Non-Isometric Faces • C-3=E-5=c’-3’ • D-4=d’-4’ M-N

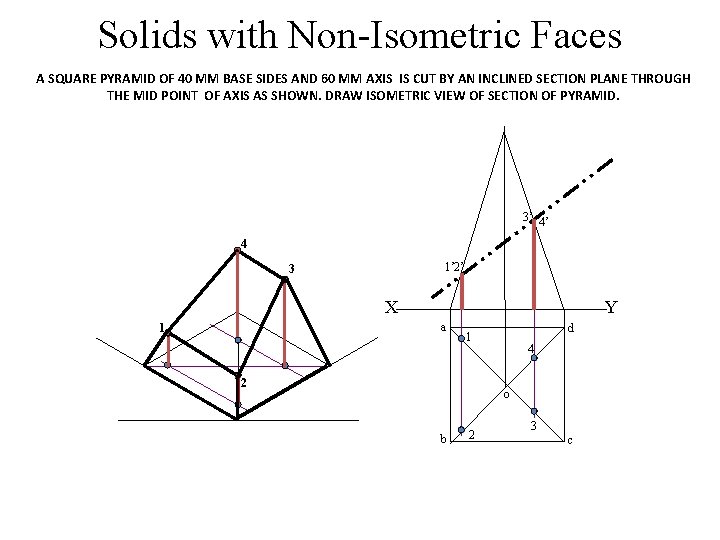
Solids with Non-Isometric Faces A SQUARE PYRAMID OF 40 MM BASE SIDES AND 60 MM AXIS IS CUT BY AN INCLINED SECTION PLANE THROUGH THE MID POINT OF AXIS AS SHOWN. DRAW ISOMETRIC VIEW OF SECTION OF PYRAMID. 3’ 4’ 4 1’ 2’ 3 X Y a 1 d 1 2 4 o b 2 3 c

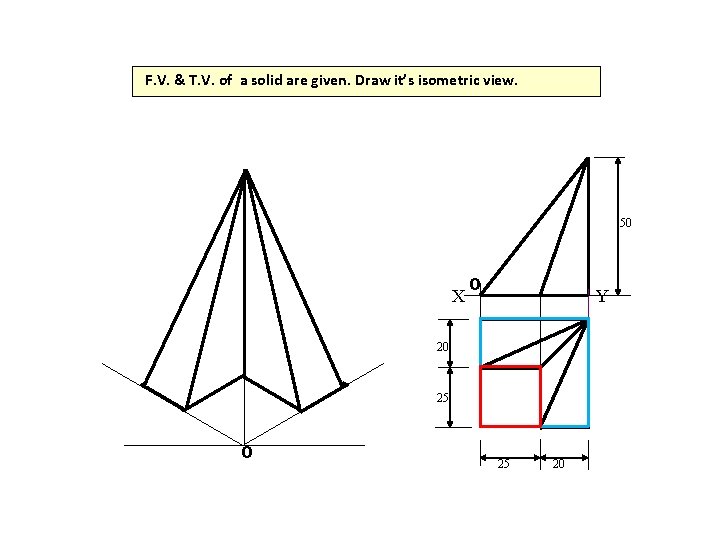
F. V. & T. V. of a solid are given. Draw it’s isometric view. 50 X O Y 20 25 O 25 20

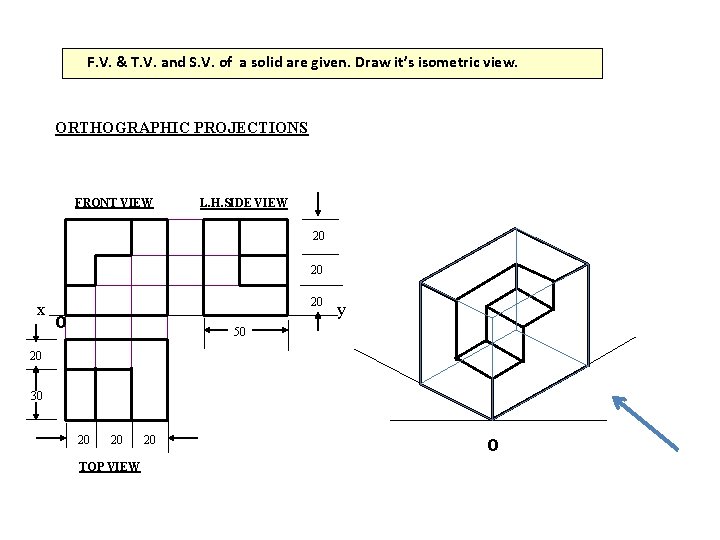
F. V. & T. V. and S. V. of a solid are given. Draw it’s isometric view. ORTHOGRAPHIC PROJECTIONS FRONT VIEW L. H. SIDE VIEW 20 20 x 20 O y 50 20 30 20 20 TOP VIEW 20 O

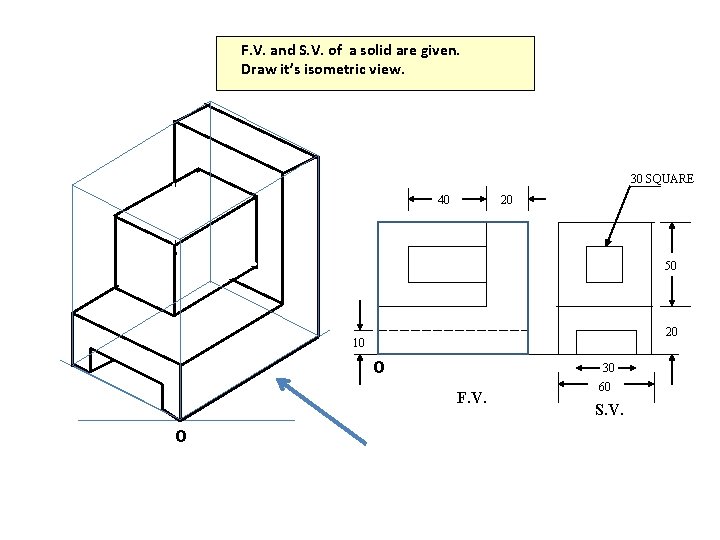
F. V. and S. V. of a solid are given. Draw it’s isometric view. 30 SQUARE 40 20 50 20 10 O 30 F. V. O 60 S. V.

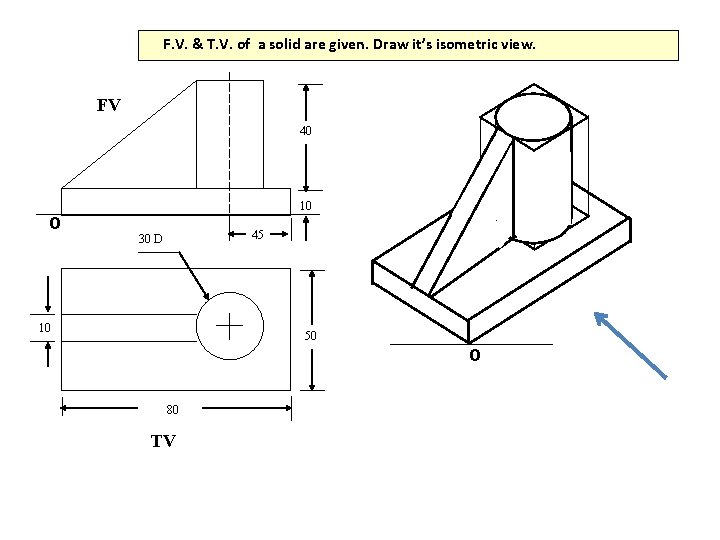
F. V. & T. V. of a solid are given. Draw it’s isometric view. FV 40 O 10 45 30 D 10 50 O 80 TV

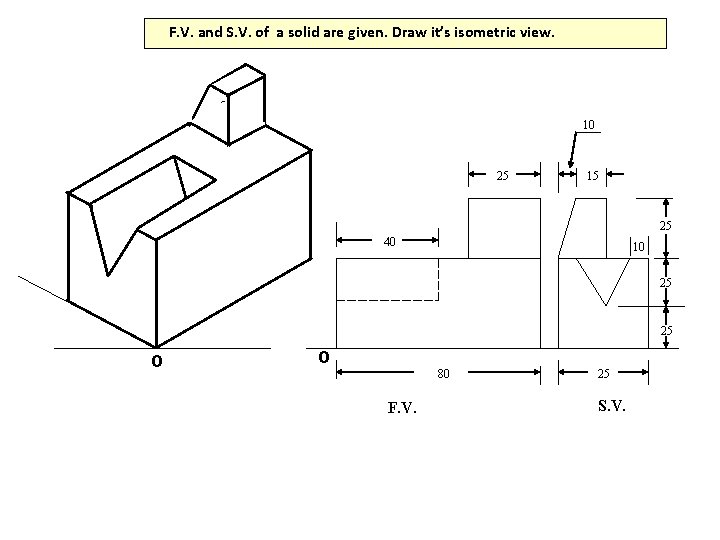
F. V. and S. V. of a solid are given. Draw it’s isometric view. 10 25 15 25 40 10 25 25 O O 80 F. V. 25 S. V.

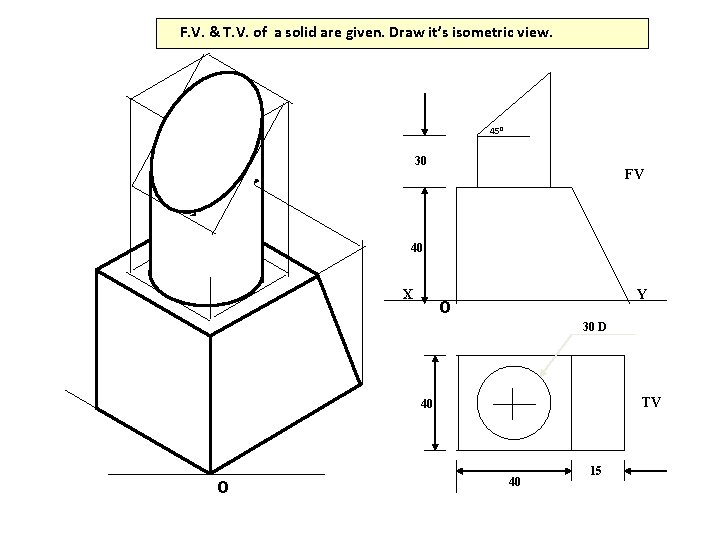
F. V. & T. V. of a solid are given. Draw it’s isometric view. 450 30 FV 40 X Y O 30 D TV 40 O 40 15

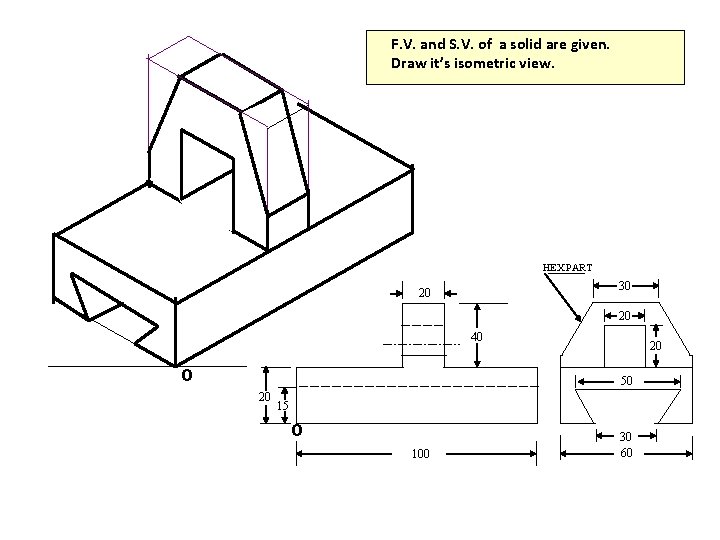
F. V. and S. V. of a solid are given. Draw it’s isometric view. HEX PART 30 20 20 40 O 20 50 20 15 O 100 30 60

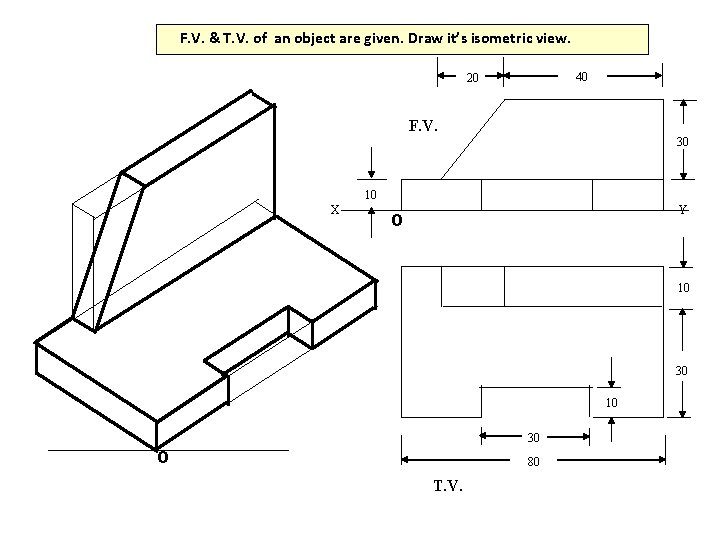
F. V. & T. V. of an object are given. Draw it’s isometric view. 40 20 F. V. 30 10 X Y O 10 30 O 80 T. V.

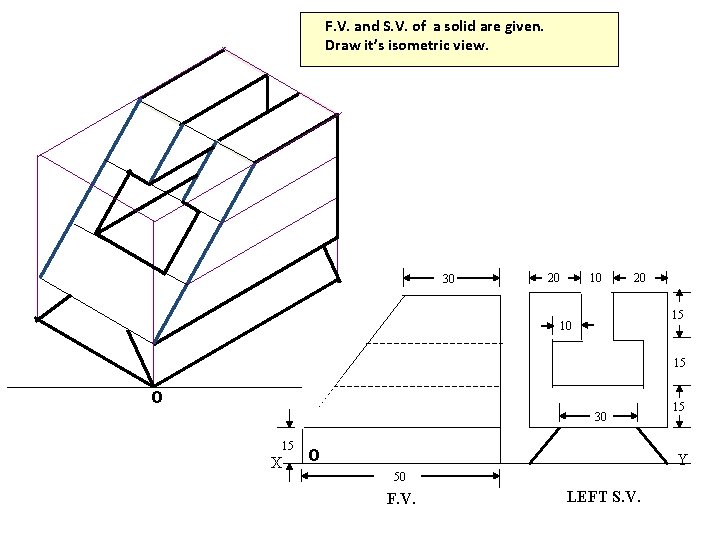
F. V. and S. V. of a solid are given. Draw it’s isometric view. 30 10 20 20 15 10 15 O 30 15 X O 15 Y 50 F. V. LEFT S. V.

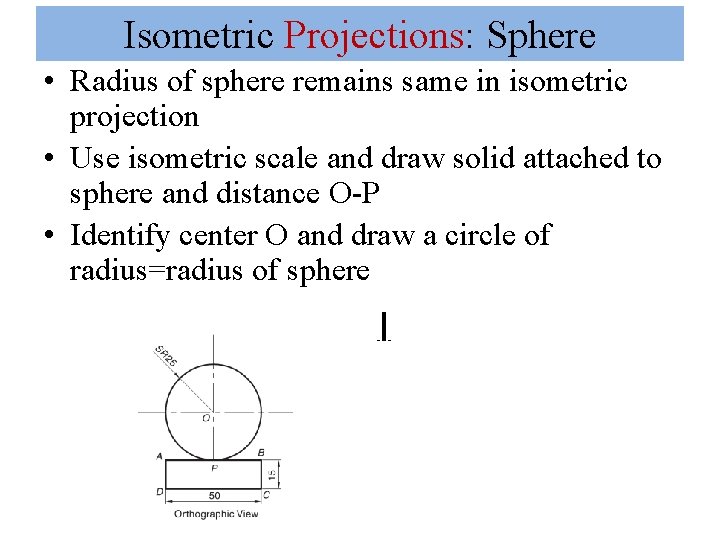
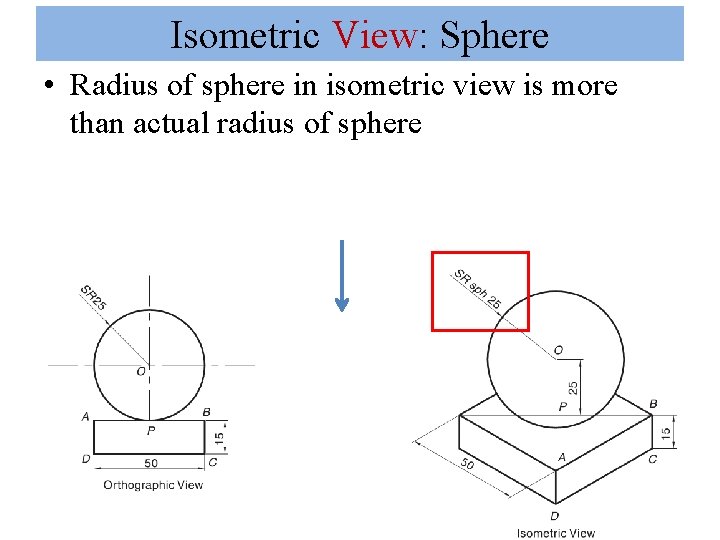
Isometric Projections: Sphere • Radius of sphere remains same in isometric projection • Use isometric scale and draw solid attached to sphere and distance O-P • Identify center O and draw a circle of radius=radius of sphere

Isometric View: Sphere • Radius of sphere in isometric view is more than actual radius of sphere