Introduction to Visual Basic Programming Visual Basic 2010

Introduction to Visual Basic Programming Visual Basic 2010 How to Program © 1992 -2011 by Pearson Education, Inc. All Rights Reserved.

© 1992 -2011 by Pearson Education, Inc. All Rights Reserved.

© 1992 -2011 by Pearson Education, Inc. All Rights Reserved.

3. 1 Introduction � In this chapter, we introduce Visual Basic programming with program code and present examples to demonstrate how programs can display information on the screen and obtain information from the user at the keyboard for processing. � You’ll use graphical user interfaces (GUIs) to allow users to interact visually with your programs. � A GUI (pronounced “GOO-ee”) gives a program a distinctive look-and-feel. © 1992 -2011 by Pearson Education, Inc. All Rights Reserved.

3. 1 Introduction � Sample GUI ◦ GUIs are built from GUI controls (which are sometimes called components or widgets—short for window gadgets). ◦ GUI controls are objects that can display information on the screen or enable users to interact with an application via the mouse, keyboard or other forms of input (such as voice commands). © 1992 -2011 by Pearson Education, Inc. All Rights Reserved.

3. 1 Introduction � Figure 3. 1 shows a Visual Basic 2010 Express window that contains various GUI controls. � Near the top of the window is a menu bar containing the menus File, Edit, View, Tools, Window and Help. � Below the menu bar is a tool bar of buttons, each with a defined task, such as creating a new project or opening an existing project. � Scrollbars are located at the right side of the Start Page’s Recent Projects and Get Started sections. � Usually, scrollbars appear when there is more information than can be displayed in certain types of controls. � Scrollbars enable a user to view different portions of a control’s contents, in this case the list of recent projects or information about getting started with the IDE. © 1992 -2011 by Pearson Education, Inc. All Rights Reserved.

3. 1 Introduction Page is shown on a tab—if multiple documents are open, the user can click a document’s tab to view it. � These controls form a user-friendly interface through which you’ve been interacting with the Visual Basic 2010 Express IDE. � The. NET framework provides many predefined controls. � The Start © 1992 -2011 by Pearson Education, Inc. All Rights Reserved.

© 1992 -2011 by Pearson Education, Inc. All Rights Reserved.

© 1992 -2011 by Pearson Education, Inc. All Rights Reserved.

3. 2 Programmatically Displaying Text in a Label � In Chapter 2, we showed how to create a simple GUI application using visual programming. � We defined the application’s appearance by dragging and dropping GUI controls onto a Form and setting properties in design mode—without writing any program code. � The application you created in Section 2. 6 displayed text and an image but did not perform any other actions. � Visual Basic programmers use a combination of visual programming and conventional programming techniques. © 1992 -2011 by Pearson Education, Inc. All Rights Reserved.

3. 2 Programmatically Displaying Text in a Label � In this section, you’ll modify the Label’s text programmatically, causing the text displayed on the Form to change when you execute the program. � You’ll also learn how to write code that performs an action when the Form loads—that is, when the program executes and displays the Form. � We begin by considering the program’s code and sample execution (Fig. 3. 2). © 1992 -2011 by Pearson Education, Inc. All Rights Reserved.

© 1992 -2011 by Pearson Education, Inc. All Rights Reserved.

© 1992 -2011 by Pearson Education, Inc. All Rights Reserved.

3. 2. 1 Analyzing the Program � Line Numbers ◦ All of our program listings include line numbers—these are not part of Visual Basic. ◦ The line numbers help us refer to specific parts of a program. ◦ In Section 3. 2. 2, you’ll learn how to display line numbers in program files. ◦ Each program in the book is followed by one or more sample outputs that demonstrate the program’s execution. © 1992 -2011 by Pearson Education, Inc. All Rights Reserved.

3. 2. 1 Analyzing the Program � Comments ◦ Line 1 of Fig. 3. 2 begins with a single-quote character ('), which indicates that the remainder of the line is a comment. ◦ Comments improve the code’s readability—you can write anything you want in a comment. ◦ Comments can be placed either on their own lines (we call these “full -line comments”; as in lines 1– 2) or at the end of a line of Visual Basic code (we call these “end-of-line comments”; as in lines 9 and 10). ◦ The compiler ignores comments—they do not cause the computer to perform any actions when a program runs. ◦ The comment in line 1 simply indicates the figure number (Fig. 3. 2) and the file name (ASimple. Program. vb) in which we stored this program. ◦ The comment in line 2 provides a brief description of the program. © 1992 -2011 by Pearson Education, Inc. All Rights Reserved.

3. 2. 1 Analyzing the Program � Classes ◦ Windows Forms applications consist of pieces called classes, which are logical groupings of methods and data that simplify program organization. ◦ Methods perform tasks and can return information when the tasks are completed. ◦ Lines 3– 10 define a class that represents our Form. ◦ These lines collectively are called a class declaration. ◦ Every Windows Forms application consists of at least one class that typically contains methods that perform tasks. © 1992 -2011 by Pearson Education, Inc. All Rights Reserved.

3. 2. 1 Analyzing the Program � Keywords ◦ The words Public and Class (line 3) are examples of keywords. ◦ Keywords are words reserved for use by Visual Basic. © 1992 -2011 by Pearson Education, Inc. All Rights Reserved.

3. 2. 1 Analyzing the Program � Class Names and Identifiers ◦ The name of the Class—ASimple. Program in line 3—is an identifier, which is a series of characters consisting of letters, digits and underscores (_). ◦ Identifiers cannot begin with a digit and cannot contain spaces. ◦ Examples of valid identifiers are value 1, Welcome 1 -, xy_coordinate, _total and gross. Pay. ◦ The name 7 Welcome is invalid because it begins with a digit; input field is ivalid because it contains a space. © 1992 -2011 by Pearson Education, Inc. All Rights Reserved.

© 1992 -2011 by Pearson Education, Inc. All Rights Reserved.

© 1992 -2011 by Pearson Education, Inc. All Rights Reserved.

3. 2. 1 Analyzing the Program � Visual Basic Is Not Case Sensitive ◦ Visual Basic keywords and identifiers are not case sensitive. ◦ Uppercase and lowercase letters are considered to be identical, so asimpleprogram and ASimple. Program are interpreted as the same identifier. ◦ Although keywords appear to be case sensitive, they’re not. ◦ Visual Basic Express applies its “preferred” case (that is, the casing used in Fig. 3. 2) to each letter of a keyword, so when you type class, for example, the IDE changes the lowercase c to uppercase, as in Class, even though class would be correct. © 1992 -2011 by Pearson Education, Inc. All Rights Reserved.

3. 2. 1 Analyzing the Program � Blank Lines and Whitespace ◦ Line 7 (Fig. 3. 2) is a blank line. ◦ Blank lines, space characters and tab characters are used throughout a program to make it easier to read. ◦ These are called whitespace. ◦ Blank lines are ignored by the compiler. © 1992 -2011 by Pearson Education, Inc. All Rights Reserved.

3. 2. 1 Analyzing the Program � The Form’s Load Event and Method ASimple. Program_Load ◦ GUIs are event driven. ◦ When the user interacts with a GUI component, the interaction —known as an event—causes the program to perform a task by “calling” a method. ◦ Common events (user interactions) include clicking a Button, selecting an item from a menu, closing a window and moving the mouse. © 1992 -2011 by Pearson Education, Inc. All Rights Reserved.

3. 2. 1 Analyzing the Program � All GUI controls, including Forms, have events associated with them. � A method that performs a task in response to an event is called an event handler, and the process of responding to events is known as event handling. � Most of a GUI application’s functionality executes based on events. � Event handling methods are called automatically. © 1992 -2011 by Pearson Education, Inc. All Rights Reserved.

3. 2. 1 Analyzing the Program � You’ll learn how to call existing methods yourself later in this chapter. � You’ll learn how to create and call your own methods in Chapter 6. � A common event for a Form is its Load event, which occurs just before a Form is displayed on the screen— typically as a result of executing the program. � Lines 5– 9 define the method ASimple-Program_Load as the Form’s Load event handler. � When this event is raised (that is, the event occurs), method ASimple-Program_Load executes to perform its task —changing the text in the Label. © 1992 -2011 by Pearson Education, Inc. All Rights Reserved.

3. 2. 1 Analyzing the Program � At the end of line 6, the clause �Handles My. Base. Load indicates that method ASimple-Program_Load is the one that will be called to handle the Form’s Load event. � The IDE automatically inserts this clause for you when you create the event handler. � We’ll discuss the contents inside the parentheses in lines 5– 6 in later chapters. © 1992 -2011 by Pearson Education, Inc. All Rights Reserved.

3. 2. 1 Analyzing the Program � Defining a Method ◦ The keyword Sub (line 5) begins the method declaration (the code that will be executed by this method). ◦ The keywords End Sub (line 9) close the method declaration. ◦ The body of the method declaration appears between the keywords Sub and End Sub. ◦ The keyword Sub is short for “subroutine”—an early term for method. ◦ Methods are also sometimes called procedures. ◦ The end-of-line comments in lines 9 and 10 improve readability by indicating which method or class ends at those lines. © 1992 -2011 by Pearson Education, Inc. All Rights Reserved.

© 1992 -2011 by Pearson Education, Inc. All Rights Reserved.

3. 2. 1 Analyzing the Program � Indentation ◦ Lines 4– 9 are indented three spaces relative to lines 3 and 10. ◦ Indentation improves program readability—in this case making it clear that method ASimple-Program_Load is part of the class ASimple. Program. ◦ Line 8 in the method body is indented three additional spaces to the right relative to lines 5 and 9. ◦ This emphasizes that line 8 is part of method ASimple. Program_Load’s body. ◦ The indentation is whitespace and is ignored by the compiler. © 1992 -2011 by Pearson Education, Inc. All Rights Reserved.

© 1992 -2011 by Pearson Education, Inc. All Rights Reserved.

3. 2. 1 Analyzing the Program � Modifying a Label’s Text with Code ◦ Line 8 in Fig. 3. 2 does the “real work” of the program, displaying the phrase Visual Basic is fun!. ◦ Line 8 instructs the computer to perform an action—namely, to change the text on the Label to the characters contained between the double quotation marks. ◦ These characters and the surrounding double quotes are called strings, character strings or string literals. ◦ The entire line is called a statement. © 1992 -2011 by Pearson Education, Inc. All Rights Reserved.

3. 2. 1 Analyzing the Program � When this line executes, it changes the Label’s Text property to the message Visual Basic is fun!. � This updates the text on the Form (Fig. 3. 2). � The statement uses the assignment operator (=) to give the Text property a new value. � The statement is read as, “Label 1. Text gets the value "Visual Basic is fun!". ” © 1992 -2011 by Pearson Education, Inc. All Rights Reserved.

3. 2. 1 Analyzing the Program � The expression Label 1. Text contains two identifiers (that is, Label 1 and Text) separated by the dot separator (. ). � The identifier to the right of the dot separator is the property name, and the identifier to the left of the dot separator is the name of the Label control. � When you add a Label to a Form, the IDE gives it the name Label 1 by default for the first Label you add—you’ll learn how to change the IDE-assigned names in Section 3. 4. � After the statement in line 8 executes, the program reaches the keywords End Sub, which indicate that this method has completed performing its task. � The keywords End Class (line 10), indicate the end of the Class. © 1992 -2011 by Pearson Education, Inc. All Rights Reserved.

3. 2. 1 Analyzing the Program � Note About Public and Private ◦ We did not discuss the keywords Public (line 3) and Private (line 5). ◦ Most classes you’ll define begin with keyword Public and most event-handling methods begin with the keyword Private. ◦ We’ll discuss each of these keywords in detail when we formally present classes in Chapter 9, Object-Oriented Programming: Classes and Objects. © 1992 -2011 by Pearson Education, Inc. All Rights Reserved.

3. 2. 2 Modifying ASimple. Program to Programmatically Change the Label’s Text Property � Now that we’ve presented the program (Fig. 3. 2), we provide a step-by-step explanation of how to modify the version of ASimple. Program you created in Section 2. 6. � Loading the Project ◦ Load the project ASimple. Program from your Chapter 3 examples folder into the IDE. ◦ You can do this by selecting File > Open Project… in the IDE and locating the project’s. sln file or by doubleclicking the. sln file in Windows Explorer. ◦ This is the same program you created in Chapter 2. © 1992 -2011 by Pearson Education, Inc. All Rights Reserved.

3. 2. 2 Modifying ASimple. Program to Programmatically Change the Label’s Text Property � Naming the Form Class ◦ In larger programs, you might have several Forms—giving each one a name helps programmers understand the purpose of each Form and improves program clarity. ◦ To change the file name from Form 1. vb to ASimple. Program. vb, right click the file in the Solution Explorer, select Rename and type the new file name. ◦ Next, double click this file to open it in design mode. ◦ Select the Form by clicking it. ◦ Notice in the Properties window that the IDE changed the Form’s name from Form 1 to ASimple. Program when you changed the file name. ◦ You can also rename a file by selecting it in the Solution Explorer, then changing the File Name property in the Properties window. © 1992 -2011 by Pearson Education, Inc. All Rights Reserved.

3. 2. 2 Modifying ASimple. Program to Programmatically Change the Label’s Text Property � Viewing the Form’s Code ◦ There are several ways to view the code for ASimple. Program: �Right click the Form and select View Code. �Right click the ASimple. Form. vb file in the Solution Explorer and select View Code. �Press the F 7 key. �Select Code from the View menu. �Figure 3. 3 shows ASimple. Program. vb’s initial contents. �The editor window contains some Visual Basic code generated by the IDE. © 1992 -2011 by Pearson Education, Inc. All Rights Reserved.

© 1992 -2011 by Pearson Education, Inc. All Rights Reserved.

3. 2. 2 Modifying ASimple. Program to Programmatically Change the Label’s Text Property � Syntax Shading ◦ The code coloring scheme used by the IDE is called syntaxcolor highlighting and helps you visually differentiate program elements. ◦ Keywords appear in dark blue. ◦ When present, comments are colored green. ◦ Other program elements use different colors. ◦ In this book, we simulate the IDE’s syntax coloring with syntax shading—bold dark blue for keywords, gray for comments, bold light blue for literals and constants, and black for all other text. © 1992 -2011 by Pearson Education, Inc. All Rights Reserved.

3. 2. 2 Modifying ASimple. Program to Programmatically Change the Label’s Text Property � One example of a literal is the string assigned to Label 1. Text in line 8 of Fig. 3. 2. � You can customize the colors shown in the code editor by selecting Tools > Options… to display the Options dialog. � Then select Fonts and Colors to display the options for changing the fonts and colors of various code elements. © 1992 -2011 by Pearson Education, Inc. All Rights Reserved.

3. 2. 2 Modifying ASimple. Program to Programmatically Change the Label’s Text Property � Modifying the Editor Settings to Display Line Numbers ◦ Visual Basic 2010 Express provides many ways to personalize your coding experience. ◦ You’ll now learn how to change the editor’s settings. ◦ To display line numbers, select Tools > Options…. ◦ In the dialog that appears (Fig. 3. 4), ensure that the Show all settings check box in the dialog’s lower-left corner is unchecked. ◦ Expand the Text Editor Basic category in the left pane and select Editor. ◦ Under Interaction, check the Line Numbers check box. ◦ Keep the Options dialog open for the next step. © 1992 -2011 by Pearson Education, Inc. All Rights Reserved.

© 1992 -2011 by Pearson Education, Inc. All Rights Reserved.

3. 2. 2 Modifying ASimple. Program to Programmatically Change the Label’s Text Property � Setting Code Indentation to Three Spaces per Indent ◦ In the Options dialog that you opened in the previous step, enter 3 in the Tab Size textbox (Fig. 3. 4). ◦ Any new code you add will now use three spaces for each level of indentation. ◦ Click OK to save your settings, close the dialog and return to the editor window. ◦ As you type your code, the IDE will update the code to conform to various Visual Basic code conventions and your current IDE settings. © 1992 -2011 by Pearson Education, Inc. All Rights Reserved.

3. 2. 2 Modifying ASimple. Program to Programmatically Change the Label’s Text Property � Creating the Event Handler Method ASimple. Program_Load ◦ Click the ASimple. Program. vb [Design] tab in the IDE to view the Windows Forms designer. ◦ Double clicking any control creates its default event handler (if it does not already exist) and switches to code view. ◦ For a Form, the default is the Load event handler. ◦ Double click the blue background of the Form to create the event handler now. ◦ The IDE automatically names an event handler with the name of the control (ASimple. Form), an underscore (_) and the name of the event that the method handles (Load). ◦ Figure 3. 5 shows the code editor with the new event handler. © 1992 -2011 by Pearson Education, Inc. All Rights Reserved.

© 1992 -2011 by Pearson Education, Inc. All Rights Reserved.

3. 2. 2 Modifying ASimple. Program to Programmatically Change the Label’s Text Property � Line 3 is too long to fit on a single line in our book, so we split the line into two lines as shown in lines 5– 6 of Fig. 3. 2. � To improve readability, long statements may be split over several lines. � In earlier versions of Visual Basic, you had to use the linecontinuation character (_) to do this as follows: ◦ Private Sub ASimple. Program_Load( By. Val sender As System. Object, By. Val e As System. Event. Args) Handles My. Base. Load � As of VB 2010, line-continuation characters are not required in most cases, so we’ll use them only when necessary. © 1992 -2011 by Pearson Education, Inc. All Rights Reserved.

© 1992 -2011 by Pearson Education, Inc. All Rights Reserved.

© 1992 -2011 by Pearson Education, Inc. All Rights Reserved.

3. 2. 2 Modifying ASimple. Program to Programmatically Change the Label’s Text Property � Writing Code and Using Intelli. Sense ◦ In the editor window, add the comments from lines 1, 2, 4, 9 and 10 of Fig. 3. 2. ◦ Also, split the first line of method ASimple. Program_Load’s first line as shown in Fig. 3. 2. ◦ Then click the line before End Sub, press Enter and type the code contained in line 8 of Fig. 3. 2. ◦ As you begin typing, a small window appears (Fig. 3. 6). ◦ This IDE feature, called Intelli-Sense, lists keywords, class names, members of a class (which include property and method names) and other features that start with the same characters you’ve typed so far. ◦ Tabs (Common and All) are provided in the Intelli. Sense window so that you can view either the most commonly used matches or all available matches. © 1992 -2011 by Pearson Education, Inc. All Rights Reserved.

© 1992 -2011 by Pearson Education, Inc. All Rights Reserved.

3. 2. 2 Modifying ASimple. Program to Programmatically Change the Label’s Text Property � As you type characters, Intelli. Sense highlights the most commonly used item that matches the characters typed, then displays a tool tip containing information about that item. � You can type the complete item name (for example, Label 1 or Text), or you can let the IDE insert the complete name for you by double clicking the item’s name in the list or by pressing the Space or Tab keys. � When the complete name is provided, the Intelli. Sense window closes. © 1992 -2011 by Pearson Education, Inc. All Rights Reserved.

3. 2. 2 Modifying ASimple. Program to Programmatically Change the Label’s Text Property � Notice that once you type the dot (. ) after Label 1, the Intelli. Sense window shows only the members of class Label that can be used on the right side of the dot. � This helps you learn about the control or class you’re using. � While the Intelli. Sense window is displayed, pressing the Ctrl key makes the window transparent so you can see the code behind the window. � Also, if you accidentally close Intelli. Sense (normally by pressing the Esc key), you can display it at any time by pressing Ctrl and the Spacebar. © 1992 -2011 by Pearson Education, Inc. All Rights Reserved.

3. 2. 2 Modifying ASimple. Program to Programmatically Change the Label’s Text Property � Compiling and Running the Program ◦ You’re now ready to compile and run the program. ◦ To do so, select Debug > Start Debugging (or press F 5 or the toolbar button ). ◦ The statement in line 8 displays Visual Basic is fun! on the Label. ◦ When you run a program, the IDE first compiles it. © 1992 -2011 by Pearson Education, Inc. All Rights Reserved.

3. 2. 2 Modifying ASimple. Program to Programmatically Change the Label’s Text Property � You can also compile the program without running it by selecting Debug > Build ASimple. Program (this menu option’s name changes based on your project’s name). � This creates a new file with the project’s name and the . exe file-name extension (ASimple. Program. exe). � This file contains the program’s Microsoft Intermediate Language (MSIL) code, which executes on the. NET Framework. � The. exe file extension indicates that the file is executable. © 1992 -2011 by Pearson Education, Inc. All Rights Reserved.

3. 2. 2 Modifying ASimple. Program to Programmatically Change the Label’s Text Property � Syntax Errors, Error Messages and the Error Window List ◦ Go back to the application in Visual Basic Express. ◦ When you type a line of code and press the Enter key, the IDE responds either by applying syntax-color highlighting or by generating a syntax error, which indicates a violation of Visual Basic’s rules for creating correct programs (that is, one or more statements are not written correctly). ◦ Syntax errors occur for various reasons, such as missing parentheses and misspelled keywords. ◦ When a syntax error occurs, the IDE places a blue squiggle below the error and provides a description of the error in the Error List window. © 1992 -2011 by Pearson Education, Inc. All Rights Reserved.

3. 2. 2 Modifying ASimple. Program to Programmatically Change the Label’s Text Property � If the Error List window is not visible in the IDE, select View > Other Windows > Error List to display it. � In Fig. 3. 7, we intentionally omitted the parenthesis at the end of line 6. � The error contains the text “')' expected. ” and specifies that the error is in column 33 of line 6. � This informs you that a right parenthesis is missing in line 6. � You can double click an error message in the Error List to jump to the line of code that caused the error. � For some errors (such as this one), the IDE shows the Error Correction Options drop-down list and allows you to simply click a link to fix the error. © 1992 -2011 by Pearson Education, Inc. All Rights Reserved.

© 1992 -2011 by Pearson Education, Inc. All Rights Reserved.

© 1992 -2011 by Pearson Education, Inc. All Rights Reserved.

3. 3 Addition Program � We’ll now build an Addition program (Fig. 3. 8) that allows the user to enter two integers (whole numbers) then click an Add Button to calculate their sum and display the result. � First, we’ll discuss the GUI and the application's code. � Then, we’ll show to lay out the GUI and create the add. Button_Click event handler (lines 5– 16) that is called when the user clicks the button. � The sample output that follows the code shows the GUI after the user has entered two integers and clicked the Add button to display the result. © 1992 -2011 by Pearson Education, Inc. All Rights Reserved.

© 1992 -2011 by Pearson Education, Inc. All Rights Reserved.

© 1992 -2011 by Pearson Education, Inc. All Rights Reserved.

3. 3 Addition Program � The Addition Program’s GUI ◦ The GUI for this program consists of three Labels, two Text. Boxes and a Button. ◦ The application user cannot directly modify the text on a Label, but as in Fig. 3. 2, a Label’s text can be changed programmatically by modifying the Label’s Text property. ◦ The Labels Enter first integer: and Enter second integer: are called prompts—they direct the user to take action. © 1992 -2011 by Pearson Education, Inc. All Rights Reserved.

3. 3 Addition Program � A Text. Box is an area in which a program can display text or the user can type text via the keyboard. � Text. Boxes are typically used to obtain information from the application’s user. � Like a Label, a Text. Box’s Text property can be used to change the text that is displayed in a Text. Box. � As you’ll see in this program, the Text property can also be used to get information the user types in a Text. Box. © 1992 -2011 by Pearson Education, Inc. All Rights Reserved.

3. 3 Addition Program � A Button is a control that the user clicks to trigger a specific action in the program. � When the user clicks the Add Button, this program reads the values typed by the user in the two Text. Boxes, adds the values and displays the result. � The text on a Button is specified using its Text property. © 1992 -2011 by Pearson Education, Inc. All Rights Reserved.

3. 3 Addition Program � Variable Declarations and Naming ◦ Lines 8– 10 are declarations, which begin with keyword Dim. ◦ The words number 1, number 2 and total are identifiers for variables—locations in the computer’s memory where values can be stored for use by a program. ◦ All variables must be declared before they can be used. ◦ The declarations in lines 8– 10 specify that the variables number 1, number 2 and total are data of type Integer; that is, these variables store integer values (that is, whole numbers such as 919, – 11, 0 and 138624). ◦ Types defined as part of the Visual Basic language, such as Integer, are known as primitive types and their type names are keywords (Fig 3. 9). © 1992 -2011 by Pearson Education, Inc. All Rights Reserved.

© 1992 -2011 by Pearson Education, Inc. All Rights Reserved.

3. 3 Addition Program � A variable name can be any valid identifier. � Variables of the same type can be declared in separate statements or they can be declared in one statement with each variable in the declaration separated by a comma. � The latter format uses a comma-separated list of variable names. � You should choose meaningful variable names to make your programs “self-documenting. ” � This helps other people understand your code. © 1992 -2011 by Pearson Education, Inc. All Rights Reserved.

3. 3 Addition Program � By convention, the first word in a variable-name identifier begins with a lowercase letter. � Every word in the name after the first should begin with an uppercase letter—this is known as “camel case. ” � For example, identifier first. Number has a capital N beginning its second word, Number. � Although identifiers are not case sensitive, using this convention helps make your programs more readable. © 1992 -2011 by Pearson Education, Inc. All Rights Reserved.

3. 3 Addition Program � Using Variables to Store the Values Entered by the User ◦ Line 12 uses an assignment operator (=) to give a value to variable number 1. ◦ The statement is read as, “number 1 gets the value returned by number 1 Text. Box. Text. ” ◦ We call the entire statement an assignment statement because it assigns a value to a variable. ◦ The expression number 1 Text. Box. Text gets the value that the user typed in the Text. Box. ◦ Line 13 assigns number 2 the value that the user entered in the number 2 Text. Box. © 1992 -2011 by Pearson Education, Inc. All Rights Reserved.

3. 3 Addition Program � What if the User Doesn’t Enter an Integer? ◦ For this program, if the user types a noninteger value, such as "hello, " a runtime error (an error that has its effect at execution time) occurs. ◦ The message displayed in Fig. 3. 10 appears when you run the application using Debug > Start Debugging (or press F 5). ◦ In this case, you can terminate the program by selecting Debug > Stop Debugging or typing Ctrl + Alt + Break. ◦ In Chapter 7, we’ll show to handle such errors to make programs more robust—that is, able to handle runtime errors and continue executing. © 1992 -2011 by Pearson Education, Inc. All Rights Reserved.

3. 3 Addition Program � Using Variables in a Calculation ◦ The assignment statement in line 14 (Fig. 3. 8) calculates the sum of the Integer variables number 1 and number 2 and assigns the result to variable total. ◦ The statement is read as, “total gets the value of number 1 + number 2. ” ◦ The expression to the right of the = is always evaluated first before the assignment occurs. ◦ The addition (+) operator is called a binary operator, because it has two operands—number 1 and number 2. © 1992 -2011 by Pearson Education, Inc. All Rights Reserved.

© 1992 -2011 by Pearson Education, Inc. All Rights Reserved.

© 1992 -2011 by Pearson Education, Inc. All Rights Reserved.

3. 3 Addition Program ◦ Displaying the Result in result. Label � Line 15 displays the total of the two values by assigning a new value to the result. Label’s Text property. � The expression �"The sum is " & total � uses the string concatenation operator, &, to combine the string literal "The sum is " and the value of Integer variable total (the sum calculated in line 14). � The string concatenation operator is a binary operator that joins two strings together, resulting in a new, longer string. � If one of the operands is a number, the program automatically creates a string representation of the number. © 1992 -2011 by Pearson Education, Inc. All Rights Reserved.

3. 4 Building the Addition Program � Follow the steps in Section 2. 6 to create a new Windows Forms application. � Name the application Addition. � In the Solution Explorer, right click Form 1. vb and select Rename, then rename the file Addition. vb. © 1992 -2011 by Pearson Education, Inc. All Rights Reserved.

3. 4 Building the Addition Program � Changing the Names of Controls ◦ Figure 3. 11 shows the Addition program’s GUI with the names we used for each control. ◦ When you build a GUI, you’ll typically rename each control. ◦ The name of a control is actually a variable that can be used to interact with that control. ◦ For example, in Fig. 3. 2 we used Label 1. Text to access and change the Label’s Text property. ◦ In that expression, Label 1 is the variable name that you can use to interact with the control programmatically. © 1992 -2011 by Pearson Education, Inc. All Rights Reserved.

3. 4 Building the Addition Program � You can change a control’s variable name by selecting the control and modifying its Name property (listed in the Properties window as (Name)). � We’ll use this technique to change the names of all the controls in this GUI, which will enable us to easily identify the Form’s controls in the program code. © 1992 -2011 by Pearson Education, Inc. All Rights Reserved.

© 1992 -2011 by Pearson Education, Inc. All Rights Reserved.

3. 4 Building the Addition Program � Setting the Form’s Text Property ◦ In the Windows Forms designer, click the Form to select it. ◦ Then use the Properties window to change the Form’s Text property to Addition. ◦ This is displayed in the Form’s title bar. © 1992 -2011 by Pearson Education, Inc. All Rights Reserved.

3. 4 Building the Addition Program � Creating the number 1 Label ◦ Next, you’ll create the number 1 Label. ◦ Visual Studio design tools help you lay out a GUI. ◦ When you drag a control across a Form, snap lines appear to help you position the control with respect to the Form’s edges and other controls. ◦ As you move a control close to another control or close to the edge of the Form, the IDE moves it a bit for you—and quickly —hence the term “snap into place. ” © 1992 -2011 by Pearson Education, Inc. All Rights Reserved.

3. 4 Building the Addition Program � Drag a Label from the Toolbox onto the Form and position it near the Form’s upper-left corner. � Figure 3. 12 shows the two snap lines that appear when you drag the Label near the upper-left corner. � These snap lines indicate the minimum distance that you should place the control from the top and left of the Form. � After releasing this Label, set its Name property to number 1 Label and its Text property to Enter first integer: © 1992 -2011 by Pearson Education, Inc. All Rights Reserved.

© 1992 -2011 by Pearson Education, Inc. All Rights Reserved.

© 1992 -2011 by Pearson Education, Inc. All Rights Reserved.

3. 4 Building the Addition Program � Control Naming Convention ◦ You’ll notice that, by convention, each variable name we create for a control ends with the control’s type. ◦ For example, the variable name number 1 Label ends with Label. ◦ This is a widely used naming practice in the Visual Basic community. ◦ For example, the Enter first integer: Label’s name could be lbl. Number 1. © 1992 -2011 by Pearson Education, Inc. All Rights Reserved.

© 1992 -2011 by Pearson Education, Inc. All Rights Reserved.

3. 4 Building the Addition Program � Creating the number 2 Label ◦ Next, drag another Label onto the Form. ◦ Set its Name property to number 2 Label and its Text property to Enter second integer: . ◦ Drag the Label near the top of the Form and to the right of number 1 Label as shown in Fig. 3. 13. © 1992 -2011 by Pearson Education, Inc. All Rights Reserved.

© 1992 -2011 by Pearson Education, Inc. All Rights Reserved.

© 1992 -2011 by Pearson Education, Inc. All Rights Reserved.

3. 4 Building the Addition Program ◦ Creating the number 1 Text. Box � Next, drag a Text. Box from the Toolbox onto the Form. � Set its Name property to number 1 Text. Box. � Drag the Text. Box below the number 1 Label as shown in Fig. 3. 14. � Snap lines help you align the left sides of the Text. Box and Label, and help you position the Text. Box the recommended distance from the Label. © 1992 -2011 by Pearson Education, Inc. All Rights Reserved.

© 1992 -2011 by Pearson Education, Inc. All Rights Reserved.

© 1992 -2011 by Pearson Education, Inc. All Rights Reserved.

© 1992 -2011 by Pearson Education, Inc. All Rights Reserved.

3. 4 Building the Addition Program � Creating the number 2 Text. Box ◦ Drag another Text. Box onto the Form. ◦ Set its Name property to number 2 Text. Box. ◦ Drag the Text. Box below the number 2 Label as shown in Fig. 3. 15. ◦ Snap lines help you position the Text. Box with respect to the other controls. © 1992 -2011 by Pearson Education, Inc. All Rights Reserved.

3. 4 Building the Addition Program � Creating the add. Button ◦ Drag a Button from the Toolbox onto the Form. ◦ Set its Name property to add. Button and its Text property to Add. ◦ Drag the Button below the number 1 Text. Box so that the two controls are aligned at the left side and the Button is the recommended distance from the Text. Box. ◦ Then use the Button’s sizing handles to resize the Button as shown in Fig. 3. 16. ◦ Snap lines help you size the Button so that it aligns with the right side of number 2 Text. Box. © 1992 -2011 by Pearson Education, Inc. All Rights Reserved.

© 1992 -2011 by Pearson Education, Inc. All Rights Reserved.

© 1992 -2011 by Pearson Education, Inc. All Rights Reserved.

© 1992 -2011 by Pearson Education, Inc. All Rights Reserved.

3. 4 Building the Addition Program ◦ Creating the result. Label and Resizing the Form � Drag a Label onto the Form. � Set its Name property to result. Label and delete the value of the Text property so that the Label is blank when the application begins executing—remember- that we set this text programmatically when the user clicks the Add button to add the numbers. � Set the Label’s Auto. Size property to False so that you’ll be able to size the Label. � Set the Label’s Border. Style property to Fixed 3 D to give the Label a three-dimensional appearance. � We use this style to highlight the fact that the Label displays the program’s results. © 1992 -2011 by Pearson Education, Inc. All Rights Reserved.

3. 4 Building the Addition Program � Set the Label-’s Text. Align property to Middle. Left as shown in Fig. 3. 17. � This centers the text vertically on the Label, so that the distance between the Label’s text and its top and bottom borders is balanced. � Then use the Label’s sizing handles to resize the Label as shown in Fig. 3. 18. � Snap lines help you size the Label so that it aligns with the right side of add-Button. � Finally, click the Form and use it’s resizing handles to resize the window so that it appears as shown in Fig. 3. 11. © 1992 -2011 by Pearson Education, Inc. All Rights Reserved.

© 1992 -2011 by Pearson Education, Inc. All Rights Reserved.

© 1992 -2011 by Pearson Education, Inc. All Rights Reserved.

© 1992 -2011 by Pearson Education, Inc. All Rights Reserved.

© 1992 -2011 by Pearson Education, Inc. All Rights Reserved.

3. 4 Building the Addition Program � Creating the add. Button_Click Event Handler ◦ Recall from Section 3. 2. 2 that double clicking any control creates that control’s default event handler. ◦ For a Button, the default event is the Click event. ◦ Double click the add. Button now to create its add. Button_Click event handler. ◦ The IDE automatically switches to the code editor window. ◦ The IDE automatically names the event handler with the control’s name (add. Button), an underscore (_) and the name of the event that the method handles (Click). ◦ Notice that the first line of the method ends with Handles add. Button. Click ◦ This indicates that the method will be called when the user clicks the add. Button, which raises a Click event. © 1992 -2011 by Pearson Education, Inc. All Rights Reserved.

3. 4 Building the Addition Program � Entering the Code from Fig. 3. 8 into the add. Button_Click Event Handler ◦ You can now enter the code in the event handler to read the numbers, perform the calculation and display the result. ◦ To ensure that your line numbers match with those shown in Fig. 3. 8, enter the comments on lines 1– 2 of Fig. 3. 8 and split the first line of the method definition as shown in lines 5– 6. © 1992 -2011 by Pearson Education, Inc. All Rights Reserved.

© 1992 -2011 by Pearson Education, Inc. All Rights Reserved.

3. 4 Building the Addition Program � Testing the Program ◦ When you’re done entering the code, test the program to ensure that it works correctly. ◦ Enter 45 for the first number and 72 for the second, then click the Add Button. ◦ The result should be 117. ◦ Now, type 10 in the number 1 Text. Box. ◦ Notice that the result. Label still shows the previous calculation’s result (Fig. 3. 19). ◦ This can be confusing to the application user. ◦ For this reason, we should clear the result. Label when the user starts typing a new number in either Text. Box. ◦ We show to do this in the program of Section 3. 7. © 1992 -2011 by Pearson Education, Inc. All Rights Reserved.

© 1992 -2011 by Pearson Education, Inc. All Rights Reserved.

3. 5 Memory Concepts � Variable names, such as number 1, number 2 and total, correspond to locations in the computer’s memory. � Every variable has a name, type, size and value. � In the addition program of Fig. 3. 8, when line 12 ' get the first number entered number 1 = number 1 Text. Box. Text executes, the data input by the user in number 1 Text. Box is placed into a memory location to which the name number 1 has been assigned by the compiler. © 1992 -2011 by Pearson Education, Inc. All Rights Reserved.

3. 5 Memory Concepts � Suppose the user enters the characters 45. � This input is returned by number 1 Text. Box. Text and assigned to number 1. � The program places the Integer value 45 into location number 1, as shown in Fig. 3. 20. � Whenever a value is placed in a memory location, this value replaces the value previously stored in that location. � The previous value is lost. © 1992 -2011 by Pearson Education, Inc. All Rights Reserved.

© 1992 -2011 by Pearson Education, Inc. All Rights Reserved.

3. 5 Memory Concepts � Suppose that the user then enters the characters 72 in number 2 Text. Box. � Line 13 ' get the second number entered number 2 = number 2 Text. Box. Text places the Integer value 72 into location number 2, and memory appears, as shown in Fig. 3. 21. © 1992 -2011 by Pearson Education, Inc. All Rights Reserved.

© 1992 -2011 by Pearson Education, Inc. All Rights Reserved.
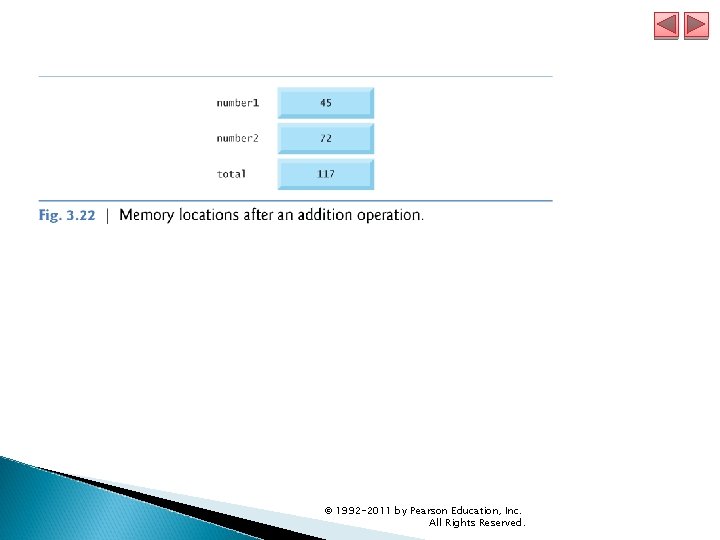
3. 5 Memory Concepts � Once the program has obtained values for number 1 and number 2, it adds these values and places their total into variable total. � The statement (line 14) ' add the two numbers total = number 1 + number 2 performs the addition and replaces total’s previous value. � After total is calculated, memory appears, as in Fig. 3. 22. � The values of number 1 and number 2 appear exactly as they did before they were used in the calculation of total. � Although these values were used when the computer performed the calculation, they remain unchanged. � As this illustrates, when a value is read from a memory location, the value is retained in memory. © 1992 -2011 by Pearson Education, Inc. All Rights Reserved.
© 1992 -2011 by Pearson Education, Inc. All Rights Reserved.
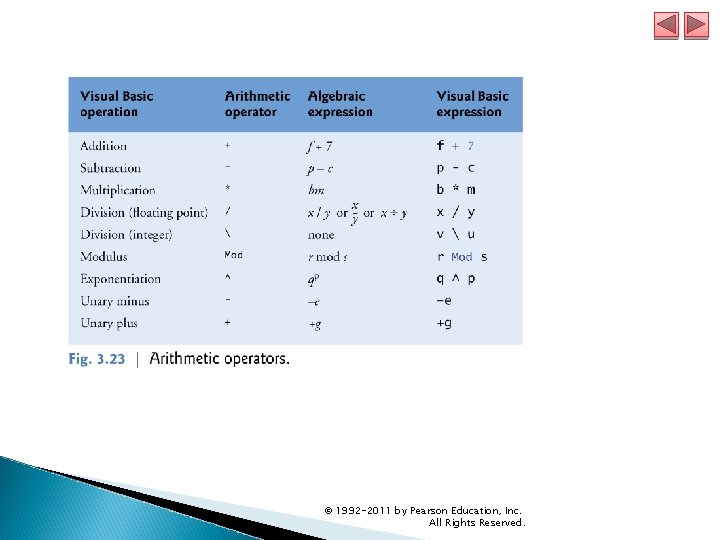
3. 6 Arithmetic � Programs often perform arithmetic calculations. � The arithmetic operators are summarized in Fig. 3. 23. � Note the use of various special symbols not used in algebra. � For example, the asterisk (*) indicates multiplication, and the keyword Mod represents the Mod operator (also known as the modulus or modulo operator), which we’ll discuss shortly. © 1992 -2011 by Pearson Education, Inc. All Rights Reserved.
3. 6 Arithmetic � Most of the arithmetic operators in Fig. 3. 23 are binary operators, because each operates on two operands. � For example, the expression sum + value contains the binary operator + and the two operands sum and value. � Visual Basic also provides unary operators that take only one operand. � For example, unary versions of plus (+) and minus (–) are provided, so that you can write expressions such as +9 and – 19. © 1992 -2011 by Pearson Education, Inc. All Rights Reserved.
© 1992 -2011 by Pearson Education, Inc. All Rights Reserved.
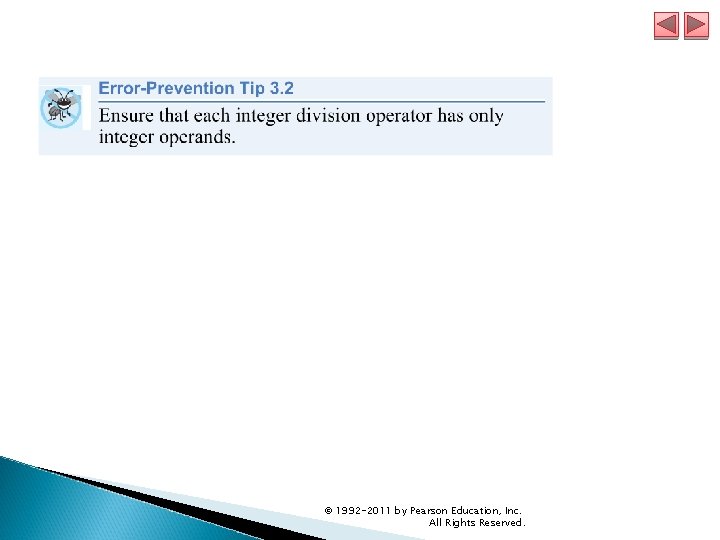
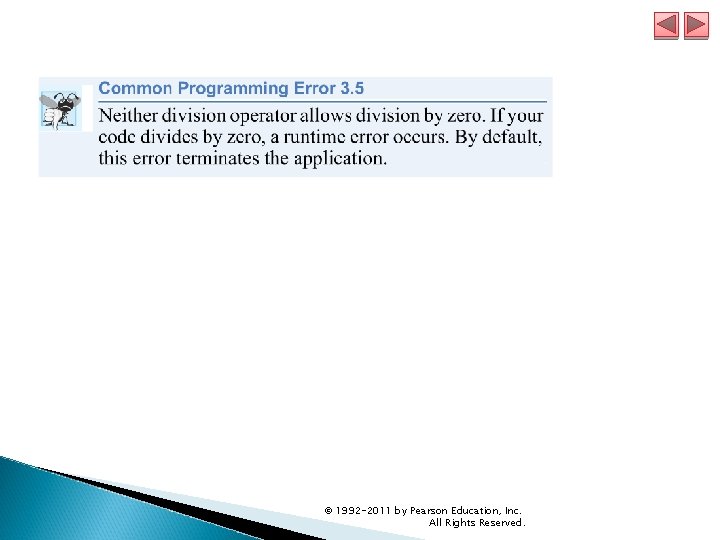
3. 6 Arithmetic � Division Operators ◦ Visual Basic has separate operators for integer division (the backslash, ) and floating-point division (the forward slash, /). ◦ Integer division takes two Integer operands and yields an Integer result; for example, the expression 7 4 evaluates to 1, and the expression 17 5 evaluates to 3. ◦ Any fractional part in an Integer division result simply is truncated- (that is, discarded)—no rounding occurs. © 1992 -2011 by Pearson Education, Inc. All Rights Reserved.
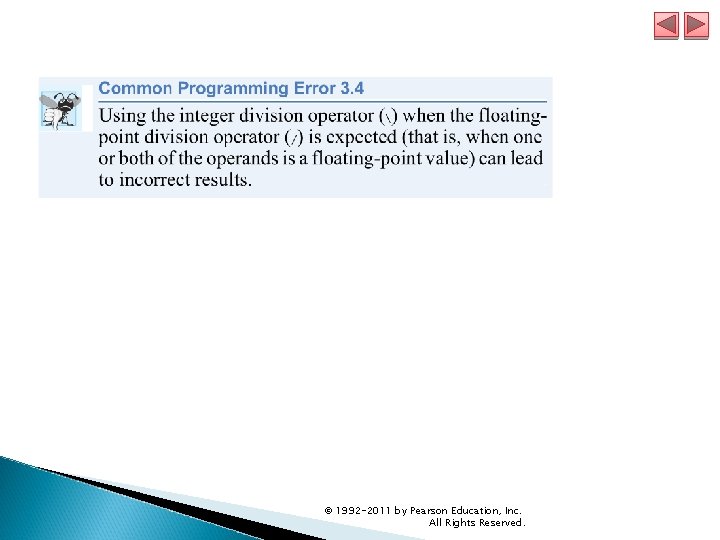
3. 6 Arithmetic � When floating-point numbers (that is, numbers that contain a decimal point, such as 2. 3456 and – 845. 7840) are used with the integer division operator, the numbers are first rounded to the nearest whole number, then divided. � This means that, although 7. 1 4 evaluates to 1 as expected, the statement 7. 7 4 evaluates to 2, because 7. 7 is rounded to 8 before the division occurs. � To divide floating-point numbers without rounding the operands (which is normally what you want to do), use the floating-point division operator. © 1992 -2011 by Pearson Education, Inc. All Rights Reserved.
© 1992 -2011 by Pearson Education, Inc. All Rights Reserved.
© 1992 -2011 by Pearson Education, Inc. All Rights Reserved.
© 1992 -2011 by Pearson Education, Inc. All Rights Reserved.
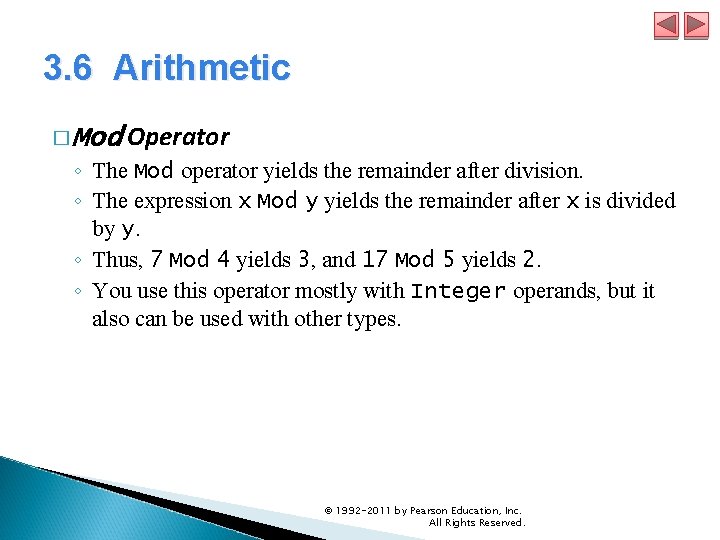
3. 6 Arithmetic � Mod Operator ◦ The Mod operator yields the remainder after division. ◦ The expression x Mod y yields the remainder after x is divided by y. ◦ Thus, 7 Mod 4 yields 3, and 17 Mod 5 yields 2. ◦ You use this operator mostly with Integer operands, but it also can be used with other types. © 1992 -2011 by Pearson Education, Inc. All Rights Reserved.
3. 6 Arithmetic � When you add 1 to 59 you normally expect the result to be 60. � But in an application that keeps time, adding 1 to 59 seconds should cause the seconds to reset to zero and the minutes to be incremented by 1. � The Mod operator is helpful in this situation. � In later chapters, we consider other interesting applications of the Mod operator, such as determining whether one number is a multiple of another. © 1992 -2011 by Pearson Education, Inc. All Rights Reserved.
3. 6 Arithmetic � Arithmetic Expressions in Straight-Line Form ◦ Arithmetic expressions must be entered into the computer in straight-line form. ◦ Thus, expressions such as “a divided by b” must be written as a / b, so that all constants, variables and operators appear in a straight line. ◦ Algebraic notation is generally not acceptable to compilers, although some software packages do exist that support more natural notation for complex mathematical expressions. © 1992 -2011 by Pearson Education, Inc. All Rights Reserved.
3. 6 Arithmetic � Parentheses for Grouping Subexpressions ◦ Parentheses are used in Visual Basic expressions in the same manner as in algebraic expressions. ◦ For example, to multiply a times the quantity b + c, we write a * (b + c). © 1992 -2011 by Pearson Education, Inc. All Rights Reserved.
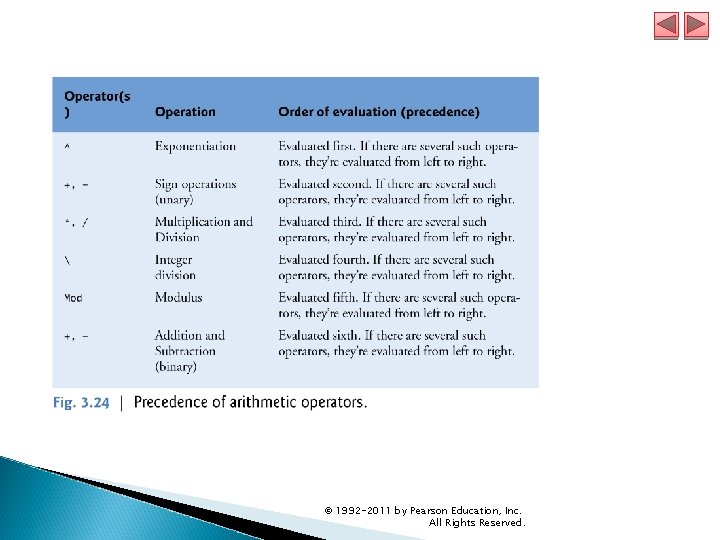
3. 6 Arithmetic � Operators in arithmetic expressions are applied in a precise sequence determined by the rules of operator precedence (Fig. 3. 24), which are similar to those in algebra. � Operators in the same row of the table are said to have the same level of precedence. � When we say operators are evaluated from left to right, we’re referring to the operators’ associativity. © 1992 -2011 by Pearson Education, Inc. All Rights Reserved.
© 1992 -2011 by Pearson Education, Inc. All Rights Reserved.
3. 6 Arithmetic � Rules of Operator Precedence ◦ Operators in arithmetic expressions are applied in a precise sequence determined by the rules of operator precedence (Fig. 3. 24), which are similar to those in algebra. ◦ Operators in the same row of the table are said to have the same level of precedence. ◦ When we say operators are evaluated from left to right, we’re referring to the operators’ associativity. ◦ All binary operators associate from left to right. ◦ If there are multiple operators, each with the same precedence, the order in which the operators are applied isdetermined by the operators’ associativity. © 1992 -2011 by Pearson Education, Inc. All Rights Reserved.
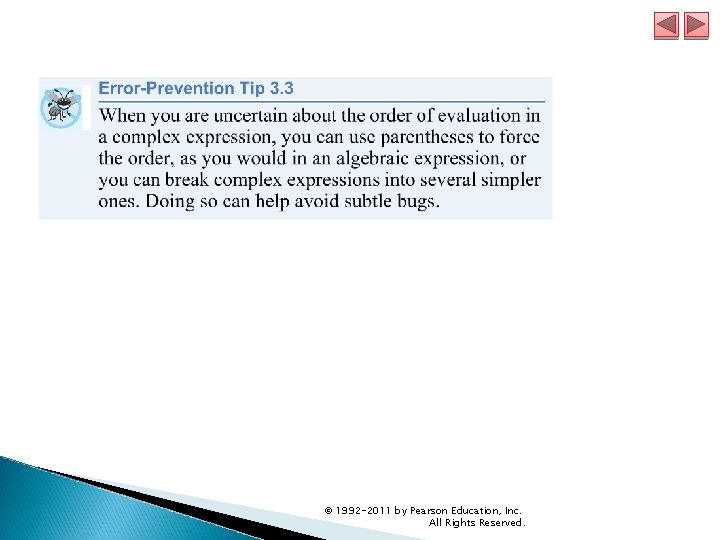
3. 6 Arithmetic � Operators in expressions contained within a pair of parentheses are evaluated before those that are outside the parentheses. � Parentheses can be used to group expressions and change the order of evaluation to occur in any sequence you desire. � With nested parentheses, the operators contained in the innermost pair of parentheses are applied first. � Not all expressions with several pairs of parentheses contain nested parentheses. � For example, although the expression �a * (b + c) + c * (d + e) � contains multiple sets of parentheses, none are nested. � Rather, these sets are said to be “on the same level. ” Appendix A contains a complete operator-precedence chart. © 1992 -2011 by Pearson Education, Inc. All Rights Reserved.
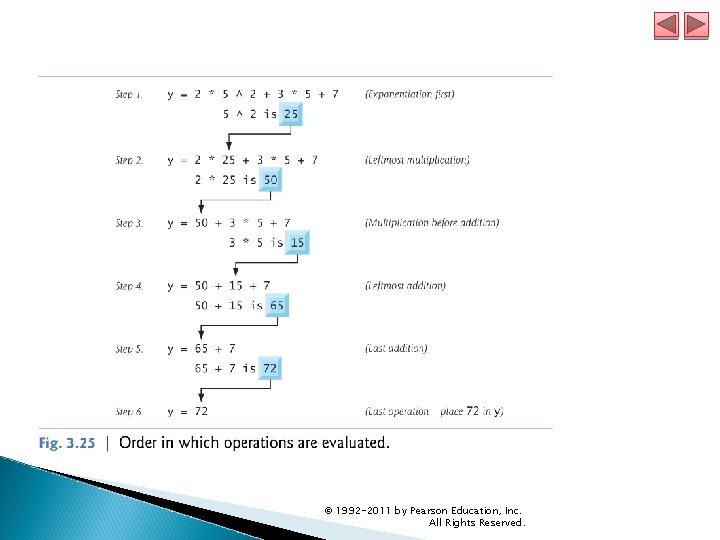
3. 6 Arithmetic � Figure 3. 25 illustrates the order in which the operators are applied in a complex expression. © 1992 -2011 by Pearson Education, Inc. All Rights Reserved.
© 1992 -2011 by Pearson Education, Inc. All Rights Reserved.
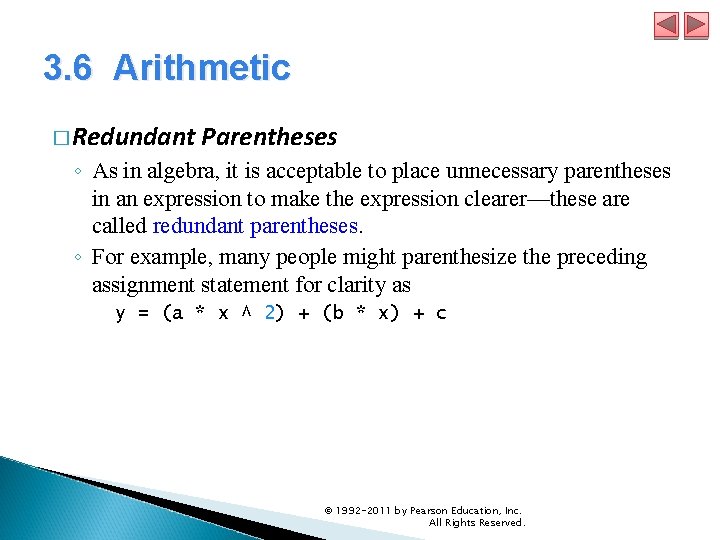
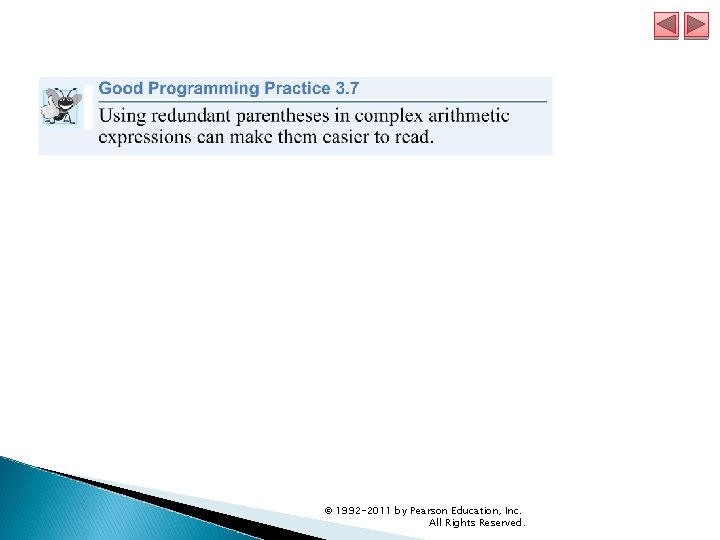
3. 6 Arithmetic � Redundant Parentheses ◦ As in algebra, it is acceptable to place unnecessary parentheses in an expression to make the expression clearer—these are called redundant parentheses. ◦ For example, many people might parenthesize the preceding assignment statement for clarity as y = (a * x ^ 2) + (b * x) + c © 1992 -2011 by Pearson Education, Inc. All Rights Reserved.
© 1992 -2011 by Pearson Education, Inc. All Rights Reserved.
© 1992 -2011 by Pearson Education, Inc. All Rights Reserved.
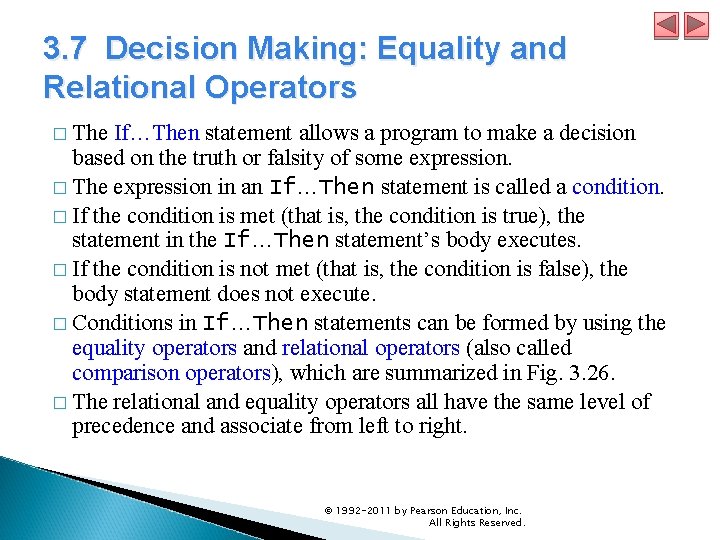
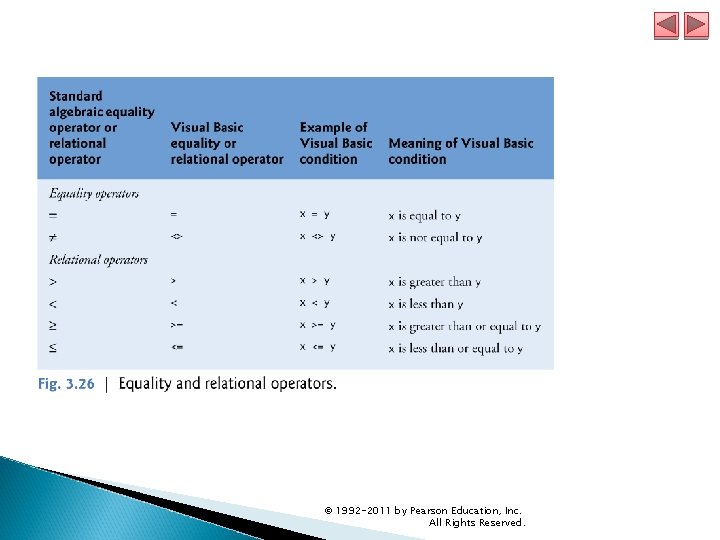
3. 7 Decision Making: Equality and Relational Operators � The If…Then statement allows a program to make a decision based on the truth or falsity of some expression. � The expression in an If…Then statement is called a condition. � If the condition is met (that is, the condition is true), the statement in the If…Then statement’s body executes. � If the condition is not met (that is, the condition is false), the body statement does not execute. � Conditions in If…Then statements can be formed by using the equality operators and relational operators (also called comparison operators), which are summarized in Fig. 3. 26. � The relational and equality operators all have the same level of precedence and associate from left to right. © 1992 -2011 by Pearson Education, Inc. All Rights Reserved.
© 1992 -2011 by Pearson Education, Inc. All Rights Reserved.
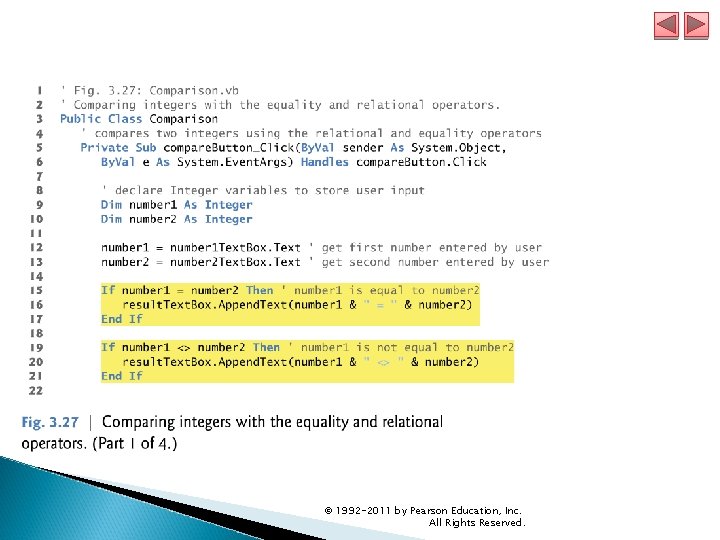
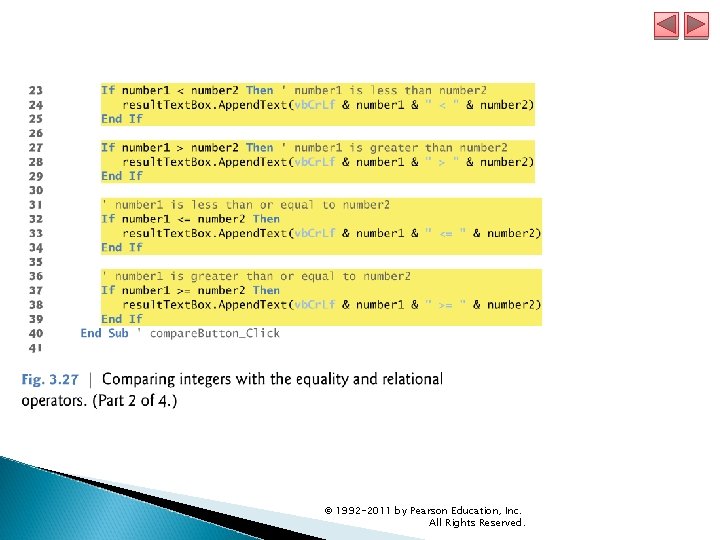
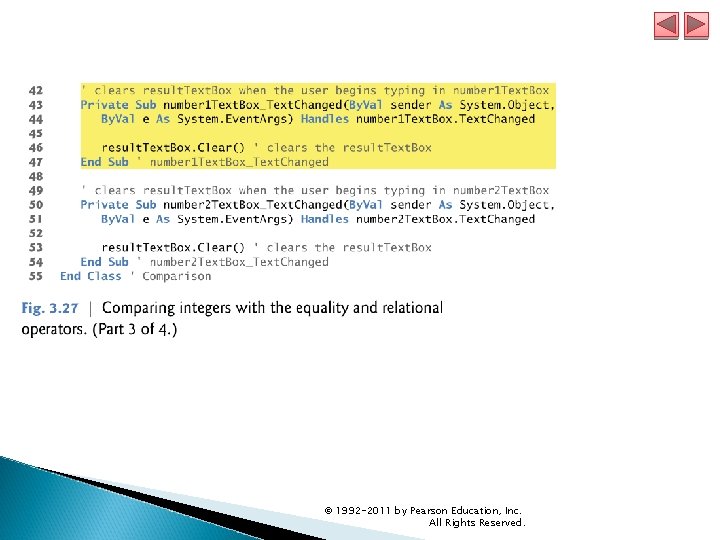
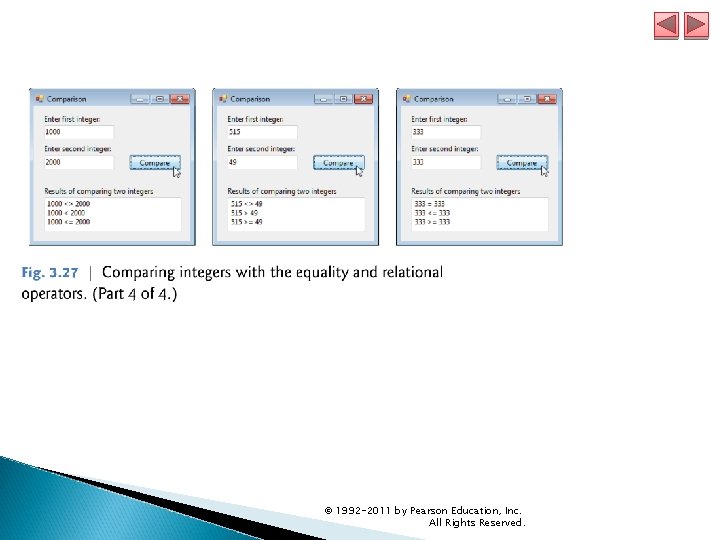
3. 7 Decision Making: Equality and Relational Operators � Comparing Integers with the Equality and Relational Operators ◦ The Comparison program uses six If…Then statements to compare two numbers entered into a program by the user. ◦ If the condition in any of these statements is true, the statement associated with that If…Then executes. ◦ The user enters these values, which are stored in variables number 1 and number 2, respectively. ◦ Then the comparisons are performed and the results are displayed in a multiline Text. Box. ◦ Figure 3. 27 shows the program and sample outputs. © 1992 -2011 by Pearson Education, Inc. All Rights Reserved.
© 1992 -2011 by Pearson Education, Inc. All Rights Reserved.
© 1992 -2011 by Pearson Education, Inc. All Rights Reserved.
© 1992 -2011 by Pearson Education, Inc. All Rights Reserved.
© 1992 -2011 by Pearson Education, Inc. All Rights Reserved.
3. 7 Decision Making: Equality and Relational Operators � Getting the Values Entered By the User ◦ Lines 9– 10 declare the variables that are used in the compare. Button_Click event handler. ◦ The comment that precedes the declarations indicates the purpose of the variables in the program. ◦ Lines 12– 13 get the numbers that the user entered and assign the values to Integer variables number 1 and number 2, respectively. © 1992 -2011 by Pearson Education, Inc. All Rights Reserved.
3. 7 Decision Making: Equality and Relational Operators � The If…Then Statement ◦ The If…Then statement in lines 15– 17 compares the values of the variables number 1 and number 2 for equality. ◦ If the values are equal, the statement in line 16 outputs a string indicating that the two numbers are equal. ◦ The keywords End If (line 17) end the body of the If…Then statement. ◦ Assignment and the equality operator both use the = symbol. ◦ When a condition is expected (such as after the If keyword in an If…Then statement), the = is used as an equality operator. © 1992 -2011 by Pearson Education, Inc. All Rights Reserved.
3. 7 Decision Making: Equality and Relational Operators � Displaying Text in a Multiline Text. Box ◦ In this program, we display several lines of text in a Text. Box. ◦ To enable this functionality, we set the Text. Box’s Multi. Line property to True in the Properties window. ◦ We also use the Text. Box’s Append. Text method, which enables us to add more text to what is already displayed in a Text. Box. © 1992 -2011 by Pearson Education, Inc. All Rights Reserved.
3. 7 Decision Making: Equality and Relational Operators � The statement in line 16 is known as a method call because it “calls” a method (that is, method Append. Text of class Text. Box) to ask the method to perform its task. � Sometimes you give a method values—known as arguments—that the method uses while performing its task. � In line 16 of Fig. 3. 27, the expression number 1 & " = " & number 2 in parentheses is the argument to method Append. Text. © 1992 -2011 by Pearson Education, Inc. All Rights Reserved.
3. 7 Decision Making: Equality and Relational Operators � In line 16, if number 1 contains the value 333 and number 2 contains the value 333, the expression inside the parentheses following Append. Text evaluates as follows: number 1 is converted to a string and concatenated with the string " = ", then number 2 is converted to a string and concatenated with the resulting string from the first concatenation. � At this point, the string "333 = 333" is appended to the Text. Box’s Text property by method Append. Text. © 1992 -2011 by Pearson Education, Inc. All Rights Reserved.
3. 7 Decision Making: Equality and Relational Operators � As the program proceeds through the remaining If…Then statements (lines 19– 39), additional strings are appended by the result. Text. Box. Append. Text statements. � For example, when given the value 333 for number 1 and number 2, the conditions in lines 32 and 37 also are true, resulting in the third output of Fig. 3. 27. � Lines 24, 28, 33 and 38 also append the value vb. Cr. Lf to the Text. Box. � This predefined value, known as a constant, positions the output cursor (the location where the next output character will be displayed) at the beginning of the next line in the Text. Box. © 1992 -2011 by Pearson Education, Inc. All Rights Reserved.
3. 7 Decision Making: Equality and Relational Operators � Indentation in If…Then Statements ◦ Notice the indentation of the body statements within the If…Then statements throughout the program. ◦ Such indentation enhances program readability. © 1992 -2011 by Pearson Education, Inc. All Rights Reserved.
© 1992 -2011 by Pearson Education, Inc. All Rights Reserved.
3. 7 Decision Making: Equality and Relational Operators � Handling the Text. Changed Events for number 1 Text. Box and number 2 Text. Box ◦ After comparing two numbers and clicking the Compare Button, the result. Text. Box shows the results of comparing the two values. ◦ If the user wishes to compare different values and starts typing in number 1 Text. Box or number 2 Text. Box, the previous results will still be displayed in the result. Text. Box. ◦ This can be confusing to the program’s user. ◦ To prevent this problem, you can handle number 1 Text. Box’s and number 2 Text. Box’s Text. Changed events and use them to clear the contents of the result. Text. Box. © 1992 -2011 by Pearson Education, Inc. All Rights Reserved.
3. 7 Decision Making: Equality and Relational Operators � The Text. Changed event is a Text. Box’s default event. � Lines 43– 47 and 50– 54 show the Text. Changed event handlers for number 1 Text. Box and number 2 Text. Box. � These methods are called when the user types in the corresponding Text. Boxes. � In both cases, we call the result. Text. Box’s Clear method, which removes the text that is currently displayed in the Text. Box. � You can also clear a Label’s or Text. Box’s Text property by assigning it the value String. Empty, which represents a string that does not contain any characters. © 1992 -2011 by Pearson Education, Inc. All Rights Reserved.
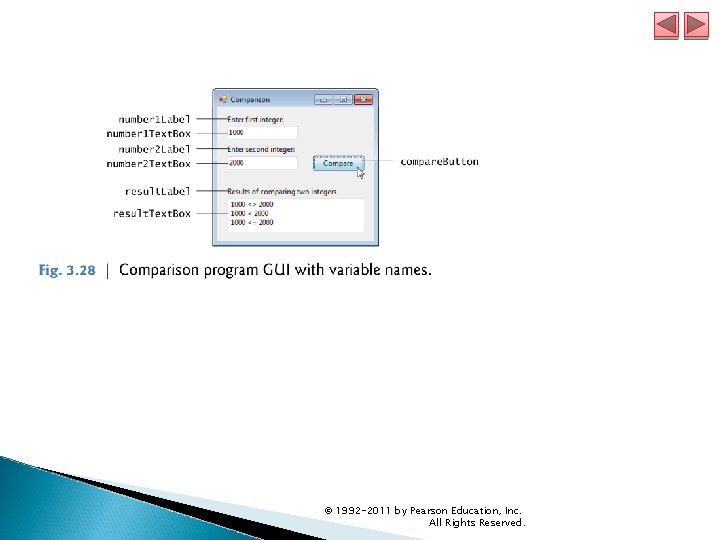
3. 7 Decision Making: Equality and Relational Operators � Building the GUI ◦ Use the techniques you learned in Section 3. 4 to build the GUI for the Comparison program. ◦ Figure 3. 28 shows the GUI with all of its variable names. ◦ To allow the result. Text. Box to display multiple lines, set its Multi. Line property to True. ◦ In the Windows Forms designer, double click the compare. Button to create its event handler. ◦ To create the Text-Changed event handlers for the number 1 Text. Box and number 2 Text. Box, double click each one in the Windows Forms designer—Text. Changed is the default event for a Text. Box. © 1992 -2011 by Pearson Education, Inc. All Rights Reserved.
© 1992 -2011 by Pearson Education, Inc. All Rights Reserved.
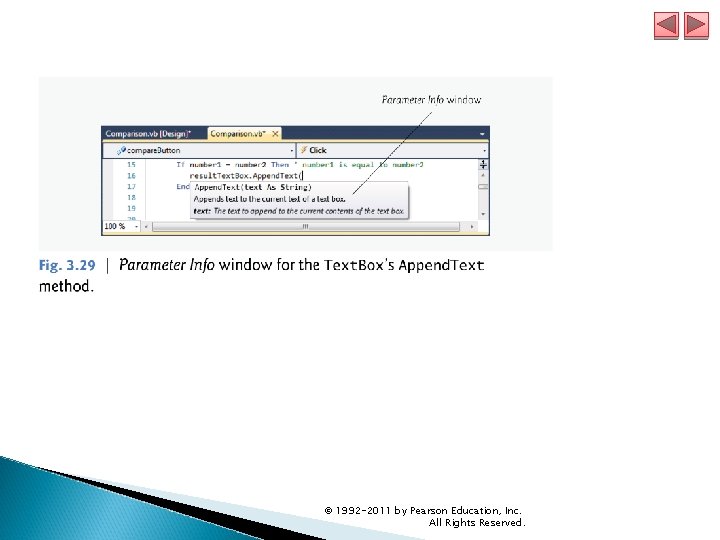
3. 7 Decision Making: Equality and Relational Operators � Entering the Code; Introducing the Parameter Info Window ◦ Enter the code from Fig. 3. 27 into the three event handlers to complete the application. ◦ When you’re typing line 16, the IDE displays the Parameter Info window (Fig. 3. 29) as you type the opening left parenthesis character, (, after result. Text. Box. Append. Text. © 1992 -2011 by Pearson Education, Inc. All Rights Reserved.
3. 7 Decision Making: Equality and Relational Operators � This window contains information about the method and the information that the method needs to perform its task—its so-called parameter (methods can have several parameters). � In this case, the parameter info window shows that the method requires you to give it the text to append to the current contents of the Text. Box. � The information you provide when you call the method is the method’s argument. ◦ Testing the Program � Be sure to test your program. � Enter the values shown in the sample outputs of Fig. 3. 27 to ensure that the program is working properly. © 1992 -2011 by Pearson Education, Inc. All Rights Reserved.
© 1992 -2011 by Pearson Education, Inc. All Rights Reserved.
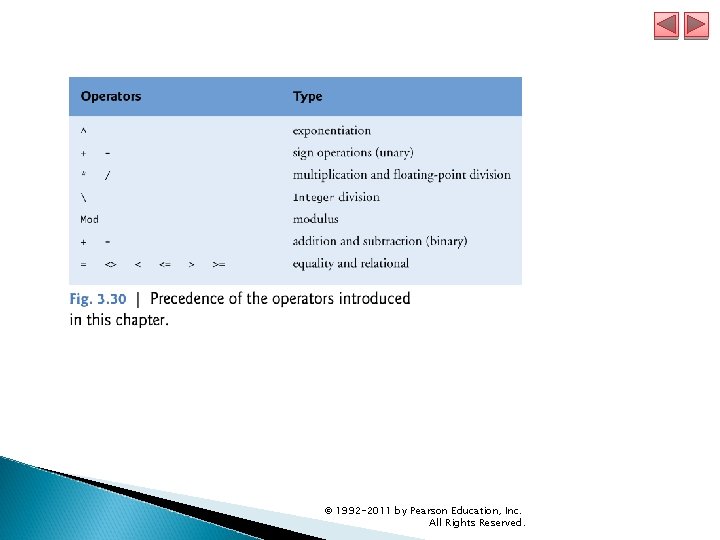
3. 7 Decision Making: Equality and Relational Operators � Operator Precedence ◦ Figure 3. 30 shows the precedence of the operators introduced in this chapter. ◦ The operators are displayed from top to bottom in decreasing order of precedence. © 1992 -2011 by Pearson Education, Inc. All Rights Reserved.
© 1992 -2011 by Pearson Education, Inc. All Rights Reserved.
- Slides: 160