INTRODUCTION TO PSYCHTOOLBOX IN MATLAB Psych 599 Summer

INTRODUCTION TO PSYCHTOOLBOX IN MATLAB Psych 599, Summer 2016 Jonas Kaplan, Ph. D. University of Southern California

Final Exam ■ – – – Full Experiment. Must: Write the entire thing from scratch yourself Take subject code and any relevant conditions as inputs Present repetitive trials that involve at least 2 different conditions Must present either visual or auditory stimuli (or both) Must collect some kind of behavioral response where timing is recorded – Must write responses out to a log file Please run your experiment plan by me as soon as possible. If you don't have something you are working on now, I will make something up for you.

Week 3 Recap
 Error using fprintf Function is")
Debugging proximal cause of error >> debug. Demo('SB 02') Error using fprintf Function is not defined for 'cell' inputs. Error in debug. Demo>print. Something (line 19) fprintf('This is your string: %sn', string. To. Print); distal cause of error Error in debug. Demo (line 11) print. Something(my. Conditions); Links to the help file for that function Links to the line in the script where the problem occurred

BREAKPOINTS

How monitors work 1– 2– 3– 4– cathode ray tube electron gun electron beam deflection yoke The deflection yoke manipulates the electron beam, sweeping it across the screen, one horizontal line ("scanline") at a time

TIME Frame 1 Frame 2 VBL Frame 3 VBL Frame 4 VBL PTB tries to swap the front and back buffers during the VBL, so that content is not being updated in the middle of a frame draw. This is called VBL Synchronization. If synchronization between buffer-swapping and VBL fails: - Visual artifacts like flicker and tearing may occur - Timing measurement will be less precise
![Flip timing VBLtime = Screen('Flip', window. Ptr [, when] [, dontclear]) Default is to](http://slidetodoc.com/presentation_image_h2/44265156f2b80bb5a540312ac7fbf009/image-11.jpg "Flip timing VBLtime = Screen('Flip', window. Ptr [, when] [, dontclear]) Default is to")
Flip timing VBLtime = Screen('Flip', window. Ptr [, when] [, dontclear]) Default is to flip now, i. e. at the next VBL interval. However, you can specify a time in the future for the flip to take place. Flip will wait until that time and then flip at the next VBL interval after the specified time. Default is to clear the back buffer. However in some cases you may want to leave the back buffer as is. Default is 0, set to 1 if you don't want it to clear.
![Using the Screen command ■ Opening the screen [window. Ptr, rect]=Screen('Open. Window', Screen. Number)](http://slidetodoc.com/presentation_image_h2/44265156f2b80bb5a540312ac7fbf009/image-12.jpg "Using the Screen command ■ Opening the screen [window. Ptr, rect]=Screen('Open. Window', Screen. Number)")
Using the Screen command ■ Opening the screen [window. Ptr, rect]=Screen('Open. Window', Screen. Number) returns a number that we will use to refer to this screen in future commands returns a rectangle (a vector of four numbers) that describe the dimensions of the screen which screen you want to open (you may have multiple monitors)

Using the screen ■ Before you can do anything with the screen (drawing on it, checking its frame rate, flipping its buffers, etc. ) you must open the screen with Open. Window ■ Open. Window returns a window. Pointer, a number we can use to refer to the screen ■ When you run "clear Screen" you are closing the screen and your window. Pointer is now useless NEW
 do stuff with the screen clear Screen (or Screen('Close',")
Using the screen Screen('Open. Window') do stuff with the screen clear Screen (or Screen('Close', w. Ptr)) NEW
![Kb. Wait [secs, key. Code, delta. Secs] = Kb. Wait() Will wait until the](http://slidetodoc.com/presentation_image_h2/44265156f2b80bb5a540312ac7fbf009/image-15.jpg "Kb. Wait [secs, key. Code, delta. Secs] = Kb. Wait() Will wait until the")
Kb. Wait [secs, key. Code, delta. Secs] = Kb. Wait() Will wait until the user presses a key, and return the time and keypress. Kb. Wait IS NOT FOR MEASURING REACTION TIMES!!
![Kb. Wait [secs, key. Code, delta. Secs] = Kb. Wait() key. Code is a](http://slidetodoc.com/presentation_image_h2/44265156f2b80bb5a540312ac7fbf009/image-16.jpg "Kb. Wait [secs, key. Code, delta. Secs] = Kb. Wait() key. Code is a")
Kb. Wait [secs, key. Code, delta. Secs] = Kb. Wait() key. Code is a vector of all the keys, with a 1 for any key that was pressed. find(key. Code) will return the index of the button(s) pressed. That code can then be turned into a character using Kb. Name()

Working with color Specify colors using a vector of 3 integers my. Color = [ x, y, z] Examples: red= [ 255, 0, 0] aqua = [0, 200, 255]
![Drawing functions Screen('Draw. Line', window. Ptr [, color], from. H, from. V, to. H,](http://slidetodoc.com/presentation_image_h2/44265156f2b80bb5a540312ac7fbf009/image-18.jpg "Drawing functions Screen('Draw. Line', window. Ptr [, color], from. H, from. V, to. H,")
Drawing functions Screen('Draw. Line', window. Ptr [, color], from. H, from. V, to. H, to. V [, pen. Width]); Screen('Draw. Arc', window. Ptr, [color], [rect], start. Angle, arc. Angle) Screen('Frame. Arc', window. Ptr, [color], [rect], start. Angle, arc. Angle[, pen. Width] [, pen. Height] [, pen. Mode]) Screen('Fill. Arc', window. Ptr, [color], [rect], start. Angle, arc. Angle) Screen('Fill. Rect', window. Ptr [, color] [, rect] ); Screen('Frame. Rect', window. Ptr [, color] [, rect] [, pen. Width]); Screen('Fill. Oval', window. Ptr [, color] [, rect] [, perfect. Up. To. Max. Diameter]); Screen('Frame. Oval', window. Ptr [, color] [, rect] [, pen. Width] [, pen. Height] [, pen. Mode]); Screen('Frame. Poly', window. Ptr [, color], point. List [, pen. Width]); Screen('Fill. Poly', window. Ptr [, color], point. List [, is. Convex]); Screen('Draw. Dots', window. Ptr, xy [, size] [, color] [, center] [, dot_type]); Screen('Draw. Lines', window. Ptr, xy [, width] [, colors] [, center] [, smooth]);
 y (x. Max, y. Max)")
Screen coordinate system (0, 0) y (x. Max, y. Max)
; Define the rectangle(s) to fill")
Drawing simple shapes Screen('Fill. Rect', w. Ptr, color, rect); Define the rectangle(s) to fill in. If you leave this blank, the whole screen will be filled, and the background color will be set to that color (when you Flip the screen, the buffer will clear to this color)
 (screen.")
Centering (screen. Center. X – rect. Width/2, screen. Center. Y – rect. Height/2) (screen. Center. X, screen. Center. Y) (rect. Left + rect. Width, rect. Top + rect. Height)
;")
Drawing circles Screen('Fill. Oval', w. Ptr, color, rect);
; >>")
Alpha blending >> Screen Blend. Function? >> Screen('Blend. Function', w. Ptr, GL_SRC_ALPHA, GL_ONE_MINUS_SRC_ALPHA); >> Screen('Blend. Function', w. Ptr, GL_ONE, GL_ZERO); DISABLE BLENDING ENABLE BLENDING

Using Draw. Dots ■ Alternate method for drawing several shapes at once. Even though it is called Draw. Dots, it will draw squares as well as circles. Screen('Draw. Dots', window. Ptr, xy [, size] [, color] [, center] [, dot_type]); Matrix containing coordinates of dot centers. Two rows, x and y. Each column is another dot. Can either be a single value, or a vector of values, one per dot Define center coordinates Single color vector, or matrix with three rows (r, g, b) 0 (default) = squares 1 = circles 2 = circles with high quality anti-aliasing
![Using Draw. Lines Screen('Draw. Lines', window. Ptr, xy [, width] [, colors] [, center]](http://slidetodoc.com/presentation_image_h2/44265156f2b80bb5a540312ac7fbf009/image-25.jpg "Using Draw. Lines Screen('Draw. Lines', window. Ptr, xy [, width] [, colors] [, center]")
Using Draw. Lines Screen('Draw. Lines', window. Ptr, xy [, width] [, colors] [, center] [, smooth]); Matrix containing coordinates. Two rows (x and y). Each pair of columns (start and end) specifies Either a asingle color, or one line. color per point in xy. Three rows (r, g, b). 0 (default) = no smoothing 1 = smoothing 2 = high quality smoothing NOTE: smoothing requires blending to be on

Animation ■ Create a loop where something changes each time through the loop

Drawing text ■ Two steps to drawing text: – 1. Set up all the properties of the text we want to draw (font, size, style) using separate commands – 2. Draw the text using Draw. Text

 The function should take")
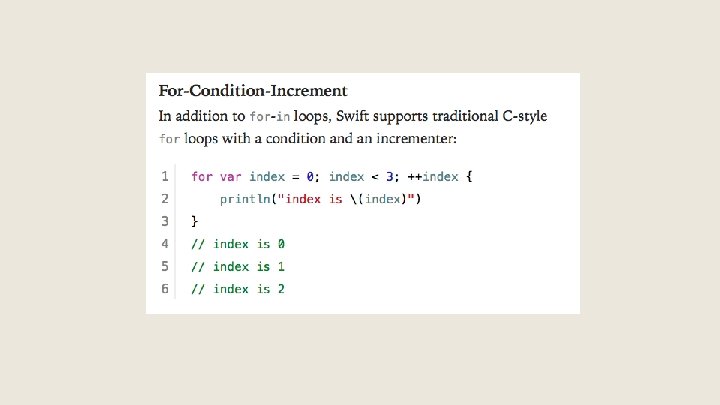
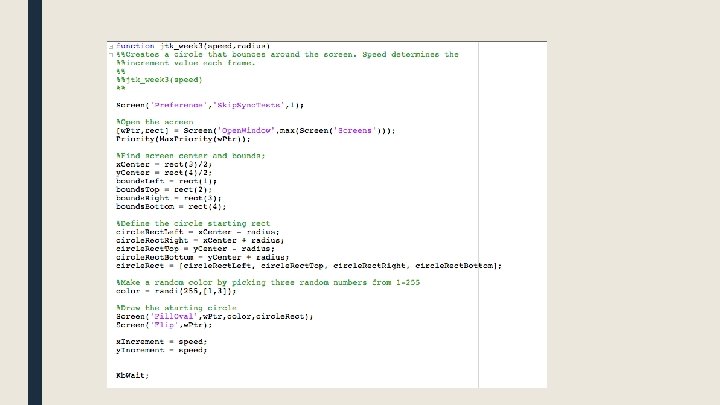
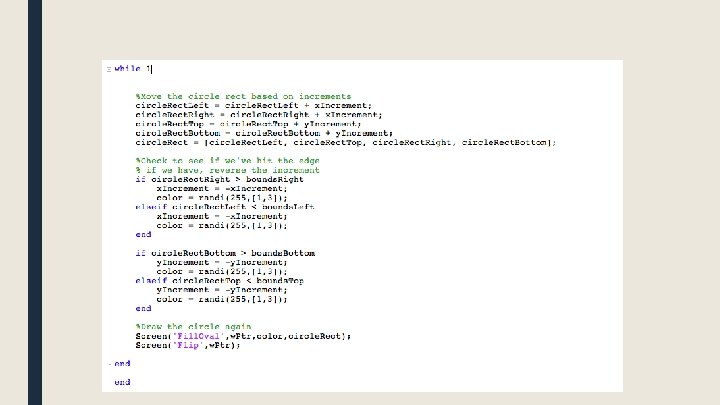
Assignment Week 3 Write a function called your. Initials_week 3() The function should take two inputs: - An integer called speed - An integer called radius The function should: - Draw a circle in the center of the screen with radius equal to radius. Wait for the user to press a key. The circle will then start moving diagonally towards the lower right hand corner of the screen. The speed at which it moves will be determined by speed: speed is actually the number of pixels that the circle will move each frame. In other words, increment both the x and y position of the circle by speed every frame. - If the circle should "bounce" off the edge of the screen. That means that once it hits the bottom of the screen, it will start to move up instead of down, and when it hits the right side of the screen it will start to move left instead of right, etc. - The color of the circle should randomly change whenever it hits a wall - The circle will continue to bounce around the screen indefinitely


Week 4 • • Drawing Text Animation Presenting images Playing movies

Drawing text ■ Two steps to drawing text: – 1. Set up all the properties of the text we want to draw (font, size, style) using separate commands – 2. Draw the text using Draw. Text
; Screen('Text. Font', w. Ptr, font. String); Screen('Text.")
Drawing Text Screen('Text. Size', w. Ptr, size); Screen('Text. Font', w. Ptr, font. String); Screen('Text. Style', w. Ptr, style); 0 = normal 1 = bold 2 = italic 4 = underline 8 = outline 32 = condense 64 = extend
")
Drawing Text Screen('Draw. Text', w. Ptr, text, x, y, color)
![Drawing Text >> [w. Ptr, rect] = Screen('Open. Window', 1); >> Screen('Text. Font', w.](http://slidetodoc.com/presentation_image_h2/44265156f2b80bb5a540312ac7fbf009/image-37.jpg "Drawing Text >> [w. Ptr, rect] = Screen('Open. Window', 1); >> Screen('Text. Font', w.")
Drawing Text >> [w. Ptr, rect] = Screen('Open. Window', 1); >> Screen('Text. Font', w. Ptr, 'Helvetica'); >> Screen('Text. Size', w. Ptr, 48); >> Screen('Draw. Text', 'Hello there', 100, [200 0 0]);

Drawing Text Sometimes, to position text, we need to know its size in pixels: rect = Screen('Text. Bounds', w. Ptr, text. String);
![Centering text, the hard way >> [w. Ptr, rect] = Screen('Open. Window', 1); >>](http://slidetodoc.com/presentation_image_h2/44265156f2b80bb5a540312ac7fbf009/image-39.jpg "Centering text, the hard way >> [w. Ptr, rect] = Screen('Open. Window', 1); >>")
Centering text, the hard way >> [w. Ptr, rect] = Screen('Open. Window', 1); >> screen. Center. X = rect(3)/2; >> screen. Center. Y = rect(4)/2; >> my. Text = 'Hello World!'; >> text. Rect = Screen('Text. Bounds', w. Ptr, my. Text); >> text. Width = text. Rect(3); >> text. Height = text. Rect(4); >> text. X = screen. Center. X – text. Width/2; >> text. Y = screen. Center. Y – text. Height/2; >> Screen('Draw. Text', w. Ptr, my. Text, text. X, text. Y, 0); >> Screen('Flip', w. Ptr);

Drawing Formatted Text Draw. Formatted. Text(w. Ptr, text. String, sx, sy, color, wrapat, flip. Horizontal, flip. Vertic al, v. Spacing, rightoleft, win. Rect) Advantages over Draw. Text: Helpful for splitting text into multiple lines. Can include newline characters in the text string (n). Can do automatic centering if you set sx to "center" or right justify if you set to "right"
![Centering text, the easy way >> [w. Ptr, rect] = Screen('Open. Window', 1); >>](http://slidetodoc.com/presentation_image_h2/44265156f2b80bb5a540312ac7fbf009/image-41.jpg "Centering text, the easy way >> [w. Ptr, rect] = Screen('Open. Window', 1); >>")
Centering text, the easy way >> [w. Ptr, rect] = Screen('Open. Window', 1); >> my. Text = 'Hello World!'; >> Draw. Formatted. Text(w. Ptr, my. Text, 'center', 0);

Paragraphs <play with options>
")
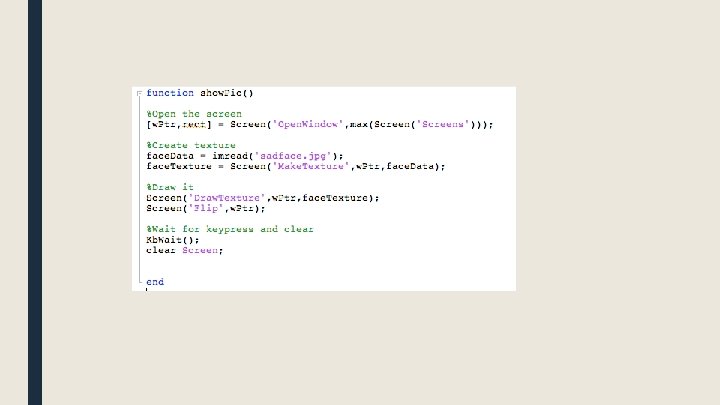
Displaying pictures ■ – – – Steps to displaying a picture: 1. Use imread() to read the image into a matrix of numbers 2. Use Make. Texture to create an Open. GL texture using that matrix 3. Use Draw. Texture to draw the texture to the screen

Images

Images
 ■ Supported image")
Images ■ Step 1: Read in the image data using imread() ■ Supported image formats: – BMP, GIF, JPEG, PNG, TIFF, etc.
![Images A = imread('mypicture. jpg'); [A, map] = imread('mypicture. jpg'); [A, map, alpha] =](http://slidetodoc.com/presentation_image_h2/44265156f2b80bb5a540312ac7fbf009/image-47.jpg "Images A = imread('mypicture. jpg'); [A, map] = imread('mypicture. jpg'); [A, map, alpha] =")
Images A = imread('mypicture. jpg'); [A, map] = imread('mypicture. jpg'); [A, map, alpha] = imread('mypicture. jpg');
; >> size(face. Data); ans = 650")
Displaying images >> face. Data = imread('sadface. jpg'); >> size(face. Data); ans = 650 506 3
 ■ Step 2:")
Images ■ Step 1: Read in the image data using imread() ■ Step 2: Make a texture
")
Images my. Texture. Index = Screen('Make. Texture', w. Ptr, image. Matrix)
; >> size(face. Data); ans = 650")
Displaying images >> face. Data = imread('sadface. jpg'); >> size(face. Data); ans = 650 506 3 >> face. Texture = Screen('Make. Texture', w. Ptr, face. Data); >> Screen('Draw. Texture', w. Ptr, face. Texture); >> Screen('Flip', w. Ptr);
![Drawing Images Screen('Draw. Texture', window. Pointer, texture. Pointer [, source. Rect] [, destination. Rect]](http://slidetodoc.com/presentation_image_h2/44265156f2b80bb5a540312ac7fbf009/image-53.jpg "Drawing Images Screen('Draw. Texture', window. Pointer, texture. Pointer [, source. Rect] [, destination. Rect]")
Drawing Images Screen('Draw. Texture', window. Pointer, texture. Pointer [, source. Rect] [, destination. Rect] [, rotation. Angle] [, filter. Mode] [, global. Alpha] [, modulate. Color] [, texture. Shader] [, special. Flags] [, aux. Parameters]); rect defining subpart of picture to present, default is whole picture rect defining subpart of screen to present picture in (defaults to center of screen)

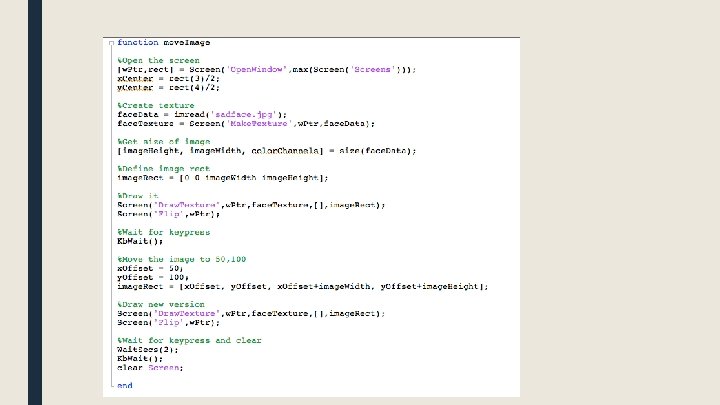
Moving images 0, 0 x. Offset, y. Offset x. Offset + image. Width, y. Offset + image. Height

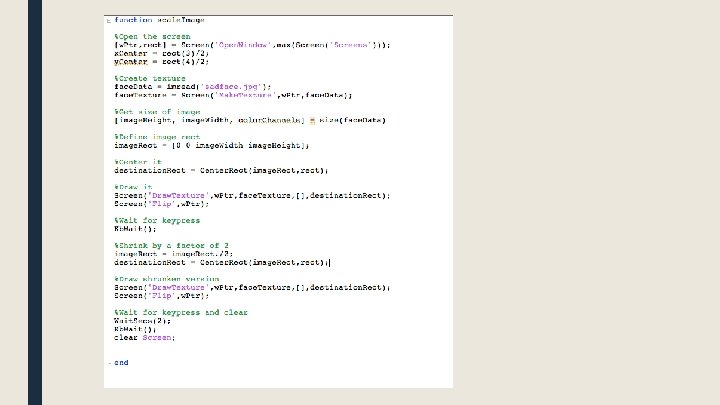
Scaling images ■ To scale an image, change the size of the destination rectangle
![Rotating images Screen('Draw. Texture', window. Pointer, texture. Pointer [, source. Rect] [, destination. Rect]](http://slidetodoc.com/presentation_image_h2/44265156f2b80bb5a540312ac7fbf009/image-58.jpg "Rotating images Screen('Draw. Texture', window. Pointer, texture. Pointer [, source. Rect] [, destination. Rect]")
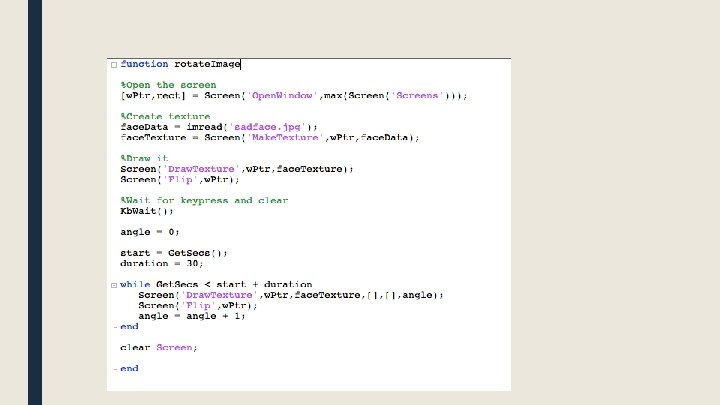
Rotating images Screen('Draw. Texture', window. Pointer, texture. Pointer [, source. Rect] [, destination. Rect] [, rotation. Angle] [, filter. Mode] [, global. Alpha] [, modulate. Color] [, texture. Shader] [, special. Flags] [, aux. Parameters]); set rotation angle. upright image is 0 degrees

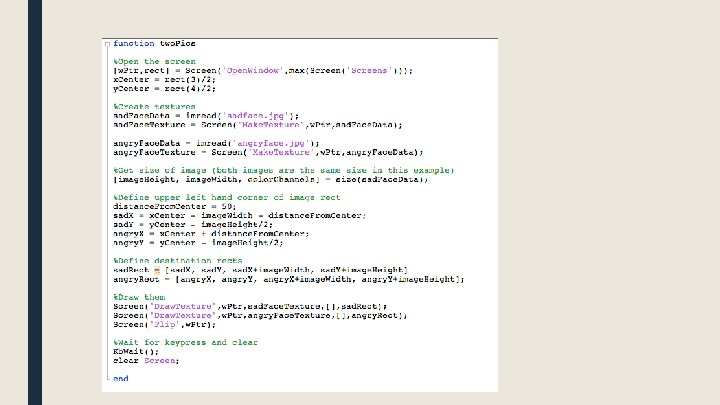
Multiple images ■ You can draw multiple image textures to the back buffer, and then flip to show them at the same time
![Transparency Screen('Draw. Texture', window. Pointer, texture. Pointer [, source. Rect] [, destination. Rect] [,](http://slidetodoc.com/presentation_image_h2/44265156f2b80bb5a540312ac7fbf009/image-62.jpg "Transparency Screen('Draw. Texture', window. Pointer, texture. Pointer [, source. Rect] [, destination. Rect] [,")
Transparency Screen('Draw. Texture', window. Pointer, texture. Pointer [, source. Rect] [, destination. Rect] [, rotation. Angle] [, filter. Mode] [, global. Alpha] [, modulate. Color] [, texture. Shader] [, special. Flags] [, aux. Parameters]); set alpha for image, alpha blending must be on 0 = fully transparent 1 = fully solid

Alpha blending >> Screen Blend. Function? ENABLE BLENDING DISABLE BLENDING >> Screen('Blend. Function', w. Ptr, GL_SRC_ALPHA, GL_ONE_MINUS_SRC_ALPHA); >> Screen('Blend. Function', w. Ptr, GL_ONE, GL_ZERO);

Displaying images ■ Loading images in and making textures can take time ■ Don't wait until you want to present the images to load them in ■ Make your textures at the beginning of your script, then present them on time

Movies http: //www. gstreamer. com

Movies OSX: Must have XCode installed Make sure to press "customize" and check all the boxes in the installer to install the parts

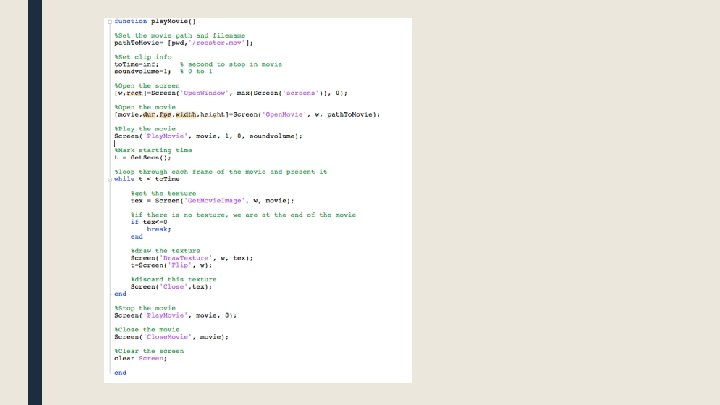
Movies ■ 1. Open. Movie to open the movie file ■ 2. Play. Movie to start playing ■ 3. Loop: – Get. Movie. Image to create frame texture – Draw texture and flip screen ■ 4. Play. Movie to stop playing ■ 5. Close. Movie to close movie file
![Movies [ movie. Ptr [duration] [fps] [width] [height] [count [aspect. Ratio]]=Screen('Open. Movie', window. Ptr,](http://slidetodoc.com/presentation_image_h2/44265156f2b80bb5a540312ac7fbf009/image-68.jpg "Movies [ movie. Ptr [duration] [fps] [width] [height] [count [aspect. Ratio]]=Screen('Open. Movie', window. Ptr,")
Movies [ movie. Ptr [duration] [fps] [width] [height] [count [aspect. Ratio]]=Screen('Open. Movie', window. Ptr, moviefile [, async=0] [, preload. Secs=1] [, special. Flags 1=0][, pixel. Format=4] [, max. Number. Threads=-1]);
![Movies Screen('Play. Movie', movie. Ptr, rate, [loop], [soundvolume]); 0 = stop playback 1 =](http://slidetodoc.com/presentation_image_h2/44265156f2b80bb5a540312ac7fbf009/image-69.jpg "Movies Screen('Play. Movie', movie. Ptr, rate, [loop], [soundvolume]); 0 = stop playback 1 =")
Movies Screen('Play. Movie', movie. Ptr, rate, [loop], [soundvolume]); 0 = stop playback 1 = play, normal speed -1 = play, normal speed backwards 0 = mute 1 = max volume
![Movies [ texture. Ptr [timeindex]]=Screen('Get. Movie. Image', window. Ptr, movie. Ptr, [wait. For. Image=1],](http://slidetodoc.com/presentation_image_h2/44265156f2b80bb5a540312ac7fbf009/image-70.jpg "Movies [ texture. Ptr [timeindex]]=Screen('Get. Movie. Image', window. Ptr, movie. Ptr, [wait. For. Image=1],")
Movies [ texture. Ptr [timeindex]]=Screen('Get. Movie. Image', window. Ptr, movie. Ptr, [wait. For. Image=1], [fortimeindex], [special. Flags = 0] [, special. Flags 2 = 0]);

 ■ – The")
Assignment # 4 ■ Create a function called your. Initials_week 4() ■ – The function should take one input: subject. Code, a string identifying the subject ■ – The function should do the following: Using a loop, present 20 trials of the following emotion categorization experiment. On each trial, a picture will appear. The picture will randomly be chosen between sad. jpg and angry. jpg. The location of the picture will also be randomly chosen between the left and right side of the screen. The edge of the picture should always be 100 pixels from the center of the screen, horizontally. Once the picture appears, wait for the user to press a key. The subject should press S for sad and A for angry. On each trial, write out the following information to the next line of a log file. The log file should be named subject. Code_log. txt where subject. Code is the code that they entered from the command line. Each line should contain: the trial number, which picture was presented, where it was presented, which key was pressed, the reaction time, and whether or not the keypress was correct. When the experiment is over, print out the subject's overall accuracy to the command window. – – –

- Slides: 74