Introduction to Arduinos What is an Arduino Arduino


")

 {")


 Digital.")

 • pin. Mode(pin, mode) configures the specified pin to behave either as")

 • value = digital. Read(3); • value")
 • value = analog. Read(A 0); •")
 • digital. Write(3, LOW); • Output pin will")
 • analog. Write(3, 100); • pin limited to")

 and loop() functions • setup(): This function is called once when a sketch")


- Slides: 22
Introduction to Arduinos
What is an Arduino? • Arduino is an electronics platform based on easy-to-use hardware (including a microcontroller) and software (based on C/C++). • “Arduino boards are able to read inputs - light on a sensor, a finger on a button, or a Twitter message - and turn it into an output - activating a motor, turning on an LED, publishing something online. • You tell your board what to do by sending a set of instructions to the microcontroller on the board.
Arduino board and IDE
Why are Arduinos so popular? • Easy-to-use and well-supported • • • Inexpensive ($20) Simple and accessible user experience Do not require extra hardware to program and use the microcontroller Wide variety of C/C++ functions that work with all the “Arduino family” Open-source Huge amount of online documentation (projects, samples, etc) • e. g. https: //lifehacker. com/top-10 -kickass-arduino-projects-1747407543 • Large amount of “shields” that you can add on to do more things • e. g. https: //playground. arduino. cc/Main/Similar. Boards/
How/when will we use Arduinos in the lab? • ALL the labs in MAE 106 use Arduino • Some of the code will be provided to you, but in most cases you will have to understand change it accordingly to finish your lab and collect data for the write-ups
Example • Potentiometer: • Servomotor: Arduino: #include <Servo. h> Servo myservo; void setup() { myservo. attach(9); }
Example, continued • Potentiometer:
How the Arduino is used in our final project? Built-in timer Compass Servo Motor Steering Mechanism Reed Switches Solenoid Valve Switches (for optional whiskers) Pneumatic Cylinder Arduino
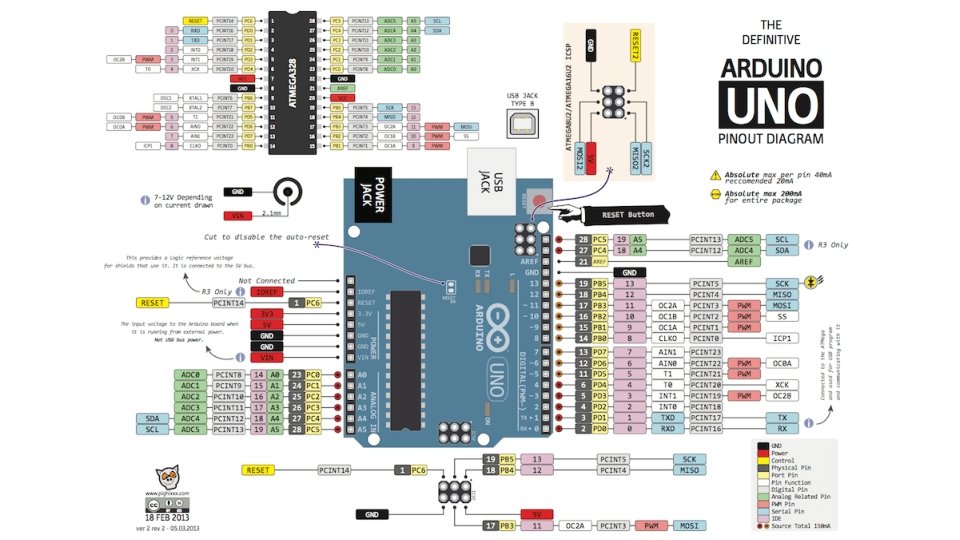
Reset Button 5 V Output Ground Battery Input Analog Input Pins Analog. Read() Digital. Write() Digital Pins Digital. Read() Digital. Write() Analog. Write() ~ only
Inputs vs Outputs • Referenced from the perspective of the Arduino Input is a signal / information going into the board. Output is any signal exiting the board. Examples: Buttons Switches, Light Sensors, Flex Sensors, Humidity Sensors, Temperature Sensors, … Examples: LEDs, DC motor, servo motor, a piezo buzzer, relay, an RGB LED, …
pin. Mode() • pin. Mode(pin, mode) configures the specified pin to behave either as an input or an output • Modes: INPUT, OUTPUT, or INPUT_PULLUP • Why INPUT_PULLUP? INPUT_PULLUP
Digital vs Analog
Digital Input: value = digital. Read (pin) • value = digital. Read(3); • value is 0, if input <= 1. 5 V • value is 1, if input >= 3. 0 V • Value is not determined, if input 1. 5 < input < 3. 0
Analog Input: value = analog. Read (pin) • value = analog. Read(A 0); • Converts analog input to digital signal with a 10 bits converter: Input voltage Analog to digital conversion value (read in analog. Read function) 0 V 00000 b 0 5 V 11111 b 1023 ? 000001 b 1
Digital Output: digital. Write (pin, value) • digital. Write(3, LOW); • Output pin will be set to 0 V • digital. Write(3, HIGH); • Output pin will be set to 5 V
Analog Output: analog. Write (pin, value) • analog. Write(3, 100); • pin limited to pins with the ~ symbol • value can be any number from 0 to 255 • 0 -> 0 V | 255 -> 5 V | 128 -> ? Fixed cycle length; constant number of cycles/sec
Arduino Language • Is actually C language with extra functions ready to be used with any Arduino board • Reference • Open source
setup() and loop() functions • setup(): This function is called once when a sketch starts after powerup or reset. It is used to initialize variables, input and output pin modes, and other libraries needed in the sketch • loop(): After setup() has been called, function loop() is executed repeatedly in the main program. It controls the board until the board is powered off or is reset.
Arduino IDE See: http: //arduino. cc/en/Guide/Environment for more information
ALWAYS: Select Serial Port and Board
Serial communication • Used for communication between the Arduino board and a computer or other devices • Arduino’s library is ready to use, and you should use it for debugging purposes as well • Serial functions: • • begin() println() available() • Note that using serial communication slows down the execution of your code, so your robot may behave differently when you have serial communication on versus not. • One solution is to save data into an array, then dump it at the end to the serial port. This is what several of the labs do. • However, the on-board memory on the Arduino is limited, so you can’t save a lot of data with this method.