Introduction to ADO Net VB Net Database Tools

Introduction to ADO. Net, VB. Net Database Tools and Data Binding ISYS 546

Steps to Retrieve Data • Establishes a connection to the database. • Executes commands against the database. • Store data results.

A Simplified View of ADO. Net Objects Ado. Net Data Provider Adapter Connection Data Consumer Dataset Win. Form Command Reader Web. Form

ADO. NET Objects • Connection Object: Represent a connection to the database. • Command Object: The command object allows us to execute a SQL statement or a stored procedure. • Data. Reader: It is a read-only and forward-only pointer into a table to retrieve records. • Data. Set Object: A Data. Set object can hold several tables and relationships between tables. • Data. Adapter: This the object used to pass data between the database and the dataset.

Data Providers • ODBC Provider – Open Database Connectivity • A driver manager • Used for relational databases • OLE DB Provider – OLE DB interfaces provide applications with uniform access to data stored in diverse information sources, or data stores. – Access • SQL Server Provider • Oracle Provider
 • Three types")
Using ODBC • Windows XP: • Control Panel /Administrative Tools/Data. Source(ODBC) • Three types of data source names – User DSN: usable only by you and only on the machine currently using. – System DSN: Any one using the machine can use. – File DSN: Can be copied and used by other computers with the same driver installed.

VB. NET Database Tools • Database connection: – Tools/Connect to database • Data Source • Server Explorer – Data connections: Right click data connection • Add Connection – Tables, Views • Create new SQL Server Database • Toolbox: Data tab • Data/Add New Data Source

Creating SQL Server Database • From Server Explorer, right click data connection and choose: • Create new SQL Server Database • Server name: – Local. Server. NameSQLExpress • Add new table: Right click Tables and choose Add New Table • Add rows: Right click the table name and choose Show table data.

How to create an ADO. Net object? • Automatically generated when creating data bound form. – Form wizard • Using Data Adapter Wizard • Using code: – Example: – dim str. Conn as string ="Provider=Microsoft. Jet. OLEDB. 4. 0; Data Source = c: sales 2 k. mdb" – dim obj. Conn as new Oledb. Connection(str. Conn) – obj. Conn. open()

Data Binding • Connect a control or property to one or more data elements. • Simple binding: Use simple binding to display a field value in controls that show Data Bindings in the property window, such as text box or label. • Complex binding: Use complex binding to bind more than one field to controls such as Data. Grid and list box. Use the control’s Data Source and Data Member to bind the data.

Creating Data Bound Form • Creating a form with ADO. Net objects and databound controls to display and update information in a dataset. • Demo: – Add data source. – Click the dropdown list next to the table’s name: • Datagrid view • Details – Drag the table to form.
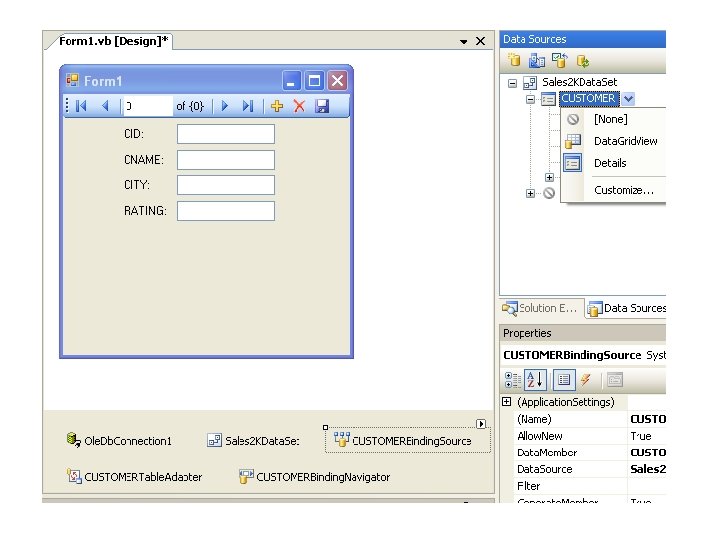

Items Added to the Form • Connection • Table Adapter: click smart tag – Add query – Preview data • Dataset: – Edit in dataset designer • Binding Source – Add query: Add a new tool strip. – Preview data • Binding navigator • Code view: Form load event – Me. CUSTOMERTable. Adapter. Fill(Me. Sales 2 KData. Set. C USTOMER)

Other Data Form Demos • Data. Grid View • Add /Modify/Delete records. • Read only form: – Delete Add. New, Delete, Save buttons from navigator bar. • Hierarchical forms: – Dataset has Tables collection and Relations collection. • Parent/Child relation – Drag the parent table and the child table to the form. Parent table uses detail view and child table uses data. Grid view – Change data. Grid’s Data. Source property to the relation.

Creating A Database Application Without Programming • Creating a database application to display information and update database. • A main form with buttons to open data forms: – Display. Info – Enter New – Modify – Exit

Data Adapter Wizard • Configure Data Adapter and generating a dataset: – From the Data tab of the Tool. Box, Drag Oledb. Data. Adapter to the form. – Use the Data Adapter Wizard to configure the Adapter. – Right Click the Adapter to preview data and create dataset. • Bind the dataset to controls. • In the Form Load event, use Adapter’s Fill method to load the dataset: • Ole. Db. Data. Adapter 1. Fill(Data. Set 11)

Creating Bound Data. Grid. View • Data. Grid. View control: – Data Source property: • Data. Set – Data Member property • A table in the dataset – In the Form Load event, use Adapter’s Fill method to load the dataset: • Ole. Db. Data. Adapter 1. Fill(Data. Set 11)

Objects Related to Data Binding • Binding. Context: It is an object that manages a collection of data sources used for binding. • Currency. Manager: It is an object that keeps track of position (the current row) of a data source. Two useful properties: – Position property: is the index of the current row. The index is a 0 -based index, the first record has a position of 0. – Count property: The number of rows in the data source.

Binding Text Box • Select Data Bindings property: – Text: choose field • Add navigation buttons: – The current record position within the data source is stored in the Currency. Manager’s Position property. This position is zero based. Add one move to the next record, minus one move to the previous record.

Move. Next and Move. Last Example • Move. Next: – Me. Binding. Context(Data. Set 21, "customer"). Position += 1 • Move. Last: – Me. Binding. Context(Data. Set 21, "customer"). Position = Me. Binding. Context(Data. Set 21, "customer"). Count -1 • How to Move. Previous and Move. First? • Note: The Position property takes care of the end of file automatically. • Note: Me. Binding. Context(Data. Set 21, "customer") returns a Currency. Manager object.

Binding. Source Object • Binding. Source is an object that encapsulates a Currency. Manager and its properties and methods. • It has two important properties: Data. Source and Data. Member. • In case that the data source for a control changes, we only need to change the Data. Source and Data. Member properties.

Binding. Source’s Position Property • If controls are bound to a Binding. Source object, to move the current record we change the Position property of the Binding. Source object: – To move to the next record: • Me. Emp. Binding. Source. Position += 1 – To move to the previous record: • Me. Emp. Binding. Source. Position -= 1

Currency. Manager • Dim cust. Curr. Mgr As Currency. Manager • Dim ord. Curr. Mgr As Currency. Manager • In a procedure: – – ord. Curr. Mgr = Me. Binding. Context(Ds 31, "orders") cust. Curr. Mgr = Me. Binding. Context(Ds 31, “customer") cust. Curr. Mgr. Position += 1 ord. Curr. Mgr. Position += 1

Binding. Navigator Object • This object automatically adds navigation buttons to the form. • Property: – Binding. Source property

Binding List. Box • Example: Bind Customer Table’s CID field to a listbox. – Create a Adapter for Customer table , and generate the dataset. – Add List. Box and set binding properties: • Data Source: Customer table • Display Member: Field to display in the listbox. • Value Member: the actual values for items in the list box. To display the selected item’s value in a text box, do: – Textbox 1. text = List. Box 1. Selected. Value • Can we use Text. Box 1. text=List. Box 1. Selected. Item? No!
: – If")
Display Selected Record • Bound textbox (same data source as the listbox): – If the Listbox and the textbox are bound to the same Binding. Source object, the textbox will automatically displays the record of the selected listbox item. • Unbound textbox

List. Box Selected. Item Property • How to display the selected record in unbound textbox? • After binding to a data source, this property return a Data. Row. View object. • What is Data. Row. View? – Object Browser: • System. Data – Data. Row. View: Item property is the default property • To retrieve a column from a Data. Row. View object (use 0 -based index to identity a column): • List. Box 1. Selected. Item(1) • Or: List. Box 1. Selected. Item(“Cname”)

An Easy Away to Create a Form with Listbox and Textboxes • Example: Display CID in Listbox and Display other fields of a customer record in textboxes • 1. Click the Data. Source window • 2. Select the Customer table • 3. Select CID field and click the drop down list next to it to change the CID field’s control to listbox. • 4. Drag the CID field to the form – Change the Data. Source property to Customer. Binding. Source and Display member property to CID • 5 Drag other fields to the form.

Using Object Browser • View/Object Browser • Data. Set object model: • System. Data – Data. Set • Relations • Tables – Rows – Columns • Use Object Browser to study object’s properties, methods.
, 0 -based index • Methods: –")
Collection Structure • Properties: – Count – Item(index), 0 -based index • Methods: – Clear, Add, Insert, Remove, etc.

Data. Set Class Hierarchy • Data. Set – Tables: A collection of datatable objects – To retrieve a table from Tables: • Data. Set 11. Tables. Item(“CUSTOMER”). • Data. Set 11. Tables(“CUSTOMER”). • Data. Set 11. CUSTOMER – Rows: Each table has a Rows property which is a collection of data. Row objects • To get the first row: Data. Set 11. Tables(“CUSTOMER”). Rows(0) – Each Data. Row object has a collection of fields. To retrieve a field: • Data. Set 11. CUSTOMER. Rows(0). Item(1)

• How many tables in a dataset? • How many records in a table?

Navigate and Display Records in Unbound Text Boxes • Use code to assign field value to the text box’s text property. • Example: – Dim dr. Found As Data. Row – dr. Found = Data. Set 11. CUSTOMER. Rows(0) • Or Data. Set 11. Tables(“CUSTOMER”). Rows(0) – Text. Box 4. Text = dr. Found. Item("cname") • Or dr. Found. Item(1) – Or: Text. Box 4. Text = Data. Set 11. CUSTOMER. Rows(0). Item(1) – Or: Data. Set 21. Tables. Item("customer"). Rows. Item(0). Item(1)

Implement Move. Next Button with Unbound Control If row. Index < Data. Set 11. CUSTOMER. Rows. Count-1 Then row. Index += 1 Text. Box 1. Text = Data. Set 11. Tables("customer"). Rows(row. Index). Item(0) Text. Box 2. Text = Data. Set 11. CUSTOMER. Rows(row. Index). Item(1) Else Msg. Box("out of bound") End If Note: Move. Previous, Move. Last, Move. First?

Using Object Browser to Study Ole. DB Object • System. Data – System. Data. Ole. DB • Ole. DBConnection – Methods: New(), New(Connection. String), Open(), Close() – Properties: Connection. String, Data. Base, Provider, Time. Out • Ole. DBCommannd – Methods: Execute. Reader, Execute. Non. Query – Properties: Connection, Command. Type, Command. Text, Parameters • Ole. DBData. Adapter – Methods: Fill – Properties: Select. Command, Insert. Command, Delete. Command, Update. Command.

Use the Find method of Table’s Rows collection to find a record • Gets the row that contains the specified primary key values. – Data. Set 41. CUSTOMER. Rows. Find(List. Box 1. Selected. Value) – The FIND method returns a Data. Row object. • Display the found record in unbound text boxes.

Code Example Private Sub List. Box 1_Selected. Index. Changed(By. Val sender As System. Object, By. Val e As System. Event. Args) Handles List. Box 1. Selected. Index. Changed Dim dr. Found As Data. Row dr. Found = Data. Set 41. CUSTOMER. Rows. Find(List. Box 1. Selected. Value) ‘ Assume Selected. Value is CID Text. Box 1. Text = dr. Found. Item("cname") Text. Box 2. Text = dr. Found. Item("rating") End Sub Note: We can get the search value from other controls such as Input. Box and Textbox.

How to Determine If Record Exists or Not Dim found. Row As Data. Row Dim Search. Value as String Search. Value=Input. Box(“Enter CID”) found. Row = Data. Set 41. CUSTOMER. Rows. Find (Search. Value) If Not (found. Row Is Nothing) Then Text. Box 1. Text = Found. Row. Item("cname") Text. Box 2. Text = Found. Row. Item("rating") Else Messagebox. show(“Record not exist”) End If

Send Changes in a Bound Data. Grid Back to the Database • Updating records in Data. Grid: – New records are added at the end of the grid. – To delete a record, click the leftmost column to select the record, then press the delete key. – Modify record • Add an Update button that use adapter’s update method to send changes back to the data source: – Oledb. Data. Adapter 1. Update(Dataset 11)

How to create a dataset with two tables and relation? • Assuming we want to create a database with Customer and Orders tables: • You need to create two adapters, one for the Customer table and one for the Orders table. Then generate dataset from the adapters. • The dataset created from the two adapters will contain both tables. • To create a relation between the two tables, double click the dataset to open the dataset’s design view. At the dataset’s design view, point to the Customer table and right click to Add relation.
- Slides: 40