Introduction Ladder Diagram Design Huffman Method Classic method

- Slides: 34

Introduction Ladder Diagram Design: Huffman Method • Classic method for designing sequential systems. • This method is more complicated but can produce a design with a minimum number of relays. • Normally used when a minimum circuit is desired even at the expense of more design time and effort. IA – Huffman Method 1

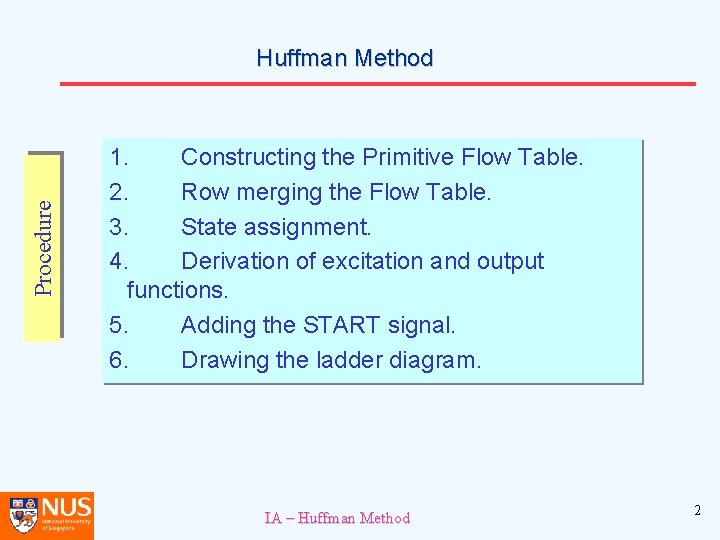
Procedure Huffman Method 1. Constructing the Primitive Flow Table. 2. Row merging the Flow Table. 3. State assignment. 4. Derivation of excitation and output functions. 5. Adding the START signal. 6. Drawing the ladder diagram. IA – Huffman Method 2

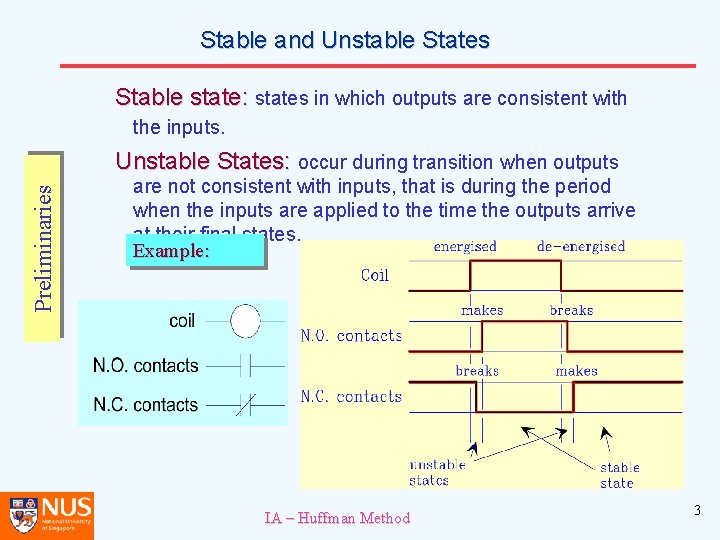
Stable and Unstable States Stable state: states in which outputs are consistent with the inputs. Preliminaries Unstable States: occur during transition when outputs are not consistent with inputs, that is during the period when the inputs are applied to the time the outputs arrive at their final states. Example: IA – Huffman Method 3

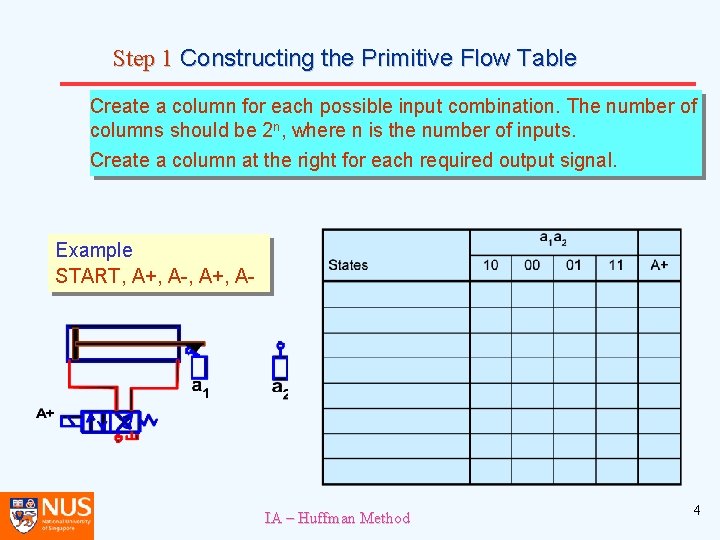
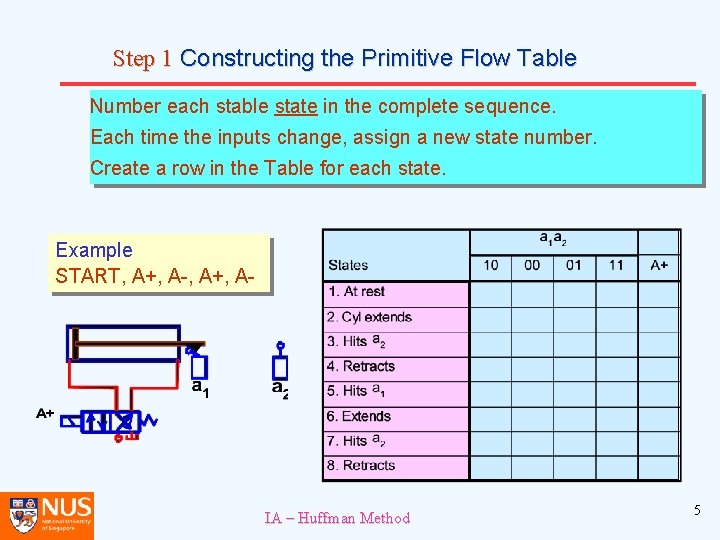
Step 1 Constructing the Primitive Flow Table Create a column for each possible input combination. The number of columns should be 2 n, where n is the number of inputs. Create a column at the right for each required output signal. Example START, A+, A- IA – Huffman Method 4

Step 1 Constructing the Primitive Flow Table Number each stable state in the complete sequence. Each time the inputs change, assign a new state number. Create a row in the Table for each state. Example START, A+, A- IA – Huffman Method 5

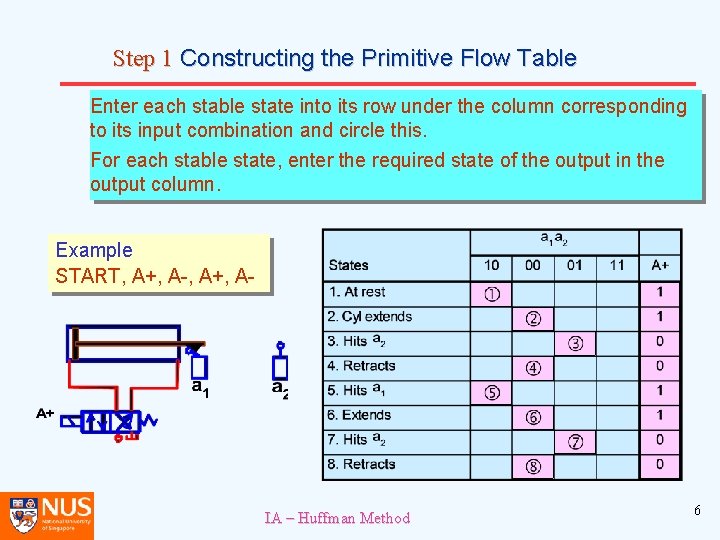
Step 1 Constructing the Primitive Flow Table Enter each stable state into its row under the column corresponding to its input combination and circle this. For each stable state, enter the required state of the output in the output column. Example START, A+, A- IA – Huffman Method 6

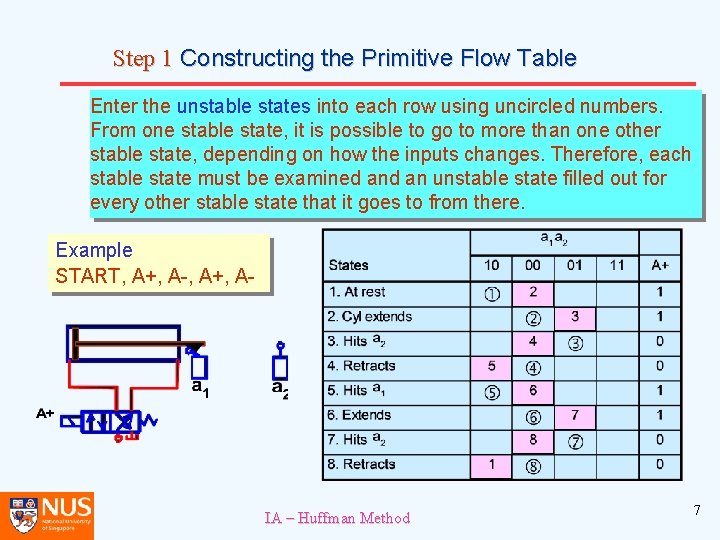
Step 1 Constructing the Primitive Flow Table Enter the unstable states into each row using uncircled numbers. From one stable state, it is possible to go to more than one other stable state, depending on how the inputs changes. Therefore, each stable state must be examined an unstable state filled out for every other stable state that it goes to from there. Example START, A+, A- IA – Huffman Method 7

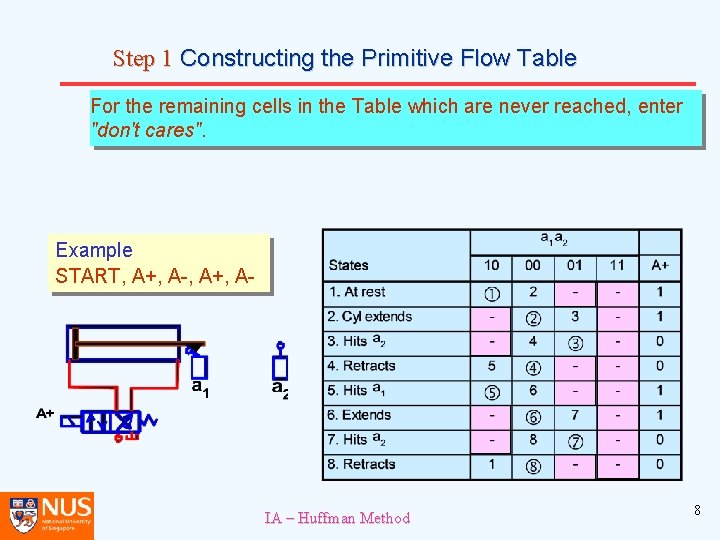
Step 1 Constructing the Primitive Flow Table For the remaining cells in the Table which are never reached, enter "don't cares". Example START, A+, A- IA – Huffman Method 8

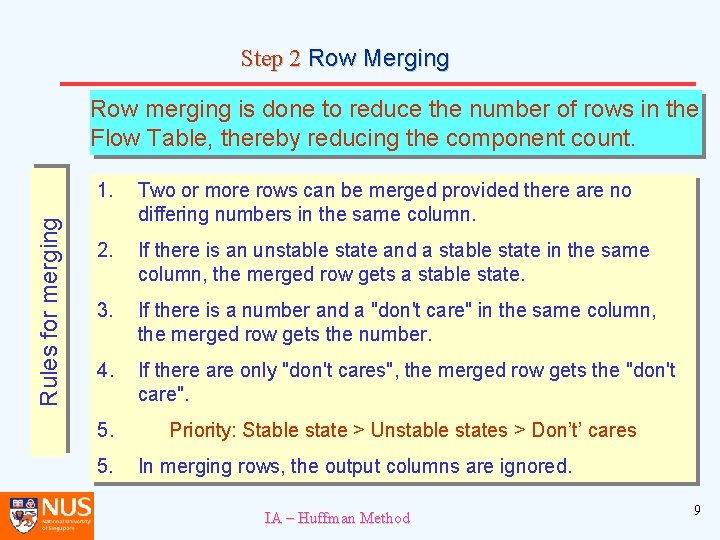
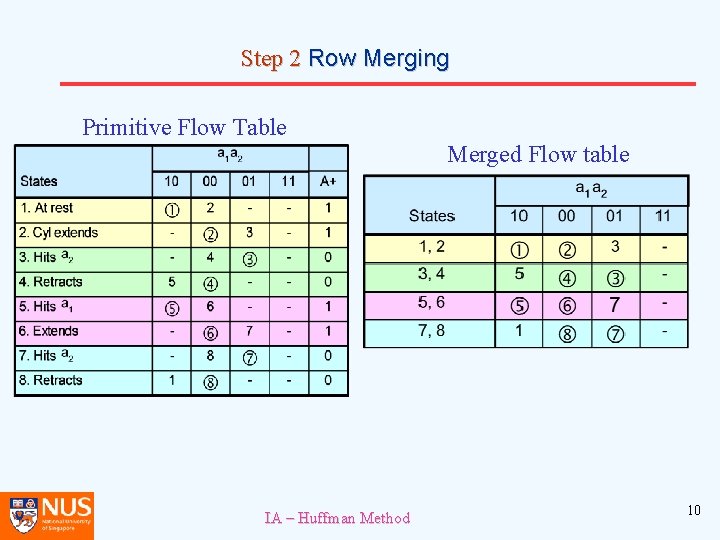
Step 2 Row Merging Rules for merging Row merging is done to reduce the number of rows in the Flow Table, thereby reducing the component count. 1. Two or more rows can be merged provided there are no differing numbers in the same column. 2. If there is an unstable state and a stable state in the same column, the merged row gets a stable state. 3. If there is a number and a "don't care" in the same column, the merged row gets the number. 4. If there are only "don't cares", the merged row gets the "don't care". 5. Priority: Stable state > Unstable states > Don’t’ cares 5. In merging rows, the output columns are ignored. IA – Huffman Method 9

Step 2 Row Merging Primitive Flow Table Merged Flow table IA – Huffman Method 10

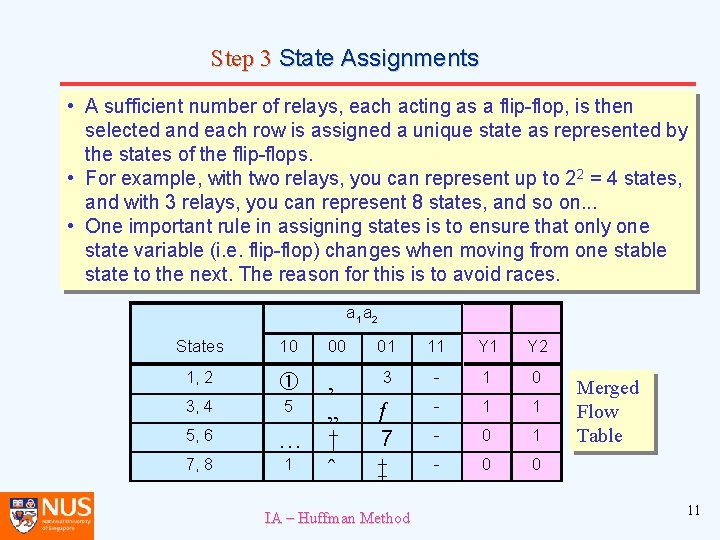
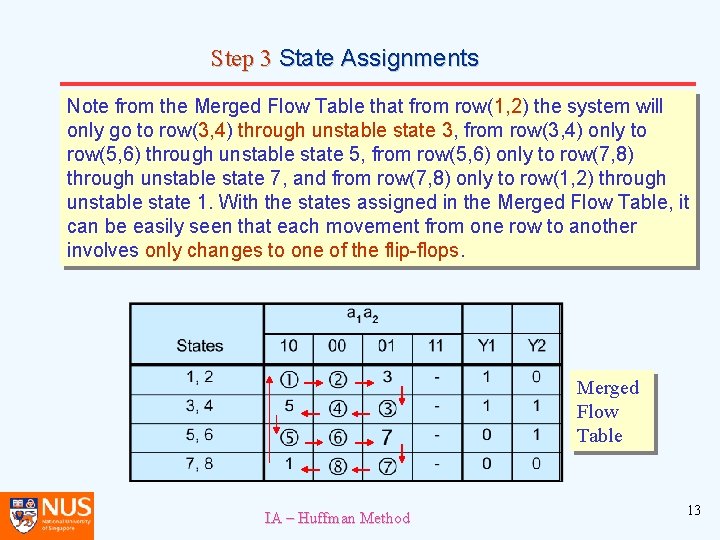
Step 3 State Assignments • A sufficient number of relays, each acting as a flip-flop, is then selected and each row is assigned a unique state as represented by the states of the flip-flops. • For example, with two relays, you can represent up to 22 = 4 states, and with 3 relays, you can represent 8 states, and so on. . . • One important rule in assigning states is to ensure that only one state variable (i. e. flip-flop) changes when moving from one stable state to the next. The reason for this is to avoid races. a 1 a 2 States 10 1, 2 3, 4 5, 6 7, 8 00 ‚ 5 „ … † 1 ˆ 01 11 Y 2 3 - 1 0 ƒ - 1 1 7 - 0 1 ‡ - 0 0 IA – Huffman Method Merged Flow Table 11

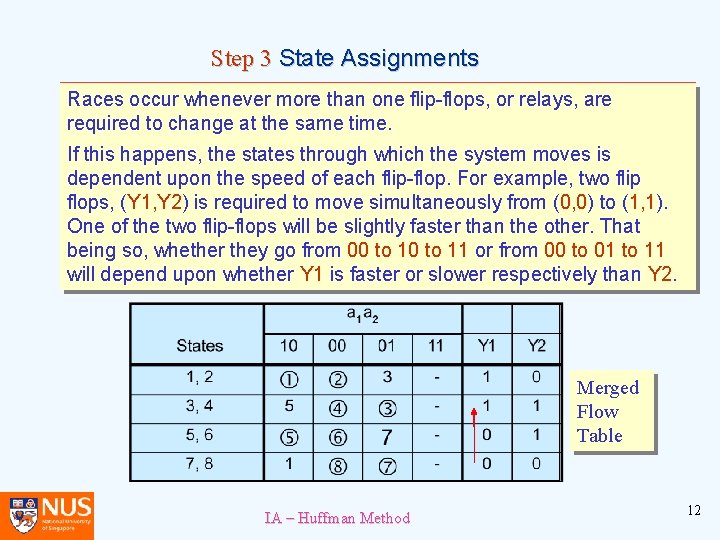
Step 3 State Assignments Races occur whenever more than one flip-flops, or relays, are required to change at the same time. If this happens, the states through which the system moves is dependent upon the speed of each flip-flop. For example, two flip flops, (Y 1, Y 2) is required to move simultaneously from (0, 0) to (1, 1). One of the two flip-flops will be slightly faster than the other. That being so, whether they go from 00 to 11 or from 00 to 01 to 11 will depend upon whether Y 1 is faster or slower respectively than Y 2. Merged Flow Table IA – Huffman Method 12

Step 3 State Assignments Note from the Merged Flow Table that from row(1, 2) the system will only go to row(3, 4) through unstable state 3, from row(3, 4) only to row(5, 6) through unstable state 5, from row(5, 6) only to row(7, 8) through unstable state 7, and from row(7, 8) only to row(1, 2) through unstable state 1. With the states assigned in the Merged Flow Table, it can be easily seen that each movement from one row to another involves only changes to one of the flip-flops. Merged Flow Table IA – Huffman Method 13

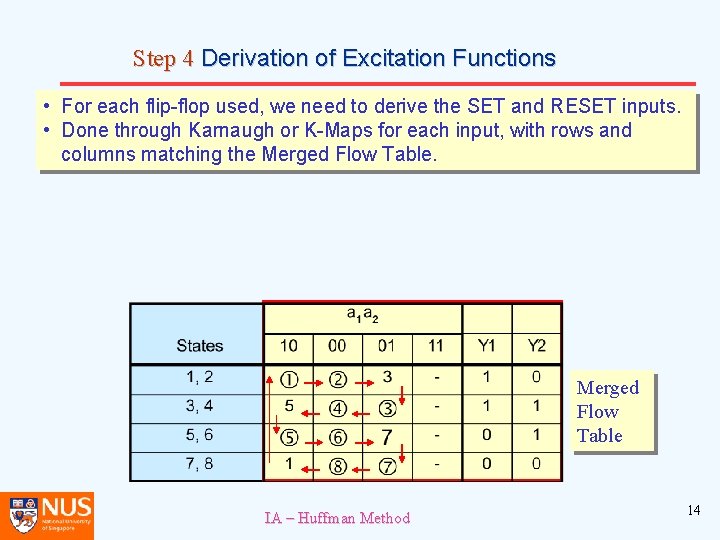
Step 4 Derivation of Excitation Functions • For each flip-flop used, we need to derive the SET and RESET inputs. • Done through Karnaugh or K-Maps for each input, with rows and columns matching the Merged Flow Table IA – Huffman Method 14

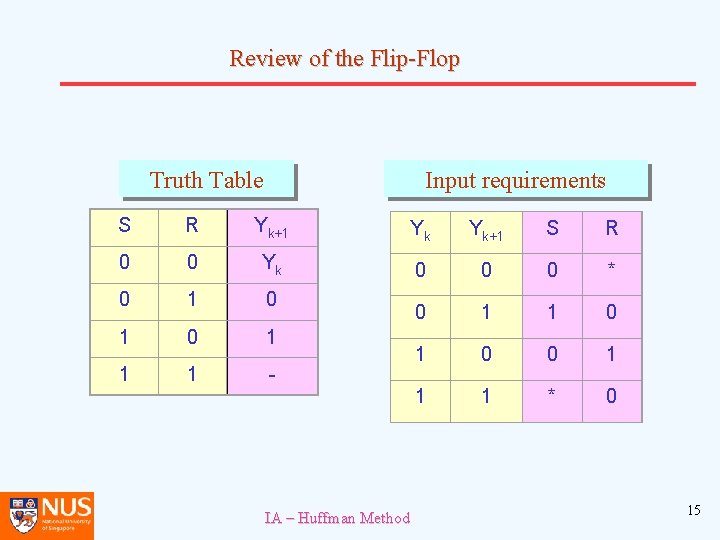
Review of the Flip-Flop Truth Table Input requirements S R Yk+1 Yk Yk+1 S R 0 0 Yk 0 0 0 * 0 1 0 0 1 1 1 - 1 0 0 1 1 1 * 0 IA – Huffman Method 15

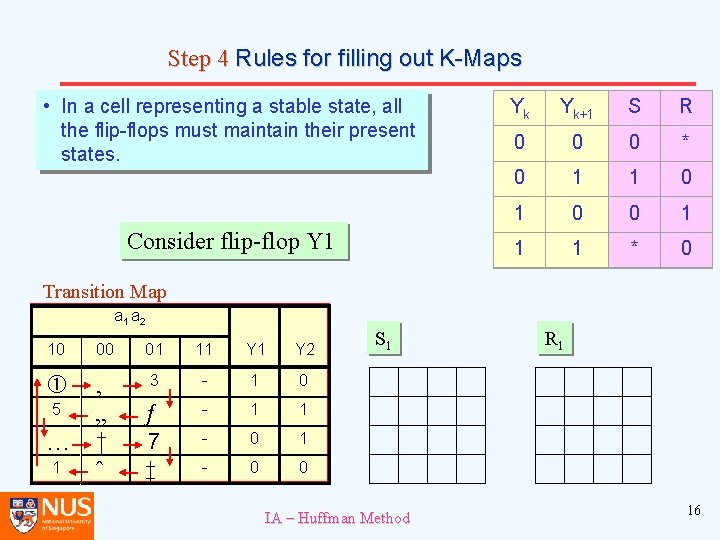
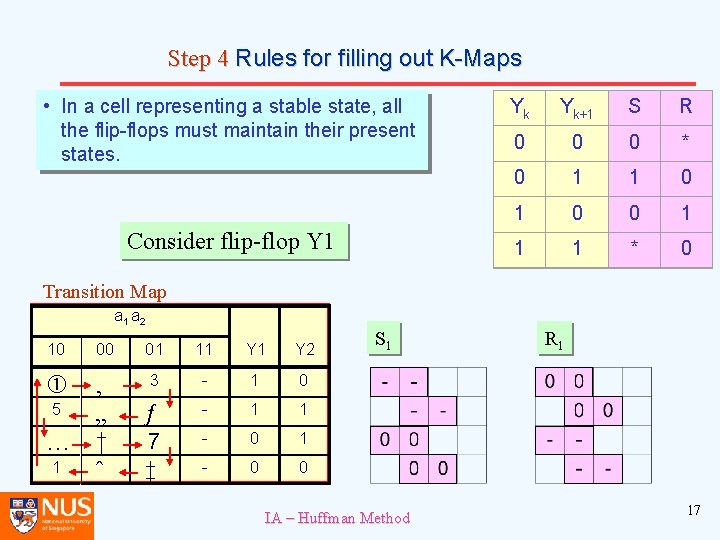
Step 4 Rules for filling out K-Maps • In a cell representing a stable state, all the flip-flops must maintain their present states. Consider flip-flop Y 1 Yk Yk+1 S R 0 0 0 * 0 1 1 0 0 1 1 1 * 0 Transition Map a 1 a 2 10 00 ‚ 5 „ … † 1 ˆ 01 11 Y 2 3 - 1 0 ƒ - 1 1 7 - 0 1 ‡ - 0 0 S 1 IA – Huffman Method R 1 16

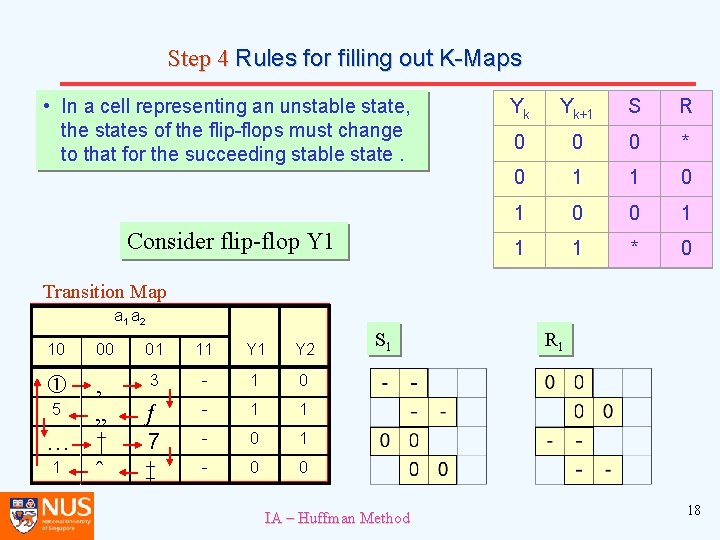
Step 4 Rules for filling out K-Maps • In a cell representing a stable state, all the flip-flops must maintain their present states. Consider flip-flop Y 1 Yk Yk+1 S R 0 0 0 * 0 1 1 0 0 1 1 1 * 0 Transition Map a 1 a 2 10 00 ‚ 5 „ … † 1 ˆ 01 11 Y 2 3 - 1 0 ƒ - 1 1 7 - 0 1 ‡ - 0 0 S 1 IA – Huffman Method R 1 17

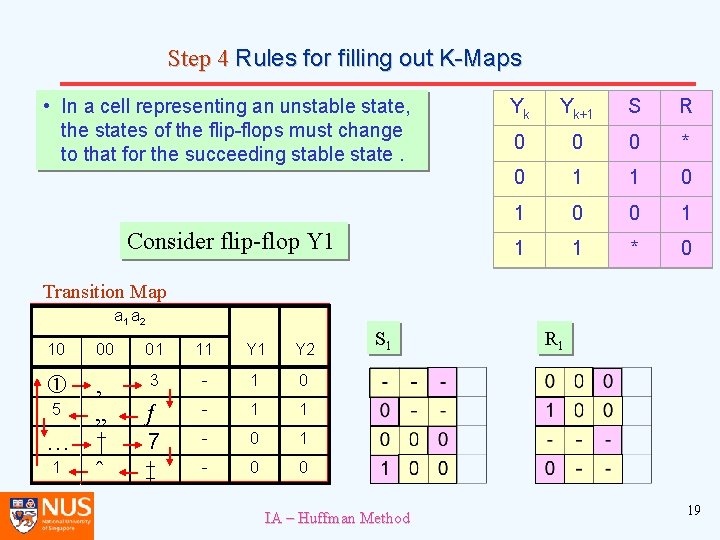
Step 4 Rules for filling out K-Maps • In a cell representing an unstable state, the states of the flip-flops must change to that for the succeeding stable state. Consider flip-flop Y 1 Yk Yk+1 S R 0 0 0 * 0 1 1 0 0 1 1 1 * 0 Transition Map a 1 a 2 10 00 ‚ 5 „ … † 1 ˆ 01 11 Y 2 3 - 1 0 ƒ - 1 1 7 - 0 1 ‡ - 0 0 S 1 IA – Huffman Method R 1 18

Step 4 Rules for filling out K-Maps • In a cell representing an unstable state, the states of the flip-flops must change to that for the succeeding stable state. Consider flip-flop Y 1 Yk Yk+1 S R 0 0 0 * 0 1 1 0 0 1 1 1 * 0 Transition Map a 1 a 2 10 00 ‚ 5 „ … † 1 ˆ 01 11 Y 2 3 - 1 0 ƒ - 1 1 7 - 0 1 ‡ - 0 0 S 1 IA – Huffman Method R 1 19

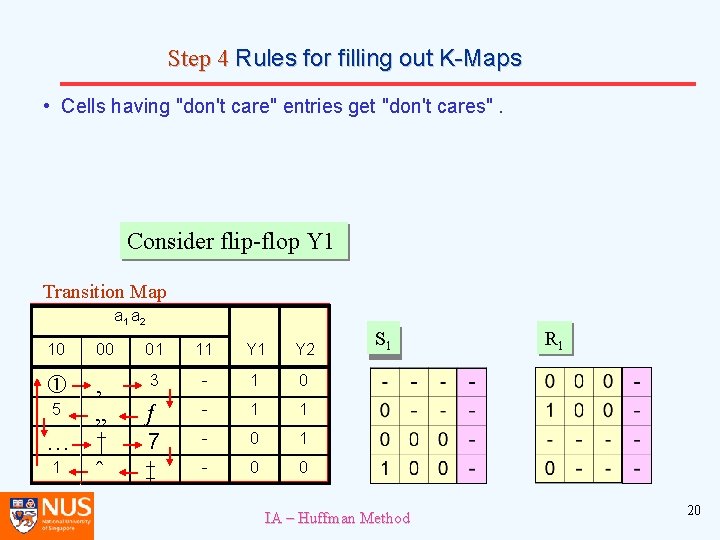
Step 4 Rules for filling out K-Maps • Cells having "don't care" entries get "don't cares". Consider flip-flop Y 1 Transition Map a 1 a 2 10 00 ‚ 5 „ … † 1 ˆ 01 11 Y 2 3 - 1 0 ƒ - 1 1 7 - 0 1 ‡ - 0 0 S 1 IA – Huffman Method R 1 20

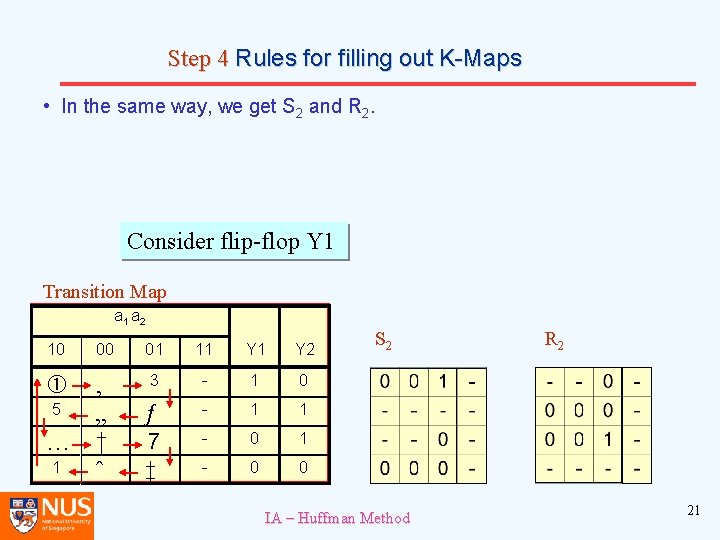
Step 4 Rules for filling out K-Maps • In the same way, we get S 2 and R 2. Consider flip-flop Y 1 Transition Map a 1 a 2 10 00 ‚ 5 „ … † 1 ˆ 01 11 Y 2 3 - 1 0 ƒ - 1 1 7 - 0 1 ‡ - 0 0 S 2 IA – Huffman Method R 2 21

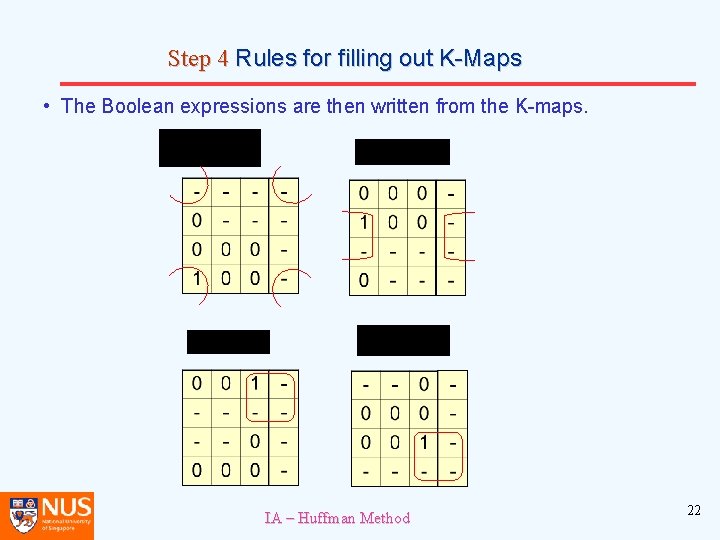
Step 4 Rules for filling out K-Maps • The Boolean expressions are then written from the K-maps. S 1 R 1 S 2 R 2 IA – Huffman Method 22

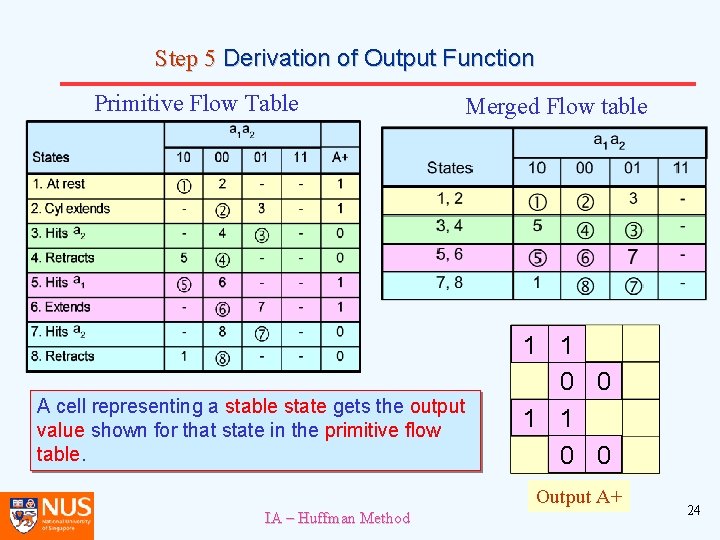
Step 5 Derivation of Output Function • The K-maps for the outputs are filled in referring to both the Merged Flow Table and the Primitive Flow Table. • The Merged Flow Table is used to determine which cell belongs to which state. • The Primitive Flow Table is used to check for the state of the output corresponding to each of the cells. IA – Huffman Method 23

Step 5 Derivation of Output Function Primitive Flow Table A cell representing a stable state gets the output value shown for that state in the primitive flow table. Merged Flow table 1 1 0 0 Output A+ IA – Huffman Method 24

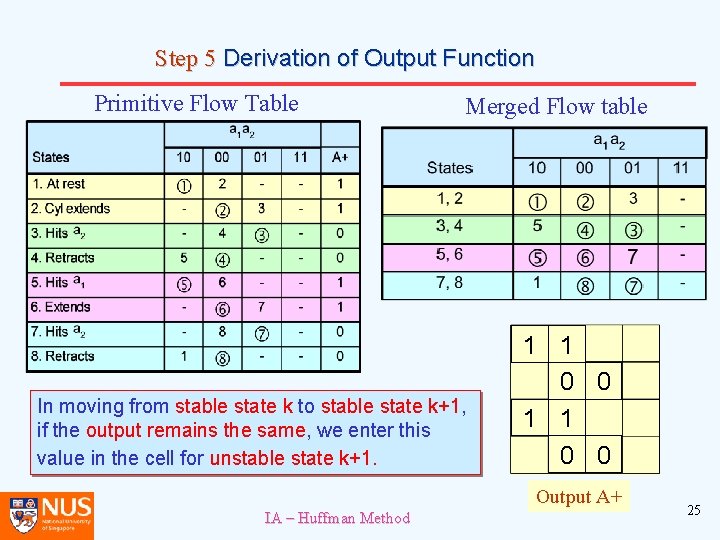
Step 5 Derivation of Output Function Primitive Flow Table Merged Flow table In moving from stable state k to stable state k+1, if the output remains the same, we enter this value in the cell for unstable state k+1. 1 1 0 0 Output A+ IA – Huffman Method 25

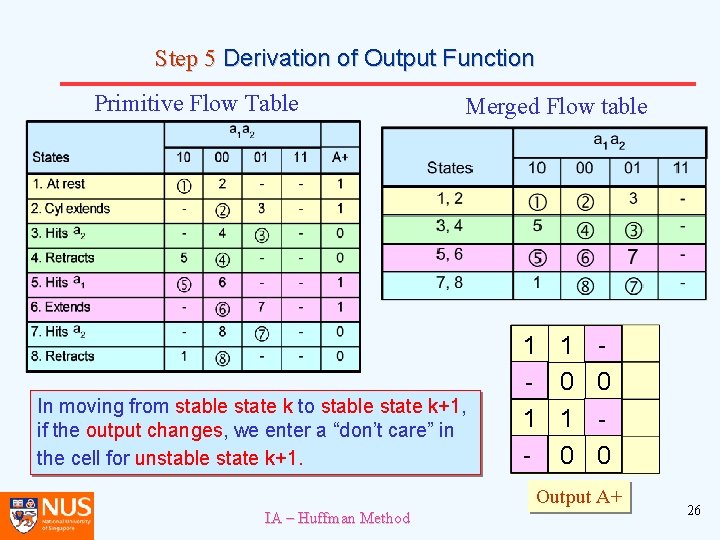
Step 5 Derivation of Output Function Primitive Flow Table Merged Flow table In moving from stable state k to stable state k+1, if the output changes, we enter a “don’t care” in the cell for unstable state k+1. 1 1 - 1 0 0 0 Output A+ IA – Huffman Method 26

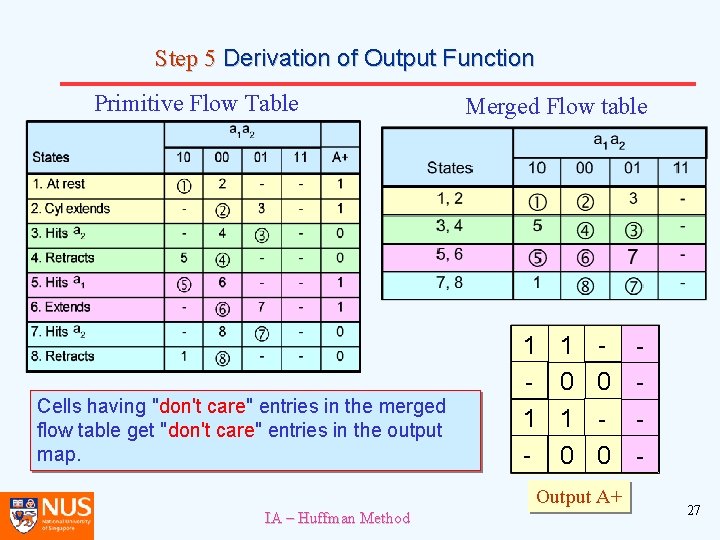
Step 5 Derivation of Output Function Primitive Flow Table Cells having "don't care" entries in the merged flow table get "don't care" entries in the output map. Merged Flow table 1 1 - 1 0 0 0 Output A+ IA – Huffman Method 27

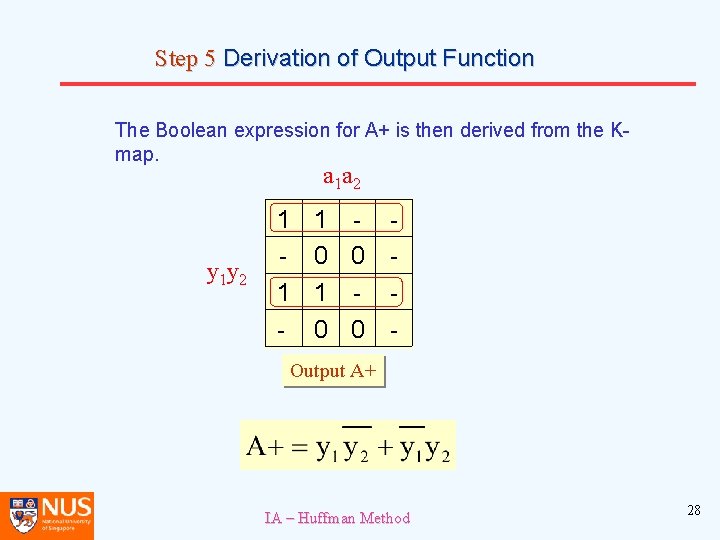
Step 5 Derivation of Output Function The Boolean expression for A+ is then derived from the Kmap. a 1 a 2 y 1 y 2 1 1 - 1 0 0 - Output A+ IA – Huffman Method 28

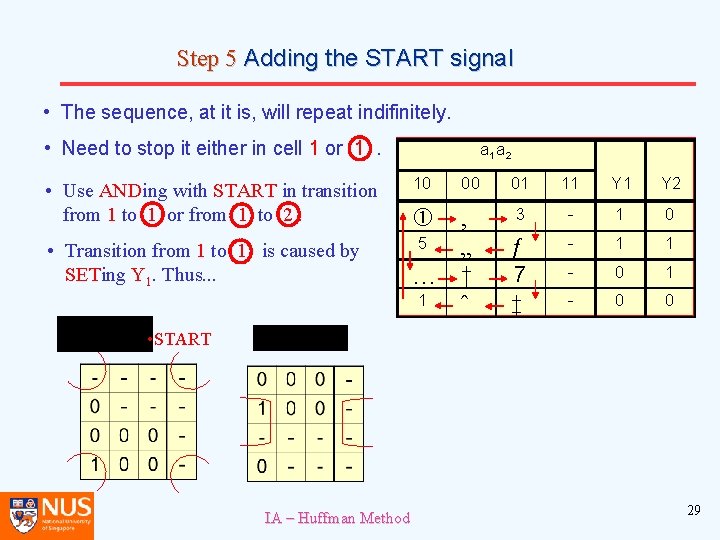
Step 5 Adding the START signal • The sequence, at it is, will repeat indifinitely. • Need to stop it either in cell 1 or 1. • Use ANDing with START in transition from 1 to 1 or from 1 to 2. • Transition from 1 to 1 is caused by SETing Y 1. Thus. . . S 1 • START a 1 a 2 10 00 ‚ 5 „ … † 1 ˆ 01 11 Y 2 3 - 1 0 ƒ - 1 1 7 - 0 1 ‡ - 0 0 R 1 IA – Huffman Method 29

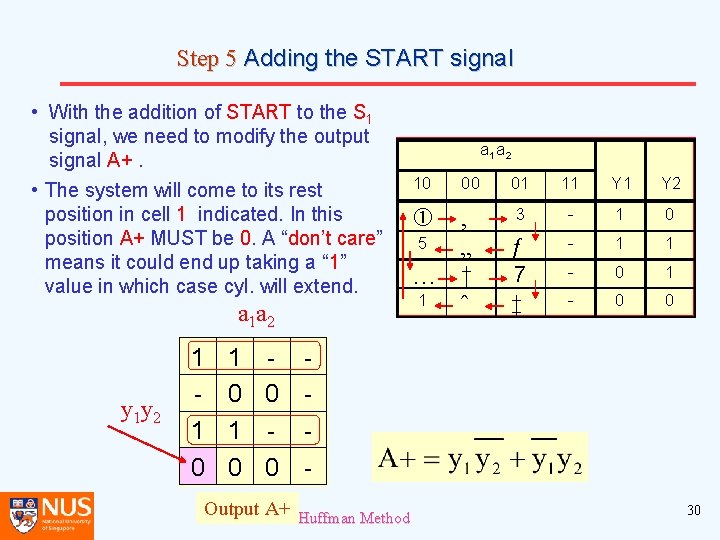
Step 5 Adding the START signal • With the addition of START to the S 1 signal, we need to modify the output signal A+. • The system will come to its rest position in cell 1 indicated. In this position A+ MUST be 0. A “don’t care” means it could end up taking a “ 1” value in which case cyl. will extend. a 1 a 2 y 1 y 2 1 1 0 - 1 0 0 a 1 a 2 10 00 ‚ 5 „ … † 1 ˆ 01 11 Y 2 3 - 1 0 ƒ - 1 1 7 - 0 1 ‡ - 0 0 - Output A+ IA – Huffman Method 30

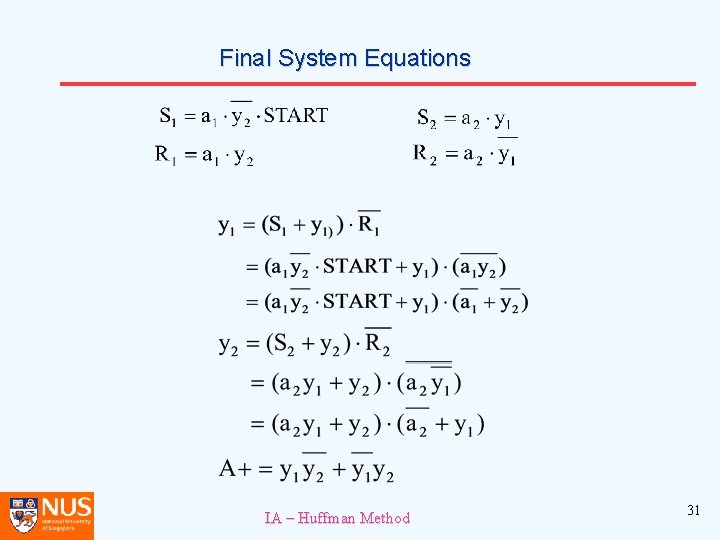
Final System Equations IA – Huffman Method 31

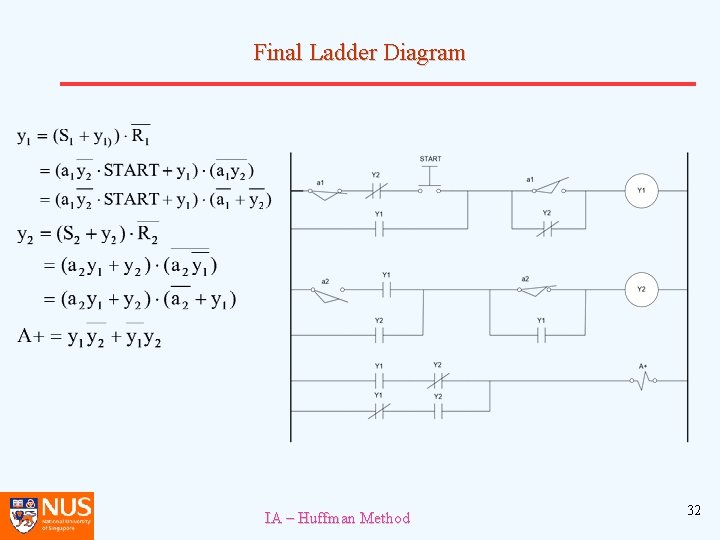
Final Ladder Diagram IA – Huffman Method 32

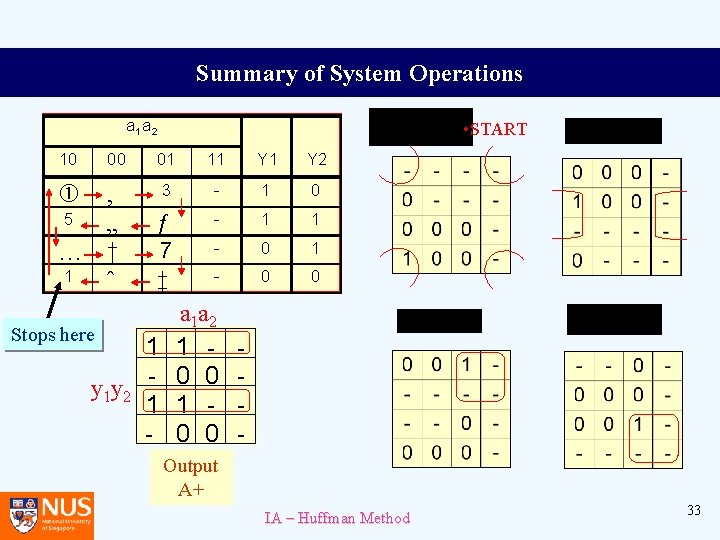
Summary of System Operations a 1 a 2 10 00 • START 01 11 Y 2 3 - 1 0 ƒ - 1 1 7 - 0 1 ‡ - 0 0 ‚ 5 „ … † 1 ˆ Stops here 1 y 1 y 2 1 - a 1 a 2 1 0 0 - Output A+ IA – Huffman Method 33

End of Huffman Method notes IA – Huffman Method 34