INTRO TO PIXLR COM GO TO GOOGLE CLASSROOM


 •")


, click the")


- Slides: 34
INTRO TO PIXLR. COM
GO TO GOOGLE CLASSROOM AND OPEN LINK TO PIXLR
OPENING PIXLR WEB APP Click on the Blue Button that says “Launch Web App” (see photo)
CREATE NEW IMAGE
OPEN AN IMAGE CLICK “OPEN IMAGE FROM COMPUTER”
LIBRARIES - PICTURES • Choose “Libraries” and then select “Pictures” underneath it or in the main area • Double Click on the “Sample Pictures” folder
LIBRARIES - PICTURES • Choose 1 of the pictures and click open (or just double click on the picture).
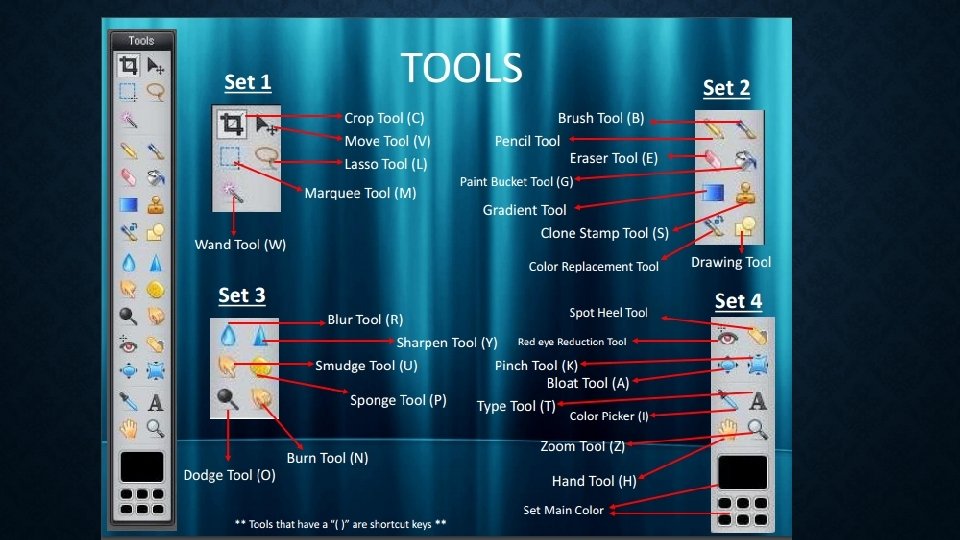
SELECT THE TEXT TOOL • From the tools palette on the left hand side, select the “A” text tool
ADD TEXT • Click on any area of the photo • Type your first and last name in the text box that pops up • Change the Font, Size, and Color (box)
MOVE TEXT • Use the “Move Tool” to change where your text is on the picture • Then click the white button (circled below) to change the “Opacity” & “Mode”
SAVING • When finished with moving and editing your text, click on File • Then click “Save”
NAME THE FILE • When you click “Save” a box will pop up • Under “Name: ” change it to your first and last name, class period, and type Pixlr Text after that • Then click the • blue “OK” button
SAVE THE FILE • When the “Save As” box pops up, pull the scroll bar down until you see your P Drive ***If your P Drive isn’t there, just save to the desktop***
SAVE IT TO GOOGLE DRIVE! To get a grade, your photo MUST be saved to your Google Drive!
SAVING TO GOOGLE DRIVE • Click the empty tab at the top of your screen to open a new tab • Type “drive. google. com” in the address bar
SAVING TO GOOGLE DRIVE • You should see a gray button or file folder that says “Classroom”, and click it then click it again when it says our class name (“Graphics…”) • CLICK THAT BUTTON! I don’t have a screenshot of it because my Google Drive is different than yours. • After you open that, you should be able to click the “NEW” button in blue
SAVING TO GOOGLE DRIVE • Then click “File Upload” from the menu options and choose the file we just saved!
TURNING IN THE ASSIGNMENT • Go to our Google Classroom STREAM and click “Pixlr Text Assignment”
TURNING IN THE ASSIGNMENT • Click on the button that says “ADD” and choose Google Drive • Choose the file you just saved and add it • Then click TURN IN
OPEN PIXLR. COM
CREATE NEW IMAGE
SPECIFICATIONS • Name it your first and last name • Make it 800 width and 800 height • Check Box for Transparent • Click OK button
FILLING A LAYER WITH 1 COLOR • Select the Paint Bucket (“Fill” tool) • Click on the color box at the bottom of tools palette
FILLING A LAYER WITH 1 COLOR • When this box pops up, move the two circles around to pick a color and shade. • Click OK button when done
FILLING A LAYER WITH 1 COLOR Put the paint bucket ANYWHERE in your checkerboard (transparent) canvas. Click to fill with the paint color you chose.
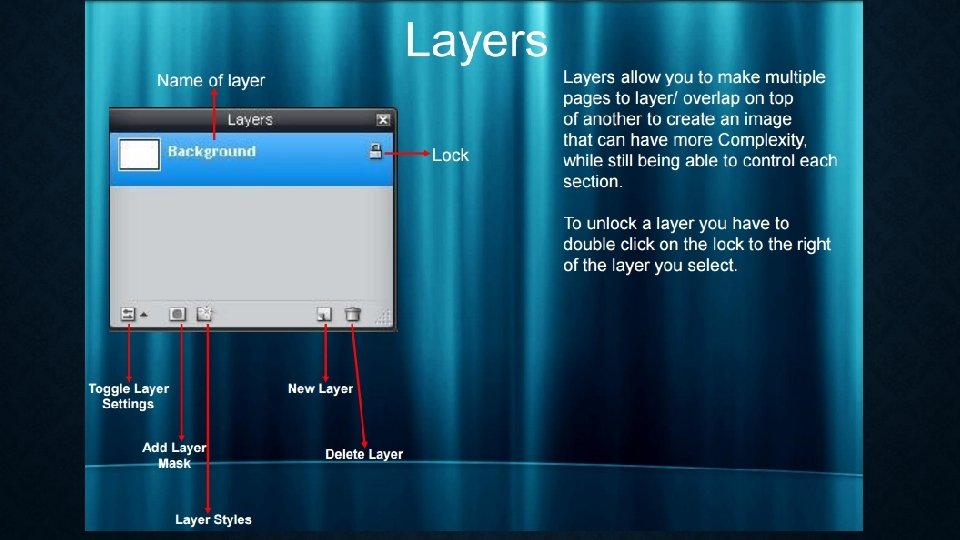
ADDING A NEW BLANK LAYER In the “Layers” palette (on the right), click the icon that looks like a sheet of paper w/folded corner to add a new blank layer. It will appear above Layer 0 as Layer 1.
FILLING A LAYER WITH A GRADIENT 1. Click the Gradient tool (looks like a blue rainbow box) in the Tools palette 2. Then click the Gradient box at the top of the screen
FILLING A LAYER WITH A GRADIENT Now, you have 3 choices to make: 1. Choose a gradient box 2. Choose either “Linear” OR Radial 3. Then choose between “Pad”, “Reflect”, or “Repeat”
FILLING A LAYER WITH A GRADIENT Put your mouse over your canvas until the “Cross Hairs” are where you want the center of your Gradient to start Drag the mouse and you will see a line. Let go to see the effects of your gradient. NOTE: If you don’t like how the gradient looks, hit “Ctrl Z” to undo the effect OR make a new blank layer and repeat the steps.
ADD TEXT Use the “Text Tool” to add your first and last name in whatever color and style that you want. ONLY REQUIREMENT: I must be able to read it easily. ***If you don’t know how to add text, then scroll thru the previous slides (11 -13) for those instructions. ***
SAVE & TURN IN • Save this file (Filename must have your name, class period, Pixlr Text 2) to your P-Drive and then Save it to your Google Drive. THAT MEANS YOU’RE SAVING IT TWICE • Then, turn it in to our Google Classroom Stream to the assignment called “Pixlr Text Assignment #2” ***If you don’t know how to SAVE or TURN IN, then scroll thru the previous slides (17 -22) for those instructions. ***