Instructors Guide to Teaching Solid Works Software Lesson
- Slides: 38

Instructor’s Guide to Teaching Solid. Works Software Lesson 8 Troy Jr. /Sr. High School Mc. Fall – Physics 3 rd November 23, 2011 Image courtesy of National Optical Astronomy Observatory, operated by the Association of Universities for Research in Astronomy, under cooperative agreement with the National Science Foundation.

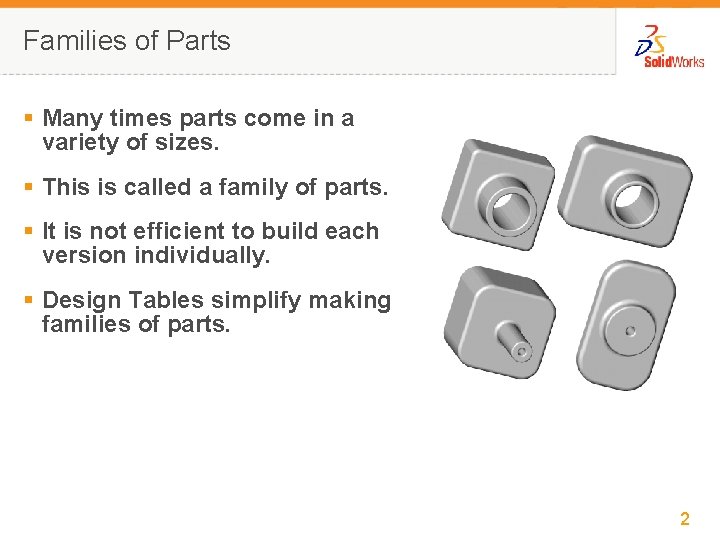
Families of Parts § Many times parts come in a variety of sizes. § This is called a family of parts. § It is not efficient to build each version individually. § Design Tables simplify making families of parts. 2

Design Table Overview § Design Tables are used to create different configurations of a part. § What is a Configuration? – A configuration is a way to create a family of similar parts within one file. – Each configuration represents one version of the part. § Design Tables automatically change the dimensions and features of an existing part to create multiple configurations. The configurations control the size and shape of a part. 3

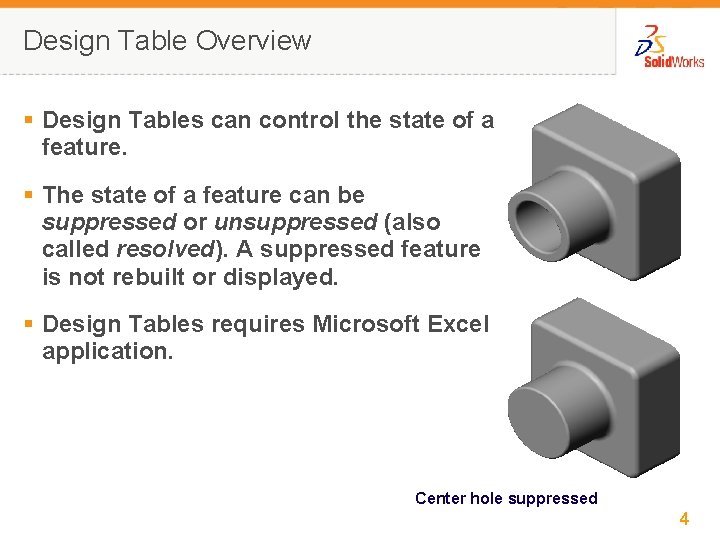
Design Table Overview § Design Tables can control the state of a feature. § The state of a feature can be suppressed or unsuppressed (also called resolved). A suppressed feature is not rebuilt or displayed. § Design Tables requires Microsoft Excel application. Center hole suppressed 4

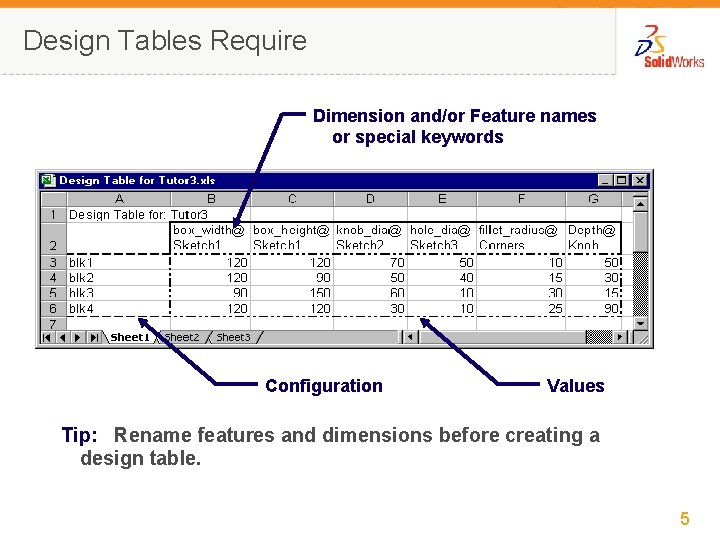
Design Tables Require Dimension and/or Feature names or special keywords Configuration Values Tip: Rename features and dimensions before creating a design table. 5

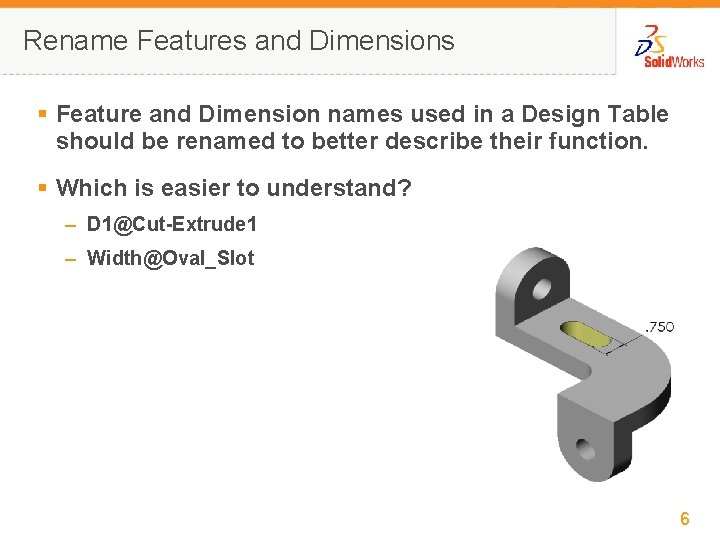
Rename Features and Dimensions § Feature and Dimension names used in a Design Table should be renamed to better describe their function. § Which is easier to understand? – D 1@Cut-Extrude 1 – Width@Oval_Slot 6

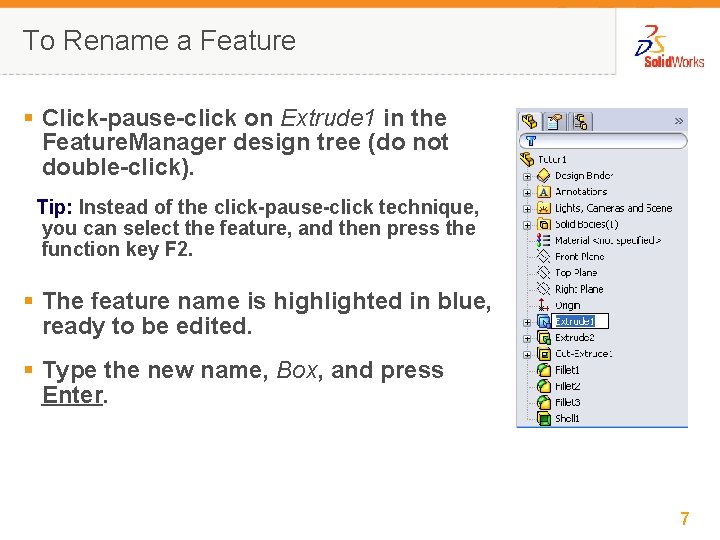
To Rename a Feature § Click-pause-click on Extrude 1 in the Feature. Manager design tree (do not double-click). Tip: Instead of the click-pause-click technique, you can select the feature, and then press the function key F 2. § The feature name is highlighted in blue, ready to be edited. § Type the new name, Box, and press Enter. 7

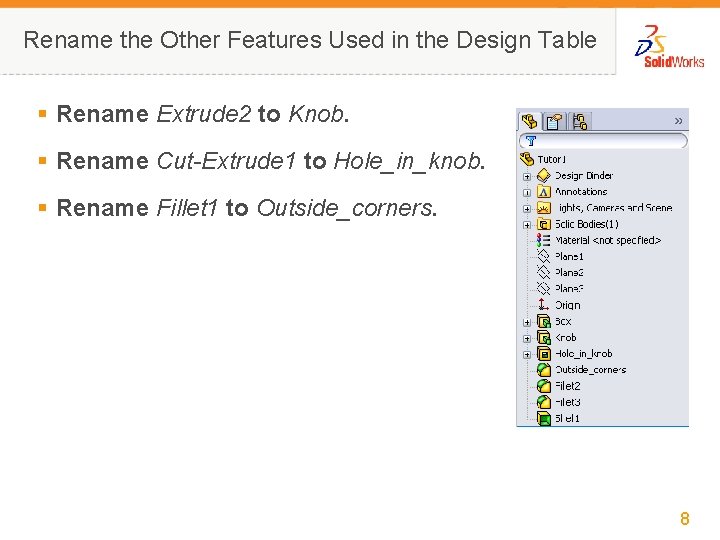
Rename the Other Features Used in the Design Table § Rename Extrude 2 to Knob. § Rename Cut-Extrude 1 to Hole_in_knob. § Rename Fillet 1 to Outside_corners. 8

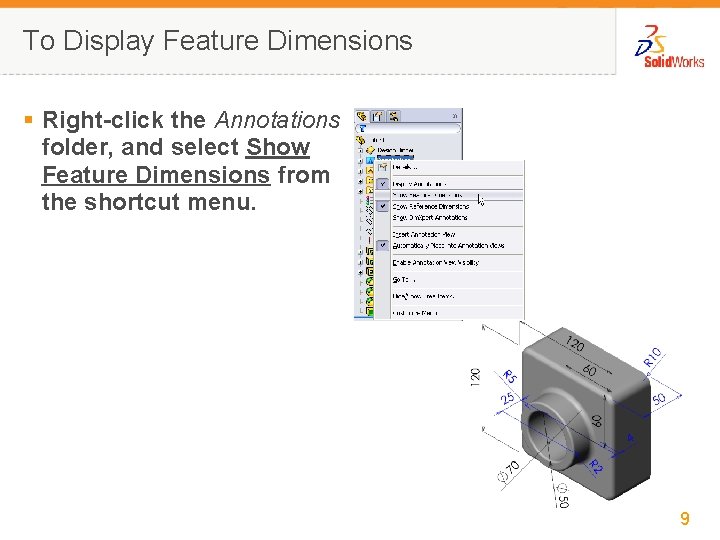
To Display Feature Dimensions § Right-click the Annotations folder, and select Show Feature Dimensions from the shortcut menu. 9

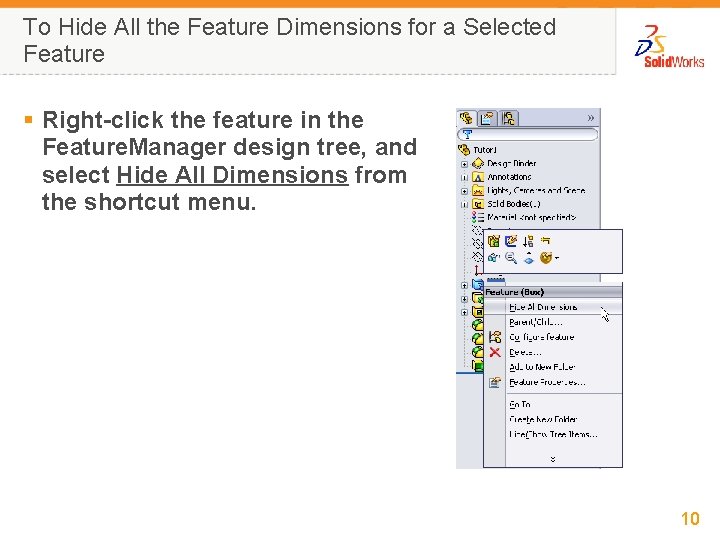
To Hide All the Feature Dimensions for a Selected Feature § Right-click the feature in the Feature. Manager design tree, and select Hide All Dimensions from the shortcut menu. 10

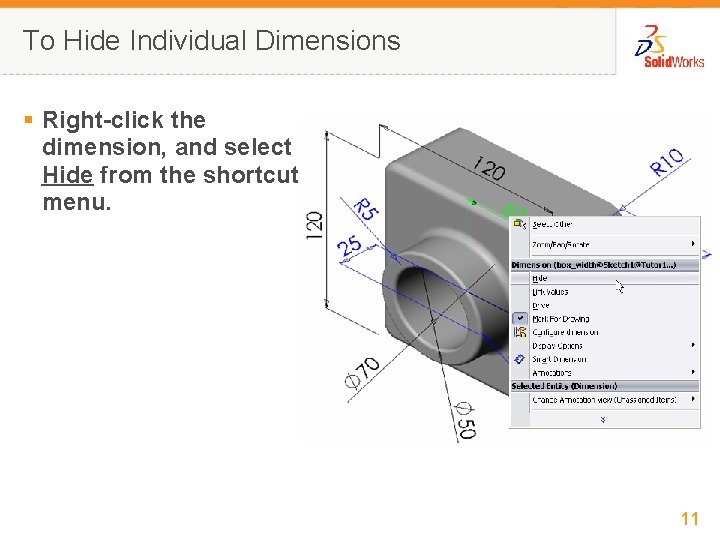
To Hide Individual Dimensions § Right-click the dimension, and select Hide from the shortcut menu. 11

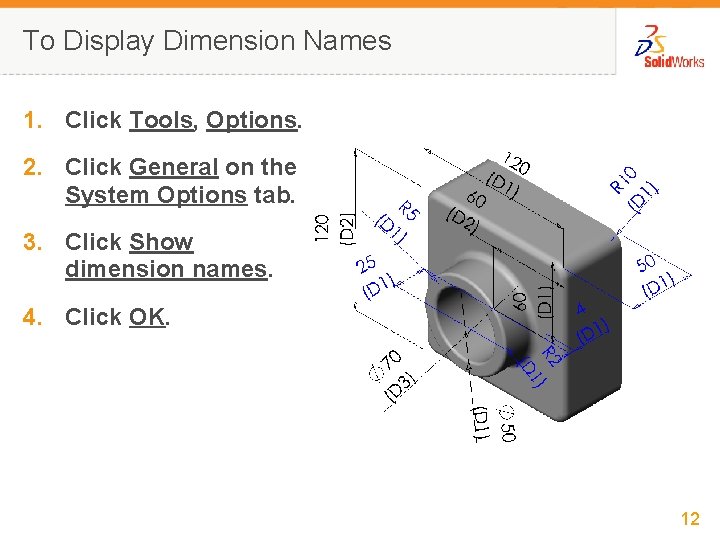
To Display Dimension Names 1. Click Tools, Options. 2. Click General on the System Options tab. 3. Click Show dimension names. 4. Click OK. 12

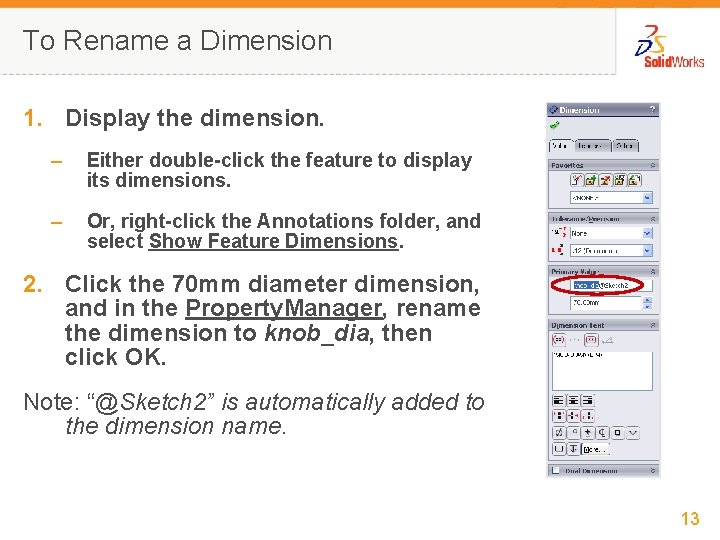
To Rename a Dimension 1. Display the dimension. – Either double-click the feature to display its dimensions. – Or, right-click the Annotations folder, and select Show Feature Dimensions. 2. Click the 70 mm diameter dimension, and in the Property. Manager, rename the dimension to knob_dia, then click OK. Note: “@Sketch 2” is automatically added to the dimension name. 13

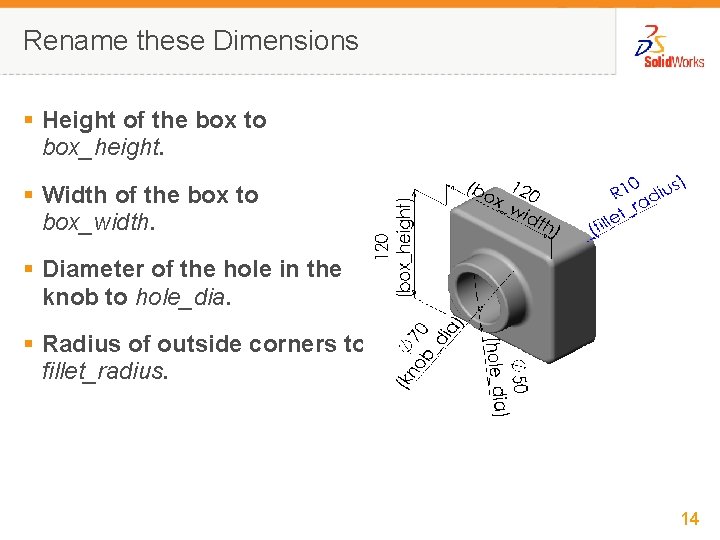
Rename these Dimensions § Height of the box to box_height. § Width of the box to box_width. § Diameter of the hole in the knob to hole_dia. § Radius of outside corners to fillet_radius. 14

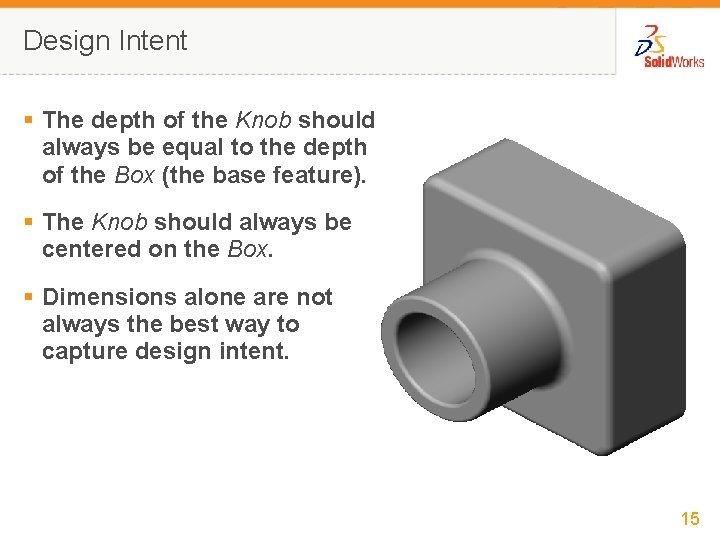
Design Intent § The depth of the Knob should always be equal to the depth of the Box (the base feature). § The Knob should always be centered on the Box. § Dimensions alone are not always the best way to capture design intent. 15

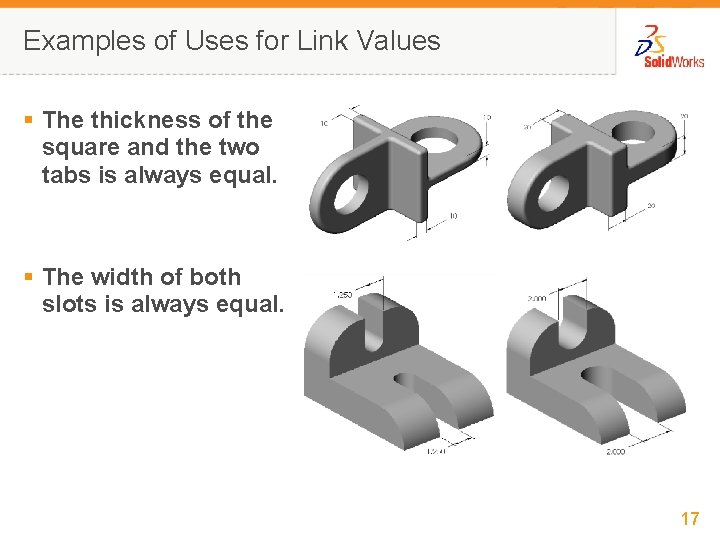
Linking Values § The Link Values command relates dimensions to each other through shared variable names. § If the value of one linked dimension is modified, then all of the linked dimensions are modified. § Link Values is excellent for making feature dimensions equal to each other. § This is an important tool for capturing design intent. 16

Examples of Uses for Link Values § The thickness of the square and the two tabs is always equal. § The width of both slots is always equal. 17

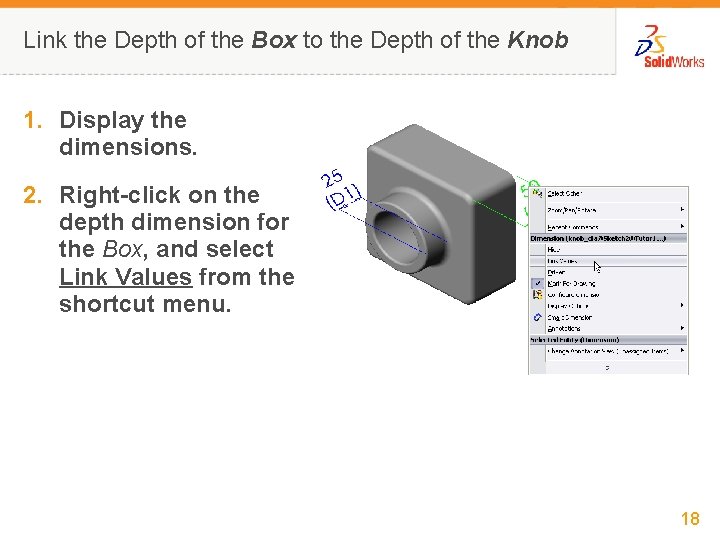
Link the Depth of the Box to the Depth of the Knob 1. Display the dimensions. 2. Right-click on the depth dimension for the Box, and select Link Values from the shortcut menu. 18

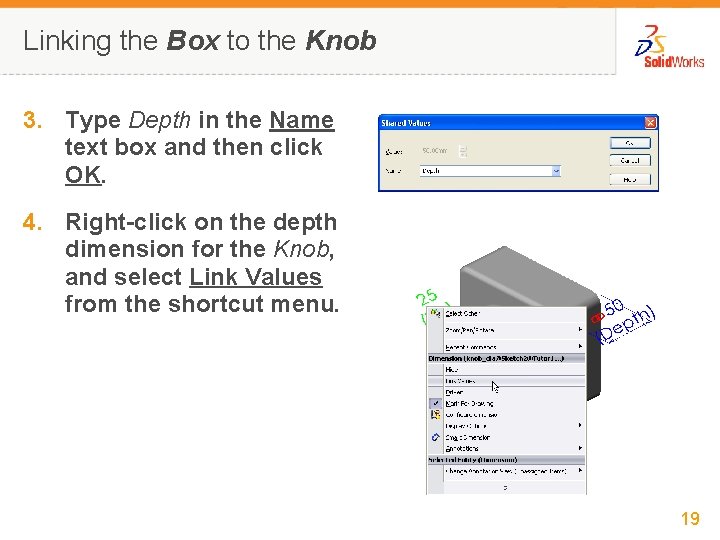
Linking the Box to the Knob 3. Type Depth in the Name text box and then click OK. 4. Right-click on the depth dimension for the Knob, and select Link Values from the shortcut menu. 19

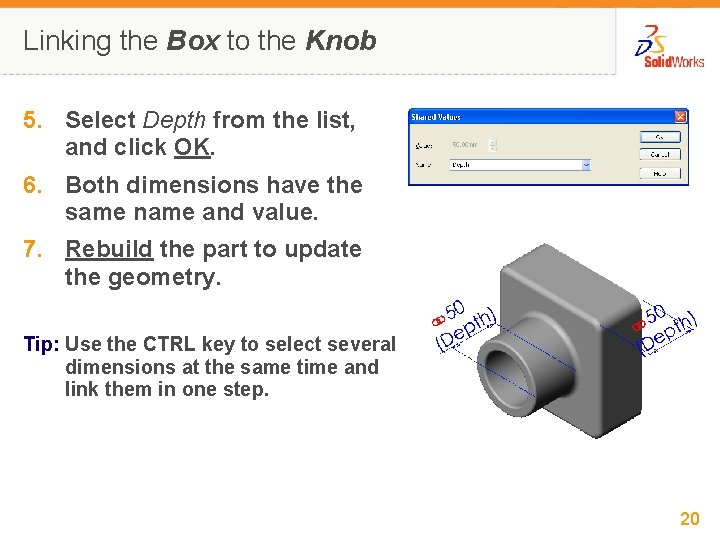
Linking the Box to the Knob 5. Select Depth from the list, and click OK. 6. Both dimensions have the same name and value. 7. Rebuild the part to update the geometry. Tip: Use the CTRL key to select several dimensions at the same time and link them in one step. 20

Geometric Relations § Relate geometry through physical relationships such as: – Concentric – Coradial – Midpoint – Equal – Collinear – Coincident 21

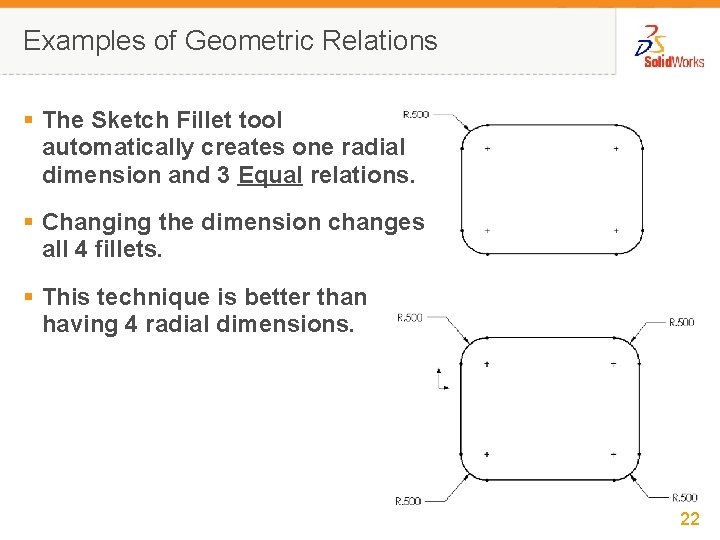
Examples of Geometric Relations § The Sketch Fillet tool automatically creates one radial dimension and 3 Equal relations. § Changing the dimension changes all 4 fillets. § This technique is better than having 4 radial dimensions. 22

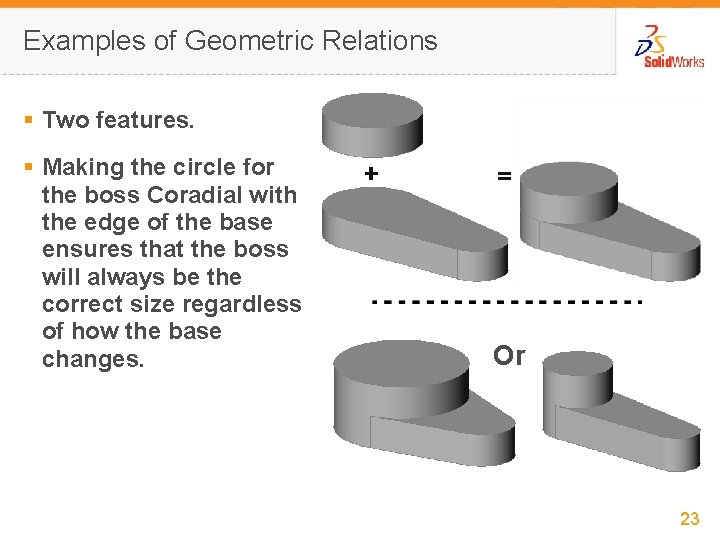
Examples of Geometric Relations § Two features. § Making the circle for the boss Coradial with the edge of the base ensures that the boss will always be the correct size regardless of how the base changes. Or 23

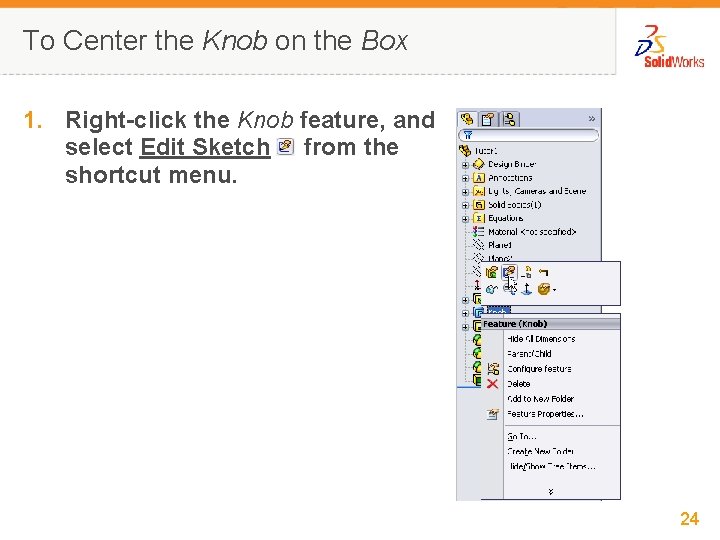
To Center the Knob on the Box 1. Right-click the Knob feature, and select Edit Sketch from the shortcut menu. 24

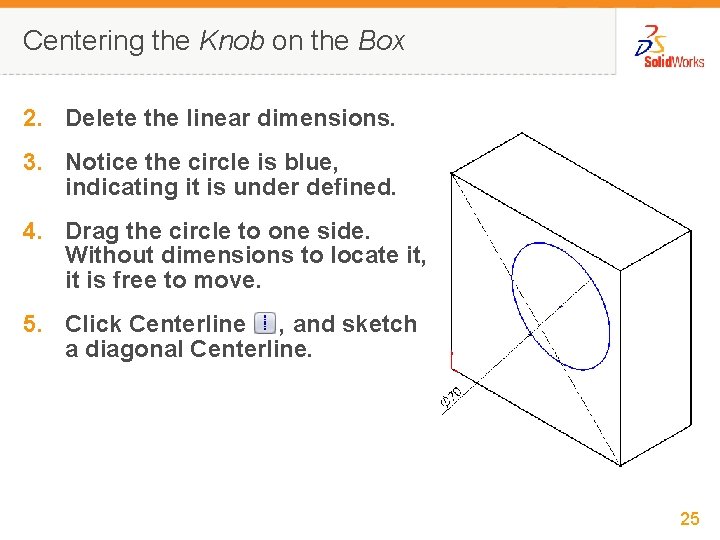
Centering the Knob on the Box 2. Delete the linear dimensions. 3. Notice the circle is blue, indicating it is under defined. 4. Drag the circle to one side. Without dimensions to locate it, it is free to move. 5. Click Centerline , and sketch a diagonal Centerline. 25

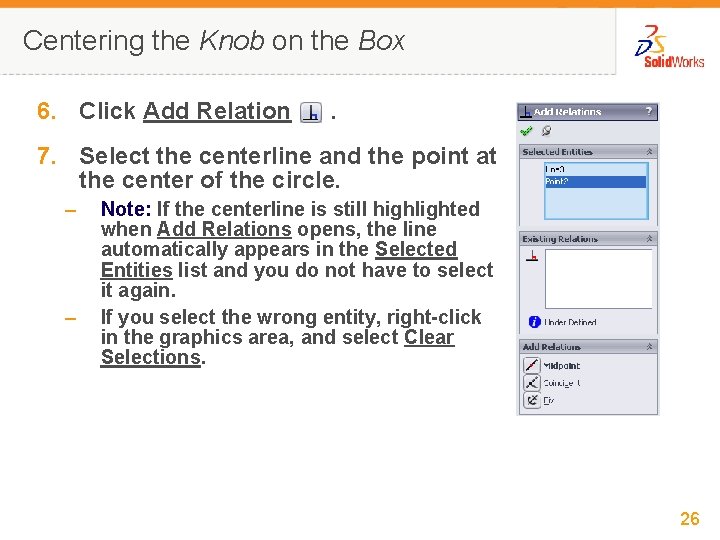
Centering the Knob on the Box 6. Click Add Relation . 7. Select the centerline and the point at the center of the circle. – – Note: If the centerline is still highlighted when Add Relations opens, the line automatically appears in the Selected Entities list and you do not have to select it again. If you select the wrong entity, right-click in the graphics area, and select Clear Selections. 26

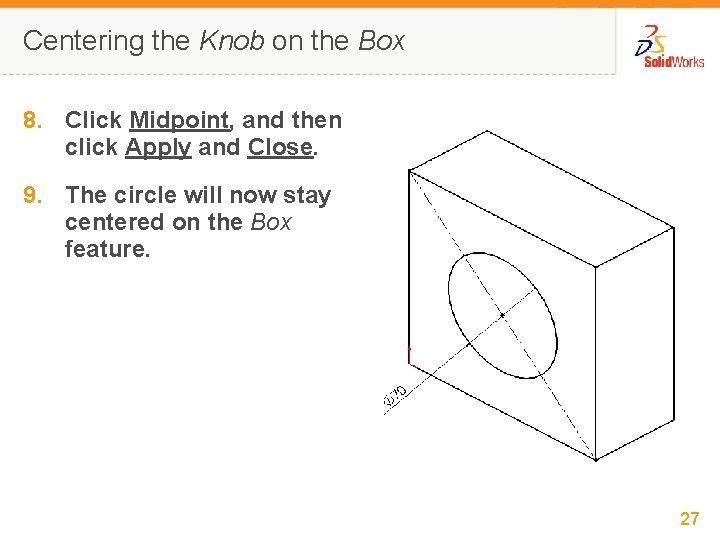
Centering the Knob on the Box 8. Click Midpoint, and then click Apply and Close. 9. The circle will now stay centered on the Box feature. 27

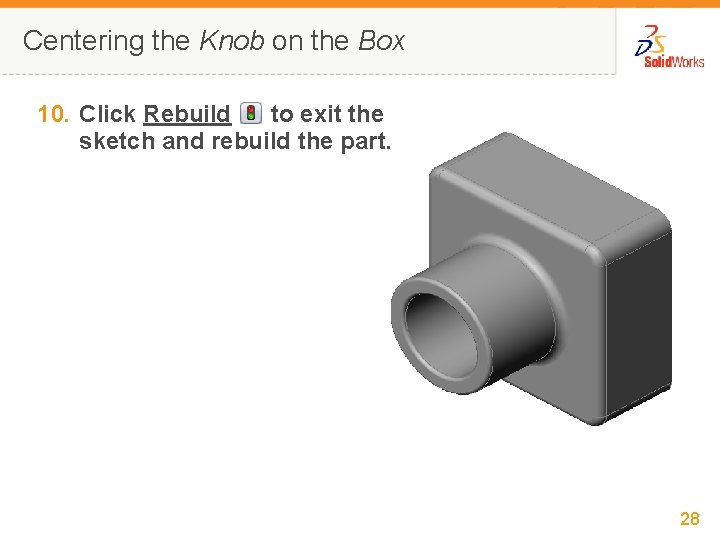
Centering the Knob on the Box 10. Click Rebuild to exit the sketch and rebuild the part. 28

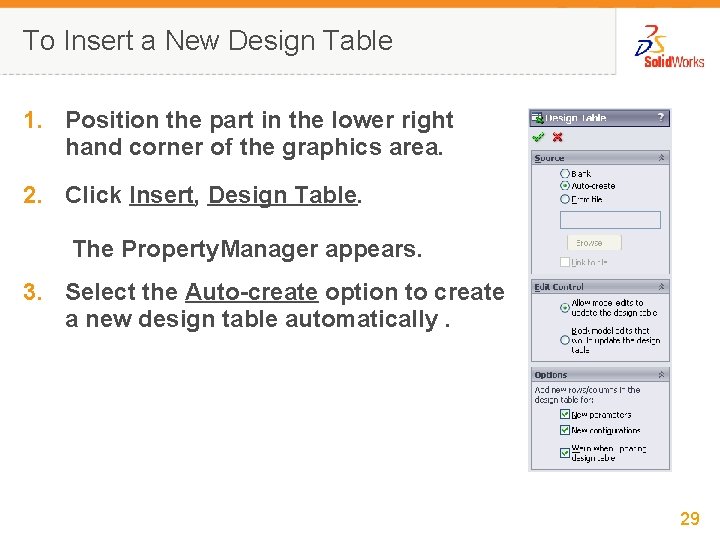
To Insert a New Design Table 1. Position the part in the lower right hand corner of the graphics area. 2. Click Insert, Design Table. The Property. Manager appears. 3. Select the Auto-create option to create a new design table automatically. 29

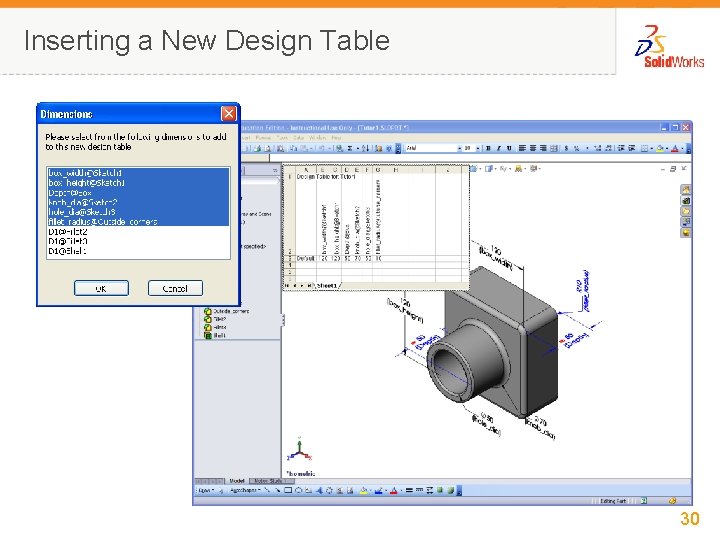
Inserting a New Design Table 30

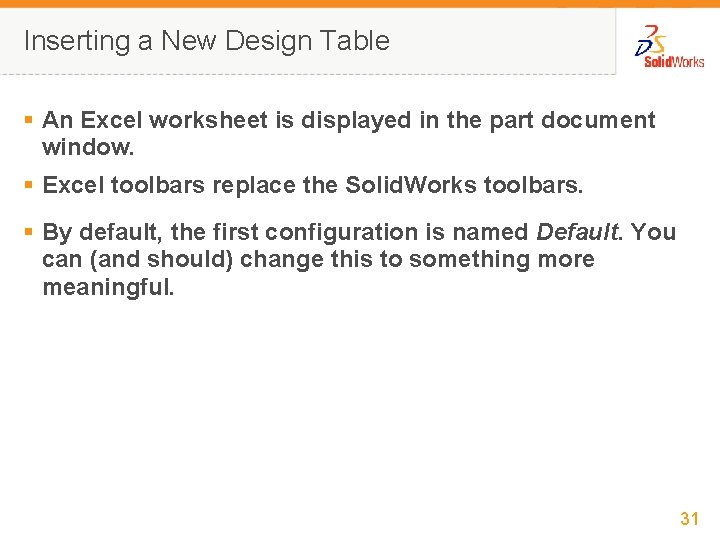
Inserting a New Design Table § An Excel worksheet is displayed in the part document window. § Excel toolbars replace the Solid. Works toolbars. § By default, the first configuration is named Default. You can (and should) change this to something more meaningful. 31

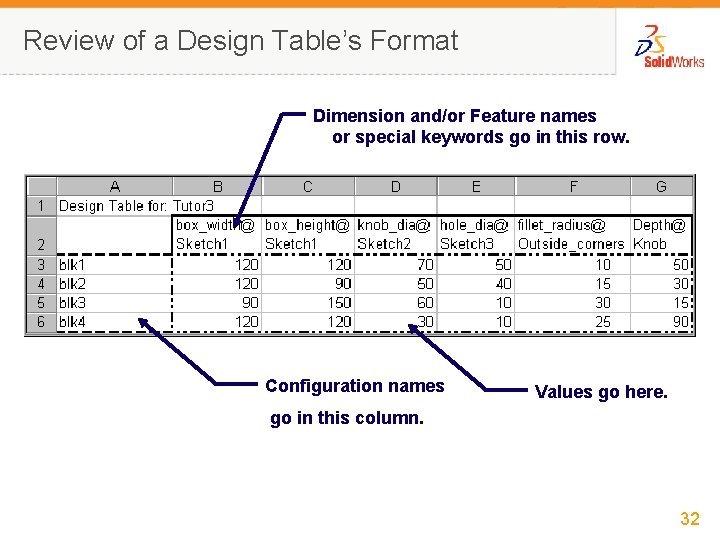
Review of a Design Table’s Format Dimension and/or Feature names or special keywords go in this row. Configuration names Values go here. go in this column. 32

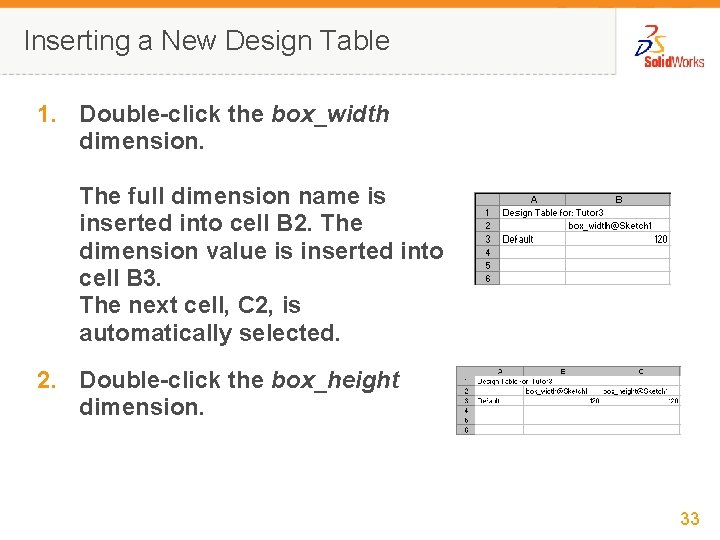
Inserting a New Design Table 1. Double-click the box_width dimension. The full dimension name is inserted into cell B 2. The dimension value is inserted into cell B 3. The next cell, C 2, is automatically selected. 2. Double-click the box_height dimension. 33

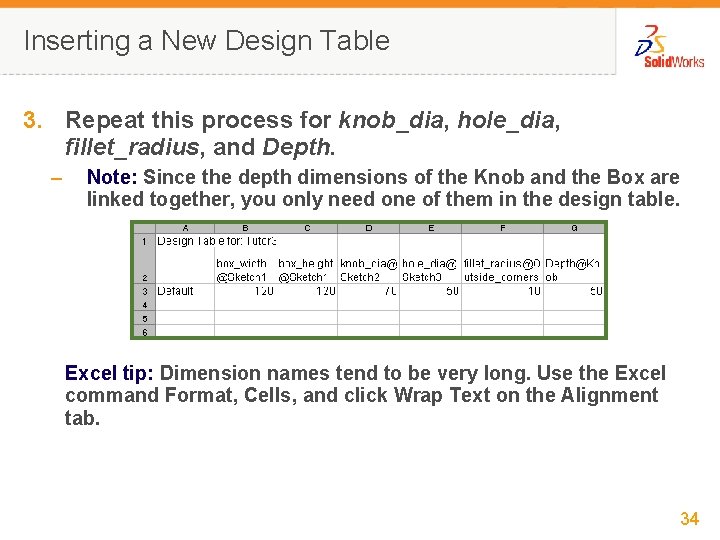
Inserting a New Design Table 3. Repeat this process for knob_dia, hole_dia, fillet_radius, and Depth. – Note: Since the depth dimensions of the Knob and the Box are linked together, you only need one of them in the design table. Excel tip: Dimension names tend to be very long. Use the Excel command Format, Cells, and click Wrap Text on the Alignment tab. 34

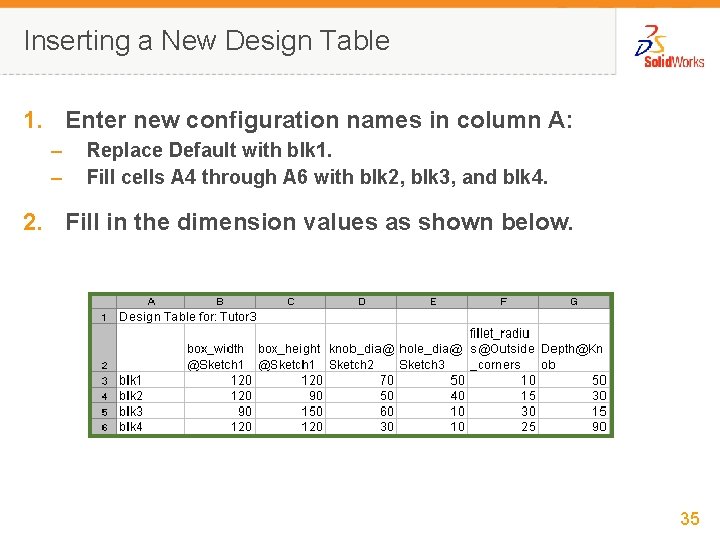
Inserting a New Design Table 1. Enter new configuration names in column A: – – Replace Default with blk 1. Fill cells A 4 through A 6 with blk 2, blk 3, and blk 4. 2. Fill in the dimension values as shown below. 35

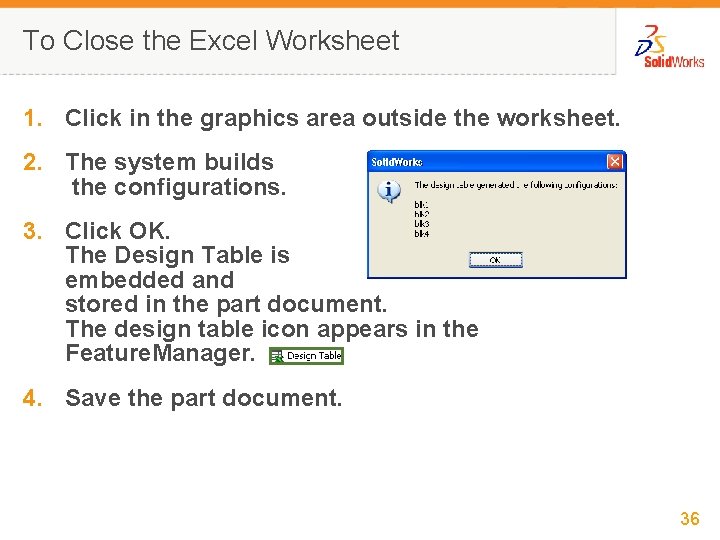
To Close the Excel Worksheet 1. Click in the graphics area outside the worksheet. 2. The system builds the configurations. 3. Click OK. The Design Table is embedded and stored in the part document. The design table icon appears in the Feature. Manager. 4. Save the part document. 36

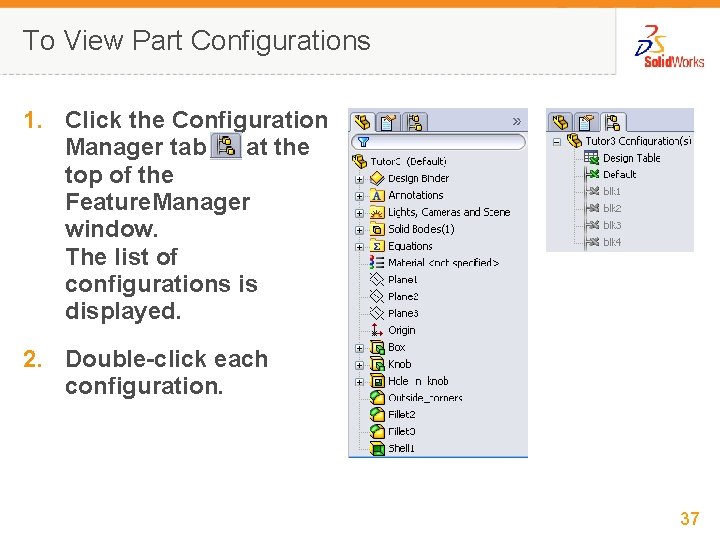
To View Part Configurations 1. Click the Configuration Manager tab at the top of the Feature. Manager window. The list of configurations is displayed. 2. Double-click each configuration. 37

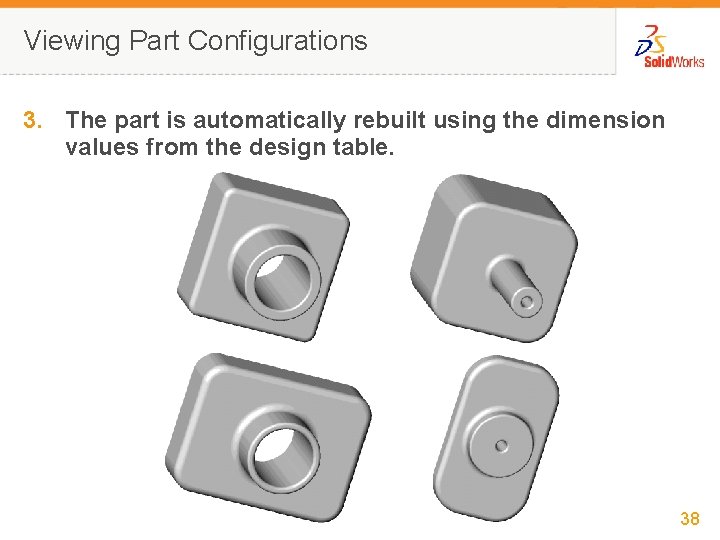
Viewing Part Configurations 3. The part is automatically rebuilt using the dimension values from the design table. 38