Install Scratch Go to http scratch mit eduscratch1


 draw a")


 and move about. Place a dot")

 and move about. Place a dot")


- Slides: 49
Install Scratch Go to => http: //scratch. mit. edu/scratch_1. 4/
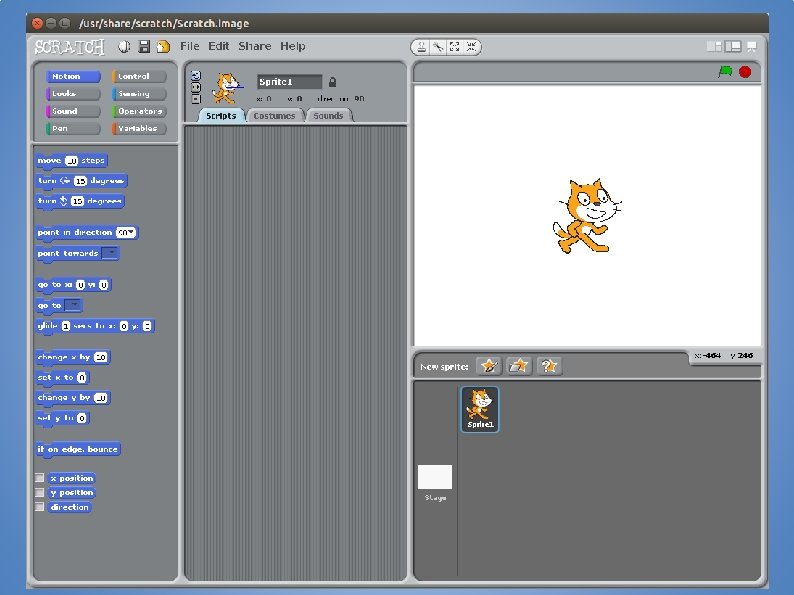
Today we do not need our friendly scratch cat so right click on it and select delete. If you have a mac press CTRL and click.
Instead of the cat lets draw a new sprite. A sprite is a picture that will be used in todays program. Click on the ‘new sprite button’ with the paintbrush on it.
Place a single dot in the middle of the screen and click OK. If it goes wrong you can always click cancel and do it again.
Now we will create some variables. Think of a variable as a box you can put things like numbers into. If we create a variable called ‘lives’ then we could put the number 3 into it so we can check on it later.
Click on the variable button in the top left of your screen. If you have a later version of Scratch - this might be called ‘data’. Click on the ‘make a variable button’
Lets call this one ‘play’ Click on OK
Click on the ‘make a variable’ button again and create another one called ‘x’ and one more time to make one called ‘y’ Remove the ticks from next to them so they are not on the main screen area
Now we need some code to make something happen. You can start with the ‘set y to 0’ as that should be on the screen already. Pick it up and drop it in the middle area. It may say one of the other names like ‘play’ the little black arrow lets you change it. You will find the ‘when flag clicked’ under control and the ‘clear’ under pen.
Next we need a loop. A loop will repeat the commands inside it over and over again. This could be Repeat ‘play’ until tired or Repeat ‘eat’ until you are not hungry. Find this loop that says ‘repeat until’ under the control section and drag it into the middle.
Lets get some drawing done. You will find the ‘pen’ command under pen, The blue commands are under motion and the dark orange one is under variables. Where you see white boxes you need to change the values by clicking in the box and typing them. See the orange ‘Y’ on the second line. That is also in variables so just pick it up and drop it in place.
Under the command section you will find these. This one (with the arrow pointing to the right) means greater than. Drop another ‘y’ into the left side and type the number 80 into the right. It now says ‘if Y is GREATER THAN 80’
Lets stick it all together. Pick up the big block by dragging the top command ‘pen up’ and drop it inside the loop. Dont worry it will expand to be big enough to fit.
Now attach the loop onto the bottom of the green flag part and put the ‘y > 80’ part in the hole next to repeat until.
It is a good idea to save now and then so you can always go back if it gets messed up or even goes wrong and crashes. Click ‘save’ icon and type in a name. Lets call this one tunes
Lets try it. Press the green flag at the top right. What happens ? ?
We need another sprite now. Click on the new sprite button with the brush again.
Using the line tool (see where I am pointing on the left) draw a line from the middle of the top down to the middle of the bottom. Make sure it is straight. If it goes wrong just hit cancel.
After you have pressed ‘OK’ place the line over the other lines - like this :
Make sure the line is still selected down at the bottom right and add some code to tell the line what to do. The orange bits are in control and the blue bits are under motion. You will need to type in the numbers ‘ 10’ and ‘minus 10’
What do your left and right keys do now ? Why ? What do the up and down keys do ? Why ?
Time for another sprite :
Make this one a bit bigger than the last dot. Maybe three dot by 3 dots make it quite close to the centre of the screen.
And lets give this new sprite some code to move about too. The ‘change y’ commands are in the variables section.
Most of these are in control. The green ones are in operations.
We need some variables on the left to check and you type in the numbers on the right.
There a few more bits to add - take your time… Orange bits are in variables. Blue in motion and Purple in pen.
Now add a new bit of code. It goes into the same middle section. When you get the ‘set pen colour’ command use the one that says ‘ 0’ not the one with a colour blob. Remember to put in the values and make sure you get the Blue bits in the right order ‘y x y’
Click on the line in the bottom right corner. We need some code for the line now :
More code… again drag the bits into the middle and put them together. If you need more room you can move up or down using the arrow on the right hand side of the middle area.
More code ? Will this ever end ?
Break time… take 5 minutes. Rest your eyes, legs, fingers and all that. Have a drink and a snack - keep up the energy levels That was a lot of coding work…. we are almost there now
You should still be in the line. Make up this bit of code. Dont worry about the colours for the moment. Just get the numbers right. We need 9 of these so right click (if you have a mac CTRL + click) and select duplicate. Repeat until you have 9 blocks just like this one.
Run the program (by clicking the green flag) and move about. Place a dot on the lowest line by pressing the space bar. Now move up and over a bit and place another dot in the space between the lines and now on the next line. . . and all the way like this to the top
If your big dot will not move up and down add in this one statement to the Big dot sprite code. Then switch back to the line code again. That should fix it.
Run the program (by clicking the green flag) and move about. Place a dot on the lowest line by pressing the space bar. Now move up and over a bit and place another dot in the space between the lines and now on the next line. . . and all the way like this to the top
On the top block that you made a minute ago, click on the colour on the right and now click on the dot that you just put on the bottom bar If it goes ‘white’ you missed : ) Try it again until it goes red. Repeat this for all of them :
Now we need to change the note number. The top one is 52 then 53, then 55, then 57, then 59, then 60, then 62, then 64 and finally 65.
Put all these blocks together and put them inside the bit of code you have already with the green flag. Put them under the ‘set x’ bit
Phew - that was hard work. But guess what…. . its testing time. Press the green flag to start (or clear the screen). Arrow keys move round. P key plays what you have put down and S key stops
What have we used today ? Loops Variables ‘If’
Thats it - you have just coded your first application. A music maker ! Does that make you a Coder. Dojo Ninja ?
No.
A Coder. Dojo Ninja is someone who takes it further and makes it into their own unique application. Some ideas : * What about different noises ? Look for ‘change Instrument’ * What about drums ? * Better graphics ? * Write me some music - I want to hear it ! * and most important… add your own ideas. . .
Did you miss any steps ? This presentation is available on our website : www. donabate. Dojo. com Click on ‘lessons’
A big thank you to The Donabate Dojo Mentor team. The Community Centre for the room and setting it up. The mums and dads and adults for transport and help and most of all - Thank you to our new Ninjas (thats you) Comments, suggestions, donations, questions to : email : team@donabate. Dojo. com Facebook : www. facebook. com/Donabate. Dojo Twitter : @Donabate. Dojo Website : www. donabate. Dojo. com