Innovative Materials Testing Technologies Inc Crack Detection In
- Slides: 25

Innovative Materials Testing Technologies, Inc. Crack Detection In Aircraft Fastener Holes Using FG RFEC Technique And SSEC System Y. Sun, T. Ouyang, J. Xu and J. Long Innovative Materials Testing Technologies, Inc. 2501 N. Loop Drive, Ames, IA 50010, USA. Tel. 515296 5328, Fax. 515 296 9910 email. suny@imtt-usa. com.

Innovative Materials Testing Technologies, Inc. Contents 1. Aging of aircraft & Aircraft NDI 2. Requirements to Aircraft NDI Techniques 3. Existing & Emerging Aircraft NDI Techniques 4. FG RFEC & SSEC Technique 5. Detecting Cross-Bolt Hole Crack Through Bushing 6. Fastener Hole Crack Detection: Raster Scan versus Rotational Scan 7. Detecting Cracks in Raised-Head Fastener holes 8. Detecting Cracks in Flush-Head Fastener 9. Summary

Innovative Materials Testing Technologies, Inc. Aging of Aircraft & Aircraft NDI 1. Impact from Aging of In-Service Airplanes 2. Cracking – A Critical Issue Affecting Aircraft Life 3. Current Status of Aircraft Crack Detection • Period of Maintenance • Disassembly and Removal of Component • Cost Breakdown 4. Demand for Advanced NDI Techniques

Innovative Materials Testing Technologies, Inc. Requirements to Future Aircraft NDI Technique 1. Multi-layered structures: up to 5 layers. 2. Deep penetration: total thickness can be up to 5 -10 cm. 3. Materials: Al, Ti, Composite, etc. and Combinations. 4. Sensitivity to small-sized inner layer cracks. 5. Fasteners of different materials. 6. Reliability of detection without human factors involved. 7. High-speed and large-area inspection. 8. Discriminate noises, such as edge effect, Tapered thickness, etc. 9. Low cost. 10. Portability and convenience in use.

Innovative Materials Testing Technologies, Inc. Existing & Emerging Aircraft NDI Techniques do not meet the above requirements: 1. UT and Guide Wave UT do not penetrate through airgap between layers. 2. X-Ray – heavy equipment and high cost. 3. Most ECTs and alternatives, limited by Skin-Depth effect, have little potential in increase of penetration depth. 4. SQUID is an exception, but with heavy and large equipment and high cost, too. FG RFEC technique can be a good candidate of future Aircraft NDI Techniques

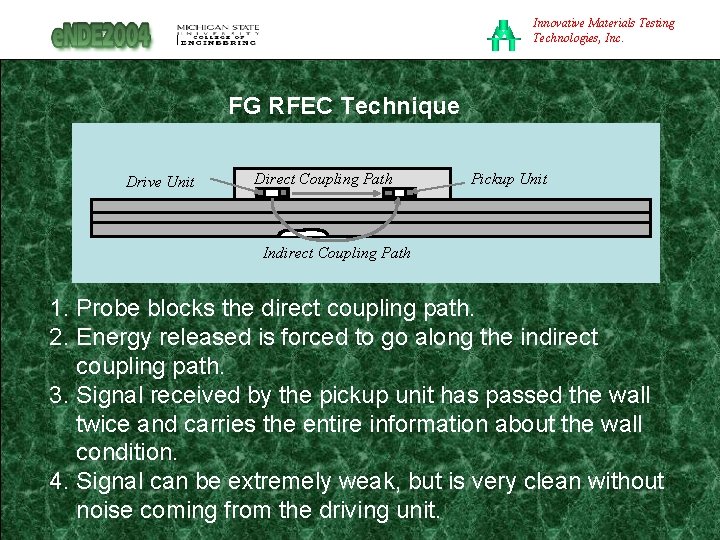
Innovative Materials Testing Technologies, Inc. FG RFEC Technique Drive Unit Direct Coupling Path Pickup Unit Indirect Coupling Path 1. Probe blocks the direct coupling path. 2. Energy released is forced to go along the indirect coupling path. 3. Signal received by the pickup unit has passed the wall twice and carries the entire information about the wall condition. 4. Signal can be extremely weak, but is very clean without noise coming from the driving unit.

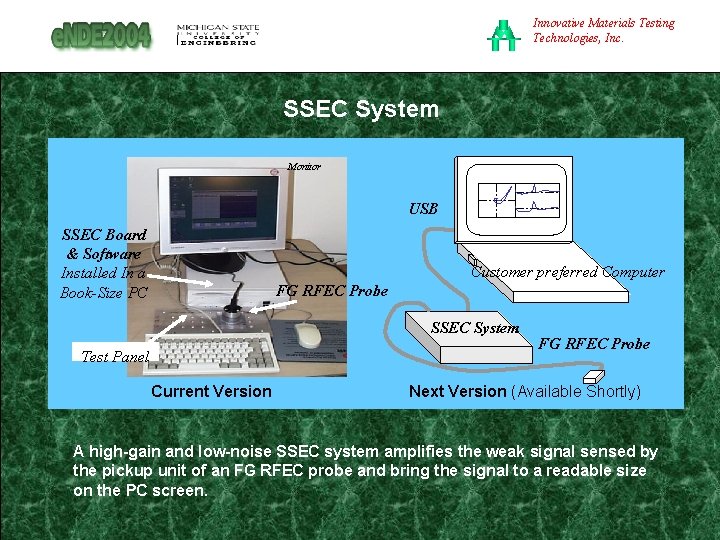
Innovative Materials Testing Technologies, Inc. SSEC System Monitor USB SSEC Board & Software Installed In a Book-Size PC Customer preferred Computer FG RFEC Probe SSEC System Test Panel Current Version FG RFEC Probe Next Version (Available Shortly) A high-gain and low-noise SSEC system amplifies the weak signal sensed by the pickup unit of an FG RFEC probe and bring the signal to a readable size on the PC screen.

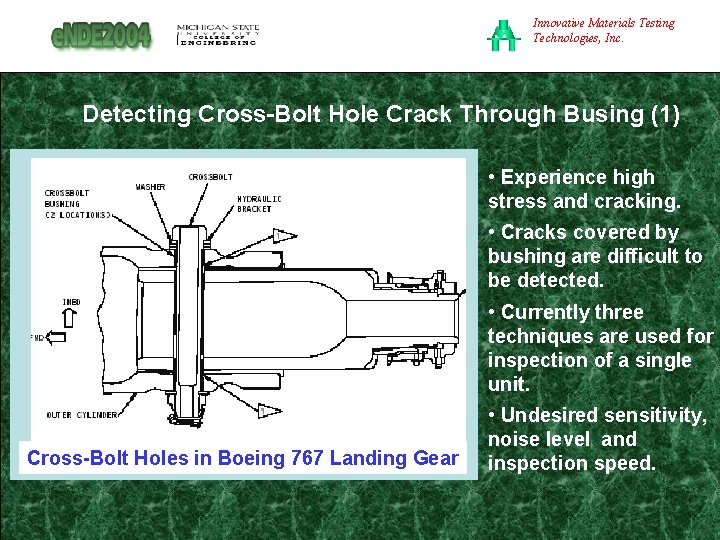
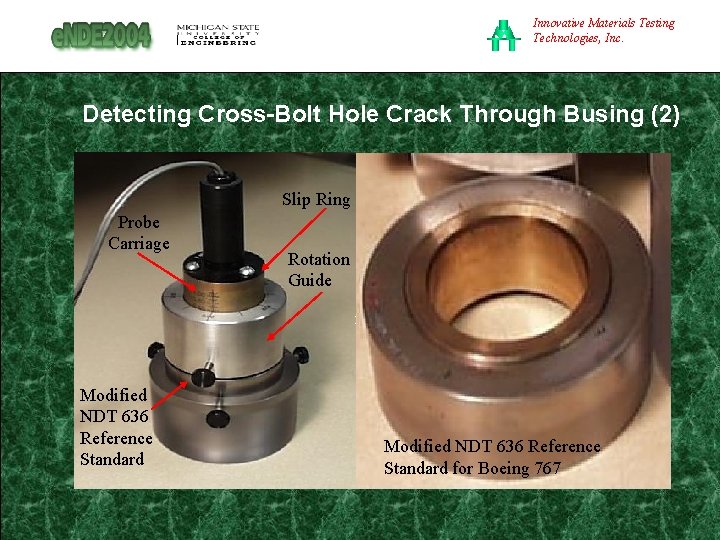
Innovative Materials Testing Technologies, Inc. Detecting Cross-Bolt Hole Crack Through Busing (1) • Experience high stress and cracking. • Cracks covered by bushing are difficult to be detected. • Currently three techniques are used for inspection of a single unit. Cross-Bolt Holes in Boeing 767 Landing Gear • Undesired sensitivity, noise level and inspection speed.

Innovative Materials Testing Technologies, Inc. Detecting Cross-Bolt Hole Crack Through Busing (2) Slip Ring Probe Carriage Rotation Guide Probe Coils D = 5. 84 mm Modified NDT 636 Reference Standard Probe Carriage Modified NDT 636 Reference Standard for Boeing 767

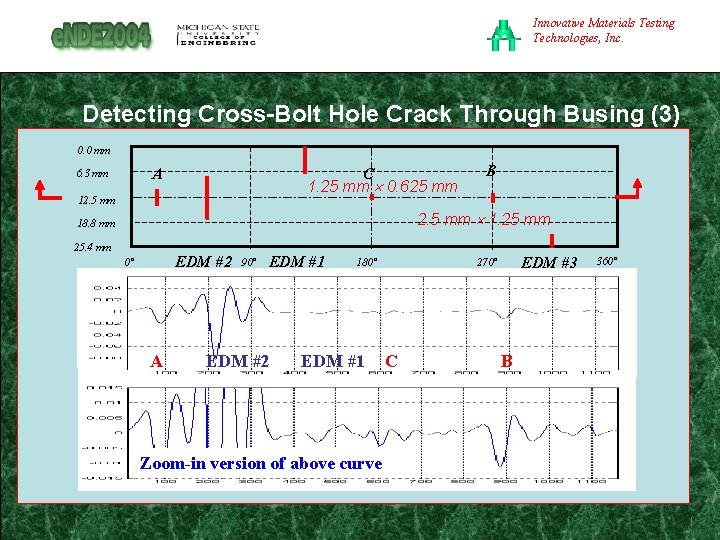
Innovative Materials Testing Technologies, Inc. Detecting Cross-Bolt Hole Crack Through Busing (3) 0. 0 mm A 6. 3 mm C 1. 25 mm 0. 625 mm 12. 5 mm B 2. 5 mm 1. 25 mm 18. 8 mm 25. 4 mm EDM #2 0° A 90° EDM #1 EDM #2 EDM #1 Zoom-in version of above curve EDM #3 270° 180° C B 360°

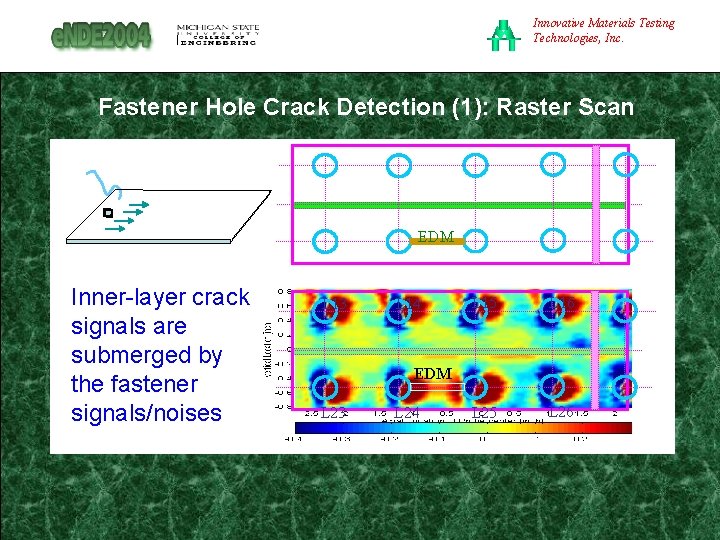
Innovative Materials Testing Technologies, Inc. Fastener Hole Crack Detection (1): Raster Scan EDM Inner-layer crack signals are submerged by the fastener signals/noises L 13 L 14 L 15 L 16 L 25 L 26 EDM L 23 L 24

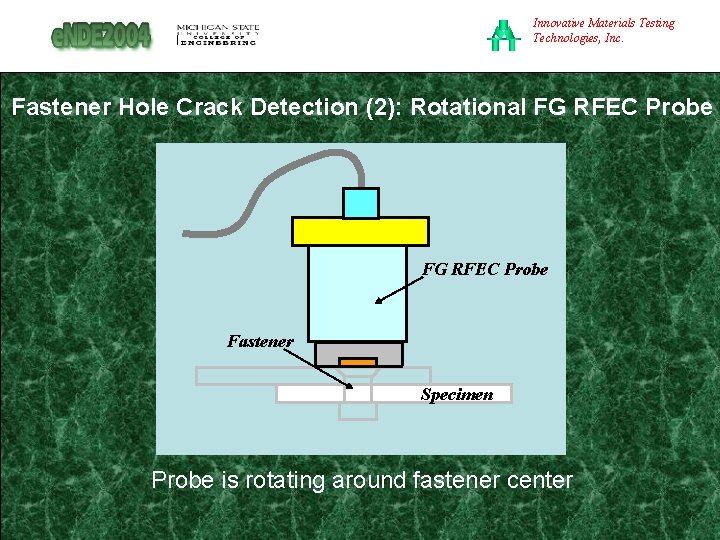
Innovative Materials Testing Technologies, Inc. Fastener Hole Crack Detection (2): Rotational FG RFEC Probe Fastener Specimen Probe is rotating around fastener center

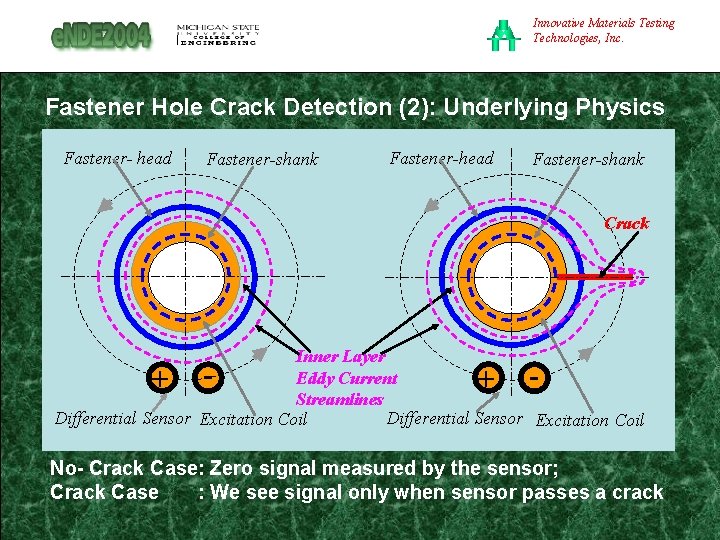
Innovative Materials Testing Technologies, Inc. Fastener Hole Crack Detection (2): Underlying Physics Fastener- head Fastener-shank Fastener-head Fastener-shank Crack Inner Layer Eddy Current Streamlines Differential Sensor Excitation Coil + - No- Crack Case: Zero signal measured by the sensor; Crack Case : We see signal only when sensor passes a crack

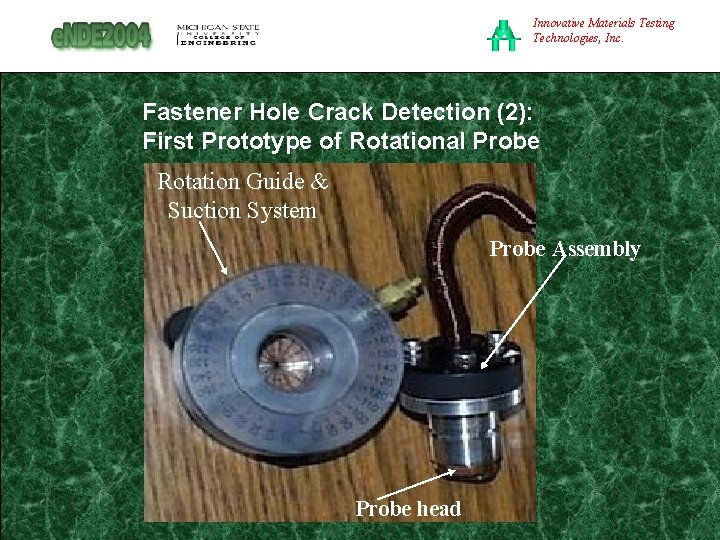
Innovative Materials Testing Technologies, Inc. Fastener Hole Crack Detection (2): First Prototype of Rotational Probe Rotation Guide & Suction System Probe Assembly Probe head

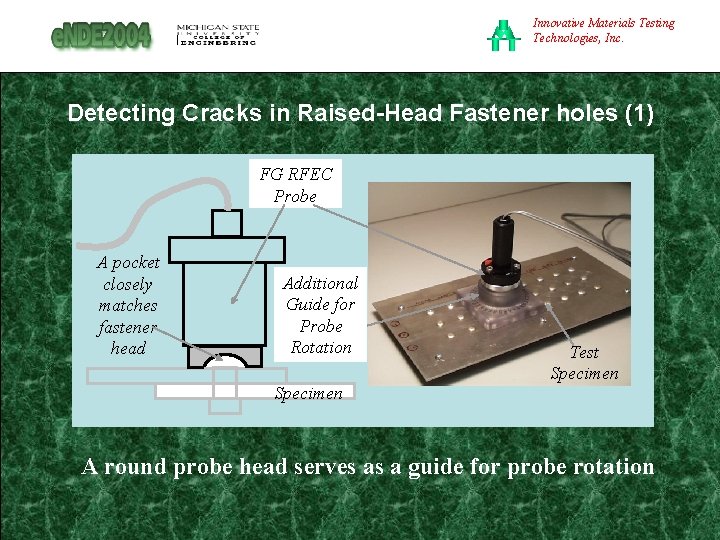
Innovative Materials Testing Technologies, Inc. Detecting Cracks in Raised-Head Fastener holes (1) FG RFEC Probe A pocket closely matches fastener head Additional Guide for Probe Rotation Specimen Test Specimen A round probe head serves as a guide for probe rotation

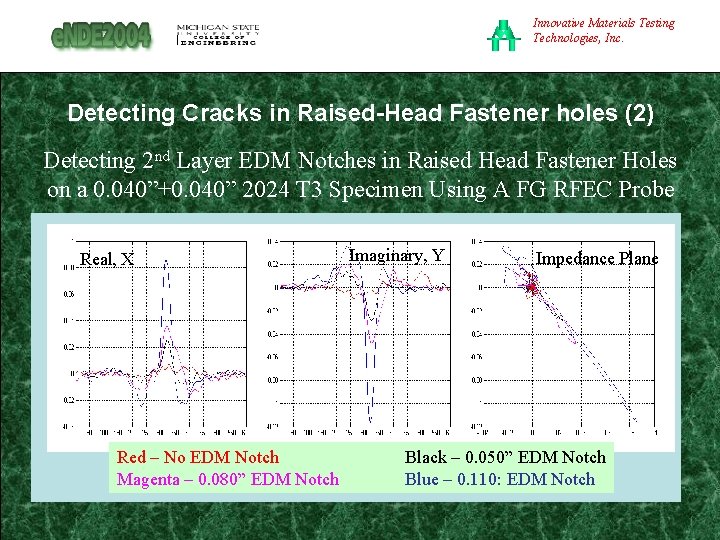
Innovative Materials Testing Technologies, Inc. Detecting Cracks in Raised-Head Fastener holes (2) Detecting 2 nd Layer EDM Notches in Raised Head Fastener Holes on a 0. 040”+0. 040” 2024 T 3 Specimen Using A FG RFEC Probe Real, X Red – No EDM Notch Magenta – 0. 080” EDM Notch Imaginary, Y Impedance Plane Black – 0. 050” EDM Notch Blue – 0. 110: EDM Notch

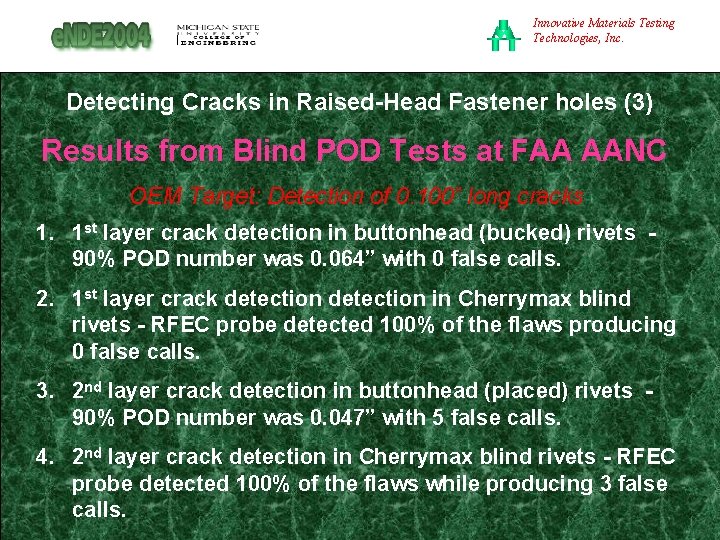
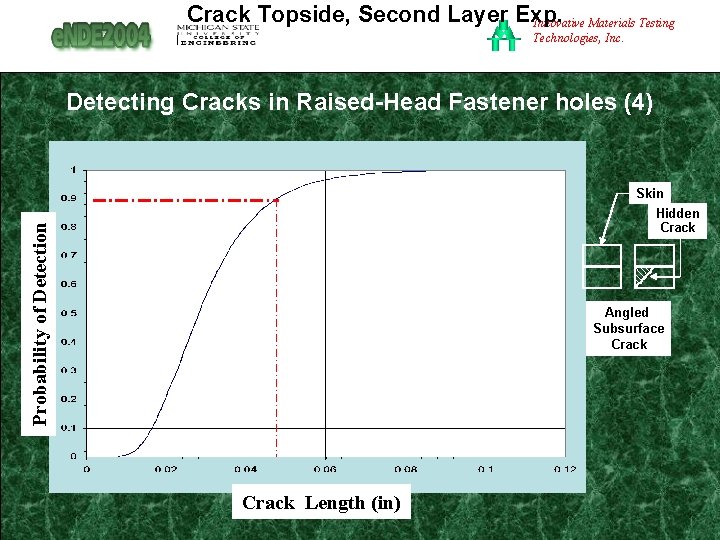
Innovative Materials Testing Technologies, Inc. Detecting Cracks in Raised-Head Fastener holes (3) Results from Blind POD Tests at FAA AANC OEM Target: Detection of 0. 100” long cracks 1. 1 st layer crack detection in buttonhead (bucked) rivets 90% POD number was 0. 064” with 0 false calls. 2. 1 st layer crack detection in Cherrymax blind rivets - RFEC probe detected 100% of the flaws producing 0 false calls. 3. 2 nd layer crack detection in buttonhead (placed) rivets 90% POD number was 0. 047” with 5 false calls. 4. 2 nd layer crack detection in Cherrymax blind rivets - RFEC probe detected 100% of the flaws while producing 3 false calls.

Crack Topside, Second Layer Exp. Innovative Materials Testing Technologies, Inc. Detecting Cracks in Raised-Head Fastener holes (4) Skin Probability of Detection Hidden Crack Angled Subsurface Crack Length (in)

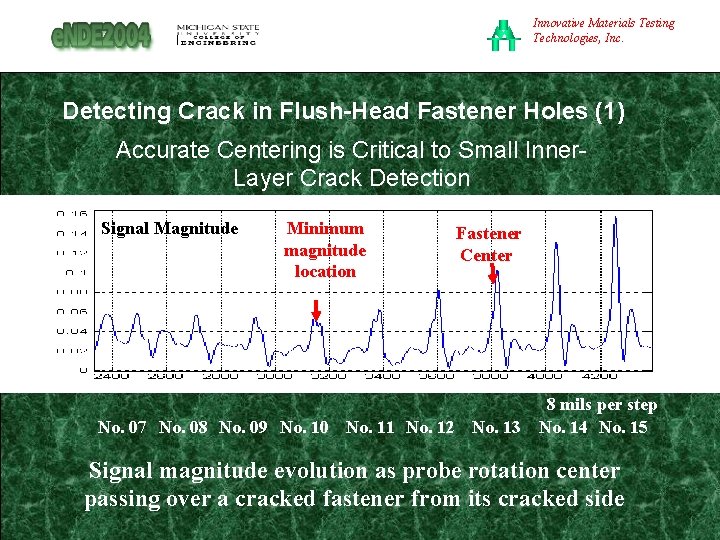
Innovative Materials Testing Technologies, Inc. Detecting Crack in Flush-Head Fastener Holes (1) Accurate Centering is Critical to Small Inner. Layer Crack Detection Signal Magnitude Minimum magnitude location Fastener Center 8 mils per step No. 07 No. 08 No. 09 No. 10 No. 11 No. 12 No. 13 No. 14 No. 15 Signal magnitude evolution as probe rotation center passing over a cracked fastener from its cracked side

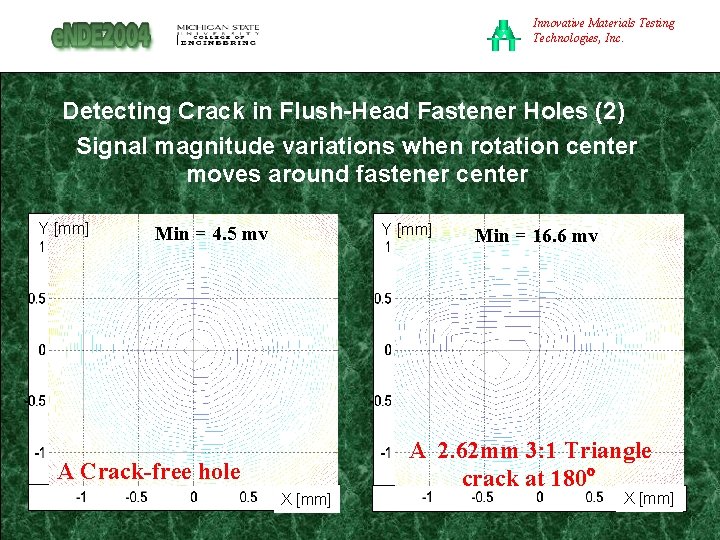
Innovative Materials Testing Technologies, Inc. Detecting Crack in Flush-Head Fastener Holes (2) Signal magnitude variations when rotation center moves around fastener center Y [mm] Min = 4. 5 mv A Crack-free hole X [mm] Min = 16. 6 mv A 2. 62 mm 3: 1 Triangle crack at 180º X [mm]

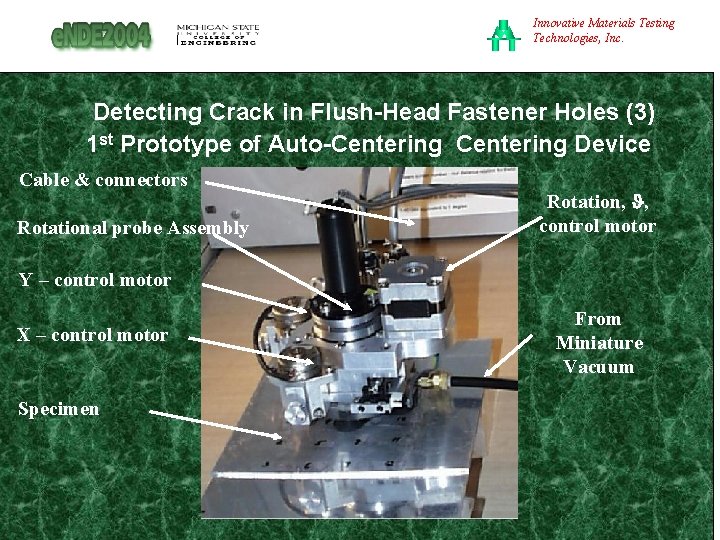
Innovative Materials Testing Technologies, Inc. Detecting Crack in Flush-Head Fastener Holes (3) 1 st Prototype of Auto-Centering Device Cable & connectors Rotational probe Assembly Rotation, , control motor Y – control motor X – control motor Specimen From Miniature Vacuum

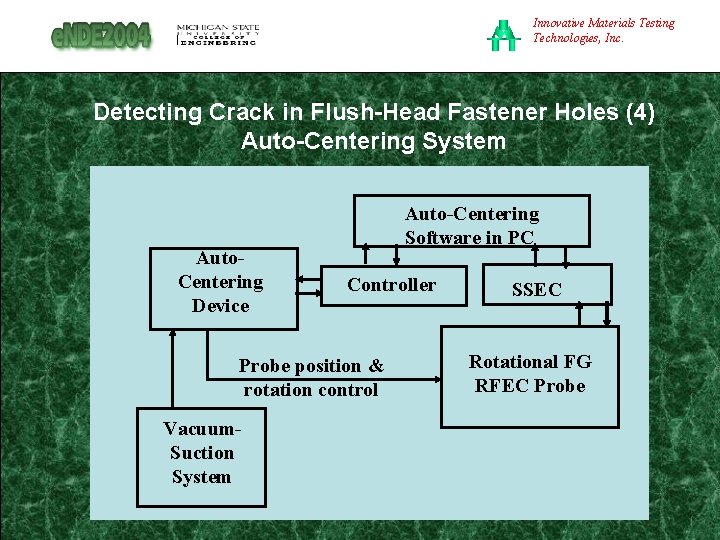
Innovative Materials Testing Technologies, Inc. Detecting Crack in Flush-Head Fastener Holes (4) Auto-Centering System Auto. Centering Device Auto-Centering Software in PC Controller Probe position & rotation control Vacuum. Suction System SSEC Rotational FG RFEC Probe

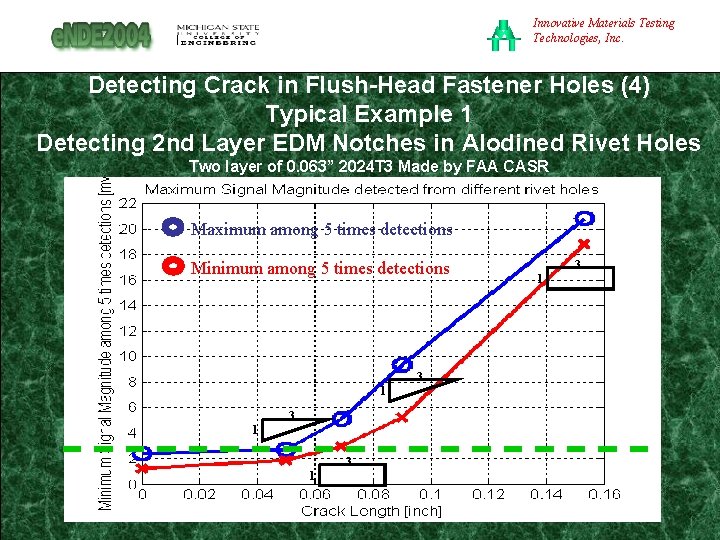
Innovative Materials Testing Technologies, Inc. Detecting Crack in Flush-Head Fastener Holes (4) Typical Example 1 Detecting 2 nd Layer EDM Notches in Alodined Rivet Holes Two layer of 0. 063” 2024 T 3 Made by FAA CASR Maximum among 5 times detections Minimum among 5 times detections 3 1 3 1

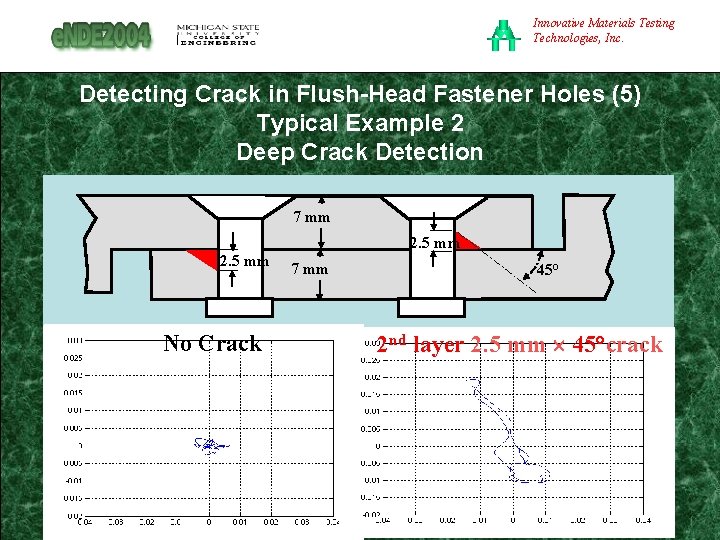
Innovative Materials Testing Technologies, Inc. Detecting Crack in Flush-Head Fastener Holes (5) Typical Example 2 Deep Crack Detection 7 mm 2. 5 mm No Crack 7 mm 45° 2 nd layer 2. 5 mm 45°crack

Innovative Materials Testing Technologies, Inc. Summary Three applications of the FG RFEC and SSEC technique in aircraft Crack Detection have been introduced. Typical test examples provided have shown the effectiveness of the technique. The test results have shown good promise of this technique in aircraft NDI applications.